The Fresh Loaf

A Community of Amateur Bakers and Artisan Bread Enthusiasts.

d_a_kelly's blog

d_a_kelly's picture
d_a_kelly

For once, a recipe which isn't from Cresci! Though the baba dough is from another Italian pastry chef, Leonardo Di Carlo (a world champion pasticcere). He's got a massive new book out -Tradizione in Evoluzione: L'Arte e Scienza in Pasticceria - which is definitely on my "to buy" list when I think I can justify it.

The best baba in the world are found, in my opinion, in Naples. They are usually huge (the Neapolitans are, unsurprisingly, the fattest people in Italy) and they only cost a euro - paradise! They soak up so much syrup that it's a wonder they don't fall to pieces while sitting, all lovely and shiny, on display.

I found a 26cm savarin mould which cost only 5 euro in a local shop so I thought I'd have a go at a large baba. I wasn't sure how much dough to put into it, so I did what I usually do in these circumstances: I filled the mould with water and then divided the weight of water by 3 (thinking that a baba dough should easily triple its volume during proofing). To be on the safe side I added 10% extra to the dough weight. This gave me a target of about 825g of dough.


Ingredients

Baker's Percentage

Weight (in grams)

Strong white flour (w320)

100

368

Castor sugar

8

29

Acacia honey

1

4

Fresh yeast

3.5

13

Egg (whole)

80

295

Soft butter (at 16C)

30

110

Salt (fine)

1.5

5

Vanilla seeds

-

Seeds from half a pod


224%

824g


Mix the first 5 ingredients together until you have a well-developed dough. This actually takes quite a bit of time - the dough is quite resistant to forming good, elastic gluten, probably because of all the fat from the eggs. Don't add the butter before the gluten is developed! I started adding mine a little too early so the final dough was slightly softer than it should have been (as a result it slightly split on one side after soaking in the syrup). Add the salt and vanilla and then the butter, slowly, until you have a smooth, soft, and silky dough. Leave it to rise for an hour at 26C and then put it into a buttered mould. Leave this to rise until it comes almost to the top (I think this took about 2 to 3 hours for me at 27C). Then in the oven at 180C. I left it in for 35 minutes, which was a bit if a guess. The crust seemed a little thick so I think a little less time would have been better.

The syrup, or bagna in Italian, is in many ways the most important thing for the flavour. In Naples it tends to be a simple affair, with a clean taste of rum and sometimes a hint of citrus zest. I followed Di Carlo again and also included a stick of cinnamon.


Ingredients

Baker's percentage

Weight

Water

100

700

Castor sugar

35

245

Acacia honey

8

56

Cinnamon

1.5

I used 1 large stick

Orange zest

2

Zest of 1 large orange

Lemon zest

0.5

A quarter of a lemon

White rum

20

140


167


Make a syrup with all the ingredients (except the rum) by bringing it to the boiling point. When the mix is tepid, drain out the zest and cinnamon and add the rum. Simple.

It's easiest to soak the baba when it is cold, so I did it the next morning. You need to heat the syrup until it is rather warm (it absorbs more easily like this apparently) and have a large container handy. My baba drank virtually all of the syrup. I think I had a dribble left, and it felt almost grotesquely swollen. I very, very carefully moved it onto a plate and then glazed it with warm apricot jam.

To finish it off I decided to make a chocolate mousse with little chunks of cherry inside. The mousse was simplicity itself.


Ingredients

Baker's percentage

Weight

Cream (35% fat)

75

150

Chocolate 66% cacao solids

100

200

Acacia honey

12

24

Butter

10

20

Cream (35% fat) lightly whipped

100

200


297


Melt the chocolate in a bain-marie while heating the first lot of cream together with the honey to about 75C. There's no need to bring it to the boil because we aren't looking for a very long preservation. Let the cream cool to about 60C and then pour onto the chocolate, allow the temperatures to stabilise and then emulsify to make a ganache. Incorporate the butter and allow to cool. When the ganache is at room temp, fold in the lightly whipped cream. And there you have it, a simple chocolate mousse. This will set in the fridge, and should hold together at room temp. I had a few problems when transporting the cake because it was really hot that day and the mousse melted slightly.

I filled the hole in the middle with cherries and mousse and then put some decoration on the top. I don't have a piping bag or nozzles here with me in Perugia so I had to improvise with cardboard, sticky tape, scissors and baking parchment. With limited success, as you can doubtless see. The white stuff is mascarpone, which I lightened with whipped cream and a little vanilla.

No crumb shot for this I'm afraid as it was a gift, but I can say that the baba was dripping with rummy goodness and the mousse was light and fruity! I'll have to make another one just for me and hopefully get a photo of the inside then.

David

d_a_kelly's picture
d_a_kelly

Anyone browsing through TFL will sooner, rather than later, come across mention of the Tartine Bread Book. I'll confess, I don't have a copy of this, but it does seem to be one of the go-to books at the moment for sourdough, no-knead, and lots of other techniques. Likewise, if you want to make enriched breads, there's really only one port-of-call, and that's Cresci by Massari and Zoia. I have a love/hate relationship with this book: it's expensive, the photography is not particularly beautiful (my opinion only but everything is so dark!) and the instructions are absolutely FULL of mistakes and omissions. But when the recipes work... well, everything seems worthwhile.

I've been interested in the panettone a tre impasti for some time now. For those who've never made a panettone, there are usually two separate mixing stages (excluding feeding the starter). The first one late at night and the second in the morning, followed by shaping and a 6-7 hour proof. The panettone a tre impasti is, as the name suggests, produced through three separate mixes. Cresci claims that a panettone made with more impasti will be lighter, softer, moister, and last longer. Better in every way therefore.

But I had my doubts. First, the dough looked far too lean compared to other panettone recipes in the book. If we look at the panettone a gusto moderno and the tre impasti it is easy to see what I mean:

(Baker's % of total ingredients)

ingredients

al gusto moderno

a tre impasti

Flour

100

100

Starter (at 50%)

20

25

Water

40

40

Sugar

45

30

Butter

60

36

Yolk

54

27

Honey

5

0

Salt

1.6

0.8

Aroma panettone

0.2

-

Powdered milk

-

3.2

Inclusions (raisins etc)

80

75


The other thing which put me off is that the instructions (I have the Italian edition) are definitely very wrong. It seems as if the first page has been printed twice and page 2 is missing, leading straight into a mysterious page 3.

But I thought I'll have a go! And I'm thrilled I did. This panettone is excellent! The volume increase is truly unbelievable. I thought it would never stop growing in the oven. And the flavour is wonderfully rich and complex - it really is a celebration of the magic of a good starter and slow proofing!

I started mine at midnight and left it to proof for 7 hours at 28C. It had just over doubled in this time. I did the second impasto at 7 in the morning, put it back in to proof for another 5 hours, and then did the final impasto. I left it to rest for about 30 minutes and then shaped it (folding it repeatedly works best before making the final shape). Final proof was at 28C for 6 hours, then 45 minutes in the oven at 175C.

To give you an idea of how much this thing grows, the pirottino here is 20cm by 6cm, and I put in only 750g of dough. It must have increased its volume by at least 6 times. Instead of using candied fruit I used gianduia. Yum! I also added the seeds from half a vanilla pod and the zest of half an orange. Because I had decided to substitute chocolate for the candied fruit and raisins, I included 5% acacia honey, to act as a humectant, and a sweeter, but mostly because I like the taste.

I made a little too much impasto to take into account loses during mixing and then took 583g of it before adding the chocolate.

My recipe was:


1st (at midnight)

2nd (at 7am)

3rd (at 12pm)

Flour (w320 - v. strong white)

135

60

34

Starter (at 50%)

57

-

-

Water

58

23

11

Sugar

23

21

25

Butter

43

16

23

Yolk

15

24

23

Honey

-

-

12

Salt

-

-

2

Vanilla & zest

-

-

Half and half

Powdered milk

3

3

2

Gianduia chocolate (milk and dark)


167


This might be the best panettone I've ever tasted, and the beauty of it is, is that it is a lot cheaper to make (though very inconvenient in its timings) than the gusto moderno.

I might have to make another one very soon, but not here in Perugia. My time here is at an end... a pity, because it's a wonderful city, and I recommend it if you ever get the chance to visit. And it's great as a base to explore Umbria, which might be one of the most perfect places I've ever seen.

David


d_a_kelly's picture
d_a_kelly

Earlier this week I noticed a post from JerryP about problems with a recipe from "Cresci": I'm very familiar with the book, but not with the recipe he mentioned. A sweet "Serbian" focaccia - though what is Serbian about it I'm not sure. Hopefully some fellow user of TFL can enlighten me!

For those not familiar with the book, the recipes in Cresci always call for vast amounts of flour, butter and yolk. This was actually one of the smaller ones (only called for 1200g of flour). Naturally I didn't use that amount! JerryP said that the dough always turned into a batter (something which has happened to me with other recipes from Cresci).

The instructions were vague in the extreme "mix all the ingredients together to make a medium firm dough, then place in the freezer for an hour. When it is firm, roll out to 4mm, cut into 3 sheets, layer with the filling and leave to rest for 30 minutes before cooking for 30 minutes at 180C."

The recipe (for the dough) was as follows:

milk (at 30C)  300g

fresh yeast 80

sugar 420

yolk 360

butter 700

00 flour 1200

vanilla pod 1


My first thought was that there was a problem with the English translation of the book. No bulk fermentation? No instructions on how to make the dough? No biga or preferment? No indictation of flour strength? No salt?? It all seemed very strange, so I asked someone in England to dig out my copy of Cresci and email me the original Italian version of the text. Most unfortunate: there's no problem with the translation, the instructions are quite simply incomplete, maybe even just wrong! Not a good thing for a book which costs £80.

I first tried making the dough with a medium strong flour, but while not a batter, gluten formation was poor and the dough was extremely greasy and unpleasant. It seemed to be weeping butter. It went in the bin :(

For my second attempt I used a w330 professional grade 00 flour which I found in a local supermarket here in Perugia. They only sell it in 500g bags and yet it's more expensive than the 1.5kg bags, but it produces a wonderfully resilient dough and has amazing absorption abilities. 

milk 69

fresh yeast 19

sugar 96

yolk 82 (about 5 eggs)

butter 159

00 flour 275


This time I mixed together the milk, yeast and sugar, and then added the flour. I worked it for quite some time, but gluten development seemed quite poor. Eventually it started to detach from the sides of the bowl, at quite point I started to add the butter, very very slowly. The finished dough was pleasingly extensible and elastic, but also quite soft and slightly greasy to the touch. I left it to bulk ferment at about 25C. It took at least 4 hours to double in size - proof I think that the 30 minutes mentioned in the book as the only proof is grossly inadequate!! I ran out of time so I put it in the freezer overnight. I think the dough would have been better if I had left it to triple in volume, which I will next time.

The next morning I rolled out the dough to 4mm and cut it into 3 sheets. The dough became very soft, very quickly, but it's very hot here at the moment. 

I scaled down the filling to an amount which seemed appropriate. I got lucky, it produced just the right amount! The original recipe calls for ground walnut, which I didn't have, so I substitued ground almond and used crushed walnut pieces for flavour and texture.

ground almond (walnut) 100

smooth apricot jam 57

egg white 43

sugar 57


Mix the almond and the jam, and then make a stiff meringue with the egg and sugar. Fold the meringue into the jam mixture in 3 goes. Put half the mixture on the first piece of dough and level. Put another piece of dough on top, cover this with mixture, and top this off with the last bit of dough. I then brushed this with egg wash. 

The book called for a 30 proof at this point, but I left it for closer to an hour. Then into the oven at 190C for 22 minutes. I was worried at first because there seemed very little oven spring, and have little growth in general, but at about the halfway point, it suddenly grew beautifully in the oven. 

Once out I had to tidy up the edges, the entire thing had spread and almost exploded! A frame would be very helpful. Then a quite brush on top with warm apricot jam.

I had to change the glaze from that in the book because I don't have cacao paste. So I made this:

dark chocolate 70% 100g

icing sugar 80

butter 40

water c.10g

Mix all together to make an emulsion and then apply to top with a spatula.


A lovely snack, but what a pity the instructions are so incomplete! And I think it could use a least a little salt in the dough - even panettone and colomba have salt in them! I've already managed to give most of them away but I've kept two back for breakfast tomorrow. Yum yum.

David


d_a_kelly's picture
d_a_kelly

I saw on thefreshloaf people talking about brioche feuilletee (I think the topic was started by andythebaker), specifically this link: http://www.parispatisseries.com/2011/05/03/la-patisserie-des-reves-brioche-feuilletee/

I was amazed by the crumb shot, but I didn't have a recipe so thought nothing else of it. Well, eventually I found a recipe and had a go. Not quite in the same league as the link, but they were lovely and delicous. Unfortunately I don't have the recipe to hand (it's in England and I'm not) but I'll post it when I can, for whoever's interested. 

I remember the recipe called for steel circles of 75mm diameter. I don't have these, but these little pirottini I bought from bakerybits were almost the same dimension. One word of warning here, I definitely rolled these too tight - halfway through proving I had to carefully unroll them and then reroll. I'm sure this damaged the crumb structure, but they were clearly struggling to expand in the centre. 

Here's my crumbshot:

The walls of the cells could be thinner, and the centre was a tiny bit denser than the rest, but to be honest, they were absolutely delicious. When I make them again I'll roll them much more loosely to start, to see if that makes a difference to the crumb. And I'll definitely make them again!!!


David

d_a_kelly's picture
d_a_kelly

Hi bakers everywhere,

this is my first bake in my temporary kitchen here in Perugia, Italy. I saw the recipe on Paul Hollywood's Bread on the BBC and, as he had stuffed it with Italian flavours, it seemed a suitable thing to try. I was dubious of the little oven I have here, which looks to be older than I am (and my oven therometer is still in transit) but, on the whole, I was happy with the result. It's pretty easy to make, and as light as a feather, dripping in melted cheese and salty prosciutto. Well done Paul Hollywood!

I slightly scaled down the recipe as his seemed to produce something far larger than I wanted. All measurements in grams.

strong white flour 300 (I used farina manitoba, which is like a very strong white in UK) 

salt 6

fresh yeast 12 (fresh yeast is easy to find here in supermarkets, but instant yeast almost impossible - the reverse of UK! I'd use 6 of instant if that's what you have)

whole milk at room temp 102

whole eggs 120 (this worked out luckily as exactly 2)

unsalted butter at room temp 150 (83% fat)

parma ham 6 - 8 slices

buffalo mozzarella 250 - 300

a bit of fresh basil

grated parmesan 

egg for glazing


Dissolve the fresh yeast in the milk and leave until it becomes bubbly (or use instant yeast and skip this step). Add the flour, eggs and salt. This is a soft dough so it's best done in a machine. I wouldn't want to try this one by hand! Work it until the dough is formed and then slowly add the butter. The dough is ready when it starts to come away from the side of the bowl and has a shiny surface. It's important to add the butter quite slowly. I think in total it took my about 10 minutes, but I had left the dough to autolyse for 15 minutes or so before I began working it. Leave in a warm place (I put it next to a lamp) until it has at least doubled in size - tripled is better. For me this took about 4 hours. 

When it's ready, dump it out onto some clingfilm, flatten it (careful, it's quite soft!) and put in the freezer, well wrapped. I found after about half an hour it was ready to be rolled. It ought to be firm to the touch. Roll it out on a lightly floured surface into a rectangle twice as wide as it is long, to a thickness of about 5mm. Keep moving it because it warms quickly and becomes sticky!

Place the parma ham across the surface and then rip the mozzarella and cover, like you were making a pizza. Then some basil and a healthy handful of grated parmesan. Roll it up (starting from the long axis) until you have a good long tube, with the filling tight inside. Trim the ends. Then take a good sharp knife and cut it down the middle, along the length of the long axis. Don't simply cut it in half!!! This done, turn the long pieces cut-side up, next to each other, and twist, one hand moving one way, the other in the other. This braids them. Stick the ends together to form a circle. This sounds more complicated than it is... it ought to look something like this when done:


You can see the filling where the dough has been cut. This melts wonderfully in the oven.

Leave that to rise, well covered to stop it forming a skin, for about 2 hours. It needs to double in size. Brush with eggwash, add more grated parmesan, and then put in the oven at 200C (without fan according to Hollywood - I couldn't turn the fan off, so I settled for somewhere in the region of 185 if the dial is to be trusted) for 25 minutes. It's best eaten warm or cold, but not oven hot.

A really tasty brioche recipe this, and I'd happily make it again now that I know the oven isn't as terrible as it looks :)


David


d_a_kelly's picture
d_a_kelly

Hi bakers everywhere!

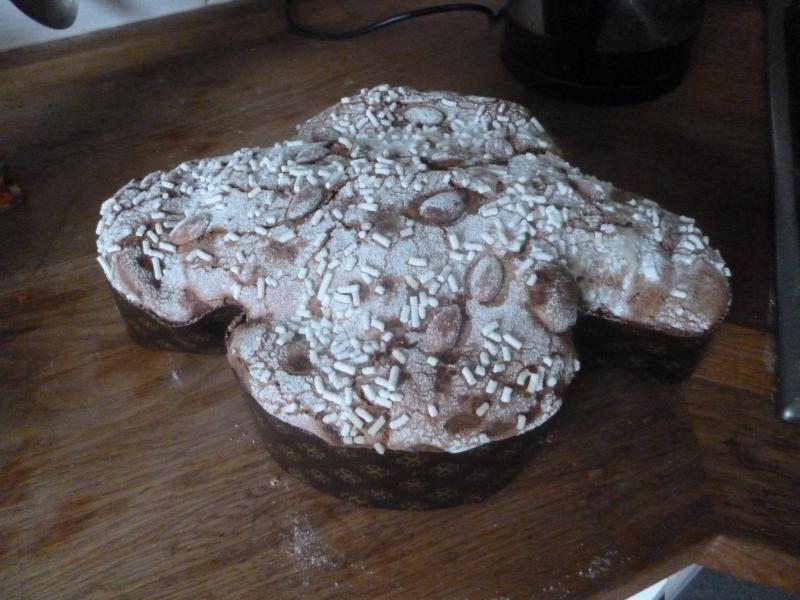
I made this a few weeks ago but have only had the chance to post it now. I took the recipe from Cresci, by Massari and Zoia. In the book it's for a panettone but I thought I'd try to make it in the form of a colomba because it was around Easter and I still had a few colomba cases left to use :)
This is a very unusual panettone recipe in the all the flour goes into the first dough. The traditional method is to split the flour between the two stages. I'm not quite sure what the benefits of this are (allowing for more autolysis) but there are a few recipes in the book where this happens. I'm pretty certain that these "non-traditional" formulae are associated with Achille Zoia. I've been working on his panettone paradiso (another flour-all-in-one recipe) on-and-off now for over a month and I kid you not, I've only made it work once, despite about 15 attempts!! Fool that I am, the one time it worked I didn't take any photos, but the crumb was the softest and moistest of any panettone I've ever had, so I'm determined to persever. But back to the colomba...

The recipe calls for hazelnut paste and gianduia amara. I bought the hazelnut paste online (very expensive) because I don't have the equipment to make a truly smooth paste at home. The gianduia I made myself, using the following recipe (in grams). I took amara here to mean the use of dark chocolate rather than milk. I used Amedei toscano black - a really delicious, and Italian, chocolate.

hazelnut paste 50

dark chocolate 70% 20

cacao butter 6

icing sugar 50

melt the chocolate and cacao butter together and then blend in the icing sugar and paste. It's important to stir constantly and drop the temp as quickly as possible to 26C to prevent it from separating. I took this recipe from Valrhona's cooking with chocolate book.

I made the first impasto at about 10pm so that I could go to bed and rise the next day with it ready.

sugar 79

water 177

hazelnut paste 32

very strong flour 316

Italian sweet starter 63

butter 63

I left the flour, sugar and water to autolyse for half an hour and then added the other ingredients, working it until the dough was stringy.

The next morning it had tripled in volume (12 hours precisely) so I reworked it with the following:

sugar 47

honey 32

butter 47

gianduia (melted) 47

hazelnut paste 32

yolk 73

salt 2.5

vanilla quarter of a pod

water 9

milk chocolate 62

dark chocolate 47


take 991 of the  impasto and add chocolate pieces. For the milk choc I used Valrhona's Jivara, and a mix of Amedei toscano black and Valrhona's Manjari for the dark. 

My last attempt at forming a colomba hadn't been a success, so taking inspiration from thefreshloaf, I decided to fold and stretch it repeatedly until I had a nice tight ball. I let this rest for an hour and then repeated the process, before putting it into the shape. I was much happier with the shaping this time, the dough had a better, tighter skin on it.
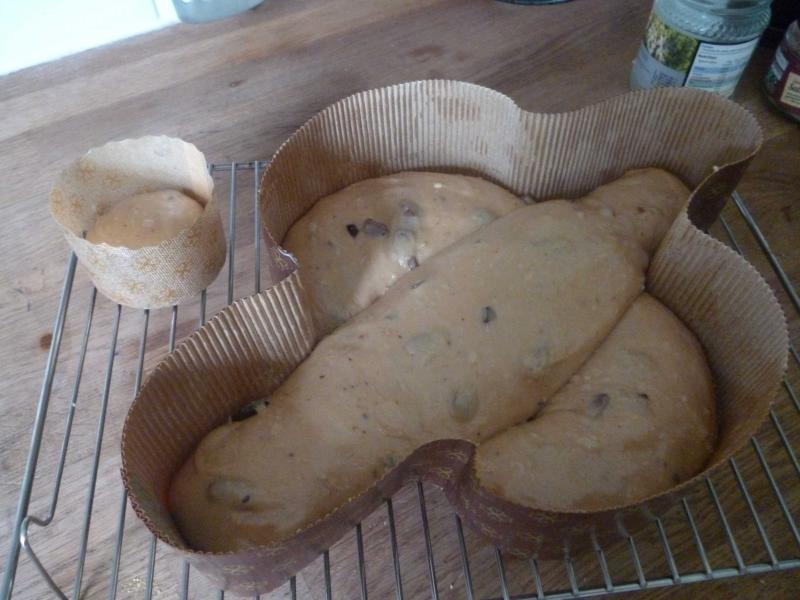
I had just enough dough left over to make a "panettoncino" of about 85g. 

About 6 hours later (held at c. 30C) it was ready to go in the oven. I glazed it, covered it was sugar granules and almonds, and then dusted it was icing sugar.
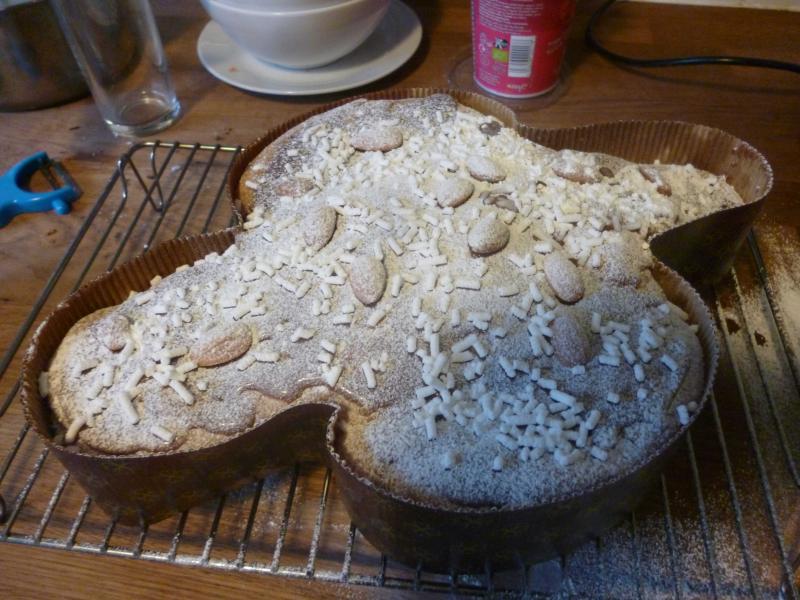
My glaze this time was a little thicker than I've made it before - too thick I think, even though I followed my usual recipe. I should have added a tiny bit more egg white. It was just a tad too thick to be easily spreadable. In the oven then for 50 minutes at 170C. I didn't bother with steam because I was worried about the icing sugar. I'm not sure it made any difference.

Oven spring was enormous. The top photo doesn't really do it justice. I doesn't show just how much over the edge of the form it is. I slightly crushed it with my hand when I was turning it upside down (idiot!!!) but apart from a crack on the surface, it popped right back out when it was hanging during cooling. 

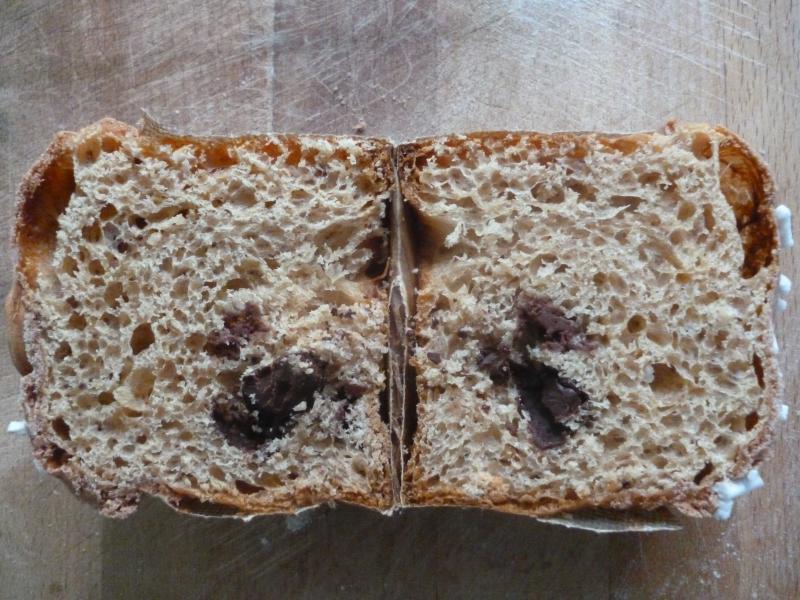
The colomba itself was a present, so the only crumb shot I have is from the panettoncino. I think there was just a little too much impasto in the pirottino... BakeryBits.co.uk markets them as 100g cases, but I think even 80g is too much if you are using them for a panettone. I think perhaps 70g might have been better. 
Well, my conclusions...

I tasted both the baby panettone and the colomba and I was very... disappointed!!! There was zero(!!) taste of hazelnut from it. Zero!!! The hazelnut paste I used was professional quality (it certainly had a professional price) but it didn't even leave a trace of flavour in the finished product. The photo in Cresci implies a deep brown crumb, but my crumb looks more beige. I didn't know what industrial strength paste Zoia must be using to achieve any flavour or colour on this one. The crumb itself, although very shreddy, as it should be, was also quite dry. The driest of all the panettone I've made so far. All I can say is thank God I used good quality chocoalte, because otherwise the entire thing would have been very uninteresting. 

It's a great shame, because I'd been looking at the recipe for ages, thinking it would be great. Where is the hazelnut flavour?!?!? Another thing I've noticed is the how much growth in the colomba is lost to sideways motion. The circular shape of the panettone form is very strong, so all the growth is directed upwards. The colomba seems structurally weaker, you can see how the sides have bulged out and become distored. 

I need a break from panettone making for the moment... the repeated disasters with the panettone paradiso have knocked my confidence terribly. Hopefully a break will allow me to... what? I'm not giving up on it though. I refuse to be beaten by a bit of flour, butter and egg!


David

d_a_kelly's picture
d_a_kelly

This one isn't very seasonal at the moment, but I love eating it for breakfast. It's so buttery and soft that I really don't think it needs an accompaniment. The recipe is taken from "non solo zucchero vol.II" where it is called pandoro evolution, but it is very similar to the pandoro a sfoglia from Cresci. 

Main impasto - in grams

sweet starter (50% humidity) 45

dry active yeast 3

very strong flour 179

sugar 36

unsalted butter (soft but not melted) 27

egg 107

salt 3.5

half a vanilla pod 

melted butter flavour 0.3 (I've made this before without the flavouring and it tasted exactly the same - but it's in the recipe so I've included it here).


mix all the ingredients together and work it until it forms a smooth, elastic dough. It should be strong and windowpane, but still very slightly sticky. Wrap it in plastic and put it in the freezer. I left it in there for an about an hour, but the book actually recommends overnight at -10C. While this is firming up, I worked on the butter for lamination:

softened unsalted butter 147

icing sugar 39 


mix the two ingredients together thoroughly, then pat into a square, wrap, and put in the fridge to firm up. When both parts are at the right consistency, take 362 of the dough and laminate it as if you were making croissants - 3 simple turns in total, with at least half an hour between each turn. It ought to look something like this when you've finished:


the total weight is 550g.

The difficult bit is then forming this into a ball without breaking the laminations. The book gives absolutely no guidance here whatsoever! I usually fold the ends underneath and then roll it around until it looks more or less spherical. I doubt very much that this is the best method! The dough by this point is really quite resistant to being shaped. 

It looks so tiny in the tin - it's hard to believe that it can possibly fill it!

Leave it to prove at about 27C and at least 60% humidity for about 10 - 12 hours. I left mine for 10 hours. 

I think it could easily have grown even more than this, so next time I might put less dough in the pandoro tin. As it was, it was just about to start spilling over the edge. If my shaping of the ball had been better then I also think this might have helped.

Leave it in the open air for about 30 minutes in order to form a skin on the dough and then it goes in the oven for 30 minutes at 170C. Leave it in the tin for a few hours after cooking before turning out. Mine stuck a little bit - I should have used more flour and butter to grease the form. 

When it's ready to eat (after a few days), dust it in icing sugar and enjoy! 

I was very happy with the crumb on this one - really light and shreddy, with a wonderfully complex buttery taste. It just fell to pieces as I was cutting and eating it. 


David

d_a_kelly's picture
d_a_kelly

Hi Everyone,

time for my second post! Unfortunately I don't have any "work-in-progress" photos of this one - the battery on my camera was flat when I made it and I couldn't find the charger. This is a 3 strand braid, filled brioche.

The brioche recipe is from Pierre Hermé's book "PH10". As you can see, it's very rich in butter (like nearly all his recipes). 

The brioche dough (500g) is as follows:

strong flour 176

sugar 26

egg (whole) 132 (approx. 3 eggs)

instant yeast 2.5

salt 4

butter 158


The original recipe calls for fresh yeast, but that's not that easy to find in the UK (at least not for me) and I don't really think it makes that much (if any) difference. I halved his yeast quantity to take into account the fact that I was using instant. I imagine that 5g of fresh yeast would work if that's what you are using. The dough was quite sticky but not overly greasy. I put it in the freezer for about 30 while making the filling. The filling recipe is (heavily) adapted from one found in "non solo zucchero vol. II" by Iginio Massari.

ground almond 150

icing sugar 150 

yolk 40

water 10

vanilla 1/2 a pod

butter 26

zest of 1 unwaxed orange.


Mix this all together to form a paste. The original recipe called for whole egg rather than just yolk, but I wanted a nice orange colour running through my brioche. 

When the brioche dough was firm I took it from the freezer and divided it into 3 balls. While working one, I kept the other 2 in the fridge. I rolled out the dough into a rectangle and then piped a line of filling down one long side before rolling it up to form a tube. I sealed the ends and put it back in the fridge. Same thing for the other 2.

When the dough was nice and cold again I braided it. As this was an experiment, I kept it to a simple 3 braid (1 over 2, 3 over 2 etc). This done, I popped it into a loaf tin and let it prove. This took about 4 hours at c.28 degrees C. Pierre Hermé doesn't give a cooking time or temperature for his dough so I guessed at 200C for 20 minutes. I think the photo shows this wasn't quite right, as the crust is a little too thick and brown for my liking. The brioche itself was also just a tiny little bit drier than would have been ideal. 

To finish I made a sugar glaze (110 icing sugar, 20 water and a few drops of orange blossom water) which I poured over the top while it was still fresh from the oven, and then sprinkled some flaked almonds and pearl sugar on it to finish it off. 

If I were to do it again, I think I'd make more of the filling (you can see in the photo how little there actually is) and experiment a bit more with the cooking temperature or time. The flavour was lovely and orangey, with a strong aftertaste of butter. 


David

d_a_kelly's picture
d_a_kelly

Hi Everybody,

this is my first post on TheFreshLoaf, though I've been starting in amazement at everyone's baking for quite some time. This is my attempt at Iginio Massari's Colomba Pasquale recipe from his book "Non Solo Zucchero vol.II". I'm not sure if this book is available in English yet. I bought my copy in a shop in Milan. This version seems to be quite a bit richer than that found in Cresci, and presented me with a number of difficulties :) Please be kind!

First impasto tripled in volume

1st impasto

sourdough starter (50% hydration) 59

water 69

sugar 72

yolk 50

flour (very strong) 189

butter 79


All measurements are in grams. It took almost exactly 12 hours to triple in volume, held at c.28 degrees C. I then went to the second impasto. This was considerably more difficult, and I didn't get it quite right. The flour I'm using is the strongest I have been able to find in a UK supermarket and it's not a "00". I think it's somewhere in the region of w320 in terms of strength. The second impasto calls for a flour of w360 (something like the manitoba you can find in Italy). I couldn't find anything this strong in the shops. I added a guestimate of vital wheat gluten to try to balance the recipe, which wasn't entirely successful as you can see from the sloppy shaping in the paper case. The dough was still a little too sticky: very usefully "non solo zucchero" has photos in the back of the book showing all of the processes, and I could see that the colomba consistency was quite different from what I had achieved. 

2nd impasto

aroma veneziana 1.2

vanilla: a quarter of a pod

flour (very strong) 51

gluten powder 1.8

sugar 50

honey 22

yolk 35

salt 3.6

water 20

butter 112


I then took 795g of the impasto and added in 205g of candied orange. This version is very rich in fruit! I then split the dough into two balls of 500g and put them in my homemade proving box for an hour, at c.30 degrees C. and humidity of 70%.

Then, with very very well buttered hands, I shaped the two balls and put them in the form:


Back into the proving box for 6 hours and then it was ready to be glazed and go in the oven (170 for 50 minutes).

and then glazed and dusted


When it came out of the oven I suspended it upsidedown for about 12 hours. I was reasonably happy with the oven spring. Most recipes I've seen for colomba use less candied fruit, so I was expecting this not to grow quite so much. Not because the fruit would interfer with the yeast, but simply because there was less dough in the case (only 795g of impasto, rather than the 850g to 870g I've seen in other recipes).

I had a slice of it for breakfast this morning and I was quite happy. Soft and tasty crumb, packed with fruity, buttery flavour. I'd like to try this again using the recommended flours. I've found, from limited experiments, that strong 00 flours seem to produce a more plastic, slack dough, which I'm sure must contribute to the texture and feel of the crumb. However I'm not yet prepared to buy a 25kg bag of caputo rosso or similiar just to make the occasional colomba which only uses... what? 240g? 

Here's the crumb:


One thing I ought to add: in order to save a bit of money and waste, I used powdered egg yolks in this recipe rather than fresh yolk. The recipe here is written for use with fresh yolk. (If using powdered yolk, substitute 48% of the weigh of yolk with powder, and the remainder with water). I've not noticed any difference with quality. I've also used the powdered yolks to make creme anglaise and creme patisserie with success. The only downside is they don't have that extraordinary colour which I've seen in yolks in Italian eggs - something I'm told is a result of the diet and breed of chicken.

Subscribe to RSS - d_a_kelly's blog