The Fresh Loaf

A Community of Amateur Bakers and Artisan Bread Enthusiasts.

albacore's blog

January 3, 2025: The Fresh Loaf is moving! Content posted after 5pm Pacific time today will not be migrated. Learn more...

albacore's picture
albacore

Work in Progress

First step: make the brew piece. Russian red rye malt and process detailed here

Here's the result after 5.5hrs in the water bath at 65.5C. The water bath is a cheap sous-vide circulator in a saucepan of hot water.


To be continued....

albacore's picture
albacore

My Rus-ian bread journey

I've always been interested in Yippee's posts about CLAS and I've done a couple of CLAS bakes with good results. Most of the detail on CLAS is to be found on Rusbrot's blog and in his YouTube videos. What caught my eye recently was his post about Russian Monastery bread. This is presented as a rye/wheat bread made with a custom built starter. The starter is made with coarsely crushed rye malt and raisins, followed by a rye flour build, so I'm guessing it is a composite of a raisin yeast water and sourdough. I didn't have any rye malt, but Rus suggests you can use coarsely crushed rye grain and malt extract instead, so I ordered some malt extract, but it never came. Back to plan A mkII - make my own rye malt! This is the guide I followed, but much simplified as I was only making 200g. A few days later it was ready and I kicked off my Monastery bread build.
I followed Rus's process to make a rye/wheat Mischbrot. All went OK and I ended up with an OK bake. It was a bit solid, (like all my rye bread is!) and had a lot of cracks in the crust - not sure why.


After this, things got more interesting. Rus suggests that you can save some of the dough to make a ripe dough starter - pate fermentee, I guess. So I did this and used it to make a high extraction wheat flour big boule.


Levain build 1

    10g rye malt coarsely crushed
    10g Red Lammas wheat grain coarsely crushed
    10g BF
    10g Red Lammas flour
    12g ripe dough
    40g water
    5 hrs 28C
   
Levain build 2

    10g levain build 1
    100g WW flour sieved
    75g water
    12hrs 25C
   
Main dough

    200g WW flour #40
    200g WW flour #50
    100g Manitoba flour
    350g water
    autolyse 20m
    106g lev build 2
    10g salt
    mix, 2 folds
    3 hrs 45m bulk
    NB: remove 70g dough as a ripe dough starter and store in frij
    shape to  one big boule
    FP 1hr 10m
   
    And what a great bake it turned out to be! Super oven spring, good loft, nice open and moist crumb


Just to make sure this bake wasn't a fluke, I did a similar bake, but to two small boules and one tubby batard again nice looking loaves:


So go on - why not give it a try! If you have a proofing box, you are good to go!

Lance


albacore's picture
albacore

I've made Abel's 90% Biga loaf several times since he published it and in my view it's a TFL classic. However, although I've had great results with the yeasted version, I've never had success with the sourdough one.
However, a recent comment from DanAyo (near the bottom of Abel's thread) made me want to revisit it. Guidance from Michael Wilson (in the same thread) helped me understand that I wasn't using the "right" sourdough for the recipe and that I needed a low acid Lievito Madre type starter to be successful.
So on his advice I repurposed my starter (normally 80% BF/20% rye and 80% hydration) into a pseudo lievito madre one - all white at 50% hydration.


Levain

    Day0: build 1 & 2 at 1:2:1 (starter:BF:water) 25C
    Day0: build 3 at 1:2:1 18C and stored overnight underwater at 18C
    Day1: take starter out of water and drain. Build 1 at 1:1:0.5 28C
    Build 2 & 3: repeat build one every 4 hours. Levain should triple

 
Biga (50% hydration)

    300g Marriages BF
    300g Marriages Canadian flour
    300g water
    60g levain
   
    Day 1, e11: mix till no more dry flour. Chop up biga into small pieces and store loosely covered at 16C


Main Dough (67% hydration)

    All biga
    395g Grandi Molini Tipo 0 flour
    5g diastatic malt
    377g water
    19g salt
   
    Day 2, m10: not much rise on biga, which I think is fine, but warmed up for 1 hour in PB at 28C
    Day 2, m11: add water to mixer and then half flour. Mix on slow until smooth and then incorporate chopped up biga
    Add rest of flour and mix on slow until smooth.
    Mix on high 1 min, add salt and mix for another minute.
    Turn out of the mixer into proofing bowl, dough temp 23C
    Bulk ferment at 28C for 3hrs 25mins with one coil fold - about 40% volume increase.
    Preshape to 2 x 850g batards. BR 20mins
    Shape, proof for 70mins at 28C
    Score and bake as normal with steam

Thoughts

    Do you need a long bulk like I did with a SD biga? Anyone know?
    Very difficult to score - I always find this with biga loaves - it must be the long biga ferment degrading the dough
    Ears and loft OK, but not great
    Super open crumb
    Mild flavour - I guess as expected from using the low acidity LM
   
Photos

Lievito madre in water bath at start:


Lievito madre drained, next morning:


Biga:


Last of the biga just before adding to the mixer:


Baked loaves:


If open crumb offends you, look away now!:

Lance


albacore's picture
albacore

Don't get too excited - the spelt is only 20% of the flour - but it makes for a nice loaf!

It's ages since I've posted details of one of my bakes on TFL. TFL is full of baking questions at the moment, so I thought a few details and pictures of my weekend spelt bake might give a bit of content variation.

It was a pretty simple bake (for me!) with 20% mockmilled spelt, 3% rye from the levain and a hydration of 74%. It includes 1% of my current favourite ingredient, fava bean flour.

I'm running a trial with my starter at the moment, keeping it on the counter and feeding it once a day, rather than keeping it in the fridge. The plan is to see if it has more "vitality" managing it this way.

Flour mix

    200g Mockmilled spelt
    780g bread flour
    10g diastatic malt flour
    10g fava bean flour


Levain

    Build 1 at e7 day0: 5/25BF-5rye/24water 27C
    Build 2 at m8 day1: 55/80-30/88 29C

 
Other

    True hydration 74%
    Salt 1.8%

Process  

    m11 day1: Spelt flour autolysed with 160g RT water + 2g salt
    e1 day1: 532g water in mixer, add dry flours and spelt mixture.  Autolyse 15min
    Add 225g levain, mix in
    3min low speed
    add 18g salt and mix 2min low speed
    Mix on high speed 1min 30secs
    Drip in 40g bassinage water on low speed, total time 4min
    Turn out of the mixer into proofing bowl, dough temp 25C
    Bulk ferment at 25C for 4hrs 15mins with a couple of coil folds. Volume increase about 55%
    Preshape to 2 x 850g batards. BR 20mins
    Shape, proof on counter for 20mins
    Retard in fridge overnight
    Score and bake as normal with steam

Thoughts

    Good ears and nice blisters.
    Pretty open crumb
    Mild flavour - I'd like to get a bit more lactic tang in - maybe by reducing levain quantity and fermenting longer?

Photos

Lance


albacore's picture
albacore


I decided the time had come for a little experiment to try and shed some light on the dark art of bulk fermentation and the influence different percentage volume increases might have on the final loaf.

I started with a pretty standard dough recipe as follows:


Initial mix

    10% wholegrain emmer flour
    10% emmer flour sifted #40
    80% bread flour
    7.7% prefermented flour @ 56% hydration
    0.15% diastatic malt
    75% hydration (69% + 6% bassinage)
    1.8% salt


Process  

    20 mins autolyse + 10 mins fermentolyse
    Add salt, then malt
    Mix 2 mins LS, 2 mins HS (Famag)
    Add bassinage on lowest speed
    Bulk ferment at 25C (see below)
    Preshape to 2 x 900g, BR 20 mins
    Shape to 2 batards
    Overnight retard in fridge
    Morning bake at 230C with steam for around 30 mins.


Bulk Ferment Details

    1st bake:
    Coil folds at 1hr & 2hr
    Duration: 5hrs 05min
    Volume increase: 71%
   
    2nd bake:
    I had to go out during most of bulk time, so I was only able to do one coil fold at 20 mins, so I increased HS mix time to 2mins 30secs
    Duration: 3hr 55min
    Volume increase: 40%
   
Differences

Both bakes produced good loaves, but with some differences:

1st bake
more spread on the peel
less loft
less oven spring
more open crumb

2nd bake
kept its shape better on the peel
more loft
more oven spring
slightly less open crumb
browned quicker in the oven
took slightly longer to cook

First bake:

Second bake:

Summary

It appears that there is flexibility in bulk volume increase, as you would imagine, but you can expect differences in the final loaves. These differences will no doubt become more pronounced if higher percentage volume increases are allowed to happen.

Lance

albacore's picture
albacore

I recently chanced upon an interesting recipe in the excellent Baecker Suepke's blog.

It is for a Black Forest chocolate cherry sourdough bread. The Modernist Bread version springs to mind, but the Black Forest one is different - not sweet, apart from the cherries - and it has toasted sunflower and pumpkin seeds. I also added some non-salted pistachio seed, which gave a rather nice contrasting green colour.

Interestingly, the recipe predates the Modernist Bread one by a couple of years. You can find the recipe HERE. It's in German, but translates successfully. There's also a variant recipe here which I didn't use, but it has a few different tweaks.

The recipe is quite complex, with a soaker, a levain and an "aroma cook piece" (Aroma Kochstück) and various grades of wheat and rye meals. I approximated these with my Mockmill. The recipe also calls for light rye flour T997. I made this by putting wholegrain rye through a #50 sieve.

Here's how the loaf looked after baking:

And here's the crumb:

The crumb and flavour remind me of a "pumpernickel on steroids". It really is bursting with flavour and I can recommend it to all who fancy an  interesting bake, albeit with some complexity.

My favourite pairing was with some good French brie; I shall be baking it again!

Lance

albacore's picture
albacore

Recently, my loaves have not been fully up to scratch – a bit spready on the peel, poor loft and poor ears.

My starter seemed to be performing OK, but sometimes with starters, who knows? I’m not the sort of baker who would cherish a 100 year old starter, so time to try a new one!

I made my last starter just under a year ago following Gerard Rubaud’s method as detailed in MC’s Farine blog. It requires a freshly milled organic blend of 60% wheat, 30% spelt and 10% rye at each daily stage – and a proofing box to maintain a constant 27C. The starter was good, so I've used the same method again.

Starter creation went something like this:

  • ·         Day 0 pm: 86g 3 grain blend + 86g organic BF + 103g warm water. Hand mix to a ball and sprinkle on 0.4g malt flour and 0.9g salt. Knead these in and sit the ball on a bed of coarse 3 grain blend in a plastic pot. Sprinkle more coarse flour on top to cover. Put lid on pot and store at 27C.

  • ·         Day 1 pm: the dough was well risen with a sweet taste and a dirty smell. I brushed off the coarse flour and took 80g of the crusty part and mixed with 80g BF, 80g 3 grain blend, 108g warm water, 0.8g malt and 0.4g salt. Knead to a ball and put in the cleaned plastic tub, covered. Store at 27c again.

  • ·         Day 2 pm: again well risen, but with a sickly sweet smell. 66g starter + 83g BF + 50g 3 grain blend + 83g warm water + 0.35g salt. Store as previous.

  • ·         Day 3 pm: well risen, with smell much reduced. 44g starter + 58g BF + 25g 3 grain blend + 46g water + 0.2g salt.

  • ·         Day 4 pm: well risen, off smells gone. Starter considered fit for use and proceeded to make levain – my normal feeds at e5, e11 and m8

  • ·         Day 5 am: last levain feed and dough made 2 hours later. 20% 3 grain blend, 75% hydration and 16% stiff levain. Shaped loaves overnight retarded.

  • ·         Day 6 am: loaves baked - quite pleased with the result!

Here's the starter at Day 1, prior to scraping off the loose coarse flour:

Day 4 levain just mixed prior to referment:

Day 5 levain prior to use:

Baked loaf:

And the crumb:

Lance

albacore's picture
albacore

I've had a good few discussions lately about domestic oven steaming, notably with DanAyo and Doc.Dough.

I've tried various in-oven solutions over the last year or two with good, but not great results. It was also getting to the point where it was taking longer to set the oven up than it was to do the actual baking!

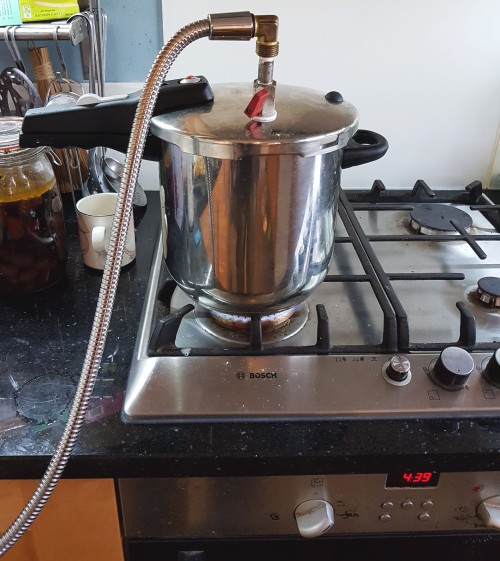
I became convinced that the best way forward was to generate steam externally and introduce it into the oven. This blog post gives some details of the practicalities of how I achieved this.

I decided that the simplest steam generator was going to be a pressure cooker, but there are other options, eg a steam wallpaper stripper!

So, as luck would have it, I found a nice compact stainless pressure cooker preowned at a good price. Originally sold by Lidl, I believe. I drilled a hole in the lid with a hole saw and fitted a 1/4 bsp ball valve, sealed in with a ptfe washer. I added a 1/2 bsp hose fitting and this end of things was ready to go.

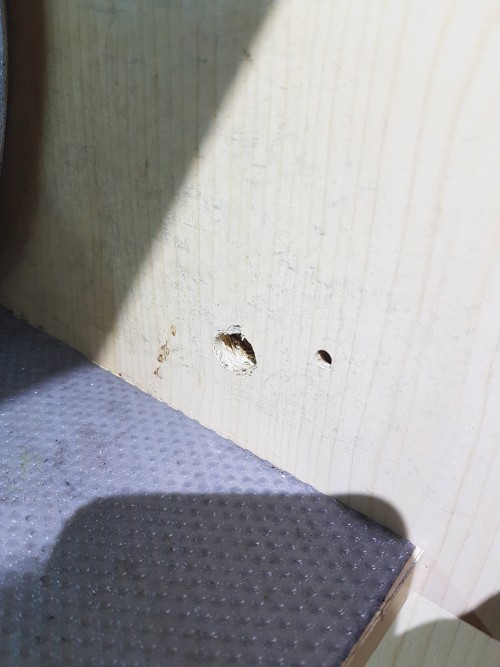
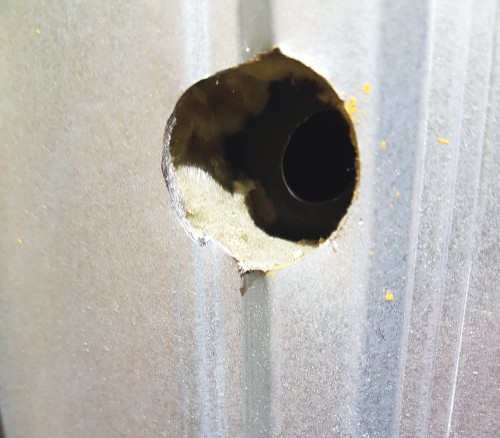
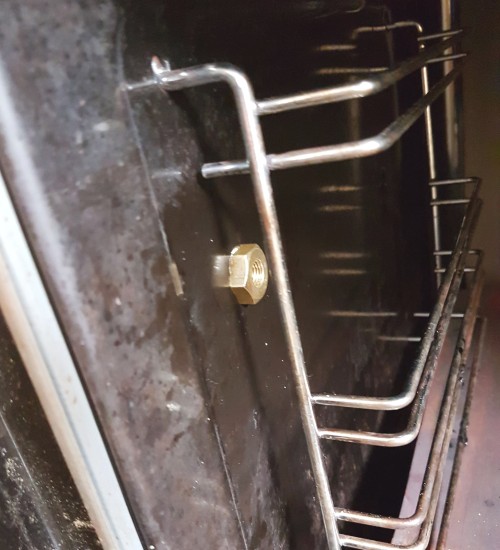
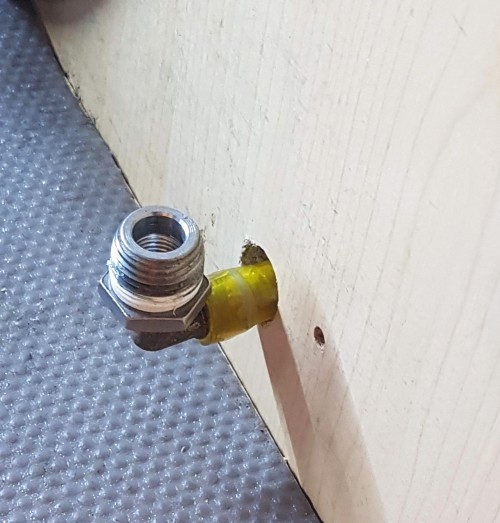
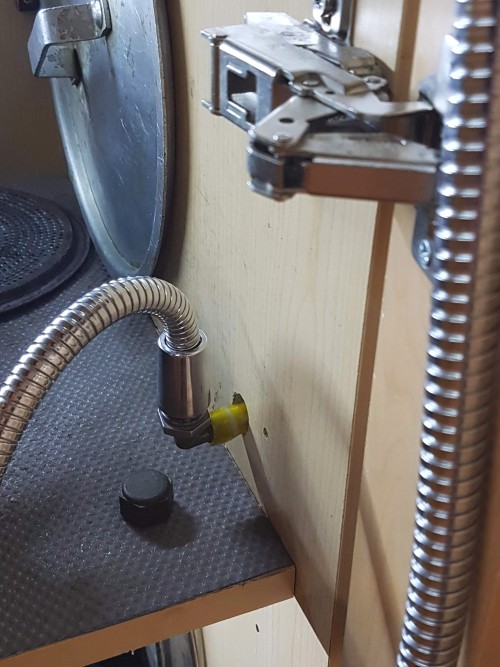
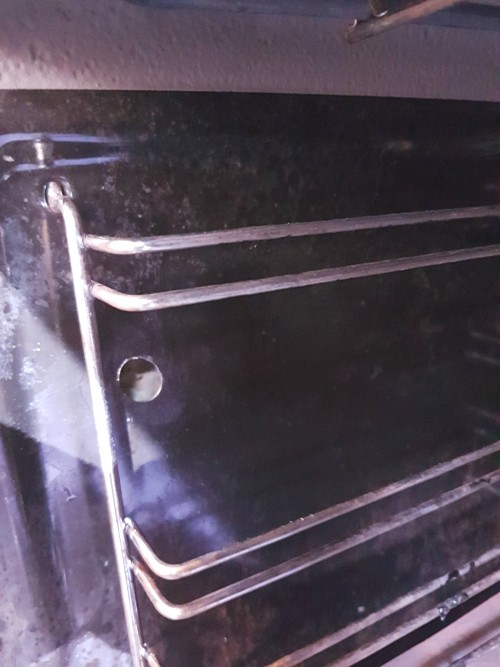
For the oven, the only way in was from the side and through the adjacent kitchen cabinet - fortunately it's all hidden away! So I drilled a hole in the oven wall with the same hole saw and fitted a threaded 1/4 bulkhead fitting with ptfe washer. I needed a bigger hole in the oven cladding to get access from the outside.

Then a bit of thinwall stainless tubing, plus some more fittings and a bit of silver soldering got the oven end of things finished. I fitted some silicone tubing round the stainless pipe, held in place with Kapton tape, to ensure the wood doesn't get burnt.

The pipe from the pressure cooker to the oven is an old shower hose - the good ones are silicone tubing with a chrome plated brass outer, so just the job.

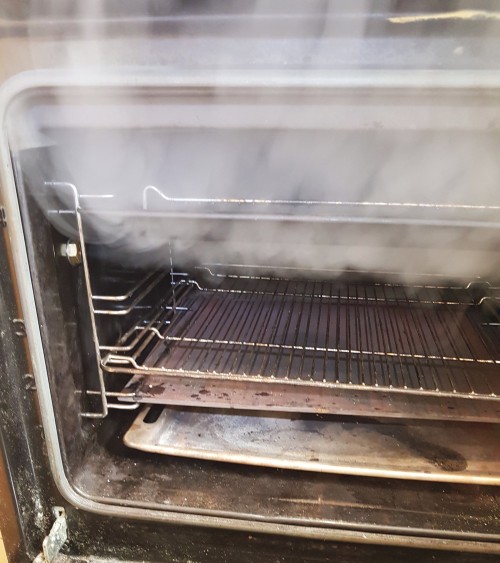
So, all done and ready to go! The trial run in a cold oven was promising, except the oven started to go rusty!

I used the steamer for the first time this morning and am well pleased with the results so far. I got the pressure cooker up to pressure - about 10psi, I think. Then put the loaves in, opened the steam up full, burner up full. The pressure soon dropped to zero, but i think the initial surge is useful.

I steamed for 10 mins and then knocked it off and briefly vented the oven.

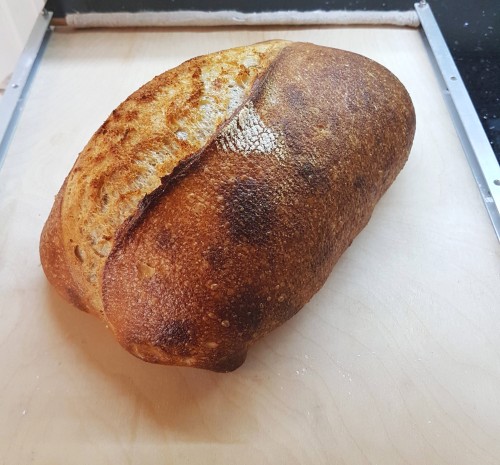
Early days, but I'm pleased with the look of the loaves. There's more work to do as the crust is slightly tough and not as crisp as I hoped - perhaps I need to reduce the steam time a bit? One interesting thing I noticed is that weight loss of the loaves was reduced.

Any way, here's a few photos of the build:
 

Lance

albacore's picture
albacore

I chanced upon a long TFL post Chasing thin, crispy, not thick/tough dough A comment by Mariana regarding a 100% sponge method loaf caught my eye. I think Mariana made it in a bread machine, but the loft was incredible. I've been thinking of making a tin loaf for a while, so this was the perfect opportunity.

It's a yeasted dough, but I did a couple of tweaks to add some extra flavour: addition of 10% Mockmilled whole wheat flour and addition of 13% leftover stiff levain I had in the fridge. Overall hydration was 64%, plus the butter.

Initial mix

  • 270g Duchy bread flour
  • 270g Waitrose Canadian bread flour
  • 60g Mockmilled whole wheat flour
  • 1.5g diastatic malt
  • 24g warm butter
  • 3g IDY
  • 0.03g ascorbic acid
  • 80g levain @ 56%
  • 324g warm water


 Later Additions

  • 12g salt (1.8%)
  • 12g honey
  • 24g dried skim milk powder
  • 64g water

Process   

  • IDY creamed with 24g water at 40C
  • 64g boiling water poured onto honey and skim milk powder - mix and allow to cool
  • 300g water in mixer, add AA, then flours, levain, creamed IDY, malt, butter
  • Mix lightly - no gluten development
  • Rest for 3hrs 40 mins
  • Add honey/milk mix and mix in on slow, then add salt and mix in
  • Develop gluten - 5 mins on high speed
  • Bulk ferment at 28C for 30 mins
  • Shape to 1 x 900g tin loaf plus a very small "leftovers" loaf
  • Final proof 1 hour at 28C - dough nearly at top of tin.
  • Bake in oven at 230C with steam for around 50 mins until internal temp 95C

Thoughts

  • A crazy big loaf - I don't think i've ever made a taller one! Height was 185mm/7.25"
  • Nice crumb - not too open, which wouldn't have been appropriate, but not tight.
  • Mild but pleasant flavour.
  • Probably not a type of loaf I will make on a regular basis, but a nice occasional style.

Lance

 
albacore's picture
albacore

I've decided I don't really like the taste of wheat bran in a loaf that much. It's fine up to about 30% wholewheat in a loaf, but after that, I find the strong, bitter flavour of the bran is not really that nice.

One way round it is to sieve out the bran and put it in your muesli, so really you are baking with high extraction flour, but for this bake, I decided to try something a little different.

I started by using white wholewheat flour, which has a milder flavour than standard red wholewheat flour. The only version I know in the UK is Marriage's Golden Wholewheat bread flour, so this is what I used - no whole grains available in the UK - unless anyone knows differently - so the Mockmill was idle for this bake.

My next idea was to remove some of the wheat bran (no wheat bran was harmed in this bake!) and replace it with some oat bran.

Add in 7% rye for a rounded flexible crumb and 3% wheatgerm for some healthiness points and I was good to go - via a double retard route for flavour and good ears.

The bake went something like this:

Flour mix

  • 430g Marriage Golden Wholewheat through a #40 sieve
  • 53g retained, 20g added back to flour
  • missing 33g made up with 33g oat bran
  • 79g Matthews dark rye through #40 sieve
  • 22.5g retained, 5g added back and 10g oat bran added
  • 470g Waitrose Canadian BF
  • 30g wheatgerm
  • 3g malt flour


Levain

  • 225g young levain at 56% hydration, 30% of flour is Rubaud wholegrain mix


Other

  • True hydration 80%
  • Salt 1.8%

Process   

  • Levain made in a 2 1/2 stage build at e5, e11, m8. The half build is a small top up one in the morning 1:0.21
  • All wholemeal flours and wheatgerm autolysed for 70mins with 423ml water at 32C
  • 414ml water at 32C added + all BF and malt. Autolyse 30mins
  • Add 225g levain, mix in
  • Add 20 salt, mix in
  • Mix on high speed 2mins 20secs
  • Turn out of the mixer into proofing bowl, dough temp 24C
  • Bulk ferment at 28C for 2hrs 10mins with in bowl S&F at 45mins and 130mins
  • Transfer to fridge for retarded bulk
  • Out of fridge next day (19 elapsed hours)
  • Rest 60mins at 24C
  • Preshape to 2 850g rounds, and a small one. BR 25mins
  • Shape to 2 batards, and 1 small boule, proofed on counter for 15mins
  • All bannetons retarded in fridge for 5 hours
  • Score and bake as normal

Thoughts

  • Overall, I was pleased with this bake. I was expecting a more open crumb, but maybe the high fat content of the oatbran and wheatgerm made it more closed? Or perhaps a longer final proof needed? Whatever, the crumb was moist, "rounded" and pliable
  • The bats had good ears and nice blisters.
  • Nice flavour with a definite sour tang

Lance

Pages

Subscribe to RSS - albacore's blog