The Fresh Loaf

A Community of Amateur Bakers and Artisan Bread Enthusiasts.

dmsnyder's blog

dmsnyder's picture
dmsnyder

Pizza made with Sourdough Starter Discard

February 14, 2014


I ended up this week with even more sourdough starter discard than usual and a craving for pizza and no activated starter and it's Valentine's Day and my wife loves pizza and so I made pizza with the sourdough starter discard.


Wt (g)

Sourdough starter from fridge (firm)

241

Water 85 dF

153

AP flour

298

Instant yeast

2

Salt

6

Total

700

The starter discard was approximately 50% hydration, so this dough was 65% hydration.

Procedure

  1. Put the water and the starter in the bowl of a stand mixer and mix at low speed to disperse the starter.

  2. Add the yeast to this mixture, then the flour and the salt.

  3. Mix at low speed with the dough hook until the dough forms a ball on the hook. Add a small amount of water or flour to achieve a medium-consistency dough.

  4. Mix at Speed 2 until you get an early window pane (about 7 or 8 minutes).

  5. Transfer the dough to an oiled bowl. Cover it tightly.

  6. Ferment at room temperature until the dough volume has about doubled (2-4 hours).

  7. Divide the dough into two equal pieces. Shape as balls and place in Ziploc bags with 1 Tablespoon of olive oil.

  8. Refrigerate for at least two hours or up to 3 days.

  9. Before using, take the dough out of the refrigerator and warm at room temperature for an hour.

  10. Preheat the oven at its hottest setting with a baking stone in place.

  11. Shape for pizzas and allow to proof for 30-60 minutes before topping and baking.

  12. Bake to taste (in my oven, 10 minutes).

I preheated my oven at 500 dF for an hour before baking the pizzas.

My toppings were (in the order put on the dough):

  1. EVOO brushed all over.

  2. Finely chopped fresh rosemary sprinkled over dough (1 tsp/pizza).

  3. Thinly sliced fresh garlic (2 cloves/pizza).

  4. Hot red pepper flakes sprinkled to taste.

  5. Oil-cured olives, pitted and sliced.
  6. Fresh broccoli cut into small florettes (about 3/4 cup/pizza).
  7. Fresh mushrooms, sliced (about 1.5 cups/pizza).
  8. Yellow onion, sautéed in EVOO until golden, then moistened with one Tablespoon of balsamic vinegar (2-3T/pizza).


The pizza was pretty good. It wasn't as good as the ones I made with the Ken Forkish formula. But it was crisp on the outside and chewy on the inside. It was thin, yet firm enough to support itself. It was nice tasting with no hint of sourdough tang, interestingly enough.

 I'm happy to know I can make very good pizza dough in a few hours and that I have a really good way of using starter discard besides pancakes.

 David

dmsnyder's picture
dmsnyder

White Flour Warm-Spot Levain from Flour Water Salt Yeast 

February 12, 2014

On my way to the Pizza section towards the back of Ken Forkish's Flour Water Salt Yeast a few days ago, I stopped in the “Advanced Levain Dough” chapter (Chapter 11) to see what Forkish regarded as more “advanced” than the other breads in his book. There are just two formulas in the chapter, and both are different mainly in calling for more frequent levain feedings. I was reminded of the day in the San Francisco Baking Institute Artisan II (Sourdough Baking) workshop when we made 4 breads which differed primarily in the levain feeding schedule. The one with the best flavor was made with a liquid levain fed twice a day. The aim was to bring out the maximum flavor from the wheat itself, unmasked by excessive acetic acid sourness or off flavors from over-fermented levain. It was an impressive demonstration.

Anyway, rather than making pizza dough, I made one of the “advanced levain” breads which Forkish calls a “White Flour Warm-Spot Levain.” This bread is made with a levain that is fed 3 times over 2 days before mixing in the final dough. These builds are supposed to be fermented at a warm temperature. I used my Brød & Taylor Proofing Box set at 85 dF.  I modified the schedule Forkish gives just a bit to accommodate other obligations, but I don't think those changes impacted the quality of the product.


It has been a very long time since I have made a lean bread with no whole grain flour. In fact, my taste has evolved in the direction of preferring higher proportions of whole grains than formerly. But, I have to say, this bread is a paragon of its type. It is delicious. I think the photos show the pale yellow color of the crumb. This is from the carotenoid pigments in the flour which are oxidized by machine mixing. The crust of this bread was crunchy and sweet. The crumb was very open. (The loaves felt very light for their size.) It was tender and only a bit chewy. The flavor was complex and sweet with a hint of the mellow tang of lactic acid. My wife, who seldom eats more than half a slice of bread at a meal, had her half slice with a bowl of bean soup. Then she had the other half. As I was clearing the table after lunch, I heard the unmistakable sound of a crunchy loaf being sliced and saw her walking off with another slice (minus a big bite) in her hand. Not a word of the “put more whole grain flour in it” mantra.

 Now, I will have to make the other “advanced” levain in the chapter, which does have some whole wheat flour and could certainly be made with even more.


Before having this bread with lunch, I had planned to give a little update on what I've been baking since my last blog entry. Here are some photos and some comments on those breads:


Jewish Sour Rye after Greenstein and Pain au Levain with Whole Wheat Flour from Hamelman's Bread

The Pain au Levain was made following Hamelman's formula and procedures, but the rye had a few tweaks that are worth mentioning. The formula I developed from the one in Secrets of a Jewish Baker can be found in Jewish Sour Rye. I build up my rye sour in 3 builds, essentially doubling each time, up to something like 800 to 1000 g. This time, I fed the second build with Bob's Red Mill "Dark Rye," which is a fine-milled whole rye flour. The other two builds were fed KAF Medium Rye. So, the breads had more whole grain rye than usual and were darker and more intensely flavored.

Secondly, I used Sir Lancelot (high-gluten) flour rather than First Clear flour. I think this made for a dryer dough and also a stronger dough. That may have contributed to the absence of any "blowouts," which I usually get with this bread. But I also let the loaves proof a little more completely than usual, which also contributed to the lack of blowouts. 

The third change is one I had been wanting to try for a long time and finely remembered to do: I usually bake this bread at 375 dF for 35 to 45 minutes. This time, following a procedure Hamelman uses for light rye breads, I baked at 460 dF for 15 minutes and then at 440 dF for another 20-25 minutes. I got of firmer, darker crust. I think I prefer this procedure.


Last Sunday, we had dinner with a couple with whom we share a love of Northern Italy. They cooked dinner, and I contracted to bake some bread. I chose to bake the Pain de Campagne from FWSY, modified to use 70% AP, 20% WW and 10% Rye flour. This has become one of my favorite breads. it is actually quite similar in flavor to the Hamelman Pain au Levain with WW flour, pictured above. 

They say "man cannot live by bread alone." I'm not sure this is what that means, but I cannot make bread alone. I don't have Ian or dbm's kind of help, but I do have ....

Happy baking!

David

dmsnyder's picture
dmsnyder

I am on a mailing list which periodically sends me formulas for new breads developed at the San Francisco Baking Institute. The most recent mailing was for a "Finnish Rye." Here's a link: Finnish Rye Bread Formula Now, I cannot attest to the Finnish provenance of this bread. Nor would I call it a "rye bread." It is only 22% rye. In fact, it has more whole wheat flour (35%) than rye. Anyway, it is a multigrain bread made with a liquid levain, a cracked wheat soaker and a flaxseed soaker. It looked interesting, but I definitely would not have made it this soon but for Paul's (PJKobulnicky) bake of it (see SFBI's Finnish Rye) that looks so good. 

I followed the SFBI formula with these modifications:

1. For the Wheat Soaker, I used coarse bulgur.

2. I added about 20g additional water during the early dough mix because the dough seemed dry to me. (That was before the soakers were added.)

3. I mixed the dough for about 7 minutes before adding the soakers.

4. After mixing the soakers into the dough at low speed for 3 or 4 minutes, I transferred the dough to a floured board and hand kneaded for another 3 minutes to distribute the bulgur and fax seeds better and develop the gluten a bit more.

5. I bulk fermented at 76 dF for 2.5 hours. I did not feel the prescribed 1.5-2 hours resulted in sufficient fermentation.

6. I proofed for 45 minutes at 85 dF.

The dough was pretty sticky with the additional water I had added. The crust softened quickly with cooling and was pleasantly chewy. The crumb was more open than Paul's, probably because of the additional water and the extra gluten development. The crumb was soft but somewhat chewy.

When first tasted a couple hours after baking, the flavor was very nice except that the flavor of the molasses and the sweetness seemed excessive. There was also a clear flavor of flaxseeds (which I happens to like). However, the flavor profile evolved considerably by the next day. Now, the bread had the flavor of a honey whole wheat bread. The distinct flavors of molasses, flaxseeds and rye have all melded and are no longer identifiable (to my taste). I had said in Paul's blog I would reduce the molasses next time. I'm not so sure now, but I might try it with honey rather than molasses.

I have eaten it plain, toasted with almond butter and un-toasted with a bit of sweet butter. I enjoyed the last option most, so far. We are going to have some tonight as leftover roast chicken sandwiches.

Both my wife and I like this bread a lot, and I expect it will be baked often. However, I will classify it in my my mind as a whole wheat bread rather than as a rye bread.

David

dmsnyder's picture
dmsnyder

My wife and I had a quiet New Years day. Very mellow, except for dinner. My wife gets pretty excited when I make pizza.

I again used Ken Forkish's formula for a sourdough pizza crust. After my successful experience fermenting my SFSD dough in my proofing box (San Francisco-style Sourdough and dishes made with it), I did the same with the pizza dough. The result was pretty much the same as I had had last Summer with this dough (Pizza Bliss), which is to say it was delicious - very flavorful with a mild to moderate sourdough tang. The rim was puffed up and very crisp. Really good eating.

I made two mushroom pizza. One had olive oil, finely chopped fresh rosemary, sliced garlic and mozzarella. The other had olive oil, tomato sauce (from Floyd's Pizza Primer) and mozzarella. 

Wishing you all Happy Baking and a delicious 2014!

David


dmsnyder's picture
dmsnyder

As the weather has turned cooler, my sourdough breads have become less tasty. They have  had a less complex flavor and have been less tangy than those baked last Summer. My kitchen is in the mid-60's of late, while it was in the high-70's (or low-80's)  in the heat of summer. So, in the interest of science and other noble causes, I set out to return my SFSD to its rightful tastiness.

The truth is that I changed a number things at once, which is poor scientific methodology. But  I think I know what made the biggest difference, and the important thing is that I made some really good bread.

The basic formula and methods for my San Francisco-style Sourdough with increased whole wheat can be found here: San Francisco-style Sourdough Bread with increased whole wheat flour And here is what I did differently:

1. I fed my levain with some firm starter that had been refrigerated for about 3 days, rather than freshly refreshed starter.

2. I fermented the levain for 9 hours at 76 dF, rather than overnight at room temperature. I then refrigerated it for about 12 hours.

3. I mixed the autolyse with water warmed to 90 dF rather than cool water.

4. After a 1 hour autolyse, I mixed the dough and fermented it in bulk at 76 dF for 4 hours.

5. I then divided the dough and shaped boules and refrigerated for 24 hours.

6. I baked at 475 dF for 12 minutes, then convection baked at 445 dF for 14 minutes more.

Here is the result:
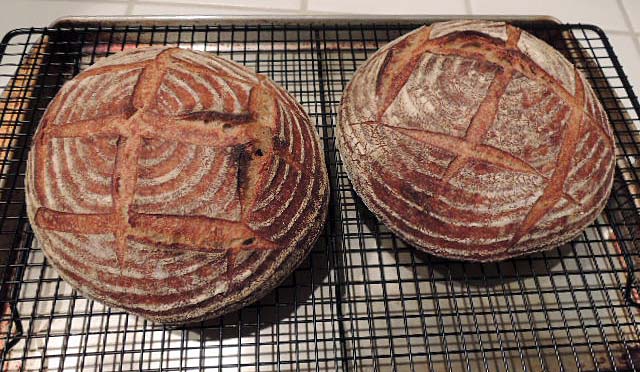
The crust is a little darker than usual. I prefer it this way. And the crumb ...
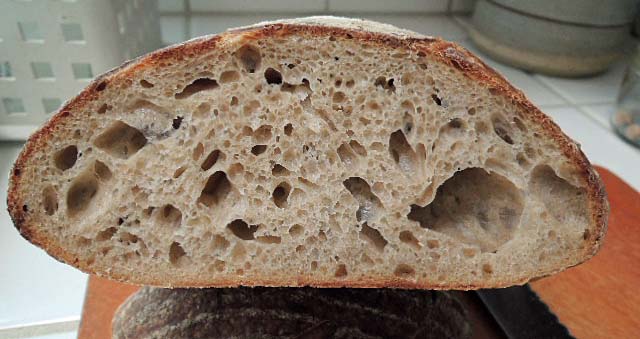
Mixed at the same hydration level as usual, this dough was noticeably  more slack from the time I mixed the autolyse. I guess that must be because my flour had more water content with the cooler whether. I think that is why I got the much more open crumb. It is also possible that increased enzyme activity played a role.

In any event, this bake produced bread with a crunchy crust, chewy but tender crumb and a delicious flavor that was both more complex and more tangy than my previous few bakes of this bread. I think I have a new procedure, at least until hot weather returns.


We often have bread that is a few days old and starting to get a bit dry, even for breakfast toast.  I hate throwing out bread, and I seldom do. Many of my favorite dishes made with bread of advancing age are made with croutons - slices of bread that I dry in the oven before using.

Except when drying bread for salad croutons or breadcrumbs, I slice it thinly and put it on a baking sheet or pizza pan. If I want it to remain pale, I convection bake the slices at 250 dF for 15 minutes on each side. If I want the slices browned, I convection bake at 350 dF for 15 minutes on one side, then turn them over, brush them with EVOO and bake for another 10 to 15 minutes. Then, depending on how I am going to use them, I may rub the warm, dried slices with a clove of garlic. That's what I did for these ...

These croutons served to support heaps of grated gruyere cheese, floating in onion soup and run under the broiler for 90 seconds before serving. 

Croutons made in this way are also delicious put in the bottom of a soup bowl before filling it with ribollita or another hearty soup.

The slices of SFSD can also be toasted in a toaster and then left in the toaster for a few minutes to dry out further. That method makes a nice base for crostini. These are topped by a chicken giblet dice sautéed in olive oil with shallots, herbs and madera wine.
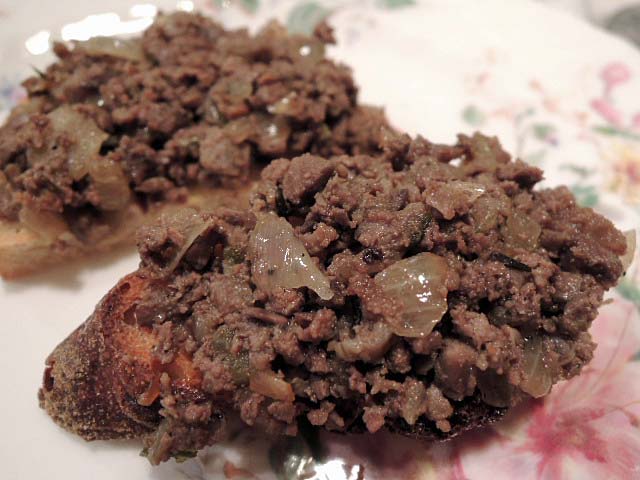
The giblets came surrounded by a whole chicken! We roasted it while eating the crostini and discussing how we really should have just made the crostini our dinner. 

Happy baking!

David

dmsnyder's picture
dmsnyder

When I got Ken Forkish's Flour Water Salt Yeast and started baking from it last Summer, I found the breads and pizza doughs to be delicious, but the fermentation times for both levains and doughs was very much shorter than what were given in the book. I figured it must be due to my warm Summer kitchen, which was in the mid- to high-70's (F). Well, now it is Winter, and my Kitchen is about 68 dF. So, I have begun revisiting some of Forkish's breads.

This week, I made his Pain de Campagne. As given in the book, this is a mostly white bread with a bit of whole wheat. It is a pain au levain, but is spiked with instant yeast. I modified the formula to 10% medium rye, 15% WW and 75% AP flour, and I left out the instant yeast for this bake. I followed Forkish's procedure for mixing and stretch and folds, but I fermented the levain and the dough in my Brød & Taylor Proofing Box set at 72 dF. The fermentation times were just a tad longer than Forkish specified for the bulk fermentation, which could be due to my leaving out the instant yeast.

Here's the result:

The flavor was less sour than I remember this bread being but quite nice. 

I made another batch of pain de campagne dough, wanting to increase the whole grain proportion and also the flavor complexity and the sourdough tang. For that batch, I increased the WW to 24%, keeping the rye at 10%. The AP flour is now at 66%.  That is, the final dough flours were: 500g AP, 200g WW and 100g Rye. (The levain contains 160g AP and 40g WW flours.)

I also included the instant yeast. I bulk fermented at 76 dF and let the dough get to 2.5X the initial volume. That took about 4.25 hours. 

And here are photos of the second bake with increased WW and instant yeast:

I went for a walk, and, when I came back, ....

Megacrackles!!

One of these loaves went to a friend whose Winter Solstice party we attended this evening. The second loaf rested for about 8 hours before I sliced and tasted it.

Just as I had hoped and Josh predicted (see below), this second bake, with more rye and whole wheat and a higher fermentation temperature, was markedly more sour. Interestingly, the flavor seemed more complex overall. 

This was a very useful lesson for me. I will be making this bread using the increased whole grain flour and increased fermentation temperature from now on. This experiment with increased fermentation temperature in particular needs to be repeated with other formulas. Stay tuned.

As a bonus, here is a loaf of  "Hansjoakim's Favorite 70% Rye" I baked a couple days ago and sliced this morning.

Note the blowout on the right. I proofed this loaf seam-side down with the intent that the folds would open up during oven spring, but, alas, I again sealed the seams too well. Thus, the blow out. A good demonstration of that which scoring is meant to prevent.

Of course, the blow out in no way detracts from the eating quality of the bread which in this instance was delicious.

David

dmsnyder's picture
dmsnyder

With all the family here for Thanksgiving and then some personal parts replacements (my eyes are getting brand new lenses, the kind without cataracts.), I haven't been posting much. So, this is a catch-up on my last few weeks' breads.

Hamelman's Pain au Levain Delicious with the Lamb and root vegetables braised in merlot I made to welcome our arriving Thanksgiving guests - just to fuel them to help making Thanksgiving dinner, you know.

Jewish Sour Rye  These were especially made to accompany Salami and eggs, our grandson's very favorite breakfast.

San Francisco-style Sourdoughs with increased whole wheat For breakfast toast and lunch sandwiches and whatever. 1 kg and 500 g boules.

San Francisco-style Sourdough


San Joaquin Sourdough Baguettes, scored various ways

Happy baking!

David

dmsnyder's picture
dmsnyder

It's a "cheap thrill." 

I don't seem to habituate to the high from taking a beautiful loaf (or two, or four) out of the oven.

"Overnight Country Brown" loaves from FWYS

I finally remembered not to seal my seams too well and to proof the boules seam-side down in the bannetons! 

The crust is crunchy and chewy. The crumb is quite chewy. The flavor 4 hours after baking was mildly sour with a prominent whole wheat flavor. Typically, the flavor of my mixed flour breads meld and mellow by the second day. This is very nice now, but I expect it to be even better tomorrow.

David

dmsnyder's picture
dmsnyder

Last week, my breads had a more or less "command performance" in the Italian language class my wife and I are taking. I've been a bit uncomfortable taking food since the class meets in  a deli/cafe/wine bar. Anyway, I decided to let it be on the teacher's head. I took a large wicker basket with half slices of 3 breads - a seeded sourdough Italian bread with 20% durum flour, a walnut-dried fig bread based on my San Francisco-style sourdough and a "Overnight Country Brown" from Ken Forkish.

Everyone seemed to enjoy all the breads. I was most delighted by the reactions of a fellow student who is a professor of art at the local State University. He was munching on the Forkish bread and carrying on about how even the local "French Bakery" (which is pretty good) puts "too much air" in their breads. He was talking, I'm sure, about the fluffiness you get when you spike sourdough breads with yeast. He thought the Country Brown was a lot like the breads he had had in France. (It is very similar to some pain de compagne I've had in the Dordogne Valley.  And we had a "guest" sitting in, which we often do. Clara is a native Italian -  an older woman who was the cook/owner of an Italian Restaurant/Pizzaria that is now closed. I understand she still has her old commercial mixer at home and bakes her own bread and makes pizzas and calzones. Her compliments meant a lot to me. 

Speaking of Forkish's breads, Fresno is now in our version of "Fall." My kitchen temperature is running right around 70 dF. I've made a couple FWSY formulas in the past 2 weeks - one is fermenting now - and they are keeping to the timings in the book more closely. I'm still not able to let an "overnight" dough bulk ferment at room temperature overnight.  I'm not too unhappy about this. The cold retardation makes the breads more sour, which i don't mind.

The breads at the head of this blog entry are some San Joaquin Sourdough baguettes and San Francisco-style Sourdoughs with 20% whole wheat I baked yesterday. 

We're having Thanksgiving at our house for the first time in several years. Our sons and their families and one of my sisters and her son will be with us.  I'm looking forward to it. It's time to start planning baking for the holiday weekend. Some breads for stuffing, some for morning toast and sandwich rolls for sure. 

David

dmsnyder's picture
dmsnyder

 Last week, I got a nice private message from a TFL member who had just made and enjoyed the Sourdough Italian Bread about which I blogged back in 2008. That bread was Peter Reinhart's Italian bread from BBA with the biga converted to a biga naturale, AKA firm sourdough starter.

That message reminded me that in 2011 I developed another “Italian Bread” formula that I actually preferred to the 2008 version. Coincidentally, my Italian class classmates have been harassing encouraging me to bring some of my breads to class for them to sample.

So, I decided to make the 2011 Italian Bread and San Francisco-style Sourdough Bread with Figs and Walnuts (San Francisco-style Sourdough Bread with Walnuts and Figs) to share with my class.

Sourdough Italian Bread

Those who have made my San Joaquin Sourdough may note the resemblance between the method outlined below and that for the SJSD. This is not coincidental. On the other hand, any resemblance between this bread and any bread actually baked in Italy …. Well, whatever, it is quite delicious.


Ingredients

Wt. (g)

Baker's %

AP flour

400

80

Fine durum flour

100

20

Water

350

70

Salt

10

2

Sugar

14

3

Diastatic malt powder

5

1

Active Liquid levain

100

20

Olive oil

14

3

Total

993

199

 Note: When I blogged about this bread in 2011, Andy (ananda) pointed out that the diastatic malt was probably unnecessary, since most American flour has some malted barley already, and it's redundant with the sugar. However, I did not review those comments until after the dough was mixed. Maybe next time I'll leave out the malt.

Method

  1. In a large bowl, disperse the levain in the water.

  2. Add the flours, sugar and malt to the liquid and mix to a shaggy mass.

  3. Cover the bowl and let it rest for 20-60 minutes.

  4. Add the salt and olive oil and mix thoroughly. (Note: I squish the dough with my hands until it comes back together, then do stretch and folds in the bowl until it forms a smooth ball and the oil appears completely incorporated.)

  5. Transfer the dough to a 2 quart lightly oiled bowl, and cover the bowl tightly.

  6. After 30 minutes, do 20 stretch and folds in the bowl. Repeat 3 more times at 30 minute intervals.

  7. Refrigerate for 12-36 hours.

  8. Divide the dough into two equal pieces and pre-shape as rounds or logs. Cover with a clean towel or plasti-crap and let rest for one hour.

  9. Shape as boules or bâtards and proof en couche or in bannetons for about 45 minutes. (Note: Optionally, if proofing en couche, roll the loaves on damp paper towels then in a tray of sesame seeds. Alternatively, you can brush the loaves with water and sprinkle with sesame seeds. If proofing in bannetons, you would use the second method but after transferring the loaves to a peel, just before baking.)

  10. One hour before baking, pre-heat the oven to 480ºF with a baking stone and steaming apparatus in place.

  11. Transfer the loves to the baking stone. Steam the oven, and turn the temperature down to 460ºF.

  12. After 15 minutes, remove the steaming apparatus. (Note: What I actually do at this point is switch to convection bake and turn the oven down to 435ºF for the remainder of the bake.) Continue baking for another 12-15 minutes or until the loaves are nicely browned and the internal temperature is at least 205ºF.

  13. Transfer the loaves to a cooling rack. Cool completely before slicing.


The crust was crisp at first but became soft and chewy after a few hours. The crumb was moist and chewy with a complex sweet, nutty, tangy flavor accented by the sesame seeds on the crust.

This bread is delicious toasted with almond butter or un-toasted dipped in olive oil, but it might be best just plain right after cooling.  

Happy baking!

David

Pages

Subscribe to RSS - dmsnyder's blog