The Fresh Loaf

A Community of Amateur Bakers and Artisan Bread Enthusiasts.

Franko's blog

Franko's picture
Franko

I was browsing through Saveur's online magazine the other day and ran across a recipe for a tomato and cheese pie from Sicily called Scaccia. The recipe can be found at the link below.

http://www.saveur.com/article/Recipes/Tomato-and-Cheese-Pie

It caught my eye not only because it looked and sounded delicious, but also because it uses durum flour for the dough. Having recently acquired 25lbs of the stuff, I've been on the lookout for any recipes that call for it, and thought I'd give this Scaccia a try.

The formula for the dough is simply flour, olive oil, salt and water, which makes a pasta dough that can be stretched out into a very thin sheet and then spread with a thick tomato sauce and cheese. The recipe indicates it can be rolled out with a pin, but that proved impossible for the dough I'd made. In hindsight I'm not sure I'd want the dough so well developed that it could be rolled out anyway, as I think it might make it a little too chewy. The next step of trying to fold this to create several layers of dough and sauce (similar to laminating a croissant or puff pastry dough) was the tricky part. My attempt was moderately close to the procedure described in the recipe, but only because I used the largest icing spatula I had to help me fold the dough over on itself. The dough was hand mixed, and then developed using the slap and fold technique until it was able to come cleanly off the counter, but the next time I mix this I'll use a bit less water to make the dough a little easier to work with. The recipe from Saveur calls just for tomato sauce and caciocavallo or pecorino cheese in the filling, but I used a blend of pecorino and provolone instead. Since I had some thin slices of spicy Capicola sausage on hand, I added some of those for good measure as well. Once I'd managed to get it folded over, more cheese and sauce were added, then another two folds with more cheese and sauce going on. Next onto a parchment lined sheet pan and sprinkled with the last of the cheese and placed in a 500F oven for 10 minutes, then for 35-40 minutes at 400F. Once out of the oven I let it cool on a wire rack for 20 minutes while I made a warm scallop and prawn salad to have for dinner. By the time that was ready, the Scaccia was cool enough to eat, but still warm and soft on the interior, with a cheesy, slightly spicy aroma coming from it. The best way I can describe the flavour and texture of this pie is that it reminded me of what the top layer of a well baked lasagna tastes like, only softer. I'm not sure if what I made is what Scaccia is supposed to be like, but this tastes fantastic just the way it is. A few photos of the procedure and results below.

All the best,

Franko


Franko's picture
Franko


A few weeks back I went looking to find a source for Fancy or Extra Fancy Durum flour here in B.C. or Western Canada but drew a complete blank with all my usual local retailers. Durum Atta flour for chapatti and other Indian baking is readily available but the x-fancy is nowhere to be found...at least for now. Fortunately breadsong http://www.thefreshloaf.com/user/breadsong  was able to give me a hand and put me in touch with one of her contacts at Giusto's in San Francisco who was quite happy to fill my 1 bag order. The shipping cost was fairly steep, but now at least I had 25lbs of beautiful, finely milled durum flour that I could use while I try to source something a little closer to home. One of the several breads that I wanted the flour for is a recipe from Maggie Glezer's 'Artisan Baking' called Tom Cat's Semolina Filone. David Snyder as well as many others on this forum have posted on it, but it was David's post of his bake of this bread that really inspired me to give it a try. Link to David’s post below:

http://www.thefreshloaf.com/node/8114/tom-cat039s-semolina-filone-maggie-glezer039s-quotartisan-breadsquot

I won't go into a step by step of the procedure since David has already covered that thoroughly in his post, with our methods and experiences with the dough being almost identical. The one notable difference being that I didn't find I needed to add any extra flour because of the dough being “gloppy” during the initial mixing. This may be because I was using a blend of Canadian AP and Bread flour, likely with a higher gluten content than the KA-AP that David used.

This is a really nice dough to work with and an easy mix by hand for the quantities given in Glezer's formula. After a 3 hour bulk ferment the dough is soft, supple, and very extensible with it's 33% prefermented flour from the poolish allowing for easy molding. Very similar to a baguette dough I thought, and something I'll try molding this dough as in future mixes. There will certainly be future mixes since this is a great tasting bread in all respects. I love toasted sesame seeds, so any bread covered in them is going to taste wonderful to me, but the crumb and crust just on their own work perfectly together, creating a good crunch from the crust with, to borrow one of David's terms, a nutty flavour. I didn't notice the nut flavour so much in the crumb as he did, rather I found a very slight acidity highlighting the mixed grain flavours. I know that several folks on this forum have noted the lack of flavour that durum flour has but whatever contribution it makes overall to this formula surely must be positive. The texture of the crumb is almost feathery soft but has good chew somehow as well, which surprised me. Again, possibly a factor of the flour combination used in this mix, and not something I'd want to change in future mixes. This bread being a natural for open faced sandwiches with fresh tomato and cheese or dry salami and pepperoncini with a little EVOO drizzled over, that's exactly what I had for a very enjoyable lunch this afternoon.

Franko


Franko's picture
Franko


Late last week my wife and I were invited to my step-son and fiance's new home for a 'get acquainted' Sunday dinner with her parents and grandparents, so I thought it might be a good idea to bring a loaf of something or other to contribute to the meal. We've met them all previously but not knowing their tastes I decided to go with a bread using poolish rather than a sour levain style bread, settling on Hamelman's Pain Rustique which uses 50% prefermented flour in the formula. The poolish was made on Saturday night and sat for almost 12 hours before being mixed with the other ingredients after a 30 minute autolyse, producing a very slack dough similar to Ciabatta. After 40 minutes of bulk ferment it needed some stretch and folds in the bowl before being able to develop it on the counter using the slap and fold technique. The dough had two stretch and folds over the course of the next hour with a small addition of flour to tighten it up to a point where it could hold a loose shape, then divided into 2 unmolded rectangular shaped loaves, placed seam side up on floured linen for a final rise of 30 minutes. I had a bit of difficulty flipping the first on to the peel and it deflated slightly, but the second loaf held it's shape during the transfer. The loaves were given a single slash and baked at 460F for 35-40 minutes with a spray or two of water during the first 5 minutes. It's been a while since I've baked an all wheat dough and I'd almost forgotten how wonderful it can smell while it's baking, especially when it has a good percentage of poolish in the mix. The first loaf came out the way I expected it would, looking worse for the poor handling during transfer, but the second made a nice loaf with a bit of an ear along the slash. Everybody seemed to enjoyed it for it's open airy crumb, chewy crust, and that it paired so well with the delicious saucy braised short ribs our future daughter in-law had made for the main course of the meal. I've been eating sour rye bread of one type or another since the beginning of the year so this was a welcome change for it's fresh wheaty flavour and light porous crumb, and one that I'll be making again in the months to come.

I'm afraid the crumb shots are a bit too yellow due to light conditions and the flash on my phone camera. The actual colour was a creamy off white.

Best Wishes,

Franko


Franko's picture
Franko

The loaf in the photo above is from a formula of my own that I've been playing around with for weeks now, trying to get a result I could live with. Finally after several previous unsatisfactory bakes, this latest attempt produced something close to the loaf I've been trying for from the beginning. The bread is a Country Style Rye with a mixed grain soaker and a levain, so nothing that hasn't been done before in many ways over many years by other bakers. Last week I made the dough and baked it in the Dutch Oven, and although it tasted fine I wasn't thrilled with the appearance. Photo below of last weeks effort.

The scoring was poor and it spread too much from what I believe was a combination of too long a final rise and too much initial steam generated from baking in the DO. That's my best analysis at any rate. The other problem was the formulation itself, which needed multiple tweaks to bump up the overall flavour, as well as the percentage of levain, which I'd originally had far too low . With the help of a spreadsheet I'd managed to put together a few weeks prior, adjusting the formulation was a quick and easy process compared to doing it the old way. More about the spreadsheet further down.

This latest bake went fairly well compared to the last, getting a good even jump in the oven, with the slashing opening up nicely minus any unsightly splitting or tearing. The colour is a bit darker than I'd prefer but with the high hydration of this loaf I thought it best to bake it as boldly as possible. The crumb is moist, dense, and flavourful, having what I'd call a medium sour tang to it. It's certainly a work in progress but it's getting there somewhat.


Making a bread formulation spreadsheet was something I'd promised myself to take a stab at sometime this year, having seen what a useful calculator they can be for adjusting formulae or quantities quickly and accurately, from using a few that my friend breadsong,http://www.thefreshloaf.com/user/breadsong had sent me late last year to try out. Being a complete newbie to this sort thing, it was a bit of a tough go in the beginning, but fortunately I had lots of expert guidance from breadsong while I plodded my way up the learning curve of making this spreadsheet . I can't thank her enough for all the tips and guidance she shared so generously with me throughout this project. This is just a very simple spreadsheet that calculates a desired final dough weight based on percentages. It's been formatted to look as close to a typical recipe layout as possible so that people who are unfamiliar with using a spreadsheet will hopefully find it easy to use. For anyone wanting something with a lot more functions and input, this one of mine will disappoint, but here's a link to Dolph's sheet that looks like it will do just about anything you could want.

http://www.starreveld.com/Baking/index.html .

Another one you might try is from joshuacronemeyer's recent post of his nifty Dough Hydration Calculator.

 http://joshuacronemeyer.github.com/Flour-and-Water/

For those who'd like to try out this one of mine, the sheet for the formula as well as the procedure are available through links at the bottom of this post. Please note that the spreadsheet file is only available by downloading it from the links provided. No email requests please. The links will take you to a Google Docs page that shows the spreadsheet with the recipe. You can use the recipe as is from the G Docs page or you can download your own copy of the file in either Excel or Open Office by clicking on 'File' , 'Download as', then select a file format (for most people it will be Excel) and it will download a functioning copy of the spreadsheet . Now it can be used by inputting your own desired dough weight in the yellow shaded cell, or change any of the numbers in the green shaded cells of the percentage column to suit your preference. The format can be saved as a template and used for other formulas as well.

Best Wishes,

Franko

Below are links to the sheet and the procedure

https://spreadsheets.google.com/ccc?key=0AjicIp92YPCTdHRDZTJmTm4zamxPM3JZWmJYVUZ0WVE&hl=en&authkey=CMDqqDM


https://docs.google.com/document/d/1SlOG7r_cdHlHEn0YwB0GgwhaCGSIgpjyPqpiDmu56Eo/edit?hl=en&authkey=CL2S_bEO#


Franko's picture
Franko


Last week I had the idea to make some sticky buns on my days off, not only because I enjoy them and have them so seldom, but also I wanted to contribute something to this long neglected blog of mine on TFL. The problem was I wanted to do something a bit different from the usual cinnamon and walnut/pecan variety of sticky bun. Often a flavour combination will come to me right away, but not this time, so I put it on the back burner knowing I'd eventually come up with something promising. Earlier this week I hit upon the idea of using pineapple in the buns, inspired by memories of one of my childhood favourites, the classic Pineapple Upside-down Cake, with it's delicious combination of caramelized sugar and pineapple. As far as a different type of nut to use, macadamia nuts were my first choice for their lovely subtle flavour and texture, and with ginger replacing cinnamon for the spice component of the buns. The dough itself is based largely on the Sweet Roll Dough from AB&P, but using whole milk instead of powdered , and increasing the percentage of yeast, as the osmotolerant yeast called for in the AB&P formula isn't readily available to me. Instead, I used the percentage (6.6%) that Jan Hedh calls for in his Sweet Bread formula from 'Swedish Breads & Pastries' . All of the formulas will be included in links below for anyone who'd like to try this variation on an old favourite for themselves.

Procedure:

The makeup is similar to sticky cinnamon buns , but you will need some rings of tinned or fresh pineapple as well as some chunks for the the filling. The rings are cut in half, each half going into a small foil tart pan that's been smeared liberally with Sticky Bun Glaze. Place a half maraschino cherry cut side up, inside the inner semicircle of the pineapple and sprinkle some chopped nuts on the other half of the foil.


This can be prepared while the dough is chilling in the fridge. When the dough is well chilled it can be rolled out to a thickness of 3mm/1/8in and approximately 41cm/16in wide. Brush the entire piece of dough with some of the syrup reserved from the pineapple, or water, then sprinkle the ginger sugar evenly over the entire dough except for the bottom 50mm/2in . Apply small chunks of pineapple and chopped nuts over top of the sugar so that the dough is evenly covered to the borders.


Roll the dough up as you would for cinnamon rolls.

and slice into 115gram pieces, placing each in the prepared foil pans. Let rise for 45-60 minutes at room temperature and place 4-6 foil pans on a sheet pan at a time per bake, keeping the others in the fridge, and bake in a preheated 385F oven for 20-25 minutes. Once the buns have a light to medium brown colour remove them from the oven and turn them upsidedown onto parchment paper.

Note: Please be careful when doing this, using gloves or tongs to prevent a hot sugar burn.

Allow to cool for 1hr or longer before serving. This is easier said than done apparently in my case, since I was only able to last about 40 minutes before trying one out. The buns have a beautiful soft crumb that soaks up just enough of the glaze to impart the caramel flavour in every bite. It's everything you'd expect from a sticky bun and a nice variation on a traditional favourite.

Below are the links to the recipes used . The first is for the Sticky Bun Glaze, the second for the Sweet Bun Dough


https://docs.google.com/document/d/1JwgUSohf6Bu0JbjBuUHfG3JeFfebCX0qd4COlbEz6ag/edit?hl=en&authkey=CJjpy74B


https://docs.google.com/document/d/1nlQFe1H7lz_CDKfcfnLuBKmRW8Bs3DEJbgk7a_n_NhI/edit?hl=en&authkey=CKCOsJwB

Cheers,

Franko


Franko's picture
Franko


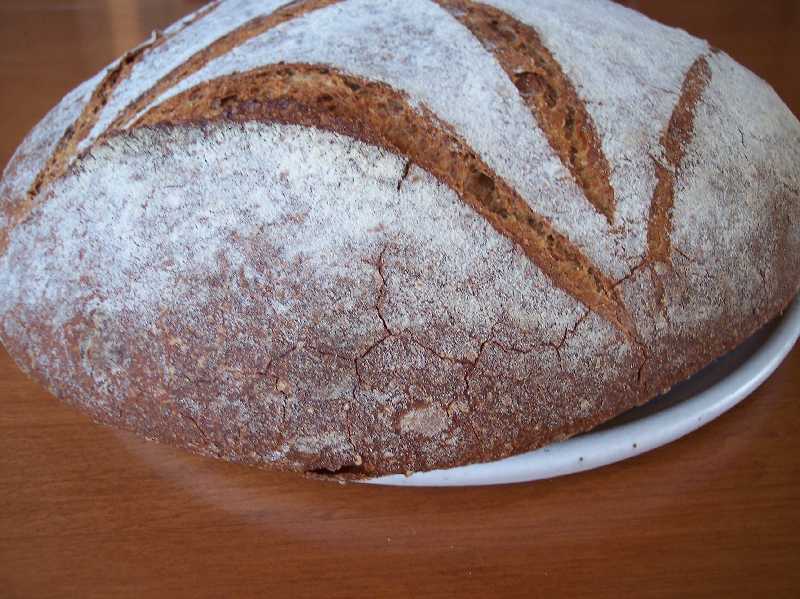
This bake started out with two things in mind. I wanted to make an 80% sour rye bread and to bake it in my Pullman pan, which I’ve used only once since I bought it this past summer. While I was looking through Hamelman's 'Bread' for a recipe to use, I stopped on the photo page showing the assorted rye breads from Chapter 6, and not for the first time thought what a marvellous display of craftsmanship it was. The one in particular that has always stood out among the others for me is the Pullman loaf at the back, sitting vertically with a series of diagonally crossed slashes the length of the loaf. I've wanted to try that slashing pattern ever since seeing it, so now I had a third thing I wanted to do, but first I needed to find a recipe to use. Unfortunately the photo in the book doesn't say what particular bread the Pullman loaf is. The only rye in the chapter other than the Horst Bandel Pumpernickel that calls for a Pullman pan is the 70% Rye with a Rye Flour Soaker and Whole Wheat Flour, and that didn't fit with what I had in mind. I decided to make Hamelman's 80% Sourdough Rye with a Rye Flour Soaker, but to make it using only natural leavening rather than the combination of sour and bakers yeast called for in his formula, and to substitute dark rye for whole rye in the soaker and final mix. Somewhere along the line I decided to throw some toasted sunflower seeds into the mix as well for a bit of added flavour and texture.

When I was making the sour/levain the night before the final mix and looking at the tiny little portion of mature sour expected to convert all that raw rye flour into the only source of leavening for this bread, I must admit I had some doubts. 18 hrs later it was clear that I had underestimated just how active my starter was. It had just about popped the lid off the container, looking more like a ripe, dark, poolish than any rye sour I've made before. Simply amazing how voracious natural yeast can be in the right environment.

Three hours before the final mix the seeds were toasted in a 350F oven for 10 minutes before I checked them for colour. I was looking for a medium to dark colour to bring out a rich nutty flavour, which I think is a key component of the overall flavour of this loaf. The time will vary for different ovens, but the smell and colour of the toasted seeds is the best indicator to watch for.

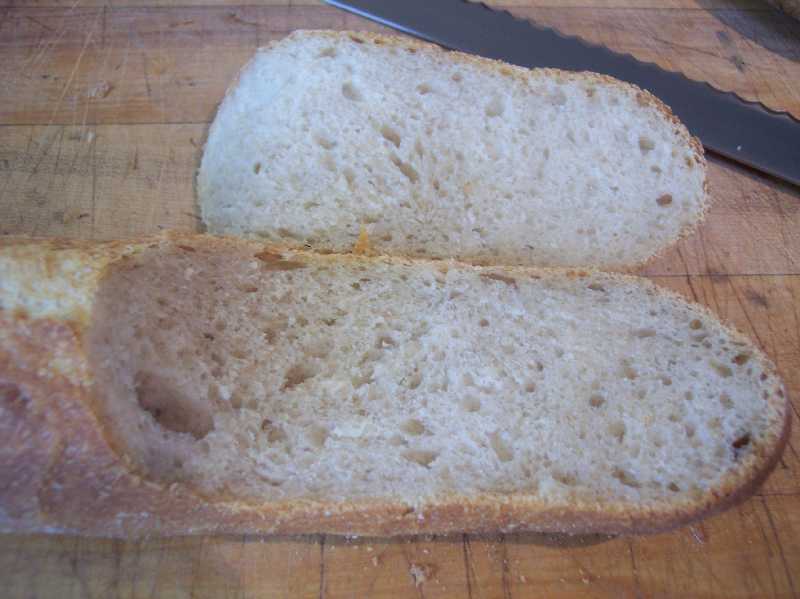
The mix was started in the stand mixer and finished by hand. In retrospect I should have done the entire thing by hand and saved myself the trouble of cleaning sticky rye paste out of every possible space it could get into on my mixer. It was just too large for my small KA to handle properly through to a finished mix, but it did get it off to a good start, needing only 2-3 minutes of handwork to develop it into a cohesive paste. Final ferment, rise and bake notes are included in the recipe to follow. Molding the bread into the pan properly is a fairly critical step to have a symmetrical finished loaf, and I spent enough time with this stage to ensure the baked loaf would be level on top and that the corners would be as even and square as possible. One thing I should point out to anyone who might make this loaf or something similar. When you place the paste in the pan, make sure that the bottom and sides of the paste are dry by blotting off any excess water from the initial molding with a towel of some kind. I didn't, and had a bit of a sticking problem in one spot when it came time to unmold the loaf. Once it had cooled a bit, along with some very gentle persuasion, it did release cleanly, but a word of caution on this point. The loaf was set to cool, wrapped in linen, for 16 hrs before slicing.

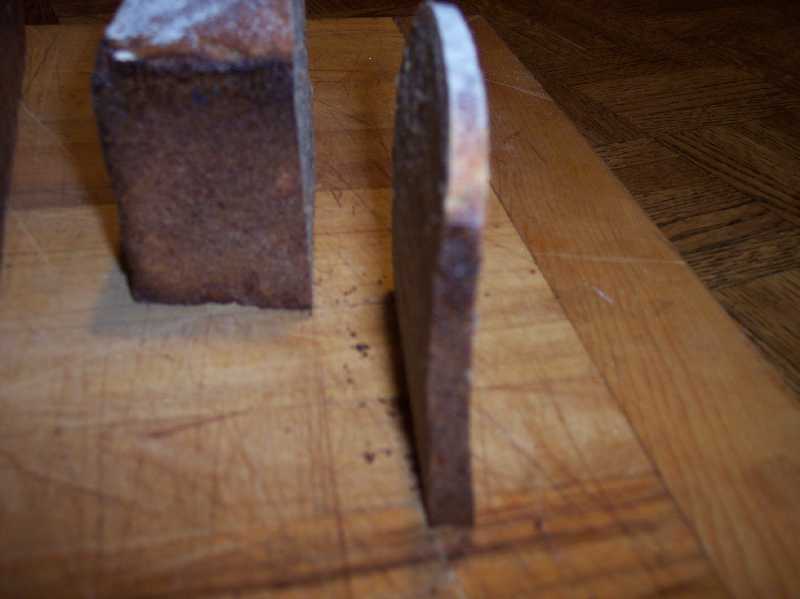
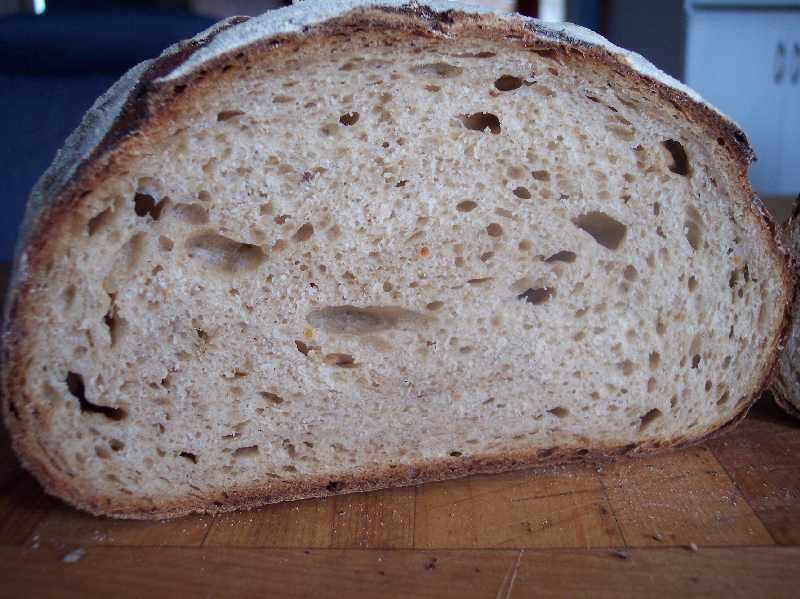
I have to say this is the best tasting hi ratio rye bread I've made so far, largely due to the sour itself, but also how well the flavour of the toasted seeds compliments not only the sour, but the dark rye flour. A thin slice of this bread has that level of flavour that lasts in the mouth for the better part of an hour and makes you want to come back for more. The crumb itself is moist and dense, and even after 6 days shows no sign of staling, due to the soaker and pan baking I'm sure. The bread is a dream to slice, yielding slices just about as thin as you could possibly want them without crumbling. Although I didn't get the nice definition on the slashing as pictured in Hamelman's 'Bread' it's a fact I can easily live with when the bread tastes as good as this one does. My favourite rye? No doubt in my mind this one is it for quite some time to come.

Franko


80% Sourdough Rye with a Rye-Flour Soaker and Sunflower Seeds-adapted from Hamelman's 'Bread'


Ingredients

%

Kg/Grams

Sourdough/Starter


Whole Rye Flour

100

390

Water

83

315

Mature Sourdough Rye culture @ 100%

5.1

20

Total


725


Soaker


Dark Rye Flour

100

200

Water-boiling

118

236

Total


436


Final Dough


Dark Rye Flour


200

High Gluten flour


200

Water


197

Sea Salt


20

Soaker


436

Sourdough


725

Toasted sunflower seeds


90

Total weight


2143


Overall Formula


Whole rye flour

40

400

Dark rye Flour

40

400

High gluten Flour

20

200

Water

72

720

Salt

1.8

18

Sunflower seeds

9

90


Notes: The total weight of this mix is scaled a little heavier than what you need for a 13x4x4 Pullman pan. Scaling weight for these pans is 2.050kg. Because the dough is very sticky, I found I lost some of the dough to my hands, paddle etc. The final weight of this formula should be more than enough to compensate for that. Scaling weight for the bread pictured was 29 grams short of 2.050 .


PROCEDURE:

Before final mixing:

Mix the sourdough and leave for 17-18 hours to ripen at 65-70F.

Next mix the soaker, cover with a lid or plastic wrap and leave over night at room temperature.


Final mixing:

DDT -80F

Mix all the ingredients except the sunflower seeds on 1st speed for 3 minutes. Adjust the hydration so that the mix is loose and sticky.

Add the sunflower seeds and mix on 2nd speed for 3 minutes. The mix should resemble a paste rather than a typical wheat based 'dough'. It should be soft and sticky.


  • Depending on the size of the mixer you may need to turn the dough out on to the counter and finish mixing by hand. If so, have your hands wet, and use a scraper to help fold the dough over itself several times until it's uniformly mixed.


Place in a bowl, cover, and let bulk ferment for 30 minutes.My dough was cool after mixing and at 74F. It was given a slightly longer 45 minute bulk ferment.


Shaping:

Using wet hands, form the paste into a log and place in the pullman pan.


  • the pan I used has only been used once previous and the glaze is intact. Because of this I didn't oil or dust the pan with flour. My preferance is that the sides of the loaf look smooth and free of flour if possible. With an older pan it should be either oiled and dusted, or lined with parchment to prevent sticking.

Press the paste into the corners of the pan with wet hands, then using a wet plastic scraper pressed flat on top of the paste, press down firmly, working the paste so that it's even along the edges of the pan on all sides. Try to get the corners as square as possible and then use the scraper to smooth and flatten the top so that it's level across the entire surface.


Final rise and baking:

Final rise of 2- 2 ½ hrs at 70-72F, covered with a clear plastic box if possible or a plastic sheet. Keep the paste damp on top if needed by spraying with water. The bread does not need to be scored, but if scoring do it just a few minutes before loading in the oven to allow the slashes open cleanly.

Bake at 465F for 15 minutes then at 435 for 45 minutes. The loaf should have pulled away from the sides of the pan, similar to the way a cake does when it's baked. Allow the loaf to cool in the pan for a few minutes before tipping it out. Cool on a wire rack, wrapped in linen, for 12 hrs before slicing.


Franko's picture
Franko

This bread took a few weeks from first concept to final bake but I'm glad I hung in there to get what I think is a good bread with a savory flavour and aroma. I'd been wanting to make a sour onion rye bread for a while but couldn't find any recipes that really appealed to me. As I was leafing through Jan Hed's 'Swedish Breads and Pastries one day I found a recipe for a Pain Dijonnaise that included mustard in the formula, something I hadn't considered using till this point but thought that adding some mustard along with caramelized onions in a sour rye would be an excellent flavour combination. I had a bake planned for the following day of a Pain de Campagne using a wheat levain so I decided to split the mix and use the onion mustard combination in one loaf to see how the flavours worked in a finished loaf. While it turned out OK it didn't have quite the punch I was looking for, lacking the intensity of overall flavour I was after, but promising nonetheless.

If I was going to make this properly I needed to start a new rye sour from scratch since the one I had wasn't a pure rye sour anymore from letting wheat based sours gradually creep into it over the last year. It took a few tries to finally get an active starter going, but that eventually worked out by keeping it wrapped in towels on top of the hot water tank, the one consistently warm spot in our house during the day while we're away at work.

When I got home from work this past Saturday I mixed the levain/sour for the next days mix leaving it to ripen over 17hours, and then getting the caramelized onions prepared as well as roasting some mustard seeds to include in the mix. The formula I'd worked out would use a dark rye sour, combined with medium rye and bread flour in the final mix, not wanting to overpower the final flavour with any more dark rye and hopefully allow the onion mustard combination to have it's say. Once I had everything in the mixer and started mixing I realized right off that I'd have to add more bread flour to get any sort of a workable mix, using an additional 100 grams to achieve a wet but manageable dough. The rest of the mix went fine after that resulting in a soft but developed dough. Formula, mixing notes, and bake profile to follow.

Once I had the bread out of the oven I had some serious doubt as to whether it was fully baked since it just didn't sound right when I tapped the bottom of the loaf. I don't normally check the internal temperature, but because of the size of this one I thought it would be wise. The reading showed 209.5F from the center so I put my trust in that and hoped for the best. When I sliced it this morning I found that it was fully baked except for one very small area in the bottom center that's barely noticeable. The crumb is chewy and moist, with a solid flavour of sweet onion, a bit of sharp from the mustard, and a pronounced sour character overall. The onion itself seems to have almost completely dissolved into the dough, but now and again you hit a pocket of lovely roasted onion flavour ...which I wish there was more of. Next time I bake this I'll increase both the onion and the mustard percentage, but for now I'm fairly satisfied with the result.

Franko

If anyone was wondering what this bread might be used for, the photos below show what I had in mind for it right from the beginning.

Montreal smoked brisket sandwich

Vancouver Island smoked sockeye salmon on toasted onion rye with onion and capers....and yes, no cream cheese!

PROCEDURE:

  1. Mix the levain/sour and let sit for 16-18 hours at 70F

  2. Add all the ingredients of the final dough *except the levain/sour to a stand mixer bowl and mix on 1st speed for 2-3 minutes until combined, then add the levain/sour and continue mixing for 2-3 minutes longer, scraping the bowl down as needed. The dough will be sticky, and show little development.

  3. Transfer the dough to a large mixing bowl and begin folding the dough over itself, rotating it a 1/4 turn for each fold and continue till the dough is cohesive and moderately developed. The dough should be soft and supple.

  4. Turn the dough out onto the counter, and using a minimum of dusting flour continue working the dough, kneading it for 3-4 minutes until the dough can hold a shape without slumping.

  5. Place the dough in a lightly dusted bowl and cover. Bulk ferment at room temp of 68-70F for 2 ½ hrs. Stretch and fold twice in the first two hours.

  6. Gently preshape in a ball, cover and let rest for 15 minutes.

  7. Shape as desired , cover, and final proof for approx. 1 ½ hrs at room temperature.

  8. Preheat oven and baking stone to 485F and have steaming system prepared in advance of loading the bread.

  9. Slash as desired, *note: if making a batard, a chevron style of slash will help give the loaf a higher, rounder, finished profile.

  10. With steaming system in place, load the bread onto the preheated baking stone and bake for 20minutes at 485F. Remove the steam system and lower the temperature to 440F and continue baking for 20 minutes, then lower the temperature to 400F for an additional 15-20 minutes. Check for an internal temperature of 210F. Turn off the heat and leave the bread in the cooling oven for 15 minutes. Remove and cool on a wire rack for 8-9 hours or overnight before slicing.

Notes:

Caramelized Onion

Two large sweet onions, coarsely sliced and mixed with the olive oil, then baked in a covered pan at 250F for 30 minutes. Remove the lid, stir the onions and continue baking for 30 or more minutes until the onions are a medium brown colour. For a future bake of this bread I would increase the ratio of onion to 35% and the mustard to 10% of the overall flour in the mix for a more pronounced flavour effect.


Sour Rye with Caramelized Onion & Mustard


Ingredients

%

Kg


Levain/Sour


Dark Rye Flour

100

140

Water

83

115

Mature rye starter-100%

10

13.9

Total


268.9


Final Dough


Medium Rye flour

18.75

150

Bread flour

81.25

750

Levain

29.8

268.9

Sliced sweet onion-cooked

25

270

Olive oil

2.1

22.8

Sea salt

1.8

19

Honey

4.9

52

Grainy mustard

6.2

65

Mustard seeds-toasted

1.4

15

Water

65

590

DDT- 72-74F


Total kg


2202.7

Total flour weight

100

1046.9

Total Hydration

67

705

Franko's picture
Franko


Earlier this month I decided it was time to start over and build a brand new rye starter for myself since my old one had become adulterated with various types of wheat flour over the last few months and I wanted a pure rye sour to use in some upcoming projects I have in mind. I'd hoped it would be ready by this weekend but it's seems the pH went out of balance over the last few days making it not quite ready for prime time. The cupboard was bare for bread and I needed something for the next days sandwiches so I thought I'd just make something using a poolish that I could leave overnight and mix up for a dough the next morning. My first thought was to make a baguette dough with the poolish, inspired by Larry's recent post of what he called his “odds and ends” http://www.thefreshloaf.com/node/21724/odds-amp-ends as well as LindyD's terrific post of the Hamelman series of videos that took us through the entire process of baguette production. http://www.thefreshloaf.com/node/21730/video-lessons-master-baker-Jeffrey-hamelman

The problem with that kind of dough for me is that while I love the flavour of baguettes, I'm not keen on having a wide open cell structure if I'm making a bread to be used for sandwiches, nor did I want a long skinny loaf. What I ended up doing was using more or less the same ingredients and percentages for a baguette dough but reducing the hydration and adding some of my dormant rye sour to the final mix for a bit of extra flavour. Honestly I'm not sure what to call this bread other than rustic or hearth style, which is fine with me since the name is less important to me than the end result. I'd intended to make two large loaves from the dough but when it came time to divide it I decided to make some baguette shapes after all, just for fun and to get some shaping practice in at the same time. In the end I wound up making 2x 250gram and 1x500 gram baguette shapes and the remaining dough as a simple hearth style loaf. The two small baguette shaped loaves turned out OK, but the scoring and final proof on the larger one left a lot to be desired. The hearth loaf had a good jump and formed a nice crunchy crust with Sylvia's steam system providing plenty of steam during the initial bake. The bread has a nice balance of flavour, with the malt and rye sour doing a kind of sweet and sour thing that works well with the nutty wheat flavour of the Red Fife poolish. The crumb is what I hoping for, with no large holes and fairly uniform, so while it's not close to being a baguette type of crumb, it did make for a good sandwich bread which is what I was after from the beginning.

Franko


Hearth Style Bread with Red Fife Poolish

Ingredients

%

Kg


Poolish


Red Fife 75% sifted flour

100

316

Water

100

316

Yeast-instant

1.5

4.7

Total


636.7


Final Dough


All Purpose flour

100

800

Water

45

360

Rye sour-inactive

6

48

Yeast-instant

1

8

Salt

2

22

Malt syrup-diastatic

1

8

Poolish

79

636.7

Total-Kg


1882.7

Total Hydration

60.5


PROCEDURE:

Mix the poolish and ripen for 12-16 hrs @ 65F


Mixing by machine:

Add all ingredients to mixing bowl and mix on 1st for 3 minutes then 2nd for 3-4 ½ minutes. DDT-76F

Mixing by hand:

Add all ingredients to mixing bowl and mix by hand for 10 minutes until you have a soft, slightly loose dough. DDT-76F Note: a slightly higher water temp should be used to make up for lack of friction heat from hand mixing v machine mixing.


Bulk Ferment-2 hrs. Fold once after 1 hr, repeat if needed for proper development.

Divide in 250 grm pieces for small baguette shapes or 500 grm for large baguette shapes, the remaining dough for batards. Preshape in rounds and rest for 15 minutes.

Shape accordingly and proof for 1-1 ½ hrs. Score as desired.

Bake at 480F with constant steam for 10 minutes. Remove steam apparatus and lower oven to 440 and continue baking for 10-15 longer for baguettes , 20-25 minutes for batard. Cool thoroughly before slicing.


Franko's picture
Franko

A plate of pastries

January has seen me doing more reading about baking than actual home baking due to three new additions to my book collection. Advanced Bread and Pastry-Suas, Breadbaking-An Artisan's Perspective-DiMuzio and Swedish Breads and Pastries-Hedh are all fine books to own and I've been enjoying them immensely over the last few weeks for their technical information and variety of recipes and methods. AB&P is easily the best text on baking in general that I've ever read, making it my 'go to' reference for some time to come I imagine.


Well eventually the time comes to put the books down and get back in the kitchen for a little practical application, so it was welcome that early last week my wife Marie asked me if I could bake a few pastries or muffins for a breakfast meeting she had scheduled with some of her colleagues at the college where she works. Nothing large or too fancy just something to nibble on during the meeting. I decided I'd make the Danish dough with Sponge from AB&P, along with some apple turnovers and a few carrot muffins for anyone wanting something a little less rich. The carrot muffin formula I've always used is one from my old trade school text and is still one of the best tasting and easiest versions of this muffin I've run across yet. Recipe to follow. The puff pastry for the turnovers was made earlier last year and the last piece of it has been taking up space in the freezer since, so I was glad to have an excuse to finish it off at last.  As for the danish dough, it's been ages since the last time I made one but this mix went well, the only changes being that I used AP flour (the closest to white bread flour I had on hand), added some ground mace to the mix and increased the overall ratio of butter from 31% to 35%, requiring me to give it an extra fold for a total of four single folds. Whenever I've made danish dough in the past it's always been done using the straight method of mixing, so the sponge is an extra step to make, but worth it for the flavour boost in the finished product and one I'll use in any future danish mixes. While I didn't get anything near as flaky looking as what's pictured in the book, it did make a very passable danish with a nice soft crumb and plenty of flavour from the butter and preferment. For me, taste testing danish is an exercise in restraint, and a good reminder of why I rarely make this pastry for myself. I did manage to keep it reasonably (Marie laughing in the background) analytical....this time, however the real test will be this summer when we'll be taking a river cruise on the Danube through Austria, Slovakia and finally to Budapest. Something, or more accurately someone, tells me I'll be eating nothing but rice and vegetables for a long time after that vacation is over.

Franko

75 gram carrot muffin

blueberry and lemon twists

chocolate and hazelnut rolls

small apple turnovers

Danish Dough with Sponge-adapted from AB&P

Ingredients

%

Kg

Sponge Formula


Bread Flour

100

214

Water

62

131

Yeast-instant

0.1

4

Mix all ingredients with a DDT of 70F Ferment 12-16@ 65F-70F


Total


349

Final Dough


Bread Flour

100

500

Milk

40

200

Eggs

16

114

Sugar

17

121

Mace powder

0.2

1.4

Salt

1.8

13

Yeast-instant

1.8

13

Butter

4

28

Sponge

69.8

349

Butter for roll-in

31

221


PROCEDURE:

Mix all ingredients for final dough on 1st sped for 5 minutes and on 2nd speed for 3 minutes to a DDT of 72F-77F. Bulk ferment for 45-60 min. Laminate 4x single fold resting 30 minutes refrigerated between folds and final make up. Proof final product for 1.5-2 hrs. Bake at 385F 10-12 minutes


Carrot Muffins

Ingredients

%

Kg

Kg

Cake Flour

100

300

150

Vegetable Oil

100

300

150

Baking Soda

1.1

3.2

1.6

Baking Powder

1.3

4

2

Sugar

77

230

115

Eggs

72

216

108

Salt

1.6

3.2

1.6

Cinnamon

1.1

3.2

1.6

Carrots

128

300

150

Raisins

40

120

60

Walnuts/Pecans

20

60

30

Total


1539.6

769.8

PROCEDURE:

Sift flour and baking soda, add salt and reserve.

Blend all but flour mix, raisins, nuts. Mix well.

Add dry ingredients and mix on 1st speed to incorporation, then an additional 30 -60 seconds.

Fold in raisins and nuts.

Let rest for 10 minutes, then scale 60g per muffin cup.

Bake at 380 for 15-18 minutes


Franko's picture
Franko


The Last Loaf of 2010

Earlier this month I made a trip down to Cowichan Bay to visit True Grain Bakery and to pick up 30K of Red Fife flour that I'd ordered for breadsong http://www.thefreshloaf.com/user/breadsong a fellow B.C. Resident and TFL member, and myself. Cowichan Bay is a small, rustic seaside village with a fair number of various shops and restaurants lining the sea side of the main drag, and is a popular tourist stop here on Vancouver Island.  The bakery itself has a funky eclectic look to it that is totally in keeping with the general ambiance of the village, with lots of bric a brac and paraphernalia decorating the walls. The staff were all very helpful and friendly, greeting me almost as soon as I walked through the door. When I told them I was there to pick up some flour that I'd ordered, the miller himself came out from the adjacent mill room with our flour and thanked me for the order, and asked if there was anything else he could help me with. Two weeks earlier I'd sampled some of their fabulous Christmas cake at one of our local craft fairs so I asked him to put one of those on the bill as well. After I'd settled the bill I asked if I could take a few pictures of the shop while I was there. He told me that'd be fine and allowed me access to the mill room so I could get a few shots of the mill setup.  I took a few photos of the bread display as well, but by now the small shop was filling up with customers, making it difficult to get any decent closeups of the breads. I can tell you that from what I saw of the breads it's all very good looking product, obviously made with a lot of skill and attention to detail. 

I'm looking forward to my next visit to True Grain,which will probably be in early Spring 2011, depending on how quickly breadsong and I go through our flour. Hopefully I'll be able to get some pics of the production area and the ovens at that time.


When breadsong and I were messaging each other to set up the arrangements for shipping and payment for the flour, she raised the question of whether the 75% sifted RF that we ordered would be considered a high extraction flour. At the time I wasn't entirely sure as I've never had occasion to use it either on the job or at home. After a quick search I found that high extraction flour lies between 75% and 100% . The best information I found was on Joe Sloan's 'Hamelman Challenge' Blog where he explains what high extraction flour is exactly and provides a conversion formula so that you can blend your own.

http://hamelmanchallenge.blogspot.com/2010/06/tech-note-high-extraction-flour.html

I've also noticed since then that Hamelman provides a description and formula as well in his side notes to the Miche recipe.

I sent breadsong the link and she ran the numbers through her Exel spreadsheet and sent me the results the next day. Darn good teamwork I thought.


Now that I had the information I needed I was finally ready to make a bread from Hamelman's book that I've wanted to make for a long time which is the Miche, Point a Calliere. This mix being a first run of the formula, I stuck as closely to Hamelman's recipe and instructions as possible, the major exception being that I built the levain over a 3 day feeding rather than 2 as the recipe calls for. One thing I've noticed since using the Red Fife is that it doesn't take quite as much water as regular bread flour to get a nice supple dough that's easy to work. In this mix however I stayed with the indicated overall hydration and made some minor flour adjustments during the second phase of the mix to achieve a very soft but cohesive dough that could be further developed through the fermentation and folding to follow. In total, I did a stretch and fold 4x over the course of a 2 ½ bulk fermentation,which gave it enough strength to hold a low profile shape after molding. The final proof was just a little over 2 ½ hrs and the dough weight before baking was 1.654kg /3.6 lbs and 1.371/ 3.0lbs after baking, a difference of just over 17%. The oven was steamed using Sylvia's method, and baked on the stone for 20 minutes @ 440 before removing the steam tray and rotating the loaf. Then another 30 min. @ 420 and 15 more minutes with the heat off and the door slightly open. Big loaf, long bake. I left the loaf wrapped in linen for 20hrs before I took the first slice just to let it settle and for the flavours to ripen. This bread is definitely not lacking in the flavour department, with a good sour tang, but the rich wheat taste of the Red Fife predominating overall. The crumb is chewy with some semi large holes and the crust is nice and crackly. This is one of those breads that doesn't need anything else with it to fully enjoy, but a slice of cheese or sausage, maybe a bowl of soup and a glass of red wine wouldn't take anything away from it either. Hmm, I think I just came up with what I'm having for a light dinner tonight. Some crumb and crust photos below.

Hope everyone at TFL has a Happy New Year, and all the best for 2011!

Franko


Pages

Subscribe to RSS - Franko's blog