The Fresh Loaf

A Community of Amateur Bakers and Artisan Bread Enthusiasts.

JonJ's blog

JonJ's picture
JonJ

Oat porridge breads are a bit of an enigma for me really. Sometimes, I get glimmers of that fabled custard consistency and the promise of an extra special bread. And the smell of that oat topping while baking is unsurpassed. Other times, the addition of the oats just exceeds the hydration capacity of my flours. And, even worse there is that dreaded gummy layer you get at the base of the bread if you don't bake it extra long.

"Sourlotti by Abby"  has quite a clever recipe and YouTube video with an oat and flax soaker. The nice thing about the soaker is that it uses a fair amount of butter (more than I would use if I was making oat porridge for myself!) and doesn't contain a lot of water. Plus it has flax/linseed in it!

I did tweak the recipe to make it my own, reduced the hydration to 74% and gave it a longer bake than I normally do. And I used a blend of white bread flours - the ridiculously high gluten sifted hard white mixed with a lower protein supermaket flour (to give the crust and reduce that springy gluten mouth feel). Made a lovely loaf, and this is an interesting new way to make an oat bread! I think I could have given it a little longer to ferment, but I'm so nervous with oat porridge breads having experienced what can go wrong.

Cooked soaker


Method: 1 hour autolyse. Then mixed in stand mixer for 8 minutes with liquid and pourable levain (fed the night before 1:10:10 with bread flour and 11 hours old at the time). Then left uncovered in the mixer for 15 minutes. Added the salt with a 3 minute mix, removed dough from mixer, placed on counter and gave a strong counter fold. Then left covered with the upside down mixer bowl for 15 minutes. Laminated in all of the soaker. Not sure what magic I got write with the mixer, or maybe it is just that I found the appropriate hydration for the flour mix but the gluten was just incredible and I could stretch the dough super thin - see the pic! Dough then placed in the proofer set to 26°C and two sets of coil folds were given. Final shaping was performed 6 hours after adding the levain. The banneton was then placed back in the proofer for an extra hour. At the end of that time there was a volume increase of 40%. 7 hours to achieve 40% increase is long for my starter at this temp - think perhaps that my levain was a little too past the peak, or I added the salt to soon. Banneton was then placed in coldest fridge shelf for a 19 hour retard. Whilst the oven was warming the banneton was placed in the freezer for 1 hour. Bread was baked at 240°C for 25 minutes in dutch oven covered, followed by 23 minutes at 210°C for a total bake time of 48 minutes - which is longer than my normal 40 minutes.

Lamination stretch

Never managed to stretch this thin before in lamination!

Bread loaf

JonJ's picture
JonJ

Formula


Inclusions

My daughter, who is 19, came down with covid and had lost her sense of smell the day before this bake. She asked if this bread had olives or cranberries in it! Think she's on the mend now, and has mentioned that she is starting to taste things again.

This is my first bread with sundried olives. They're kalamata olives and needed to be hand pitted before baking. The sundried olives brought a fairly pungent olive taste to the bread, not unpleasant but tasted like a strong olive oil, and a different flavour to the breads I've made with regular pickled olives. Although only 20g was used in the loaf the flavour tended to dominated, but 20g of sundried olives was around 19 olives, so its fairly concentrated.

The sundried tomato, like the sundried olives, were used 'dry' and weren't rehydrated before using. They were fairly unusual in that they weren't fully dried - they have a nice amount of moisture in them and we keep them in the fridge. So it felt right to use them as they were and they were great in the bread, but next time I'll double the quantity.

The feta didn't seem to do much. The quantity of feta probably also needs to be doubled, and next time I won't crumble as finely.

This bread was made using the food processor to develop the dough, which together with the home made proofing box seems to be becoming my new standard way to make bread.

The water, chilled in the fridge overnight, and levain (from the proofer) were initially mixed in the food processor to form a slurry. To this all the flours were added and were given two 10 second pulses and then left to 'fertmentolyse' for 50 minutes. Then a series of about 4 additional short pulses of the food processor, were done patting down the dough between each pulse to give, in total, another 15 seconds of whizzing. So, a grand total 35 seconds of food processor mixing.

The dough was then moved into the proofer, set to 26°C. Prior to lamination the salt was mixed into the dough by hand, around 1.5 hours after the initial levain mix. The inclusions were laminated in, followed by 2 coil folds. Shaping was done 5.25 hours after adding the levain, with the aliquot just under 50% increase in volume. The banneton was placed in the proofer for an additional 15 minutes before retarding on the bottom shelf of the fridge at 5°C for 15 hours. Banneton was removed from the fridge and popped into the freezer while the oven was warming, which is probably why I did the crazy scoring since the top surface was stiff and easy to score! Bread was baked at 240°C for 25 minutes covered, then 220°C incovered for 20 minutes.

Really enjoying this bread flour which is made from a sifted winter hard white wheat flour. This is my first local flour that has a decent protein percentage, around 14% apparently and it just sucks up the moisture, as well as giving that ridiculous oven spring that I've been envying. It also gives that mouth feel of a high gluten bread, that not unpleasant chewy gluten in your mouth which I've only ever noticed before from added VWG! The hard red wholemeal is a sprouted flour, got a bit chopped off in my formula but think it brought some flavour to the bread, kind of hard to tell with all the inclusions.

Scoring

Baked top view

Crumb series

Crumb detail

JonJ's picture
JonJ

Recipe in bakers guild format

Have never made a bad olive bread. And the same is also true for breads made with blueberries! And when blueberry is in the dough the bread gets a beautiful painterly effect.

Previously I've made a blueberry compote and used that in the bread, but this time around I just used defrosted frozen blueberries that were then mashed. The juice from the blueberries was also used in the bread, and because of this I roasted the walnuts so that the net effect would be that one inclusion contributed extra moisture and the other withdrew moisture from the final dough. Using whole blueberries seemed to have worked well this time, although the blueberry flavour in the final bread was a little on the weak side.

I'm still going through a phase of doing long mixes in order to develop the gluten as much as possible, being inspired by some of what Mariana said about developing gluten. The stand mixer was used on its slowest setting (which is around 80rpm) with the dough hook for a very long time until the dough was no longer puddling on the bottom of the bowl and the sides were clean. This took 24 minutes in total, but in all fairness the bread flour used was a fairly weak 11.2% protein (and actually the wholemeal and wholewheat flours were in a similar ballpark too).

After mixing the dough was laminated and coil folded, but this bread was only coil folded twice in order to not disturb the blueberry swirls.

The thing that stands out for me about this bread is that fermentation was very slow. Perhaps it was the long mixing, perhaps my levain was weak to start with, but more likely it was the change of seasons and my kitchen was around 18°C (65°F) for most of the time. When the aliquot had not moved enough after 7 hours I put the dough in the coldest part of the fridge overnight and completed the bulk the next day - when it got another 10 hours before the aliquot finally reached 50%. I'm guessing that at least for the first few hours after coming out of the fridge there wasn't much fermentation activity, and also I lose trust in the aliquot once its been in the fridge (as the smaller body of aliquot dough changes temperature more rapidly than the main body of dough).

But it all worked out in the end! I loved eating this bread and was sad to see the end of it. Just love the 'fruit breads'.

This one also motivated me to go out and buy a polystyrene box and heat mat, so that winter baking won't be so painful this year. It has already changed my baking life.

Sliced blueberry bread

JonJ's picture
JonJ

Joy Ride coffee has a YouTube channel with what, for me, are quintessential quarantine videos. Videos often have a transporting sound track, and the visuals usually include beautiful tracking shots of Romanian scenery which have transported me out of lockdown. His quest for lacy crumb has been quite 'infectious', if you'll excuse the covid pun.

In his latest video there is an appealing technique for shaping directly from dough that has been coil folded. No banneton is used.

The method relies on dough preparation that included a lamination and gentle coil folds. Good dough strength is required, with the dough proofing under tension. It can include proofing in the fridge too.

Instead of performing a traditional shaping and transfer to a banneton he does something different. Dough that is already highly fermented and has already doubled in volume (at least) is gently inverted from the dish in which coil folding was being done onto a lightly floured surface. It is then gently folded over, as you would fold over an omelette in a frying pan and sealed around the edges. It is then lifted a quarter turn by means of a dough scraper to give a shape more like a batard, and transferred onto a parchment for baking. Finally, it is left for an hour covered with a tea towel before baking, although I do wonder if this additional settling is actually required.

It makes sense that this gentle shaping with very little degassing could create a better crumb. Plus, the resultant loaf has a shape that looks more or less like a traditional batard produced using a banneton.

I played around recently making a loaf with the method, but since my dutch oven is round I added an extra manipulation for pushing the batard shaped dough into a boule shape. After making the batard shape, and working my way around in a circle, I pushed in from the side moving down to the bottom, cinching the dough to the base as I went. I used two dough scrapers for this -  taking turns with each dough scraper to free the dough scraper trapped underneath the dough. Working this way I managed to get a round boule too, but as you can see from the pictures the crumb was quite unusual - there were these elongated and vertically oriented alveoli clustered near the base, almost certainly created as an artifact from my additional step of transforming the dough into the boule shape. I suspect that if I'd stopped at the batard shape without doing that last step it would have had a more regular crumb, and been more successful.

Hope this post gives someone ideas! It is exciting to try out a completely different method sometimes. What I like about it is that it has the potential to produce a better crumb and maybe even simplify the process of bread making. The number of steps could be reduced. An it might be a neat way to make bread after an overnight counter ferment.


-Jon

After removal from Pyrex dish used for coil foldsAfter removal from Pyrex dish used for coil folds

Then folded over as you would fold over an omelette in a frying pan, and sealed around the edges.

Given a quarter turn, then rounded using two dough scrapers, as described in text.

The boule shape is retained.

The additional rounding to make a boule shape seemed to result in these vertically oriented elongated alveoli. Will try again and leave it in the basic batard shape next time as I think that will work out much better.

JonJ's picture
JonJ

So, I was inspired by Dan's post to try a new drug, errr... ascorbic acid (vitamin C) in my baking. And I also did a little bit of reading up on this site and saw that Doc. Dough recommended a much lower amount than was used in Dan's original post - 20-30 ppm of ascorbic acid.

The flours that I bake with typically have a low protein percentage of around 11.4g/100g or so, and in the past when I've tried to push the hydration too far I've ended up with flat breads, so my thinking is that the effect ascorbic acid has through  strengthening the gluten by oxidative bonds is something that could help my particular breads at the higher hydration.

By adding some vital wheat gluten, I've been successfully baking with these flours at high hydration, but the 'mouth feel of the bread' isn't the best. The bread becomes a little bit too springy for my taste, and some of that soft feel in your mouth can get lost.

As you can see from the photo above, the ascorbic acid appears to have allowed me to continue making soft bread, even at the higher hydrations, and without adding VWG. Got a great crumb at 80% hydration, even an ear.

Why I say 'appears' though is that I didn't really bake a control bread without the ascorbic acid, so this is still unconfirmed. And to be fair, my baking method pushed the dough to develop gluten quickly. This may have allowed for my flours to cope with the higher hydration. The baking method used on this bread had a lot of dough manipulation up front: after the 1 hour autolyse the Kenwood mixer was used at speed 2 for 5 minutes to incorporate the levain; then for the next 10 minutes hand bassinage was used to slowly increase the hydration from 70% to 80%; thereafter the salt was mixed in by hand, and finally after that it still needed another 5 minutes in the mixer again on speed 2 before the bowl was running clean again. So a fair amount of dough strengthening immediately after adding the levain. Never mind that a lamination was done after that to incorporate the olives into the bread. It is still an outstanding question for me then if the dough strengthening manipulations on their own were what made this bread better; or even if the vitamin C allowed them to work effectively.

Adding such a small amount of ascorbic acid in the home kitchen isn't simple. By mass, and by my math, 25 ppm of ascorbic acid means the 400g of flour used in this loaf works requires 0.01g of ascorbic acid. A 500mg vitamin C tablet was dissolved in 500g of water in a jar (see photo below). I just let it sit for two hours swirling occasionally. There were still sediments in the solution once the pill was fully dissolved, for which I made the optimistic assumption that that would be insoluble parts of the binder as I think ascorbic acid itself, even in crystalline form should dissolve into the water in a couple of hours. Only 10g of that solution was then used as part of the water added to my bread during the autolyse. The remaining 490g was not used in the bread, but I did drink half of it and boy you can certainly taste that it had ascorbic acid in the solution!

I'm enjoying the soft feel of this bread, and keep going back for more and more slices. Hopefully I'll manage to work out where this bread went right, either it isn't a fluke and the ascorbic acid trick is the reason or it may simply be that hitting it hard and working the gluten strongly from an early stage is what made all the difference.

Swirl of sediments as the tablet dissolves.

 Bread in profile.

JonJ's picture
JonJ

I'm loving making breads with this interesting wholemeal - Eureka Wholemeal. It has bits of whole kernels, or I guess you would say cracked kernels, in addition to the usual bran (and germ!). I think it behaves more like a white bread flour in my baking, the dough has nice strength and doesn't seem to be hampered by the bran and tastes very nice.

Paul has previously written about his visit to the mill here - from his review I suspect "wholemeal flour is made by recombining all of the bran" means that in this case the bran is combined back into the flour and this could be why it behaves more like a regular bread flour. Although, as Paul says "I can't imagine how a split-then-recombined WW flour would taste different than a milled-all-together WW flour when using the same wheat."

It might be a South African miller thing to make flours like this - here is another one that has some cracked kernels in it (even though it is a bleached flour) - Snowflake Nutty Wheat - "18% coarse wheat bran is added for high-fibre content". Or am I wrong and this is something that is made by millers everywhere?

This bread was made using Full Proof's method for combining two doughs via lamination. The one dough was this wholemeal and the other was a bread flour dough. Both flours are fairly low in protein, around 11%. The hydration of the doughs was the same at 75% (or 77% if you include the levain in the calc).  The boule was shaped at 50% volume growth and left to prove further until 80% growth and then into the fridge for an overnight cold retard before baking the next day.

Close up

 The wholemeal dough is on top of the bread flour dough here, prior to laminating them together. You can see some cracked kernels in this zoomed in photo.

JonJ's picture
JonJ

So, there was this thing that Don said the other day in a TFL blog post that really got me thinking. Think it was a quote from Jennifer Lathams about tweaks to the Tartine bakery method, and the thing that was said was "[...] longer includes the leaven in the autolyse and salt is not added until enough water has been incorporated to make a very extensible dough."

I think I've been doing bassinage wrong! I usually try it after the salt is already in the dough.

This weekend's loaf came out surprisingly well when I left the salt out until the end. After a one hour autolyse I incorporated levain with the machine mixer (only about 3 minutes, the last two minutes on speed 2 of the Kenwood), and the mixer bowl was staying clean after the mix and could feel the dough was already nice and taut and felt like it had some strength. Then by hand I spent ten minutes adding the additional bassinage water 10g at a time by means of what I would describe as 'circular' stretch and folds turning the bowl as I did it. And then, using the same method by hand another 3 minutes to incorporate the salt. And it worked so well. Sometimes you can tell the dough is going to bake well, and it stretched out beautifully when I laminated the olives in.

The loaf is a little darker than I wanted (probably from the 1% baker's malt) but the eating was great - sometimes the stars align and I get that great crust and soft crumb and this was one of those days! It does feel like the stars are aligning more frequently recently, but it might just be my mixer! Unless I've actually stumbled upon something that can be repeated with the mix by machine, bassinage by hand and add salt after method. Will only know next time I bake, but the old hands here are probably getting ready to tell me of even better ways to do the bassinage.

Loaf with cross scoring


The scoring was a simple cross, I didn't want to jinx things and get a flat loaf as I did let the aliquot jar show an 80% increase (shaping at 50%) and was afraid it would flatten in the oven, but oven spring was good too.

Olive bread crumb

Sliced, ready for sandwiches

JonJ's picture
JonJ

The last few loaves have been an experiment in varying the flour that is used together with a white bread flour base. All of these breads are 80% white bread flour; the experiment is in varying the remaining 20% to be either chakki atta (Indian stoneground wholewheat), unsifted wholewheat (without germ), wholegrain spelt, semolina or rye.


All breads had a hydration of 80% and were made according to the Full Proof basic open crumb recipe, however a machine mixer was used to incorporate the levain and salt. The remaining steps were true to the recipe, including lamination, coil folds and waiting for the dough to rise to a volume increase of between 55 and 85%, followed by overnight cold retard. The white bread flour used was "champagne valley" which has a protein content of 11.7% by itself, so vital wheat gluten was used to increase that protien content in order to support the 80% hydration (final protein was 14.9%). The levain used for all was 90% white bread flour and 10% rye.

Some flours were much harder to work - the spelt dough was extremely sticky. The semolina was particularly tiny, had a glossier texture than the others and made the best toast. The rye was super soft and spongy (and maybe the atta, wholewheat and spelt would fit into the spongy group too). A tighter shaping seemed to have been achieved with chakki atta and wholewheat, probably because they absorbed more water, and my personal favourite was the unsifted wholewheat, but it is hard to remember and it might have been more accurate to compare side by side rather than relying on my fallible memory of how they tasted.

All of these breads were lovely to eat, and weren't as different from each other as I'd originally figured. It has been a good learning experience knowing what each flour brings to the bread by itself, and also I realise that 20% can change the bread, but not as much as a higher percentage does and so they are all still white breads, albeit with a uniquely different twist in each case.

JonJ's picture
JonJ

Like many bakers here I've been strongly influenced by Full Proof baking. The basic open crumb recipe has worked very well for me in the past, and the detail described in Kristen's method has allowed me to get a feel for where to push the envelope with the breads that I make, although, of course this method is not for a lazy baker!

I'm also currently in the throes of developing my own approach with how to use a stand mixer in my sourdough baking. This is new to me, so thought a bread story midway along this journey would be worth writing about here.

The bake described here has some unusual features:
- the stand mixer is used to assist with the incorporating the levain  (and this involves some experimention with bassinage to mix at a lower hydration at first with an increase the hydration afterwards)
- forgot to add the seed topping just after the shaping and added it just prior to bake, so tried a seed topping together with a fancy scoring (which ultimately didn't work out)
- finally the shaping was done after a higher volume increase than normal.

The process followed is mostly faithful to Full Proof's method, with the major change being that the stand mixer was used to incorporate the levain into the autolysed dough. And almost immediately after that the mixer was again used to incorporate the salt (without the 30 minute wait normally done with the method). 3-4 minutes of mixing was done on the slowest speed (using a vintage Kenwood) with 2 hour autolysed dough to incorporate the levain, followed by another 4 minutes to incorporate the salt. The salt was mixed into some of the held back water, not one of my best ideas as I realised I had to throw it into the mixture due to undissolved salt and it took a few turns of slopping around in the bowl before it was incorporated, I could see then why folks prefer to pour the salt grains directly into the mixer. Finally, an additional 4 minutes of mixing was done to slowly incorporate the held back water to bring the final hydration up to 80% from starting at around 70%. The dough was taken from the mixer bowl and directly given a counter fold.

Thereafter the rest of the process followed was fairly faithful to the Full Proof method - with a lamination 45 minutes later, then 3 coil folds around 45 minutes apart, a period of rest until the volume increase was achieved and direct to final shaping without pre-shape. Then directly into a cold fridge for overnight retard. In other stand mixer experiments I didn't do any of the lamination or folding as the machine mixer is capable of developing the gluten well. But it was done here, mostly to see the result of what happens when you do that in conjunction with machine mixing. Call me crazy, but the lamination was so much fun to do with all that gluten!

Got stuck in an unexpected online meeting at the time I was due to do the shaping and ended up doing the final shaping about 45 minutes later than I intended to. So, the volume increase was around 85% as measured by aliquot jar rather than the 50% that I was aiming for, and it was immediately placed into a cold fridge for overnight retard and baking the following day. Quite liked the extra benefit that gave to the crumb, and still had a fairly good oven lift which surprised me.

I might keep the volume target higher like that! Or try what Benny has been doing and shape at 50% and let it sit at room temperature until the aliquot jar says something like 85% before placing the bannetons into the fridge. Not sure what difference that would make and if it would be better.

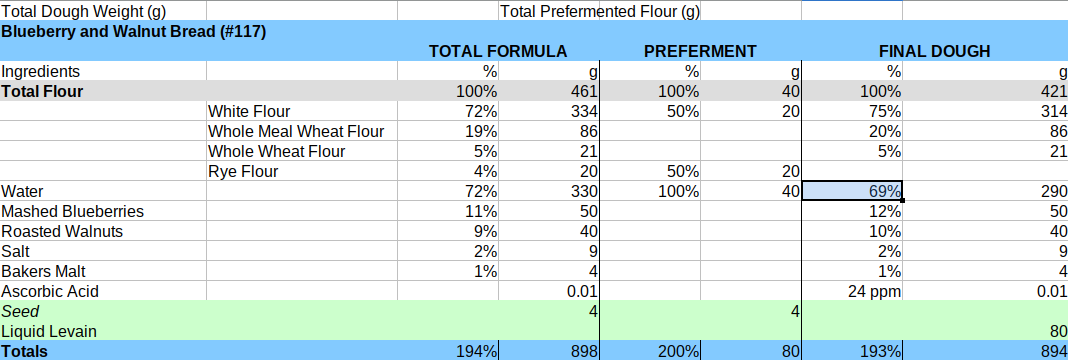
The flours used for this bake are as per the Full Proof method, 79% bread flour (I did sub some of that with vital wheat gluten as my flour is only 11.7g/100g protein; with the VWG the final protein became 14.9g/100g), 20% wholegrain (Indian Chakki Atta was used), and 1% rye which came from the levain (levain was built with 90% white bread flour and 10% rye with hydration of 100%). When I repeat this bake I intend to use 'real' wholewheat instead of the Chakki Atta - I like seeing larger bran particles in my breads and it just makes it seem more wholesome, but I can't really articulate why this would be preferable!

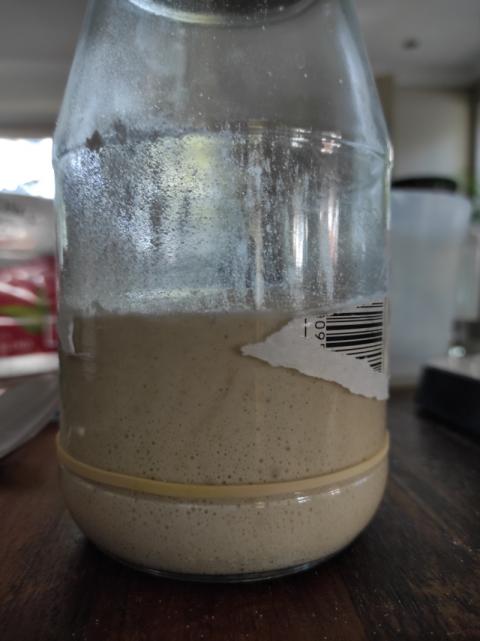
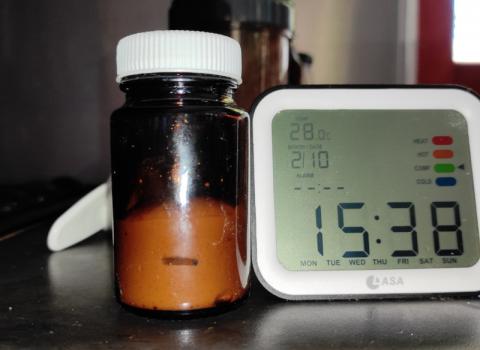
Lovely fizzy levain prior to it being mixed into the autolyse dough. This levain was only 2 hours 10 minutes old (or two hours since the overnight levain was fed further;  the growth from the height of the rubber band took 2 hours 10 minutes). It helps to be in summer conditions - room temp approx 26 deg C.

Levain was fed 1:10:10 overnight, and then the next morning it was given a 1:1:1 feed when it was at the height of the rubber band. The levain is 90% bread flour and 10% rye at a hydration of 100%. Most recipes suggest feeding 1:2:2 before baking, does it make much difference, I wonder? I'm just impatient and prefer a 1:1:1 feeding prior to using in a bake, although 2 hours makes it feel a little bit like I'm using instant yeast!

Aliquot jar at time of shaping. Trying to be more accurate with how I read the jar - there is a mark on both sides of the jar and a photo is taken with flash. Can digitally estimate the volume increase by counting the number of pixels on the photograph, and then I average the measurements from both sides of the jar. Was a little inspired to up my aliquot game by Benny's YouTube video.

Prior to shaping. Still holding shape from last coil fold which was 2 hours previously.

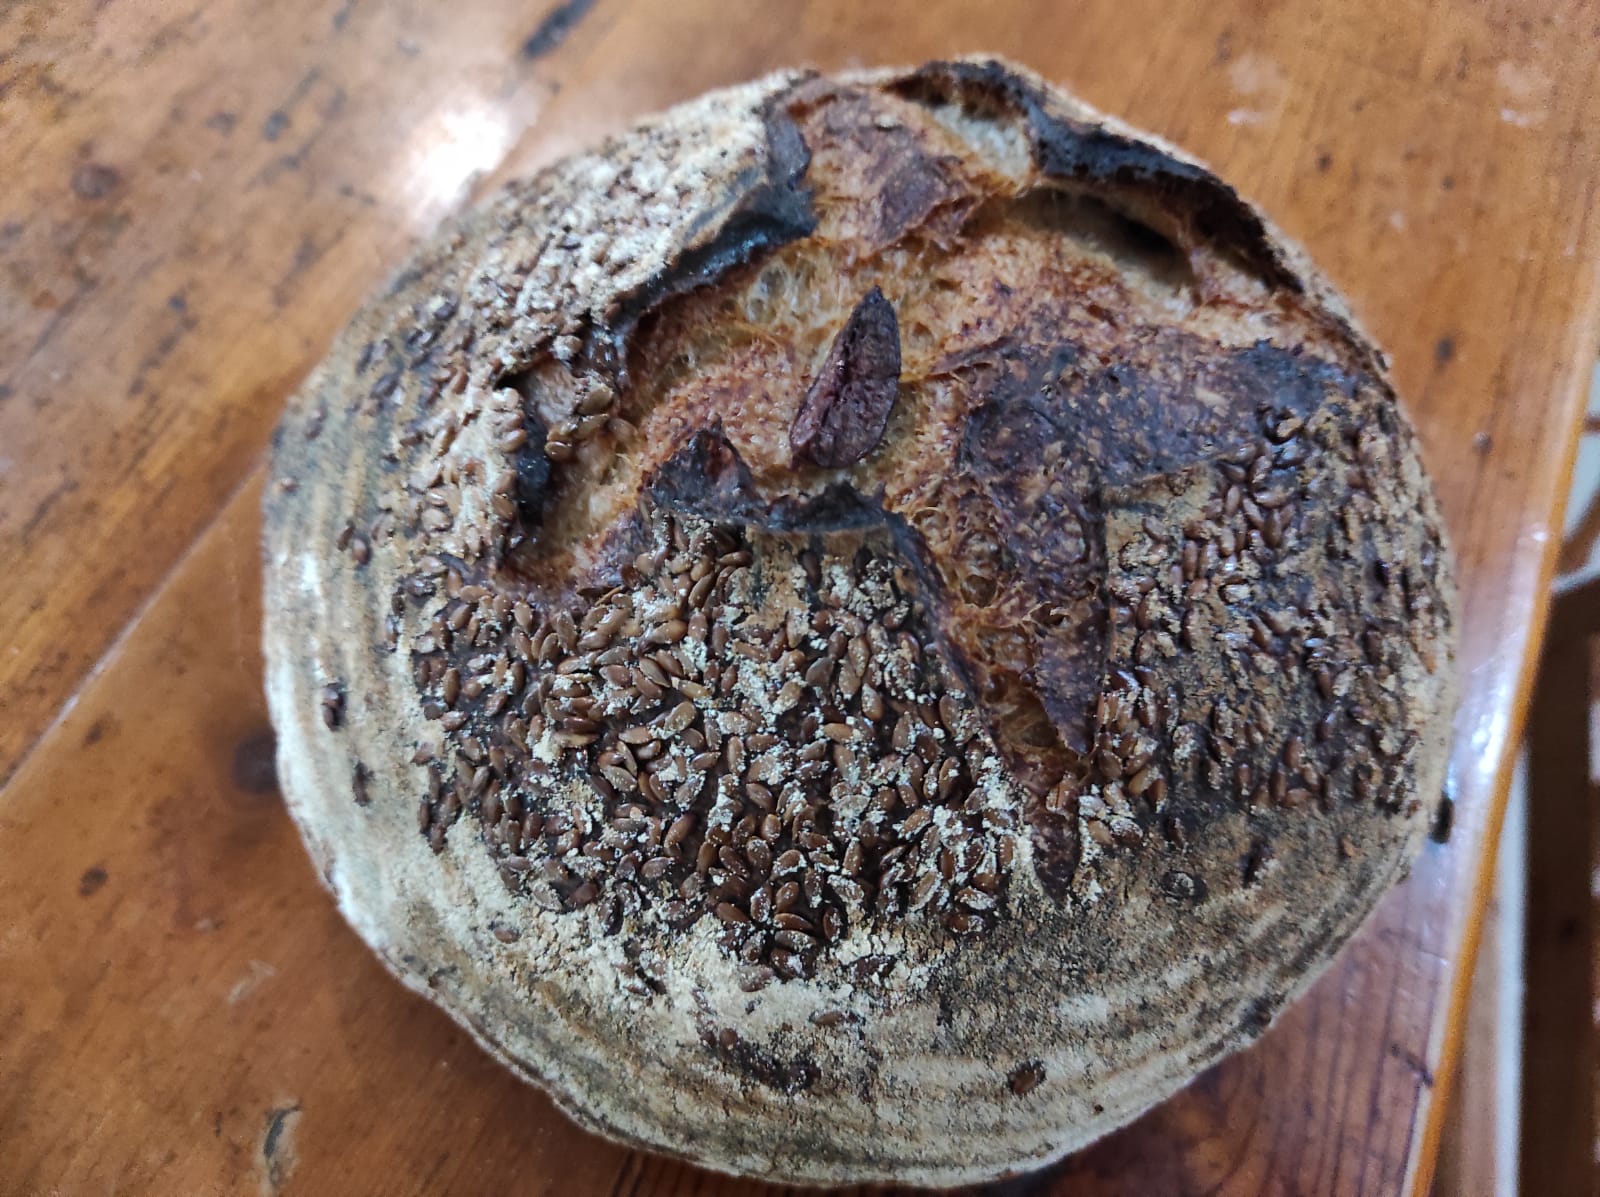
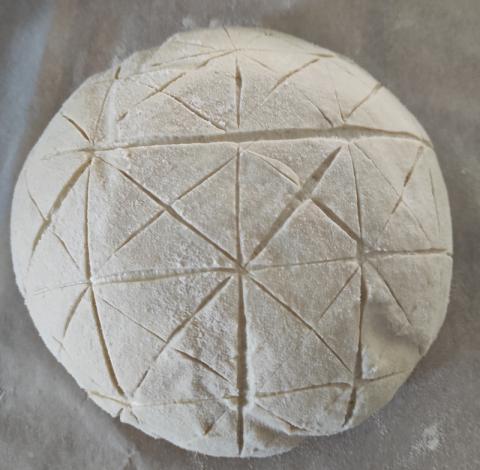
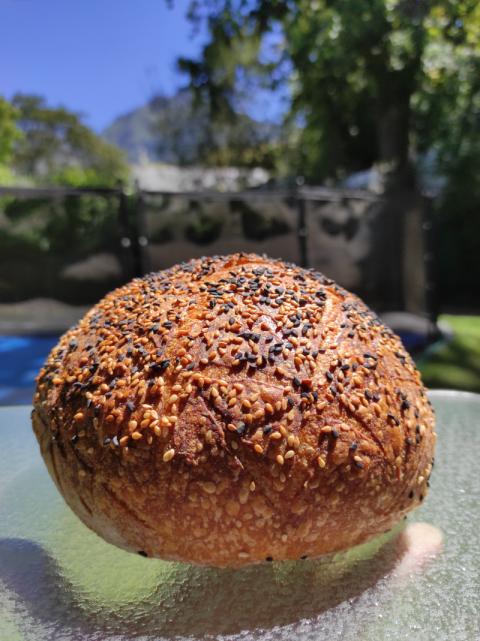
The next morning before baking. Had forgotten to add the seed topping after shaping, so just prior to shaping thought I'd do an elaborate score as I could see what I was doing.

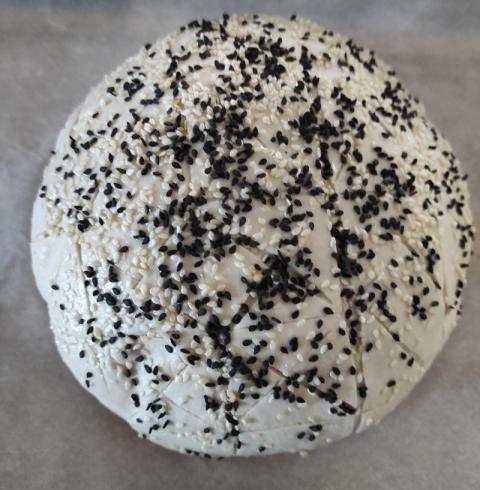
Seeds added after scoring using an egg white wash. Do prefer having seeds on my breads!

The baked loaf had a great lift. (Comme une vraie boule). The attempt at elaborate scoring was largely lost, but can't help but wonder if the scoring allowed the bloom to hold such a nice shape.

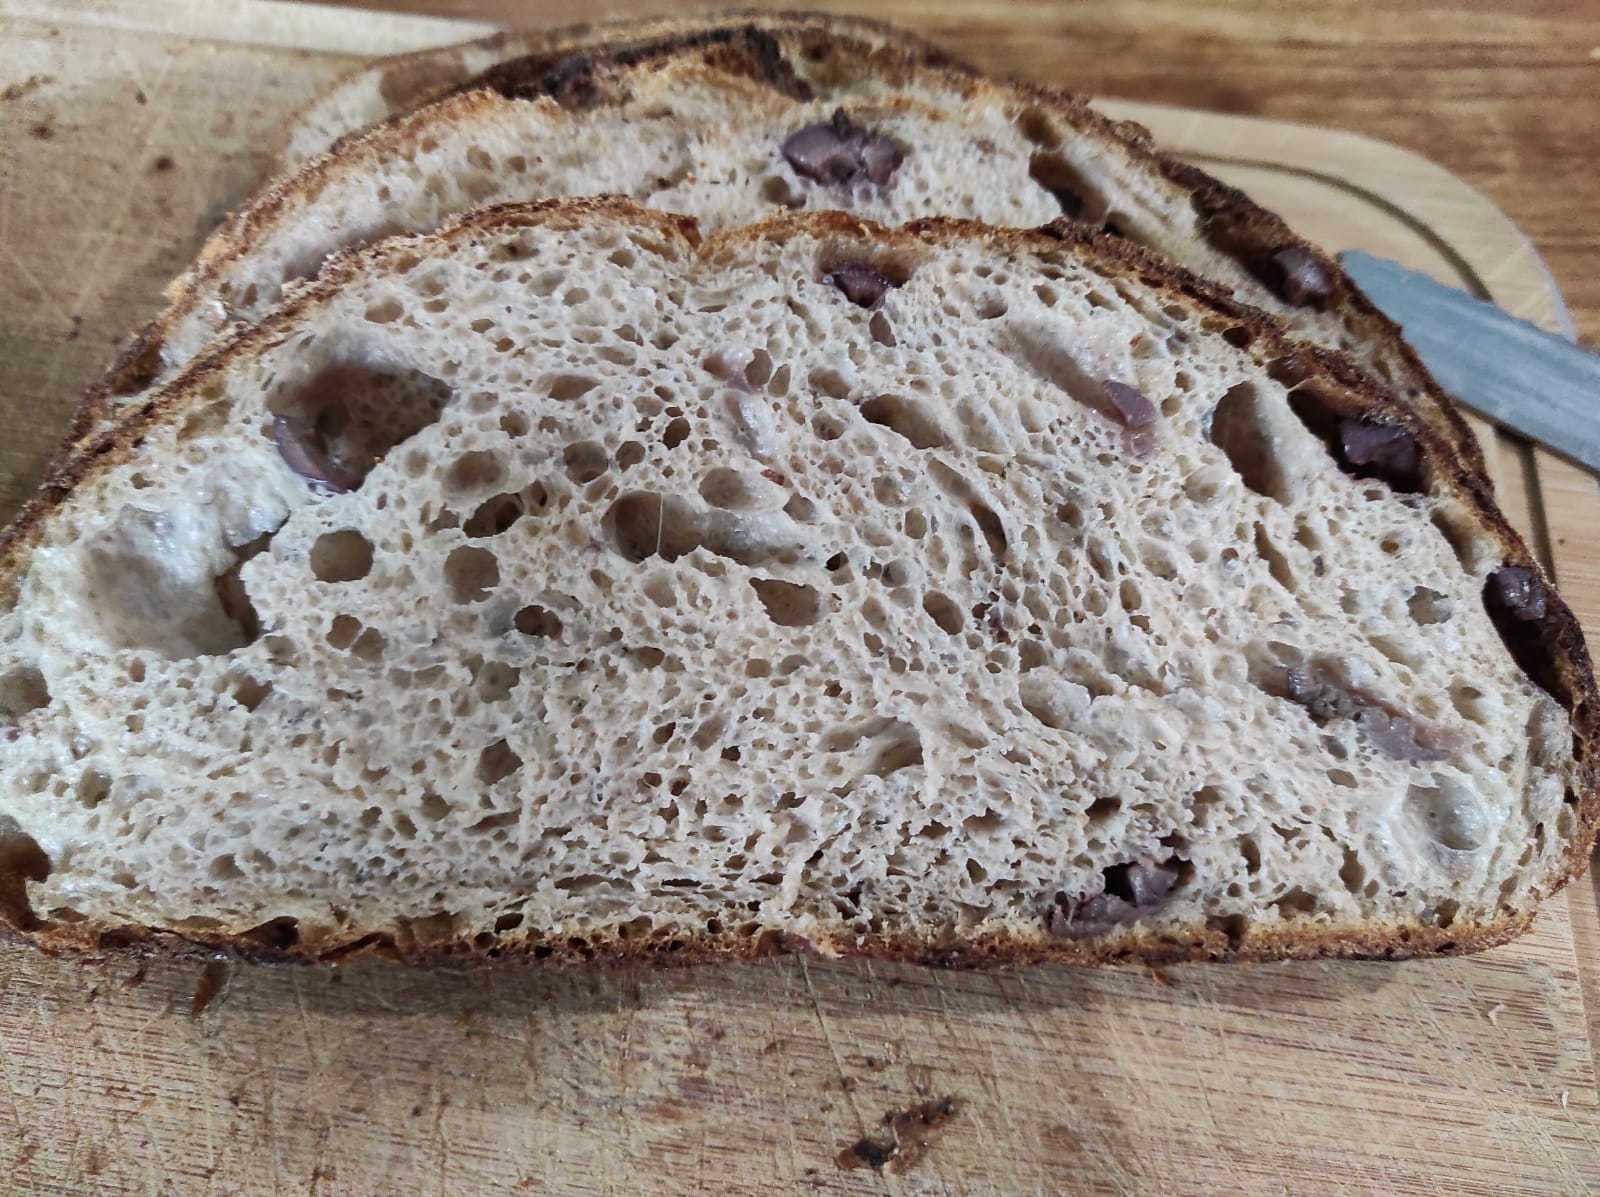
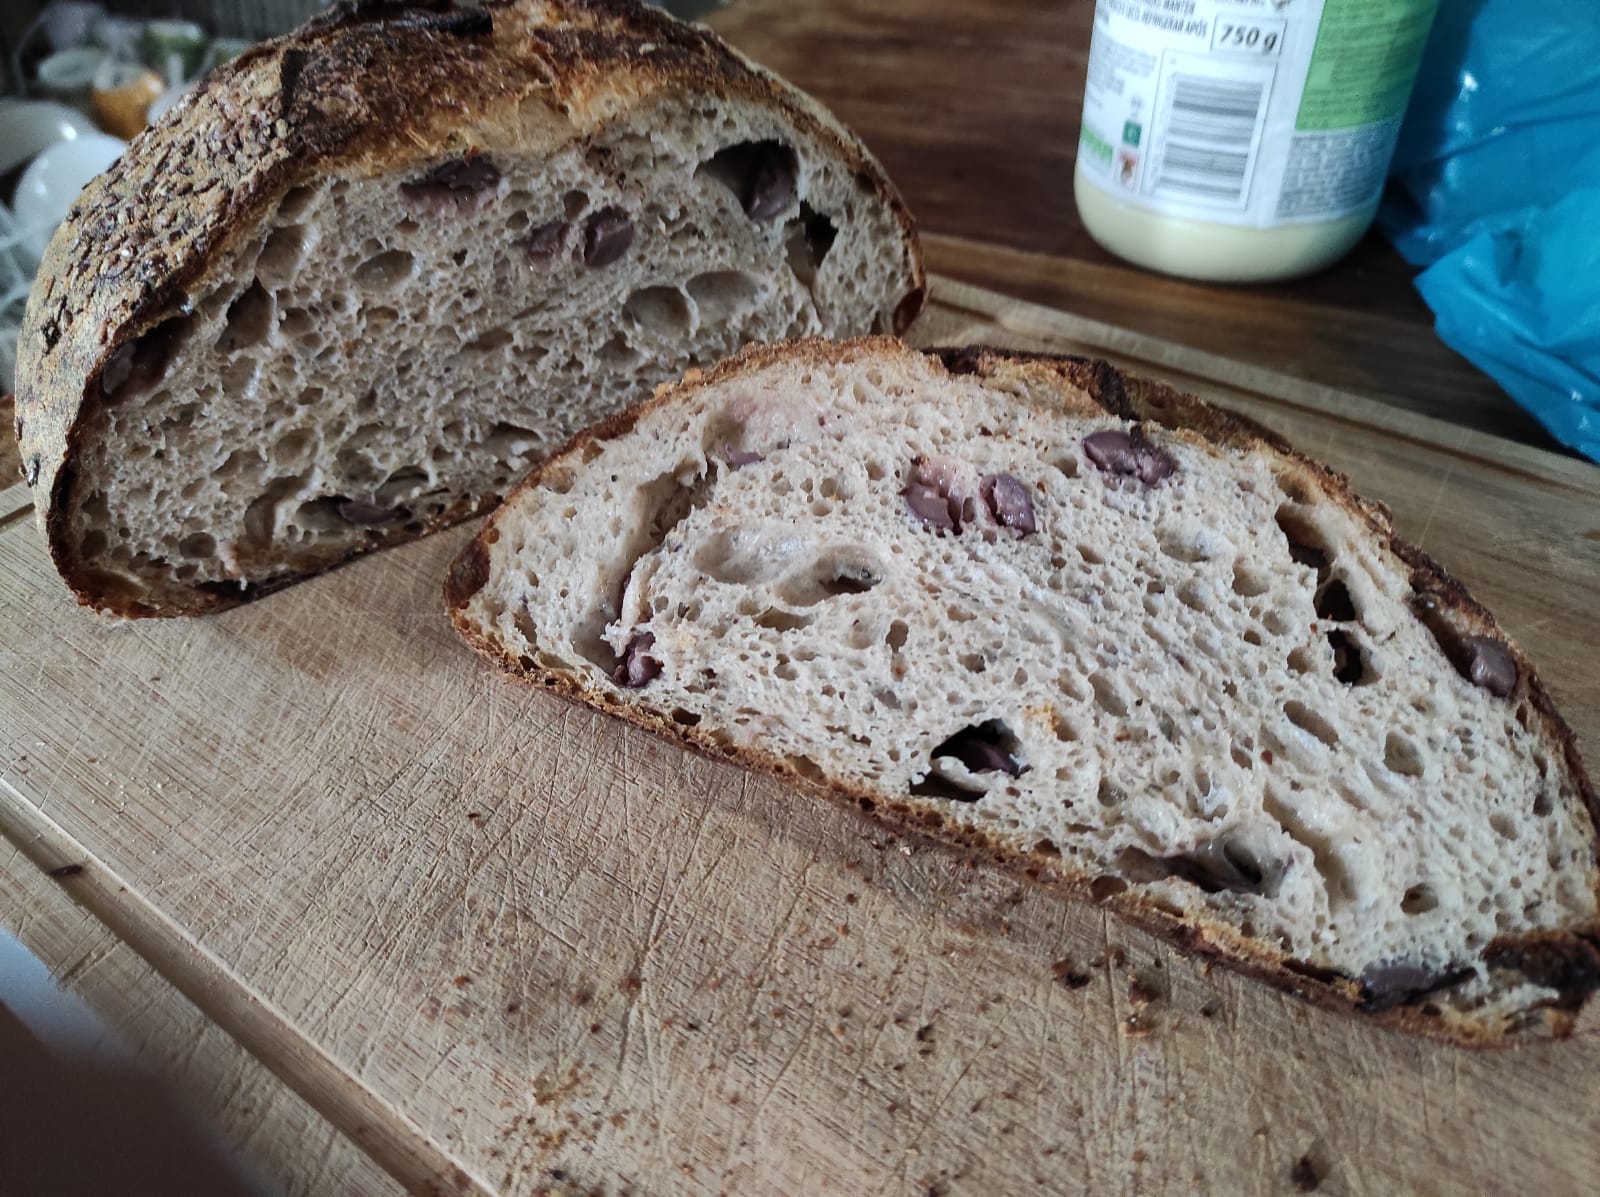
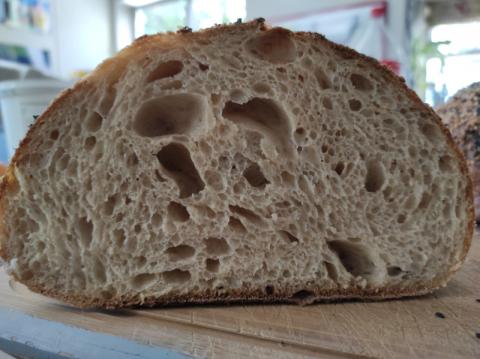
Pleased with the crumb, will certainly use the stand mixer again in my baking going forward.
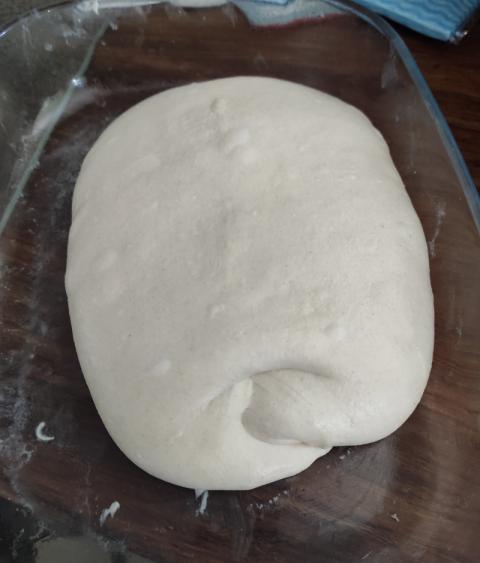
JonJ's picture
JonJ

The community bake provided the excuse to bake a simple ciabatta recipe that a friend has been baking for years.

It is the exact opposite of my recent sourdough breads in almost every dimension: instant yeast, has no autolyse, uses sugar, is super rapid, no wholewheat, etc etc. Even for an instant recipe it is fairly minimalist eschewing the biga or couche or anything that would complicate the life of the home baker for whom the original recipe was intended.

Sometimes it is fun to try something radically different, and it reminded me of what was possible in bread baking.

The recipe then:

  • 500g white bread flour (stoneground, 11.5% protein)
  • 450g water (lukewarm - 28 deg C)
  • 2.5g sugar (0.5 tsp)
  • 4.5g instant yeast (1.5 tsp)
  • 13g salt (1.5 tsp)
  •   13g olive oil (1 Tbsp)

    - Mixed as an all-in-one-mix; first mixed the dry ingredients (yeast, flour, sugar, salt) to ensure even distribution and then added the lukewarm water. Note: the original recipe calls for adding the salt after the dough was mixed, but went even minimalist than that with an all-in-one.
    - Five minutes of stretch-and-fold (in-bowl) after mixing. More like an in bowl stretch and slap. After five minutes dough was still sticky, but there was some evidence of gluten formation and it was holding shape better. Original recipe says you can do machine mixing but should finish off by hand, and being minimalist again did everything by hand.
    - Smothered  top of dough in bowl with olive oil and let the oil run down the sides of the dough in the bowl. Coverred bowl and left until doubled in volume. This took around 1h 45min for me (RT of 23-24 deg C).
    - Tipped out onto heavily floured surface and did a basic 'envelope' shaping. No couche. This is where I went a little wrong, should have gone directly onto the final tray rather than having to move it again and there was certainly some degassing and flatness caused by that.
    - Baked at 200 deg C for 30-40 minutes until golden brown showed on top and base tap sounded good (took 35 min).

    Since I was breaking all the rules we only waited 30 minutes for cooling before we tucked in with good butter which melted instantly. Soft crust, nice mouth feel, lovely salty taste. Certainly, a poor crumb compared to the true sourdough master pieces from the community bake, but for a low effort effort this was a surprisingly solid recipe.

Pages

Subscribe to RSS - JonJ's blog