The Fresh Loaf

A Community of Amateur Bakers and Artisan Bread Enthusiasts.

PalwithnoovenP's blog

PalwithnoovenP's picture
PalwithnoovenP

Yesterday was a hectic day and this bread is one of the reasons. Last Sunday, I saw some beautiful red beans so I bought some; that same day while watching a late night movie minutes before midnight I decided to make red bean paste for tomorrow and I proceeded to wash and soak the beans so they will be ready for tomorrow.

I made the red bean paste yesterday, smooth but with some chunks left for character including the bean skins. It was a 2 hour process; boiling, mashing by hand and sweetening. I love the texture of homemade bean paste and its sophisticated sweetness. I also like to make a small amount so we can have it fresh; what was left will be used for various rolls, pastries and sweets in the coming days.

My homemade red bean paste.

With the bean paste made, I suddenly thought of making a bread that would go well with it. For me, there is no better bread but a mantou, its slight blandness will make the red bean paste shine while providing the perfect texture. Just thinking of kneading dough by hand is somewhat tiring so I made a convenient schedule, make the dough at night, retard it and cook it tomorrow.

I thought I can have a good rest until night time but suddenly, dad requested if I can make my sticky rice dish that he loved and said he had all of the ingredients needed bought. How can I refuse? It is only one of the few times dad requested something from me and it’s me requesting something from him often like his wonderful fruit preserves and sweets. To add more, I decided to make some rice dumplings/zongzi (粽子) from the sticky rice I have which will be treated differently.  So from the afternoon until midnight; I kneaded the dough, cut the meat and vegetable to their appropriate sizes, marinated and cooked them, prepared the rice and did all the things that need to be prepared in advance. If I haven’t done those, this day will be even more stressful. Thanks to the fridge!


Today is as hectic as if not more than yesterday, I cooked the sticky rice, made 2 rice dumplings, and made this bread! It was so exhausting but every effort I made was rewarded with very good food! We really had a feast today! Dad invited his friend and they really enjoyed what I made. They said now that I'm 21, I can really pull off some exceptional dishes without getting help. Seeing them enjoy the food I made is even more rewarding than enjoying the food itself, especially coming from my dad.

A well made mantou is already good but when deep fried like what is done in dim sum restaurants something magical happens and dipped in condensed milk, you cannot ask for more. It also goes great with savory dishes, in fact this was inspired by a bread in a Chinese restaurant served with red braised pork. The crust is thin and extremely crunchy. This can be described as a gigantic fried mantou.  It is also not overly airy, it's fluffy and substantial just how we like it.


The flour I used was unbleached so it has a yellowish tinge to it.


Honestly, it's so soft, it's difficult to cut.


It's better to pull shreds from the crumb.


It really goes well with black or lightly sweetened coffee!

You choose, classic style with condensed milk...


Or with red bean paste....


My favorite... Combine the two!


-----------------------------------------------------------------------------------------------------------------------------------------------------

My sticky rice dish that dad requested...


Kiampung, a sticky rice dish with meat and vegetables commonly found in Hokkien households and in Chinatown. There are many versions of this dish but mine is my dad's favorite.

Some rice dumplings made with almost the same ingredients as an experiment. I used banana leaves and nylon string to wrap because that's what I only have on hand. With a different leaf and string (a thick natural fiber one is ideal) wrapping the tetrahedral zongzi (locally called as machang) is a pain so wrapping is "just seal it" style. The bamboo leaves used are only available in Chinatown which is 2 hours away from us given there is no heavy traffic jam. For a misshaped zongzi with a different aroma because of the different leaf, it came out pretty good.


-----------------------------------------------------------------------------------------------------------------------------------------------------

Those flowers in the first picture have a special place in my heart and they are blooming right now. With those flowers, many friendships were formed back when I was a child. There are 3 varieties that I know; red, yellow, and white. The red variety has the most flowers now; the yellow variety still has many buds that haven't bloomed; the white one still doesn't have any sign of flowers. These are called Santan, very common here and most yards now are covered with red and yellow flowers.


As you can see, each cluster is composed of many tiny flowers. Each flower has a stalk that you can pull; pull them halfway and you can link each flower to another flower, this is what girls usually do forming garlands and bracelets; pull them all the way and a tiny drop of liquid (they say it's the nectar) oozes out that you can sip and the taste is lightly sweet and this is what I do back then (we sometimes even strip whole shrubs of their flowers) and we think that the yellow variety produces the best tasting one. Every afternoon, kids flock the shrubs to do what I mentioned above sharing what they made/picked with the other kids while playing outdoor/team games (Ah! Those were the days!) nurturing friendships that we still remember to this day. Ask any kid of this generation and they probably wouldn't know what I'm talking about! :P The games and fun that they know today are iPad and Apps.


I wish you could see that stalk with the precious nectar!

Yes, technology might have taken some "fun" from this generation but I'm thankful for it and happy that I lived in this time. Ingredients are easier to source, recipes and food from around the world are easier to find broadening my mind and palate, and I am able to share some good stuff and see those of others no matter where in the world we are.


It's a tiring but happy day! When you finish a day weary and smiling, you appreciate rest much better!

Thank you very much!

PalwithnoovenP's picture
PalwithnoovenP

I've been thinking of different methods of baking crusty lean loaves in my clay pot (it's my only baking gear, no oven or fancy grills) lately. One that should be easy but gives me results as close as an oven can get, that means a brown crackly crust, scores that bloom and an open crumb. The heat of the pot is very uneven, the bottom is extremely hot while the top is too cool so the only way to get an even bake is to let the top and bottom of the bread face the extremely hot bottom of the pot. My "pot sticker" method gave me good results but the bread lacked volume, so I tried another 5 different cooking methods so I can test which one will give me the best results. I made a basic dough since the method is the focus here rather than taste. As for the taste; they are sweet with a complex wheaty flavor, slight slight tangy note with the right amount of salt for flavor and very fragrant with some just having a moister crumb than others. Even though they are have burnt spots, they still beat many store bought breads here by a mile. All loaves are made the same way except for the cooking method so there is only one variable to consider for evaluation of results. Some are "ugly" and I hesitate to post them but I decided to post them anyway so I'll learn from them when I do modifications in the future.

The dough is made with bread flour, water, salt and instant yeast. I planned to do a 70% hydration dough but it felt wetter than that maybe because I added more water since I didn't use a scale since I don't have one. The flour was autolysed for 12 hours in the fridge; salt and yeast were added and the dough was fermented at room temperature for 2 hours with stretch and folds every 30 minutes; to the fridge it went for a retardation of another 12 hours.

The dough was then divided into 5 equal pieces straight from the fridge, pre-shaped into a boule with a refrigerated bench rest for 25 minutes then shaped then refrigerated again. I took out one from the fridge every 30 minutes since that is the approximate cooking time for a loaf; each loaf was proofed for 1 hour and 20 minutes approximately. They are baked with steam for the first 10-15 minutes.

*This is just a sneak peek  of the 5 loaves. I have summarized each method below in detail along with a crumb shot for each. In general they all have a thin crust; some just have a crisper bottom and/or top crust.


Here they are:

*I can't think of better names for my methods so these are just what came to my mind first (might be funny :P)


DEFINITION OF TERMS:

THEORY- My idea/reason why I employed the method

PROCEDURE- What I actually did for that particular method

RESULTS- The actual observations/results when I evaluated the breads

POSSIBLE CAUSES- The reasons I thought of behind the results

1) Seam-side up 

Theory: The loaf will not be scored so there are no scores to squish and shape to compromise (ex: boules with a flat top where it should be rounded) when the bread is flipped since the top and bottom of the bread are relatively "flat".

Procedure: Shape into a tight boule. Proof seam-side down on a floured cloth. Invert on an oiled parchment and baked on a preheated inverted cake pan for 15 minutes. Release the steam and flip the bread. Continue baking for 15 more minutes until brown.

Results: It came out really FLAT! The center of the "top" was burnt when it was inverted. Although FLAT, crumb is open, moist and chewy.

Possible causes: I was not careful when i flipped the bread so it deflated. I didn't seal the seams tight enough so there is a lack of support. It might be overproofed.


2. Side cooked pan loaf

Theory: By tilting the bread on its side where the top is perpendicular to the bottom of the pot the top and sides are exposed to the radiant heat and they will be brown and crisp.

Procedure: Shape into a batard. Proof in a llanera (oval flan mold), oiled and lined with parchment. Score 2 overlapping cuts before baking for 15 minutes then release the steam. Turn the bread on its "side" and bake 7-8 minutes per side.

Results: Oven spring was good. The top and sides are brown and crisp with some blistering though some areas are burnt/pale. Crumb is pretty tight but moist and chewy.

Possible causes: The mold supported the structure of the bread The bread was not rotated evenly. Too much handling/harsh shaping or a tad underproofed.


3. Inverted "Dimple loaf"

Theory: By forming a fissure at the center of the loaf there is something where you can anchor the loaf on the side/edge of a baking pan to let the top and sides face the radiant heat once the structure is set and the bottom has browned for a brown and crisp top crust.

Procedure: Shape into a batard. Proof in a llanera, oiled and lined with parchment. Make a fissure in the center of the loaf just before baking and bake for 15 minutes. Release the steam. Invert the loaf on the edge of the llanera (ideally the fissure should be used) so one side is exposed directly to the radiant heat while the other side is shielded by the llanera, bake for 15-18 minutes switching sides halfway.

Results: The fissure was almost negligible so the top was anchored to the baking pan by "wherever it will stick" part of the bread forming those two arcs on top. There are some blistering but with burnt and pale spots on the top crust. It is a bit flat but crumb is pretty open, moist and chewy.

Possible causes. The fissure was not formed at the right  time so it rose to almost the same height as the rest of the loaf. The loaf was not rotated evenly when the top directly faced the radiant heat. The bread might be a tad overproofed.


4) Side-scored heart loaf

*Inspired by the German Pretzel
 
Theory: By creating a loaf that is taller than it is wide like a heart shape which is very close to a German pretzel, scoring will tend to go at the "side" rather than at the top eliminating the risk of squished "top score marks" when the loaf is flipped at the same time encouraging expansion of the loaf. The idea is like method no. 2 but with the bread turned on its side already at the beginning of the bake. 

Procedure: Shape into a pointy batard. Coil the ends around to form a heart and proof in a floured cloth. Place in an oiled and lined baking pan. Score the side with the blade pointing downwards (this is to encourage the formation of an ear which did not happened here!) and bake for 15 minutes. Release the steam and invert the bread on the baking pan and bake for another 15-20 minutes allowing conduction to brown the top.

Results: The loaf was roughly heart shaped and a bit flat. The score didn't open fully. Only the center of the top browned and crisped while the surrounding areas are pale and soft though there is some blistering. Crumb was pretty open,moist and chewy.

Possible causes: The dough might lacked support because I struggled with the shaping and it was proofed without something to conform its shape. The pot didn't have the high enough temperature because I used less firewood for that roaring fire required or because the fire was not maintained well enough for I am busy doing other things. The baking pan insulated the other areas of the top crust from the fierce radiant heat and only the center was browned by conduction.


5) Avoid the center!

*Meant to be an improvement for my pot sticker (double cooked) lean loaf 

Theory: By scoring around the center, a good spring on the loaf (especially for a wet dough which should be baked at high temperatures) will be encouraged while at the same time creating a small portion of the crust (rather than the crumb) as the contact point when the dough is inverted on a surface only as large as the contact point exposing the top crust directly to the radiant heat avoiding a "crispy crumb" while maintaining a crispy crust.

Procedure: Shaped into a tight boule. Proof seam-side down in a covered container. Transfer to an oiled and lined baking pan and score in a square pattern. Bake for 15 minutes then release the steam. Flip the bread on a smaller baking pan and bake for another 10-15 minutes until brown and crisp.

Results: Top crust is browned well and extremely crisp with good blistering and less burnt and pale spots but the crumb showing through the score marks became indistinguishable from the rest of the crust and became crisp too! The "contact point" is pale at first so it was browned by conduction at directly at the "floor" of the pot after the rest of the crust was browned. Crumb is open, moist and chewy; more open than that of the pot sticker bread.

Possible causes: It is the reverse of method no. 4 where the "center" was the one insulated by the pan so the surrounding areas are exposed to hotter temperatures though farther than the heat source. The higher temperature at the pot gave the loaf a better spring than the steaming temperatures of my previous bake.


Personal Opinions:

*For structure, I think the best is method no. 2 as you can see in the photos.

*For crust, color, crumb and overall appearance, method no. 5 clearly wins for me.

*I will combine those two in the future with further modifications for a good lean loaf.


Thank you for your patience for reading through this LONG post! Please let me know what you think and pick a favorite. Your comments, questions and suggestions are very helpful and encouraging and will allow me to learn more.


Thank you very much!

PalwithnoovenP's picture
PalwithnoovenP


We had an abundance of chicken eggs and what is a better way to use them than to make flan? Leche Flan! Actually, our tradition when there is a surplus of eggs is either to make flan or salted eggs and this is one of the few times we decided to make flan because making salted eggs is more economical and less of a hassle; you just need to immerse eggs in a salt water solution for a few days, boil them and... Voila! You have salted eggs! They're great alone, for spreads and dips, or the best is mixed with tomatoes as accompaniment to cured/grilled/fried meats. The flan's process is a little more involved because you have to separate the eggs first, add milk and flavorings to the egg yolks, strain it twice over a fine cheesecloth before depositing it in a caramel lined mold (llanera) and steaming it until done over a low heat so that it cooks gently. The necessity to utilize the leftover egg whites also presents a problem for some. That (daunting) process is one of the reasons why it is only cooked for special occasions not to mention the cholesterol and sugar overload it delivers but it's very nice to have once in a while.

This is a traditional/old fashioned leche flan. It is very different from other "baked" custards like crème brûlée or crème caramel though it may look like one. The caramel is cooked directly in the mold/pan no matter how big or small it is by covering the bottom evenly with sugar and melting it over a stove; cooking it to the right stage is critical and a little more challenging. It is also steamed rather than being baked in a water bath.The main difference that sets it apart lies in its taste and texture. It is NOT supposed to be delicate or light, it is so rich a few bites may be enough to satisfy you though we eat more than that because it is that good. It should "bite" with sweetness but not cloyingly, firm and makunat (sorry, no direct translation; chewy might be the closest but not quite) but still has the ability to melt in the mouth without the help of one's teeth and fragrant with the aroma of dayap a local lime that is similar to key limes. Some substitute vanilla but it's just not the same, for me the flavor and aroma of the lime zest is so necessary to cut through the richness and provide balance for this dessert. Maybe the only thing left to make this ultimately traditional is to use duck eggs but with our chickens' eggs, the texture and flavor is the same if not better.

I would also like to show the real purpose of the llaneras I so often use in my baking cause they are cheaper, easier to find and are so versatile to use for breads and cakes to tarts; I have various sizes from very small to gigantic ones. The one in the picture is slightly deformed (it should be more oval) because I used it for a purpose not intended for it but because they're cheap it's easy to replace them, surprisingly their lifespans are pretty long and I've been using them this way for almost two years. I don't want to use expensive cake pans because my clay pot is a crude environment I don't want to waste money by damaging them. I've used my llaneras here:

http://www.thefreshloaf.com/node/40958/cream-sandwich-bread-filled-pork-floss-no-oven

http://www.thefreshloaf.com/node/40201/what-can-you-say-about-my-breads

http://www.thefreshloaf.com/node/41529/my-most-decent-lean-bread-and-ww-bead-wo-oven-date


Inverted onto a plate, the rich brown top with the glorious caramel dripping is just luscious!


Don't let these small bubbles fool you!


Incredibly dense, smooth, fine, and creamy. The slight bitterness of the caramel, richness and sweetness of the custard and aroma and flavor of the lime makes a dessert that is full of character and flare.


When I was still a child we're already raising chickens; both bantams and large breeds like the Kabir, Sasso/naked neck (locally called as cobras) and Vantress. I don't know if I could call them free range but they are not caged, eat only corn, and roam around the yard all day eating whatever they can find. They even eat our banana TREES sometimes. These are the reasons why the few eggs that they lay are so tasty; although each hen lay only a few eggs there are many of them so a few weeks that we don't consume their eggs we end up with a ton and that's how we have a surplus of eggs every so often. Their meat is also very tough from all the exercise they get but very flavorful, cook them right and they're one the best meats on the planet! We often prepare them for birthdays and other significant occasions much like the flan.

On the summer of 2014, we experienced what has never happened before, many of our chickens died; we didn't know if it's because of "pestilence" or just because of too much heat. Everyday, we bury 3-4 chickens; seeing the trend we had no choice but to slaughter all that was left of the large breeds. I had to do all the cooking as well as all the household chores as my mom was recovering from a gallbladder surgery at that time. I had to cook one every day for 6-8 hours straight over a wood fire for a week. That experience taught me to be more responsible.

The bantams were a bit more resilient and 9 survivors were left, 8 hens and a single rooster. If the rooster had died, we will also slaughter the hens as there will no more hope for a new generation to rise. For two weeks, no deaths occurred so we were convinced that the event has ended. Then hens started laying eggs and a few chicks hatched, every time they lay eggs we just allow the hens to incubate their eggs. After six months of egg less meals (we seldom buy our eggs outside), the "second" generation of bantams are mature and ready to reproduce themselves. We started to consume their eggs but only a little so every batch will have chicks hatched from them.

Here are our chickens now.These are just a few of them as others are still roaming when I took this photo. The "tailless" (just to clarify, we did not cut his tail; it is natural to him) one on the right is a special one, from all the years we've been raising chickens, this is the only time where one sprang from a brood. Isn't he cute?


Yes, the eggs used for the flan already came from the prolific layers of this generation. Our location is pretty rural so it allows us to raise farm animals (our neighbor has water buffaloes and another has pigs), there is a river behind us that floods three quarters of the yard in the morning and drains back in the afternoon so sometimes we see gigantic Tilapias swimming around that we try to catch and the smaller ones are feasted upon by our chickens. Although how rural it may get here, we are just 10 minutes away from the city where the huge malls, cinemas, offices and universities are; so I can say that our place is perfect. Bread is something that you don't make at home because rice is the staple and because it is readily available in the bakeries in every street corner that's why most homes here including us don't have an oven. Most breads here are just something you don't want to eat; full of air, too much yeast, no flavor and stales in a day so there is no way for us to have good bread but to make it myself so I try to make it in every way I can. Dishes are often passed by actual teaching and demonstration, not by written recipes which is a great bonding for the family. How we cook is an art, no one needs recipes here, ingredient ratios or measurements; we just cook by heart with what we taste and what we feel; be it a stew, preserves, or elaborate dishes and desserts. No matter how "inconsistent" our methods are, the magic is they turn out excellent and great every time we make them and this is what I incorporate in my "baking" sometimes. Rainy season is coming soon and I'm looking forward to my dad's fruit preserves, another opportunity to learn his techniques!

Recently, we discovered that this flan sliced thinly is great for sweet sandwiches especially on lightly enriched loaves. It feels like a sweet, creamy,rich soft cheese! It's excellent! Thank you very much!

PalwithnoovenP's picture
PalwithnoovenP

I should have posted this a long time ago since I've made this during my practicum but my laptop gave up as I was writing this while doing my practicum report. It is one of the greatest challenges I've ever faced, after typing nearly a ten page report a message just flashed saying my laptop is corrupted two days before the deadline! (What makes it worse is the policy "submit it on or before the deadline or GRADUATE NEXT YEAR!"). I had to retype my report relying only on my memory but it did not deter me, in the first place what's in my report came from my mind and just a little more push t will be my graduation so I wouldn't waste all my efforts from the past four years. Thank God I was able to finish it and even got a 1.0! These are the lessons college taught me for the last time: Learn to prioritize; plan for the worst; and if I can do something now, do it now so I'll have plenty of time doing what I love. My parents were very proud of me as I was able to graduate and also make it to the dean's list.

Fast forward to months later after graduation, my dad gave me a new laptop as a graduation and birthday gift so now I can post again! He also gave me a huge table whose sole purpose if for bread, MY BREAD! He says no one can touch it except me so it is always clean and ready for kneading and shaping breads. Maybe someday he said we will have an oven and a mixer and all other equipment necessary for baking. I am very lucky because I have parents who are very supportive of my craft. Of course if I will have a job I will try hard to provide those myself for my family and for my bakery as it is really my dream and their dream for me.

Back to the bread, I made this in my dormitory when I was longing to make bread without my clay pot. It made me sleepless for nights thinking of what bread can I make and how I will make it. During those times I was thinking of a street snack, the kind that when you're walking and your tummy rumbles you buy some then carry on with your business. I thought of A RUSTIC SANDWICH WITH A RUSTIC BREAD because earlier I've seen post on breads like the shao bing, scallion pancake and rou jia mo; though they are cooked in different ways they all have a rustic personality but what captured me is the flakiness of the first two I mentioned, I want to replicate that. I married their characteristics for my ultimate bread: flaky and yeasted like a shao bing; crispy, full of scallion flavor and cooked in a frying pan like a scallion pancake; and sturdy enough to hold up to wet fillings.


The dough is the most basic with just flour, water, yeast and salt with just the slightest touch of sugar and oil for softness. I only made a small amount so I won't waste a ton of ingredients if it fails. After the bulk fermentation I divided it into four then proceeded to do some "Oriental style lamination" where you have laminate one by one. I rolled each one flat, spread some oil and sprinkled some chopped scallions, toasted sesame seeds, a little salt and optional white pepper. I then rolled them like spring rolls, coiled them and flattened them. After a 20 minute rest, I cooked them on lightly oiled pan for 7 minutes on each side on low heat. I don't like their pale sides so i cranked the heat up and browned them quickly but I don't think it's necessary as we can see in English muffins. I was rolling on a small chopping board so I have not rolled them thin and big enough, if I have done so they could be flakier with more layers, that's just a theory though. Also, for the first two i cooked the heat was too high so they were burnt slightly.


They were crispy and flaky on the outside as you can see on the first picture shards were all over the plate. They were soft and substantial inside with some visible layers. They were a bit sweet but very savory full of scallion flavor with a hint  of toasted sesame. When I brought some leftovers home, my mom said she could eat them alone everyday without tiring of it but I think she's exaggerating a bit though. 

This is how they look inside:


I filled them with some braised chicken thighs fragrant with ginger and garlic with just a kick from chilies the flaky scallion buns are the prefect complement to it. The buns and chicken are good alone but the textures and punch of flavors they deliver when when together is sublime.


It's so good I forgot that the oils and juices are dripping down my fingers and just let myself fall into the world of good food.


The photos were taken at night when I returned to my dorm after my training inside my bedroom under a fluorescent light which is a first time for me since I'm used to taking photos in the afternoon at our home using only the light from the sun. I also cooked the braised chicken myself because I cooked my own meals there, therefore allowing me to experiment with my food because of the small quantities. Now that I'm back home, I'm so excited to try and share many of my "no-oven" bread baking ideas.

This was a long post mainly because of the stories behind this bread. Can you think of a better name for them? in fact, I don't know what to call them so I just stick to calling them flaky scallion buns. Thank you very much!

PalwithnoovenP's picture
PalwithnoovenP

I'm already at my dorm for more than two weeks but the bread baking addiction hasn't stopped. I really need to get my hands on some dough manipulation or else...! They say to stop an addiction you must identify your danger zones; when you are most likely to do the thing you are addicted in like when you don't have something to do for two days because of your work schedule from 4 consecutive sleepless nights because new bread baking ideas are plaguing your mind like mad piranhas swarming on an unsuspecting prey! And did I mention that I brought my flour and yeast with me in my dorm? Of course with my other ingredients and utensils too! So instead of resting from all the tiring work and sleeplessness I decided to make bread. I don't have my clay pot here with me but I HAVE TO MAKE AND EAT BREAD! I checked my stuff and yes! I have my little bamboo steamer that endured my adventures for three years with me! I shall make some steamed buns to pacify the "bread making beast" inside me.


I made the pork and mushroom stuffing and the dough on my first rest day. The dough has the lightest enrichment; mid-strength flour, a bit of white sugar, salt, yeast and oil. I fermented it for 2 hours at room temperature then divided it into balls before putting it in the fridge. The next day I let the dough warm up for an hour before stuffing. Because of the long rest, they are so easy to roll and pleat. By the way I am trying to improve my pleating to make it more beautiful.


Finally this steamed bread of mine is not the snowy-white cloud-fluffy kind you get in dim sum restaurants. It soft and chewy with a bite and has an elastic skin. It is hearty enough to support the fragrant and juicy pork meatball inside.


I've used some red cupcake liners instead of parchment squares for convenience and to add some festive look to my buns. I hate steamed buns as a child but loved them as I grew up. I'll try the pot sticker method next time for fried sipao / ShengJianBao to recreate a favorite! Thank you very much!

PalwithnoovenP's picture
PalwithnoovenP

This is perhaps one of if not the CRAZIEST idea to make bread. I don’t know what struck me to think of this but it worked! I just posted my most decent lean bread that I made a few days ago yesterday with good results but I want the top crust to be crisp just like oven baked bread so I made another experiment.

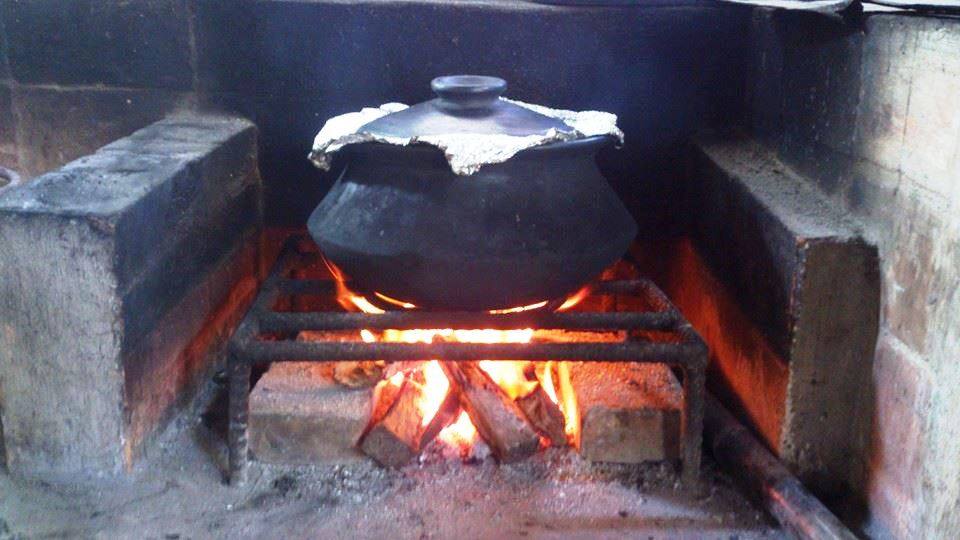
My problem with breads of this type when baking in a clay pot is pale tops and burnt bottoms; so I then thought, what if I cooked the bread at a lower temperature to cook the inside and set the structure then finish at high dry heat to just develop the crust? The high heat necessary for the second cooking isn’t a problem with my pot (it turns bread into charcoal :P) so the only problem is the first cooking method.

I’ve read that steam is necessary for the crisp crust of lean hearth breads but only at the beginning of the baking process so I thought of separating the process; steam the bread in the steamer then finish the crust in my clay pot, easy right? The bread is already cooked and only surface browning is what I’ll be looking for so no risk of raw dough and burnt crust. Not really, the uneven heat in the pot will only brown one side of the bread, so I then thought that one side’s crust should be already developed before going into the pot.

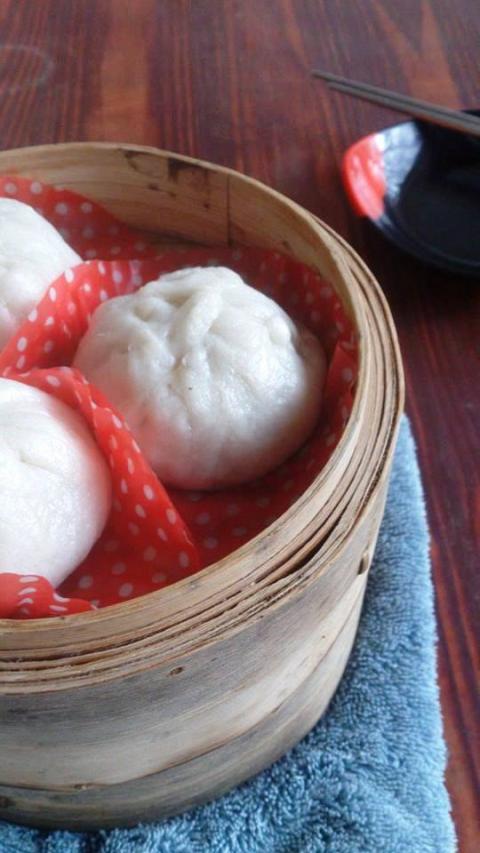
I suddenly remember my favorite treat from Chinatown, Shanghai fried siopao! Outside my country I think it is known as ShengJian Bao/ShengJian Mantou. Buns are fried until crispy at the bottom then hot water is poured to steam the top. I think it will solve my problem so I went to make the bread.

I made the usual 70% hydration 50/50 Bread and all-purpose flour mix and made a cold autolyse for 24 hours! I originally planned to have a 16 hour cold autolyse but my mom defrosted the refrigerator and I don’t want to mix in the yeast without a place for a retarded bulk rise, so I just put it in a cooler for 8 hours until I was sure that the fridge is clean and cold. I then mix in the instant yeast and salt and gave it a bulk rise for 2 hours with 3 sets of stretch and folds before putting it in the fridge. The next morning, I pre-shaped it into a boule, rested it for an hour then shaped it into a tight boule and finally proofed it seam side up on a cloth for an hour.

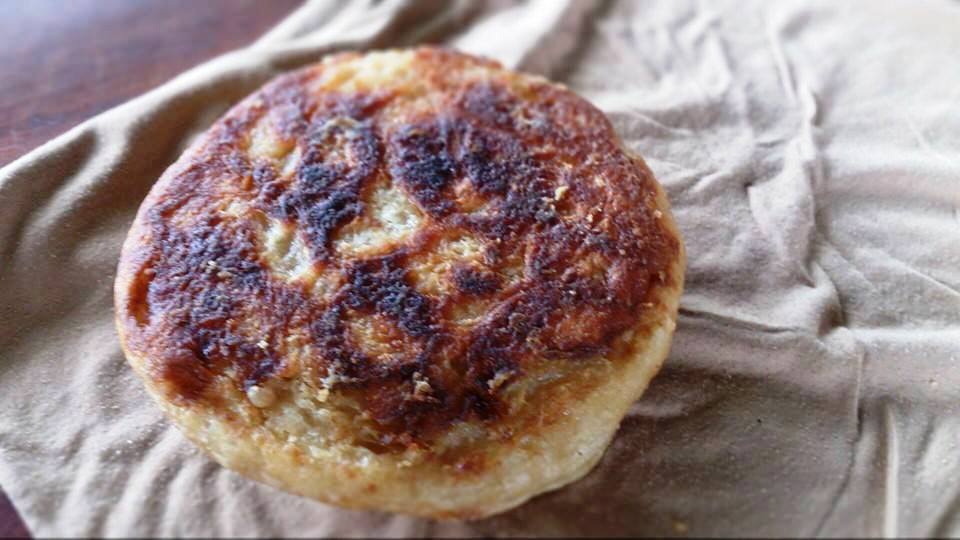
To cook the bread, I preheated a frying pan during the last minutes of proofing and pour a thin layer of oil; I made sure the pan is hot enough so the dough won’t stick. I slide the dough and fry the bottom until it is brown, about 3-5 minutes then boiling water is poured  and I covered the pan to steam for another 15 minutes, I check the water from time to time so the bread won’t burn.

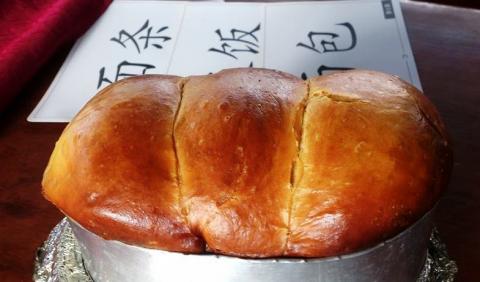
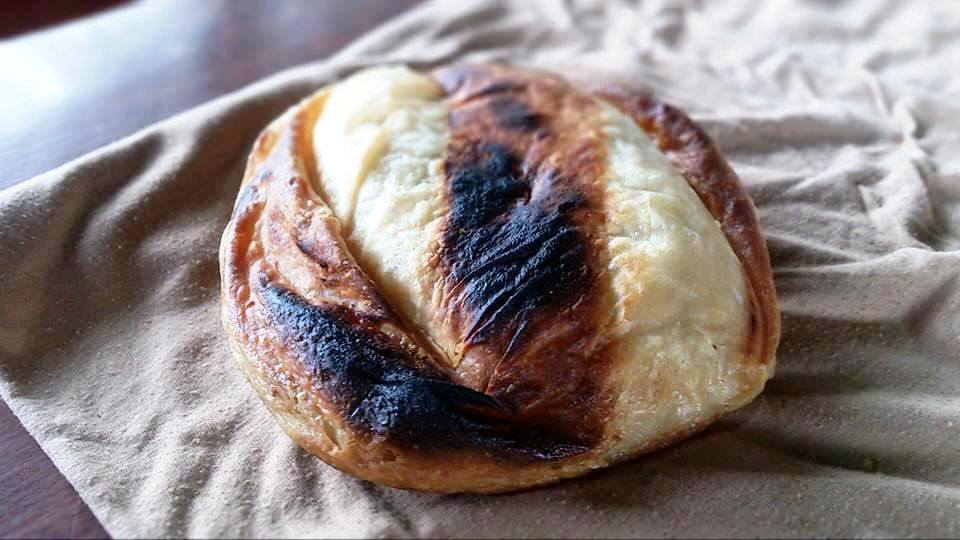
For the second stage, I let the bread cool a bit then put it UP-SIDE DOWN over two oiled llaneras, then baked it in the pot over high heat for 8 minutes, every 2 minutes I check and rotate it so the top gets evenly browned.

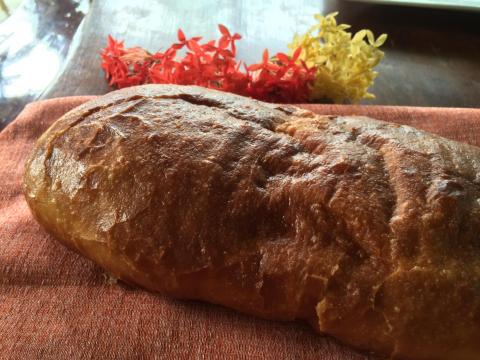
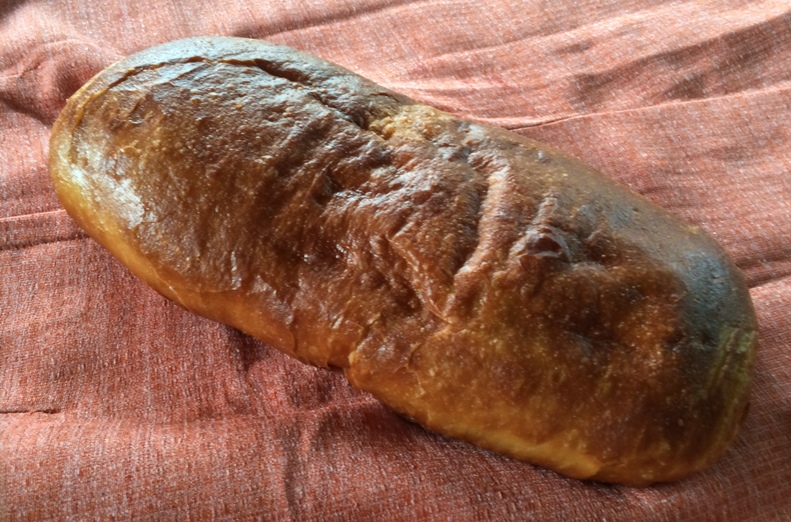
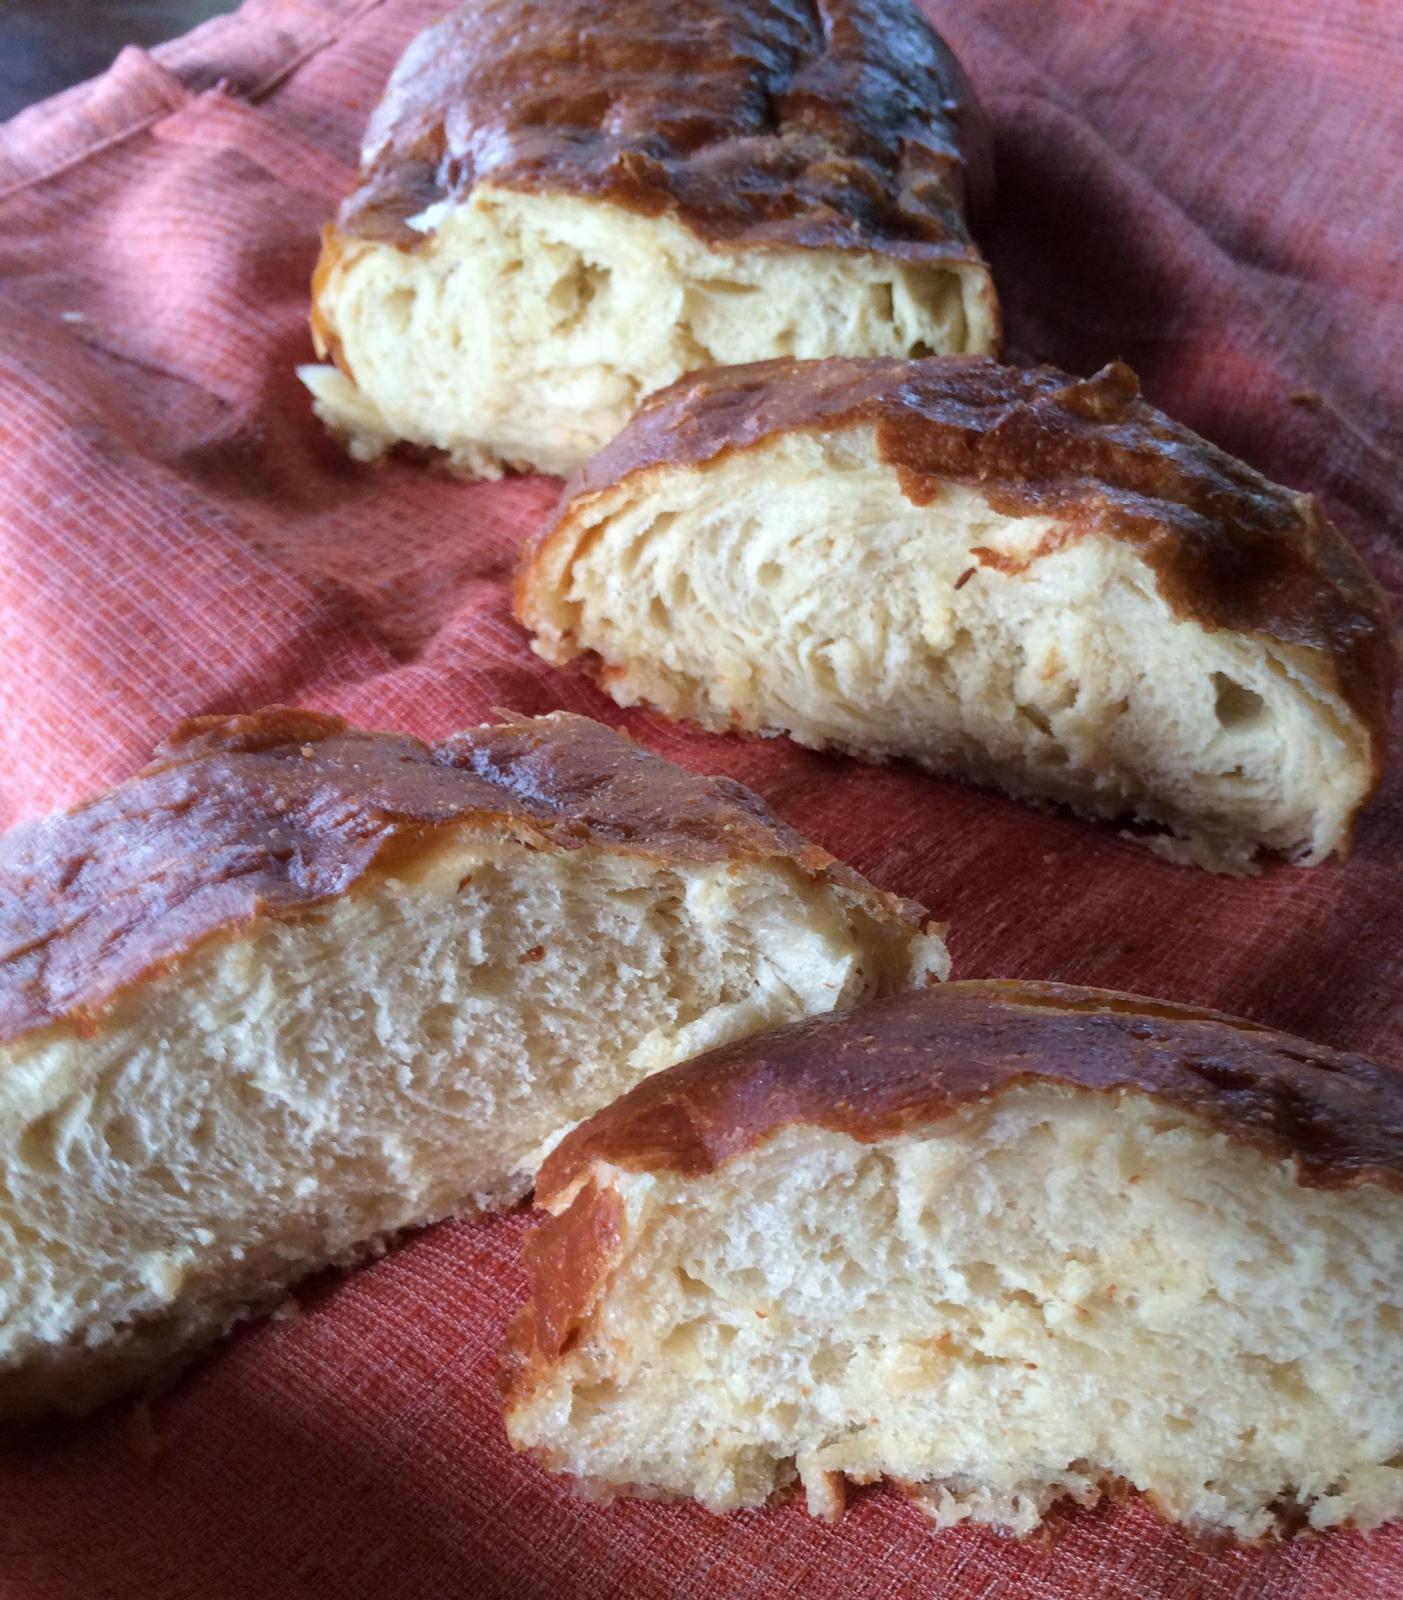
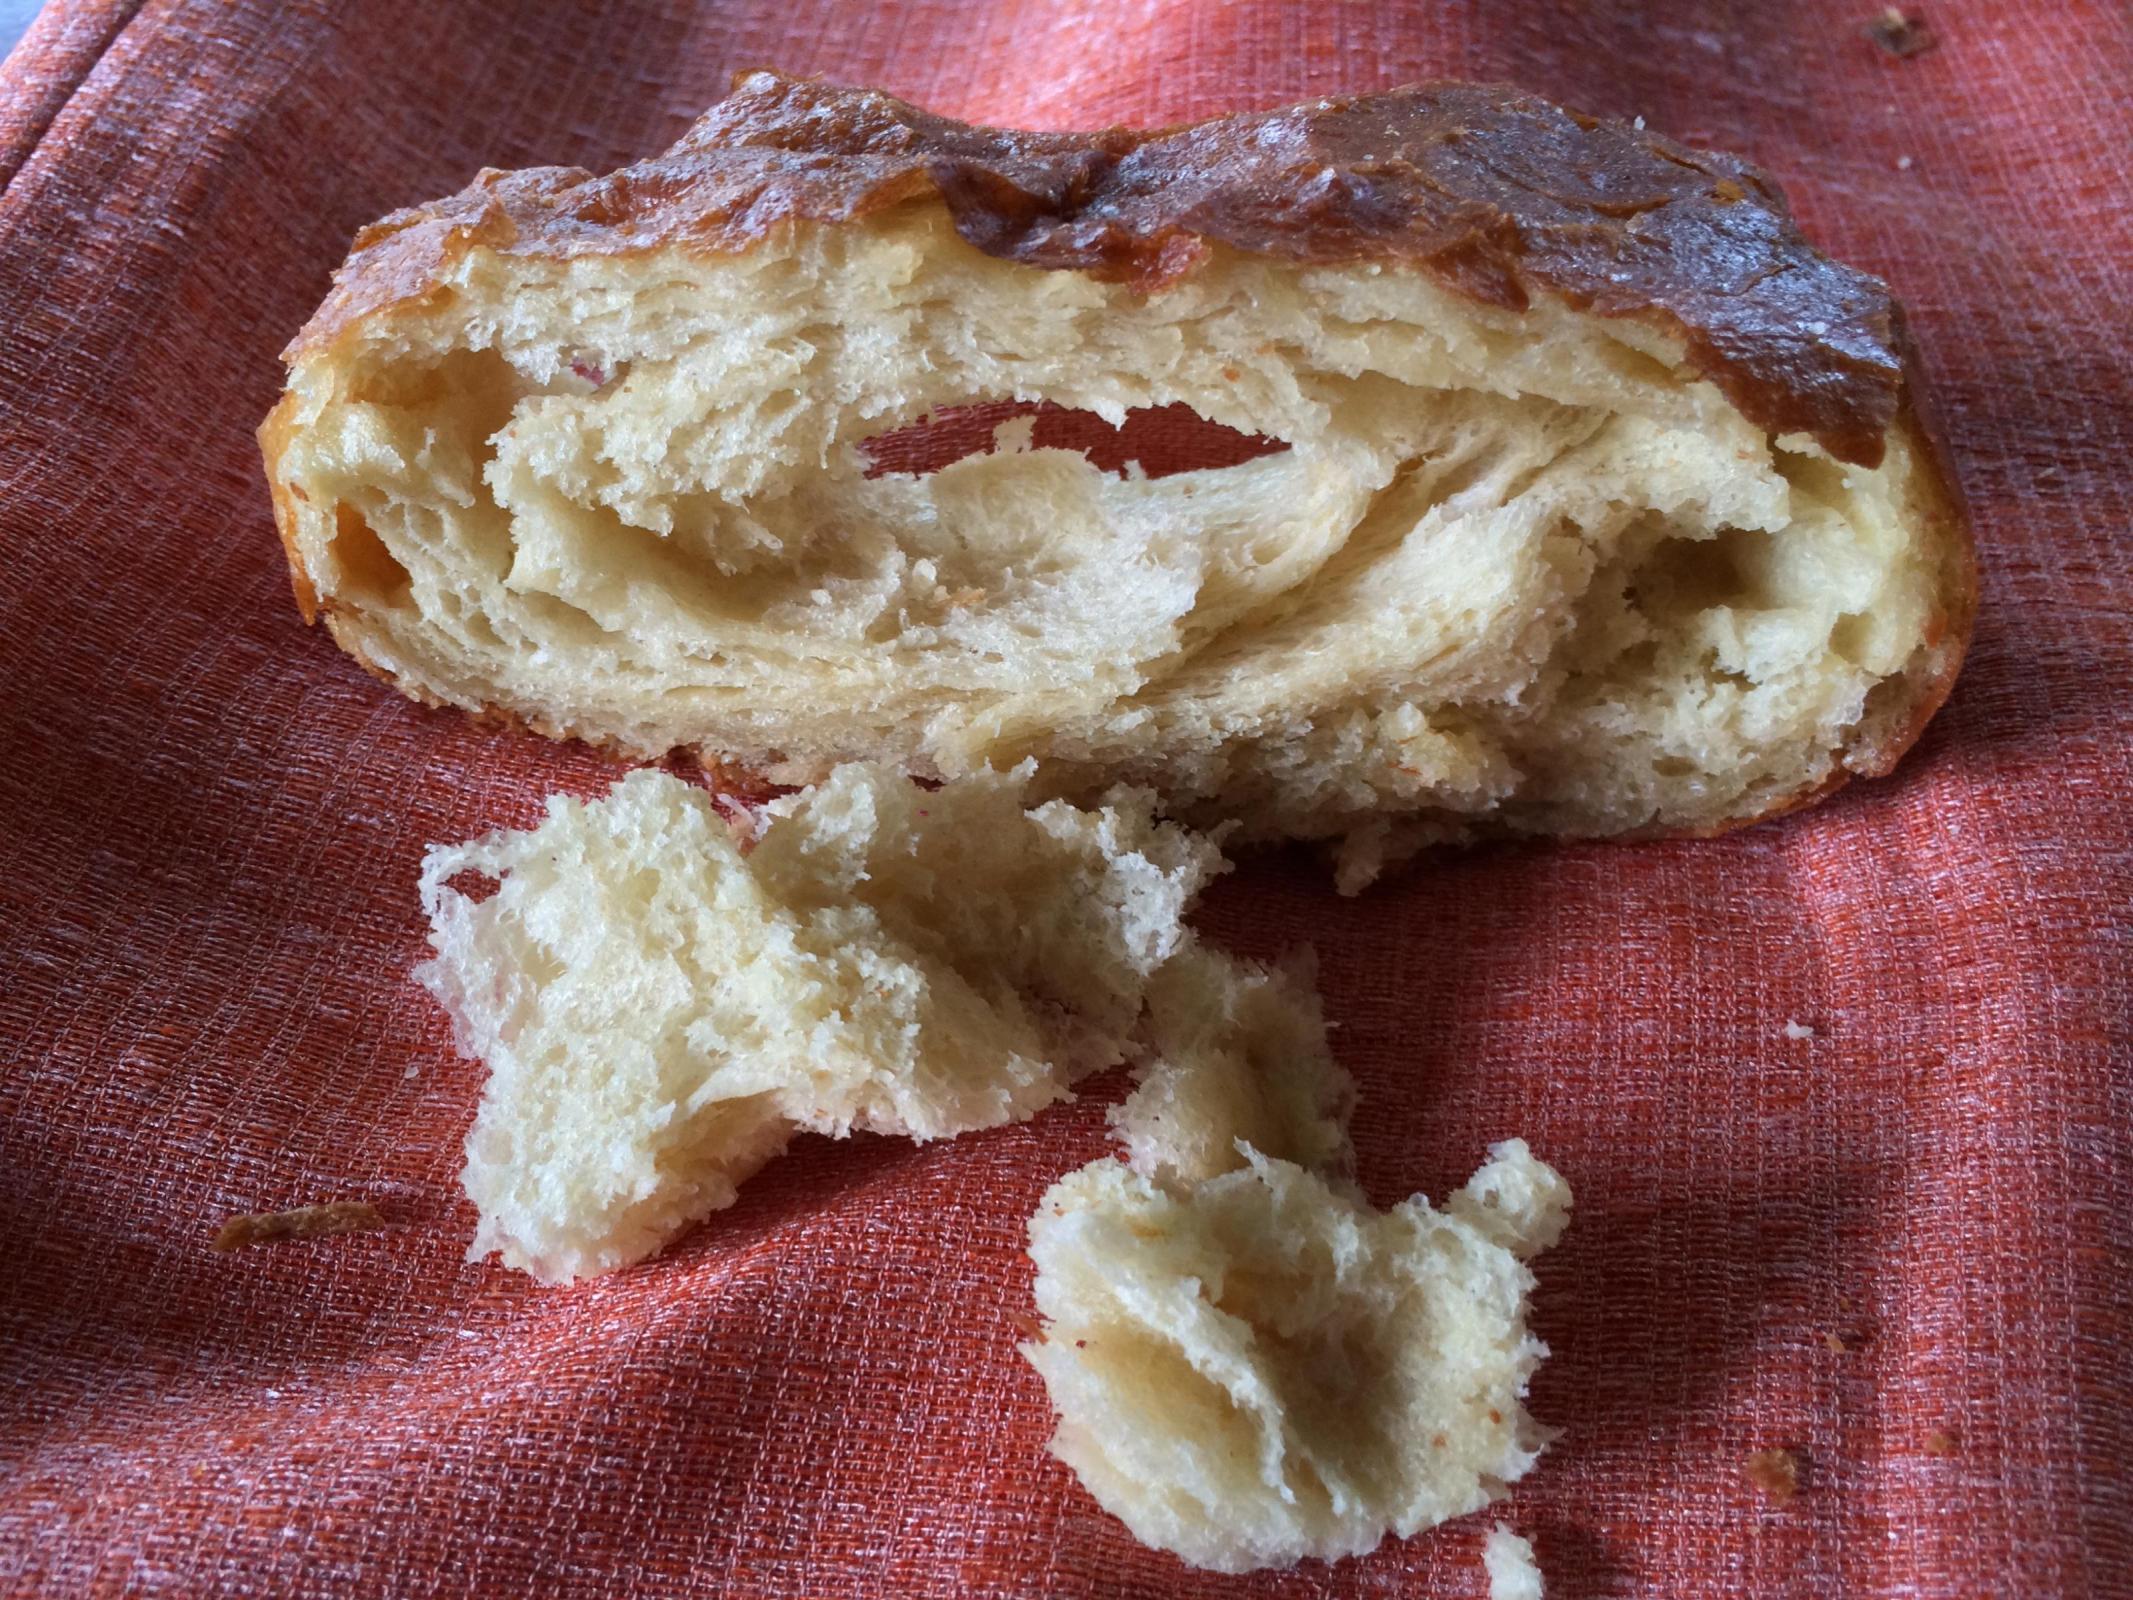
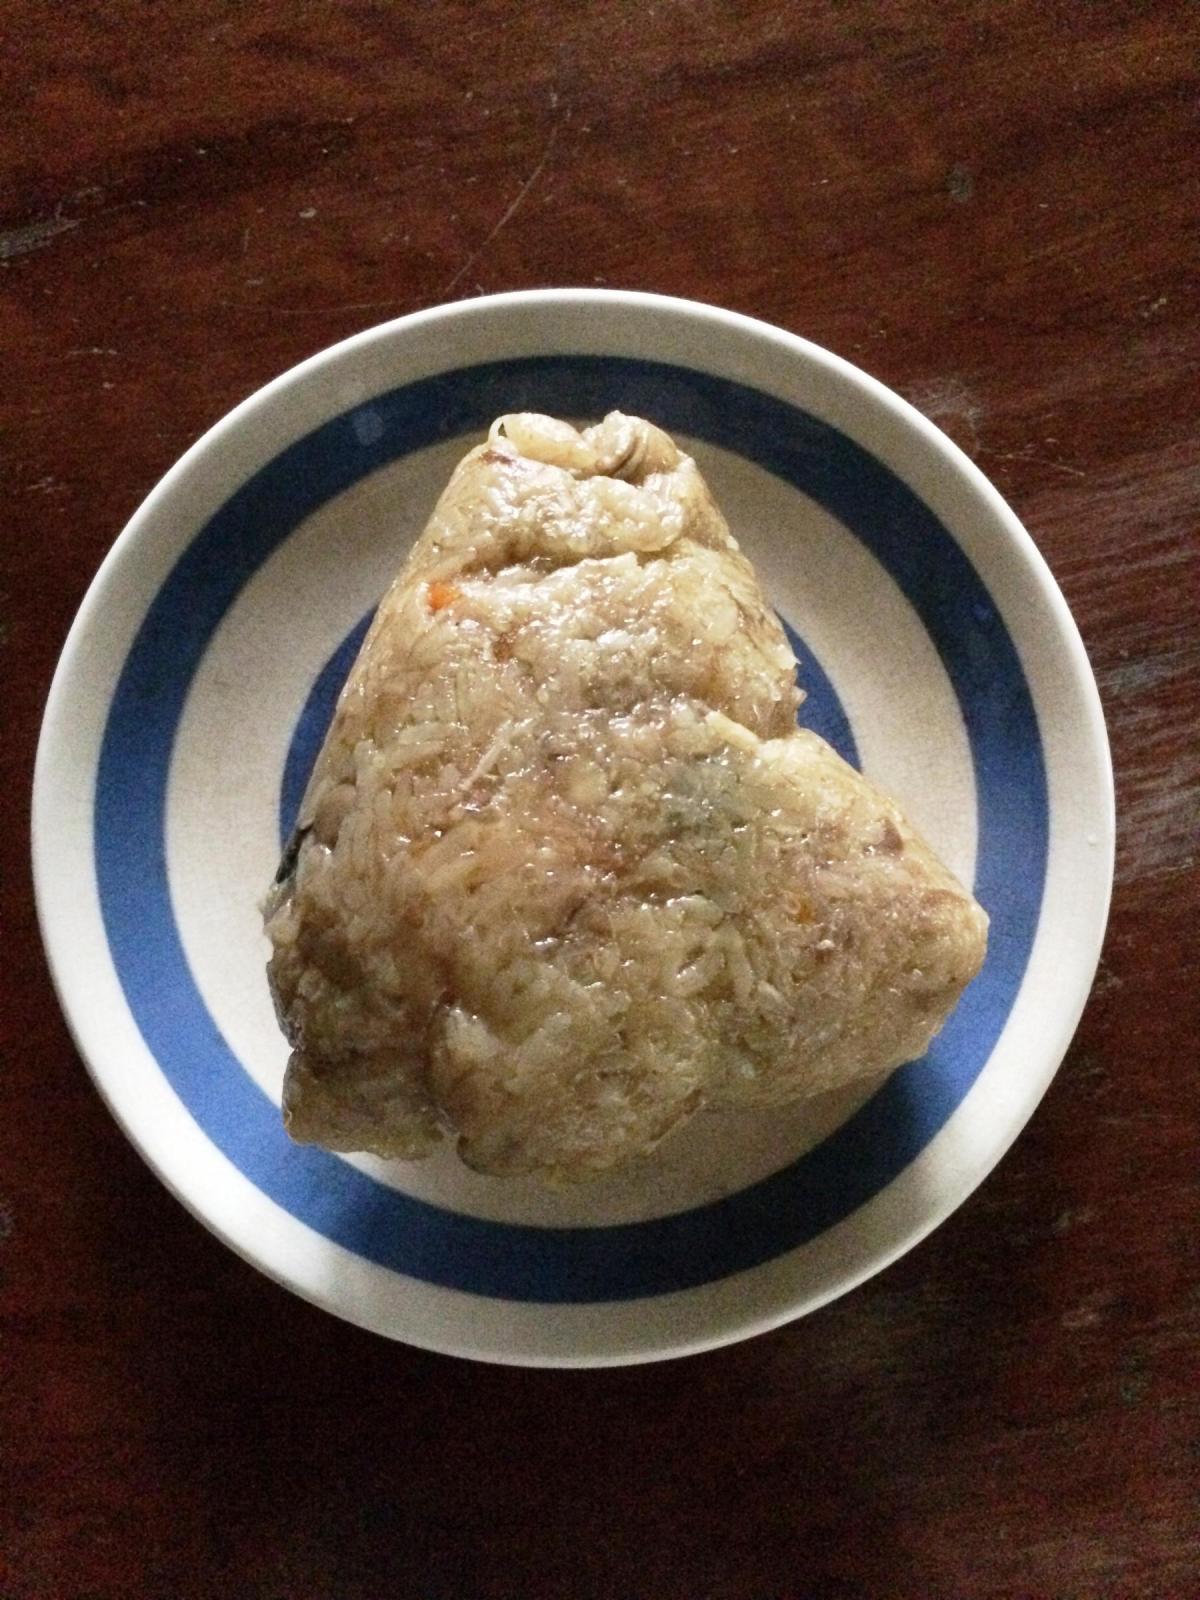
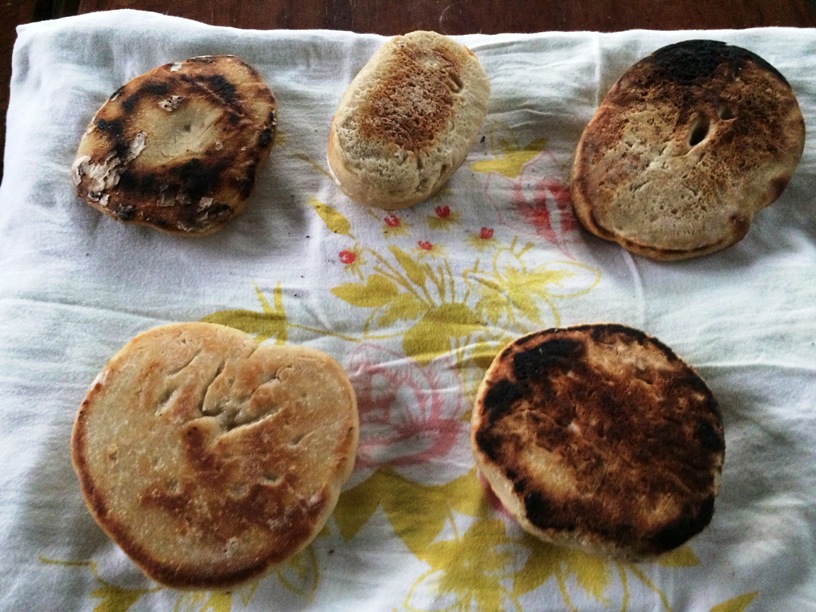
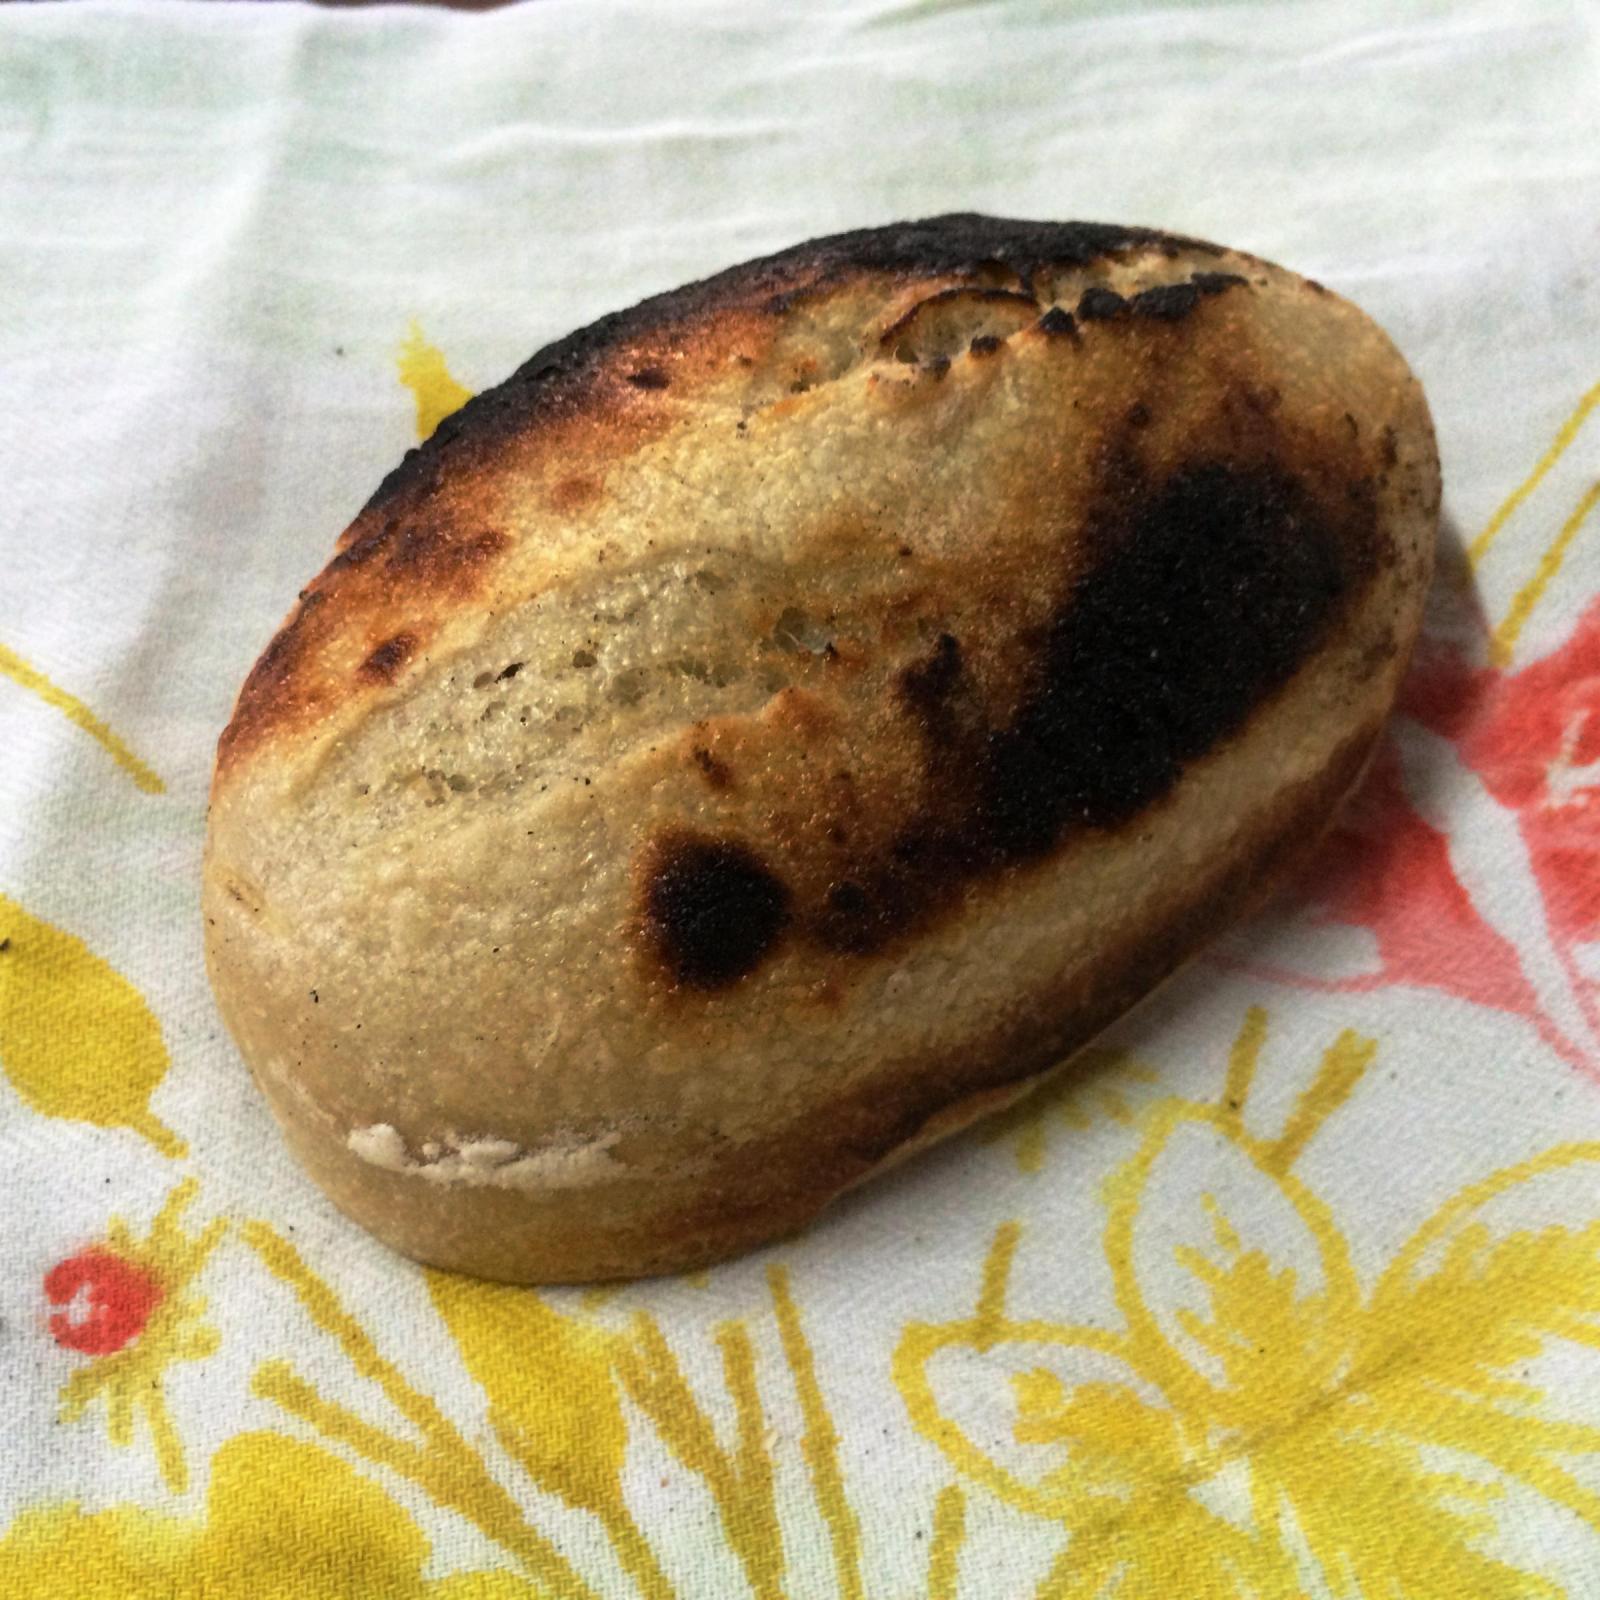
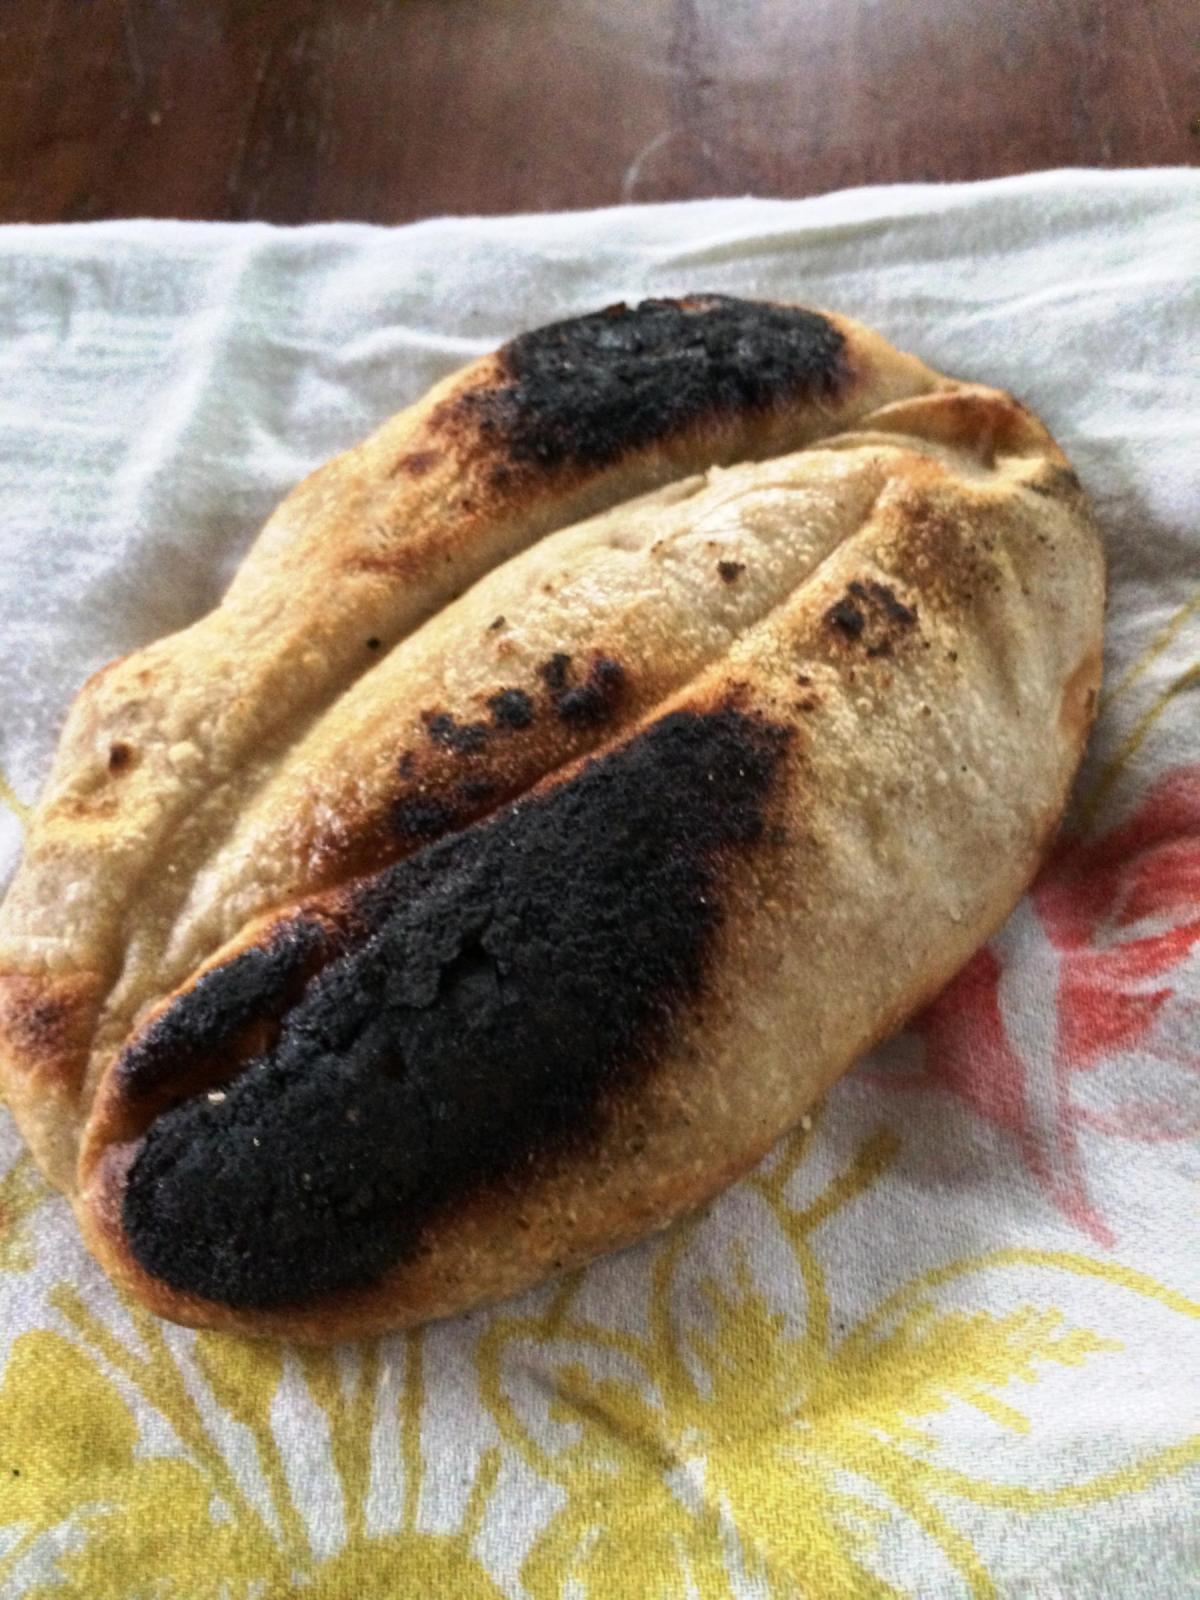
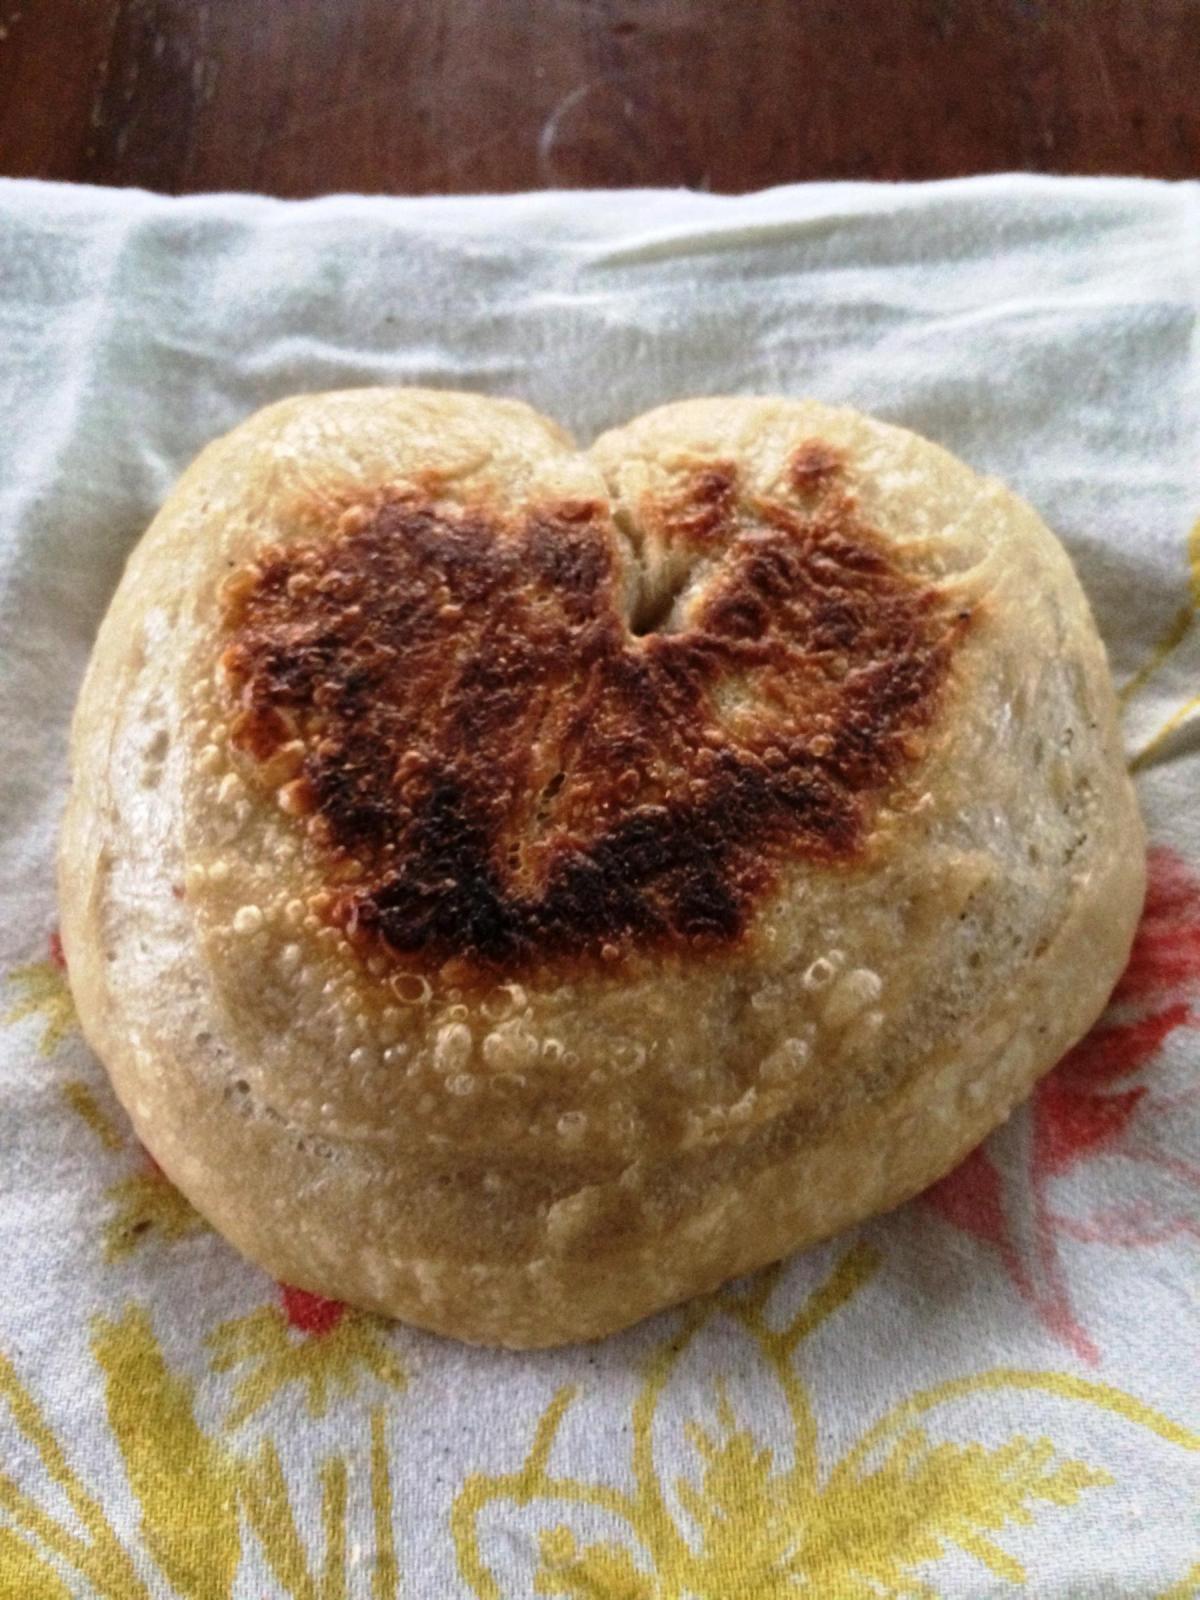
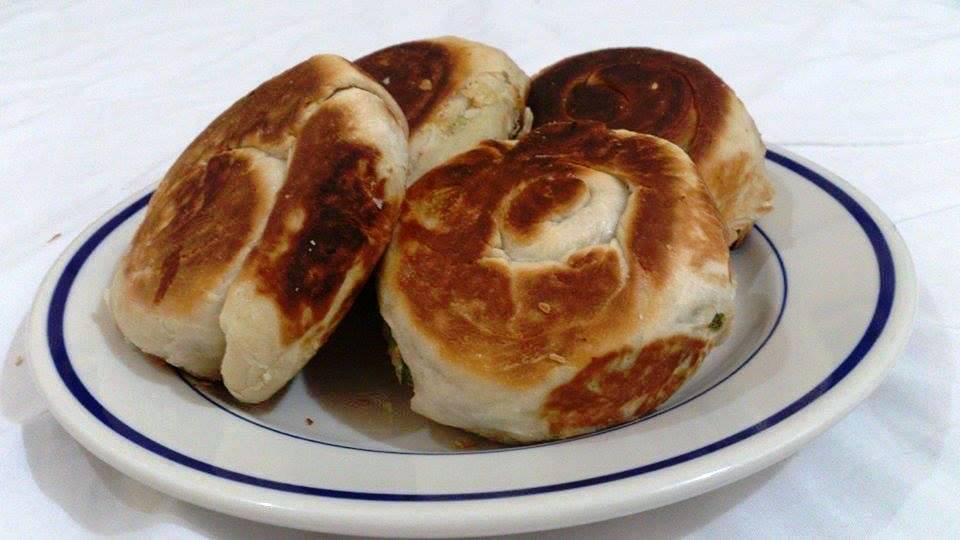
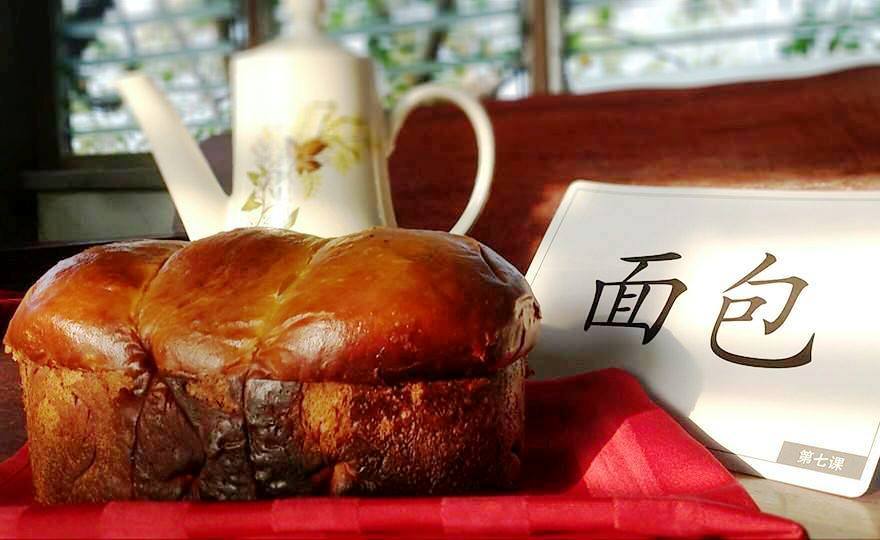
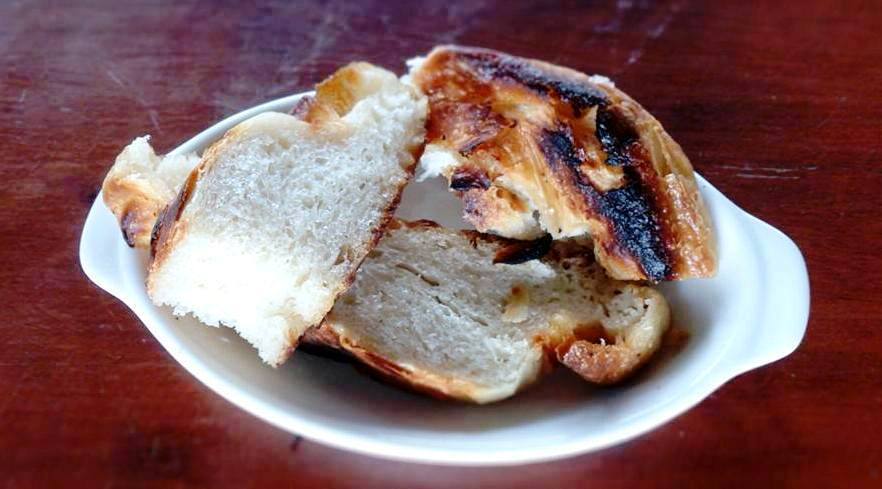
The crust was nicely browned and charred, I must admit that I left it a moment longer that's why it was charred on some areas. Yes I like a bold bake but not to this extent (I just said to myself, at least it is not "charcoal" and still edible) so I was surprised that it added a whole new dimension to the flavor profile; the bittersweet caramelized notes of the crust is delicious; now i know why some breads are intentionally charred like pizza napoletana. Also, It looks like it was scored but it wasn't. Those white "spots" are just areas not directly exposed to the radiant heat at the bottom of the pot which came from how I positioned the two llaneras to support the bread. A pretty accident indeed!


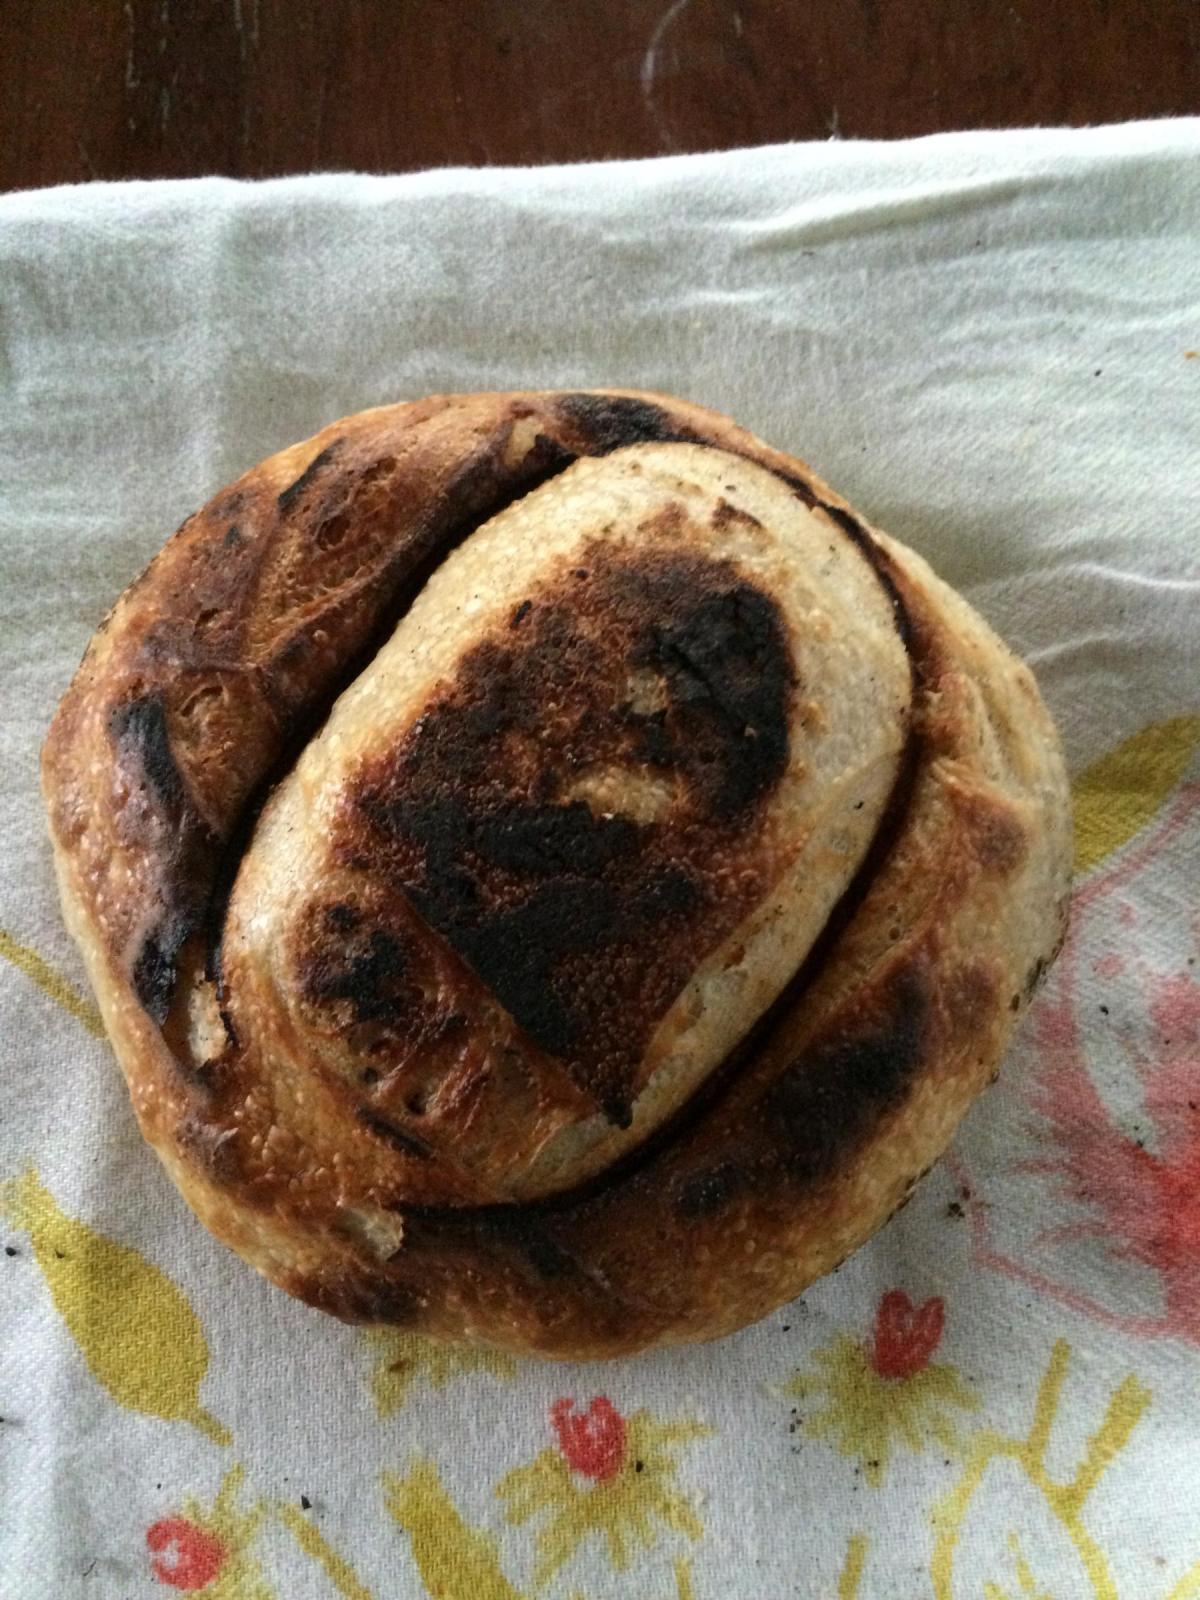
The fried bottom, it is also crisp but in a different way!
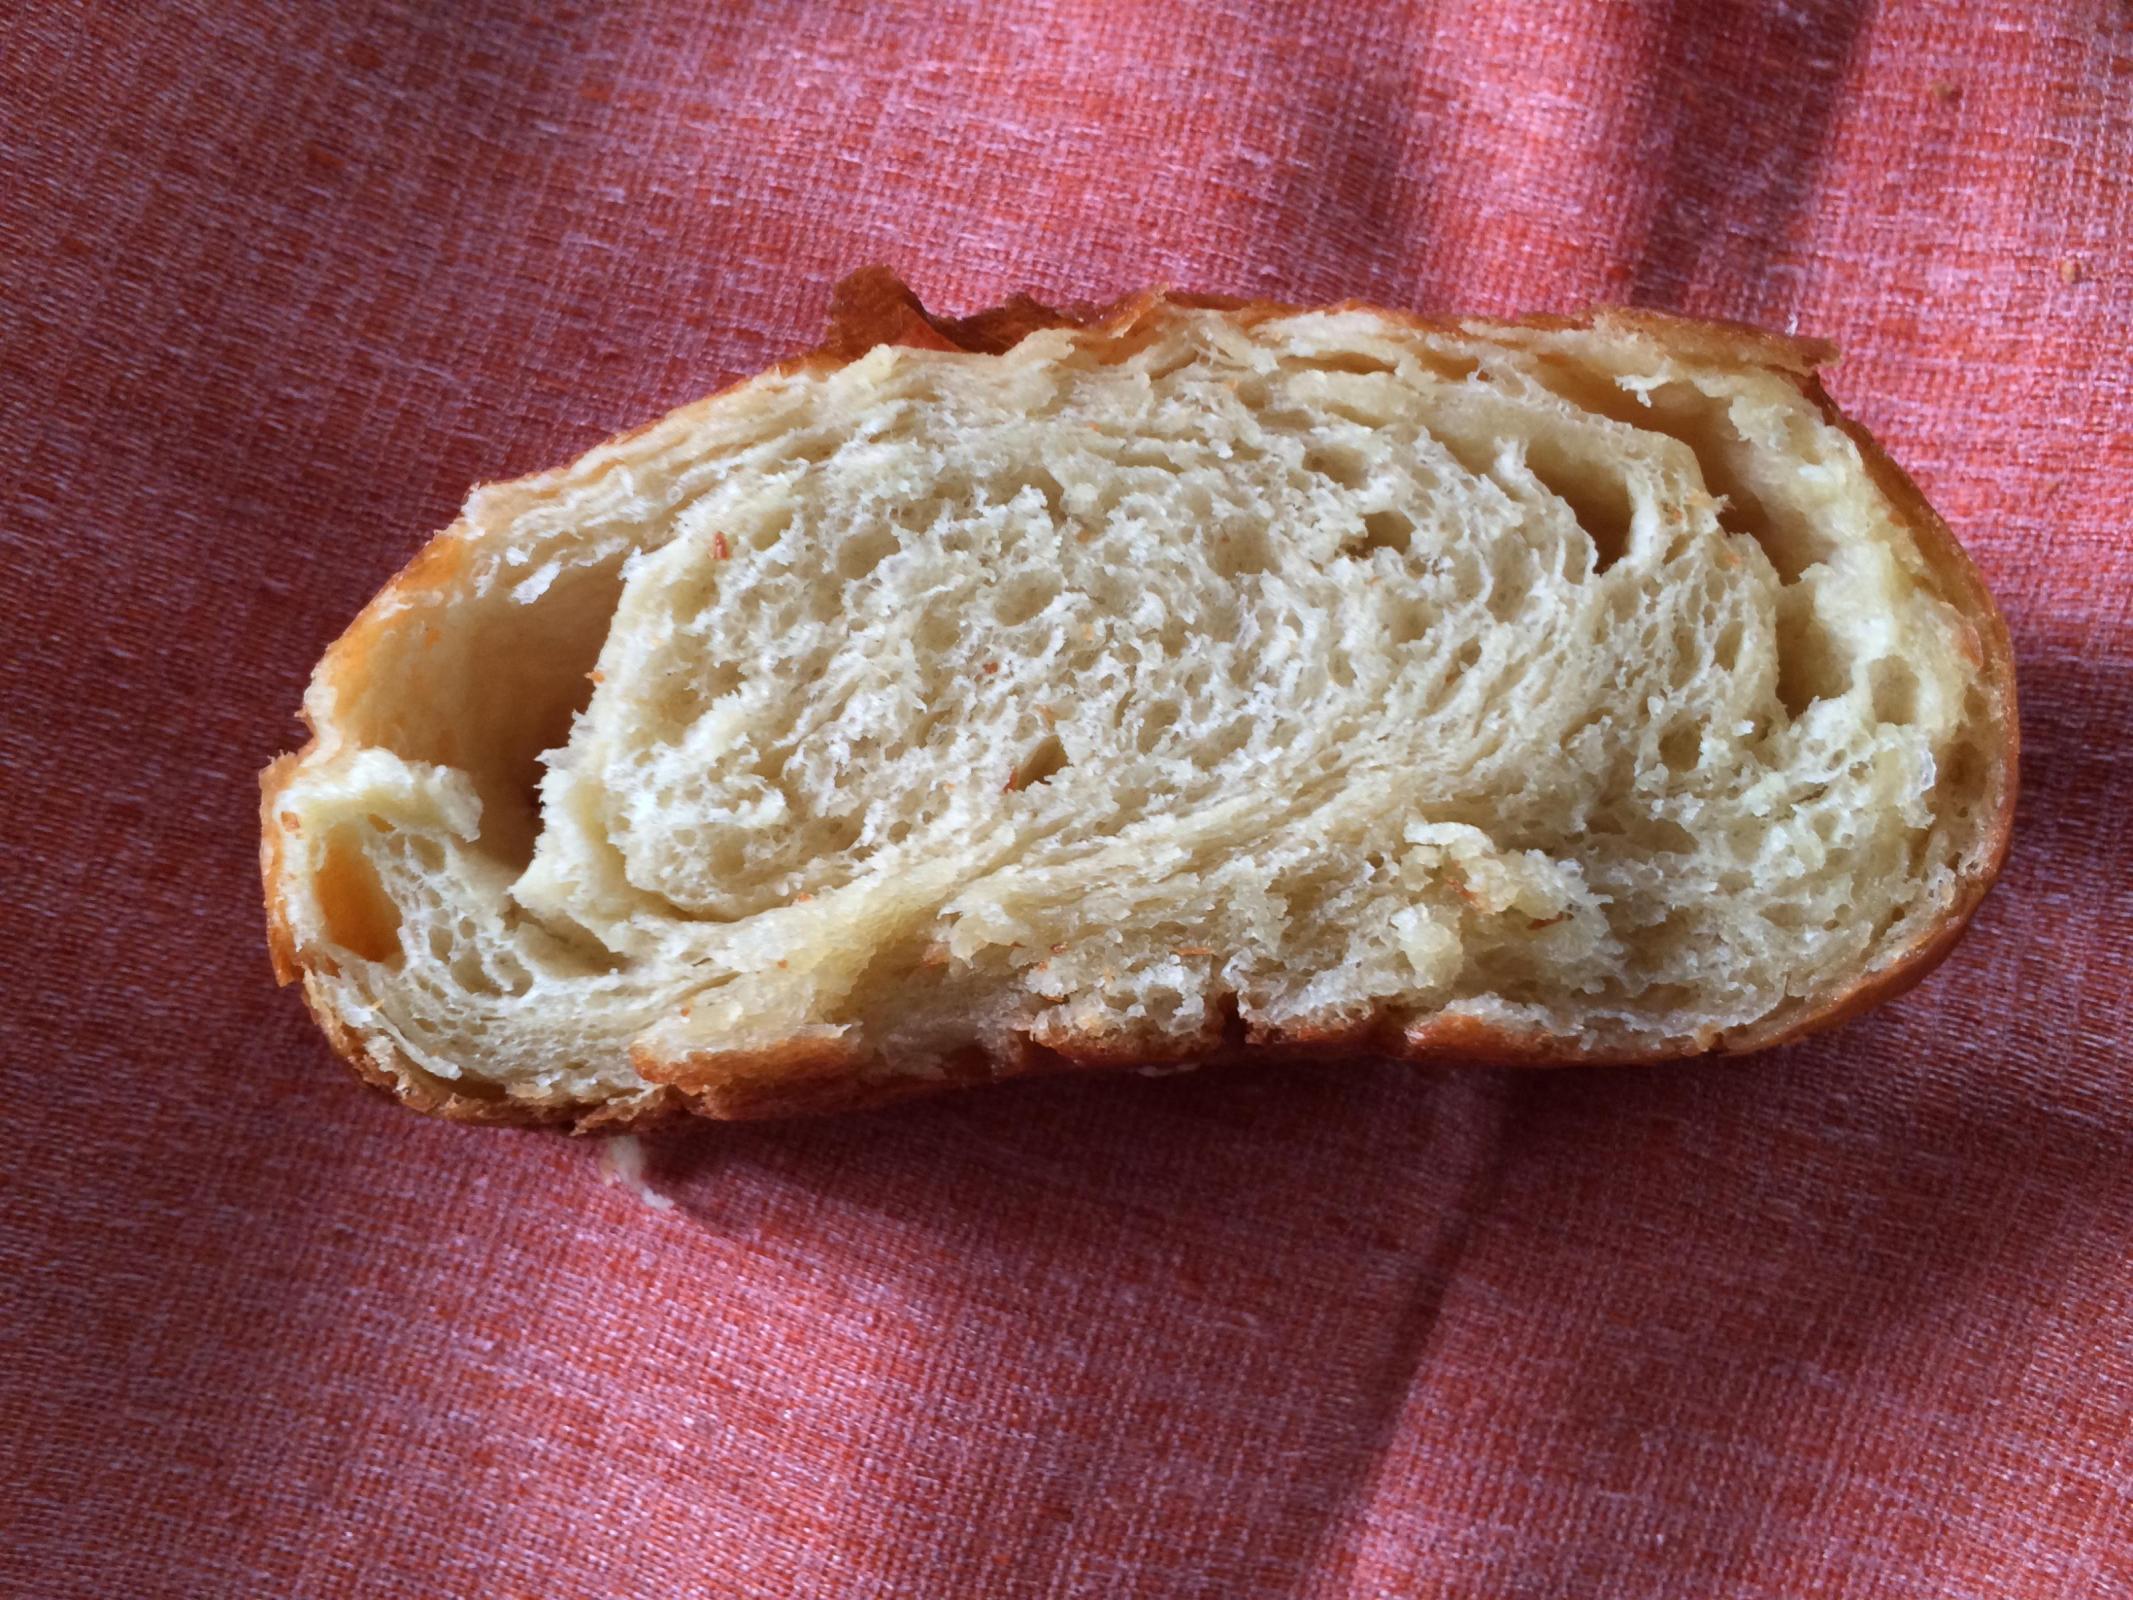
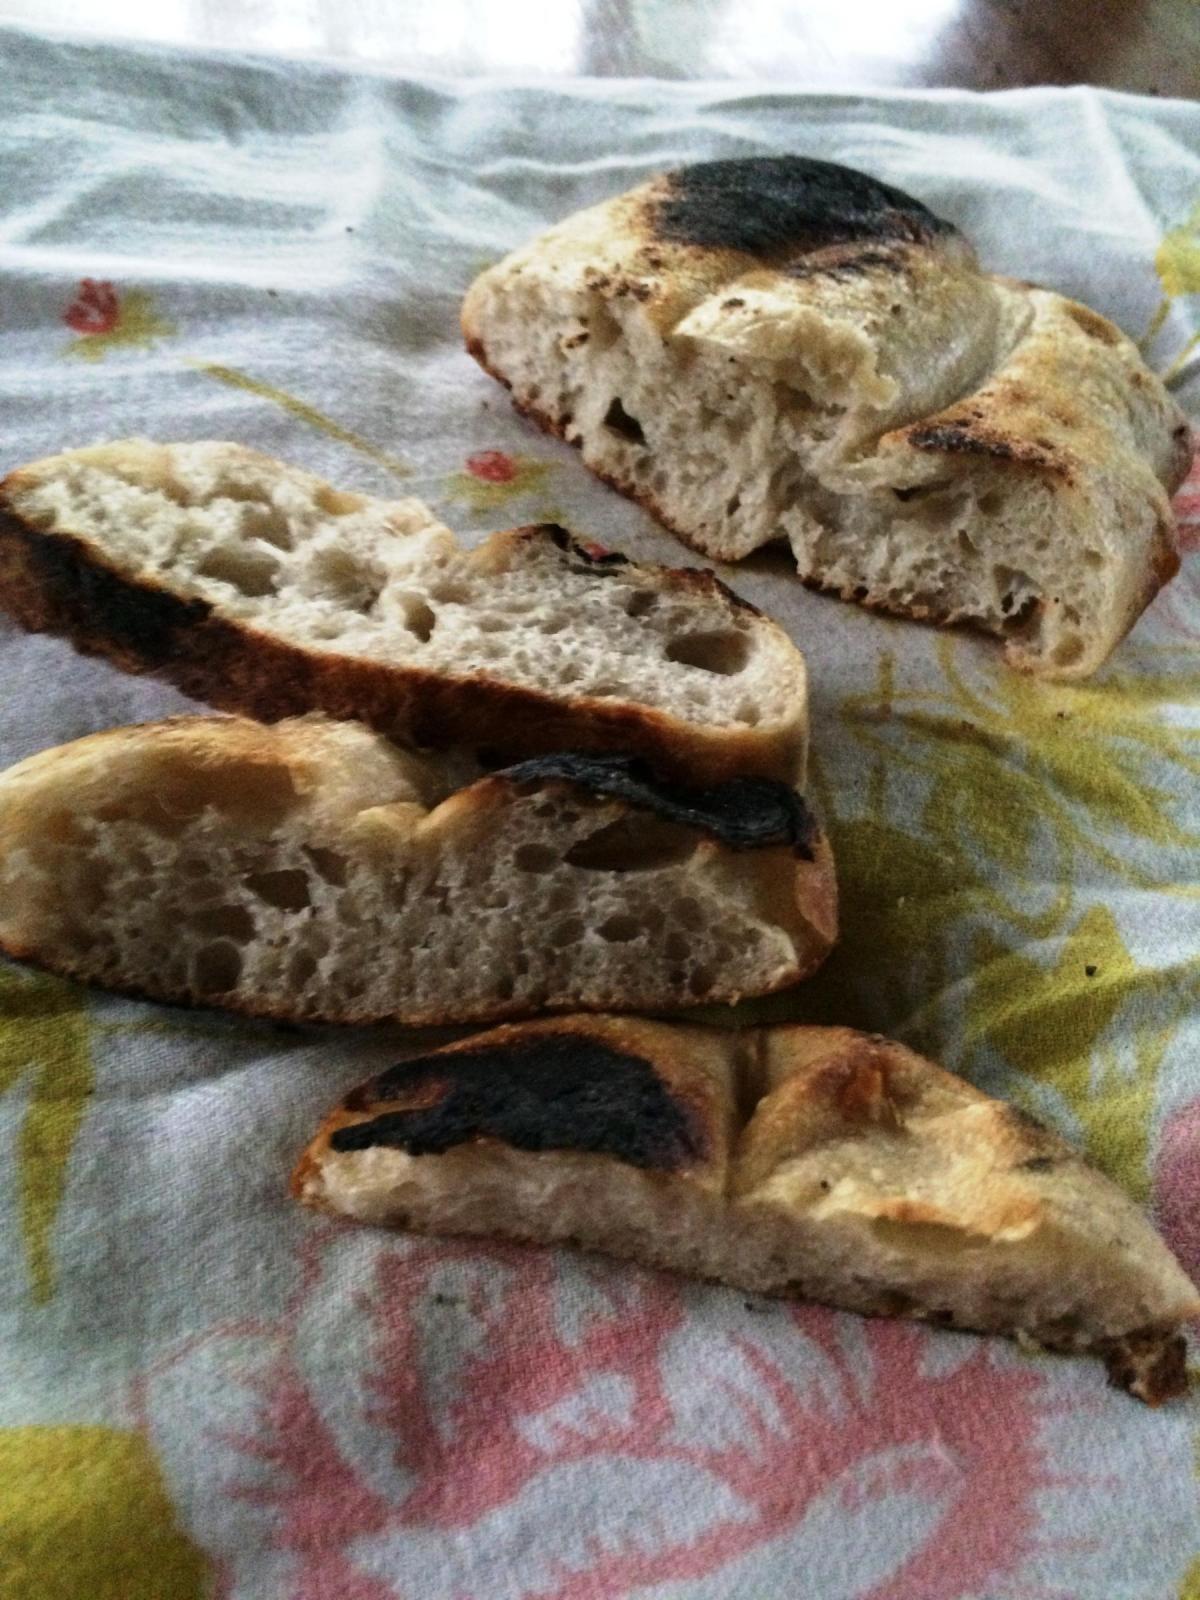
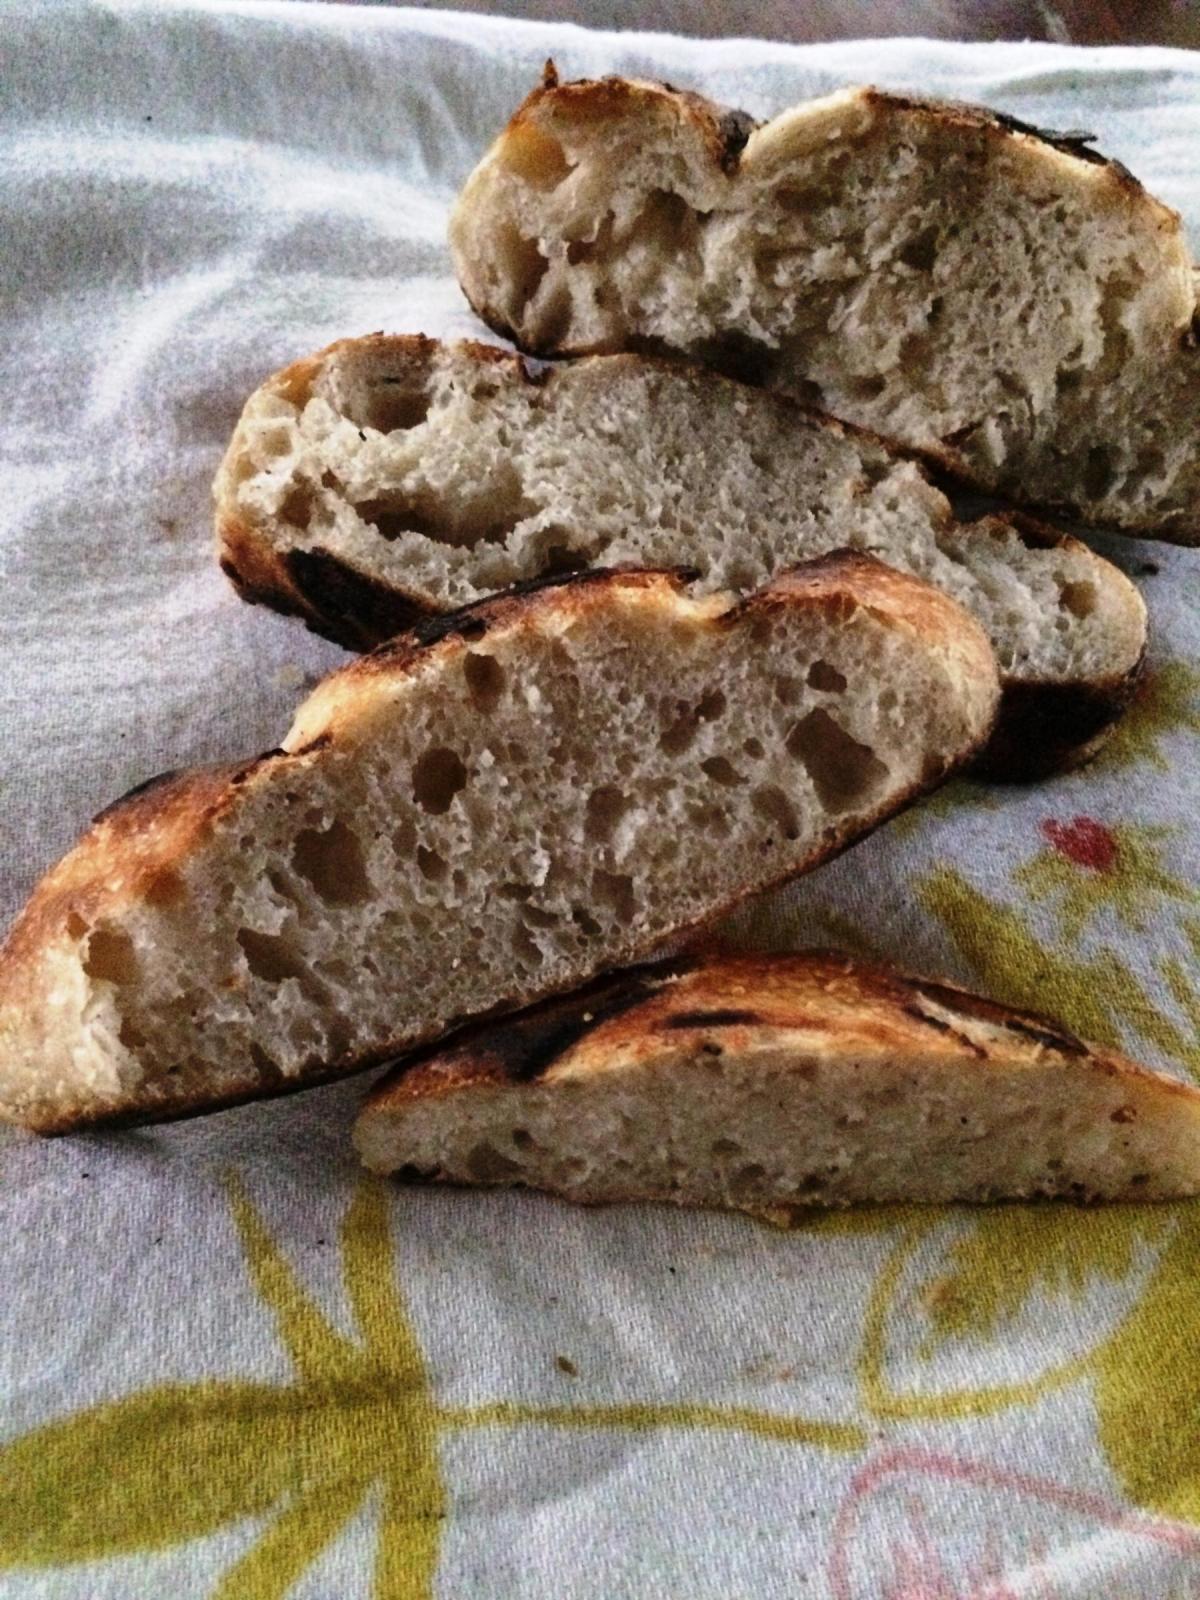
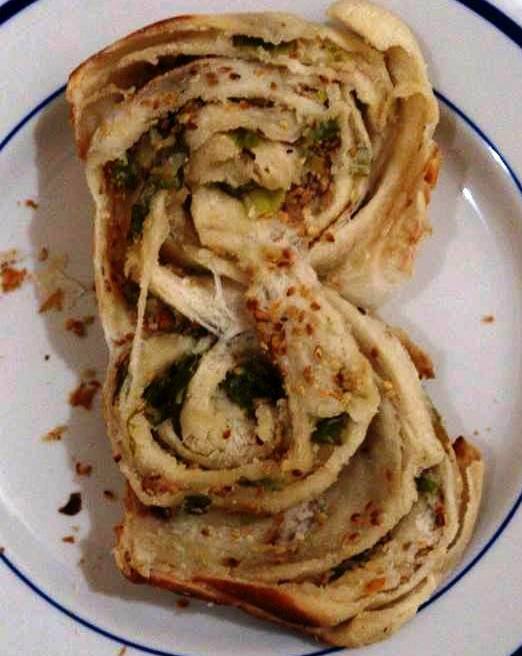
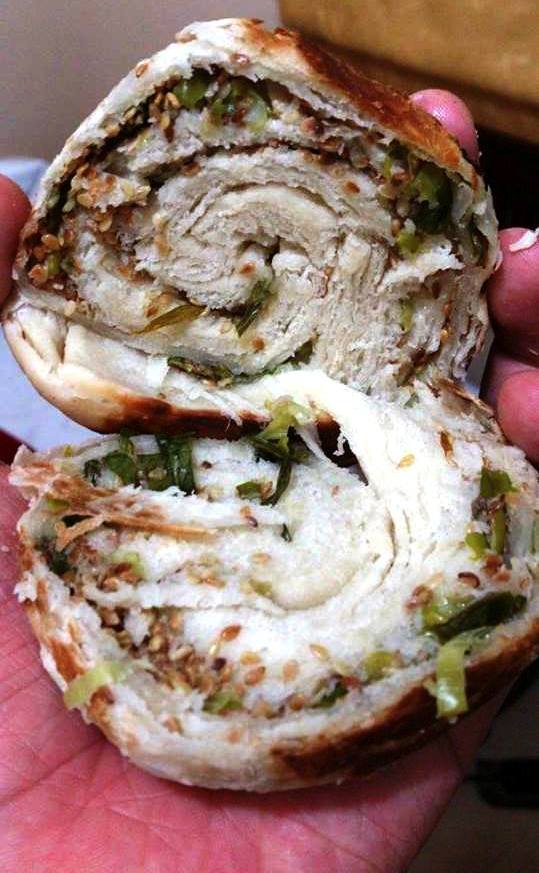
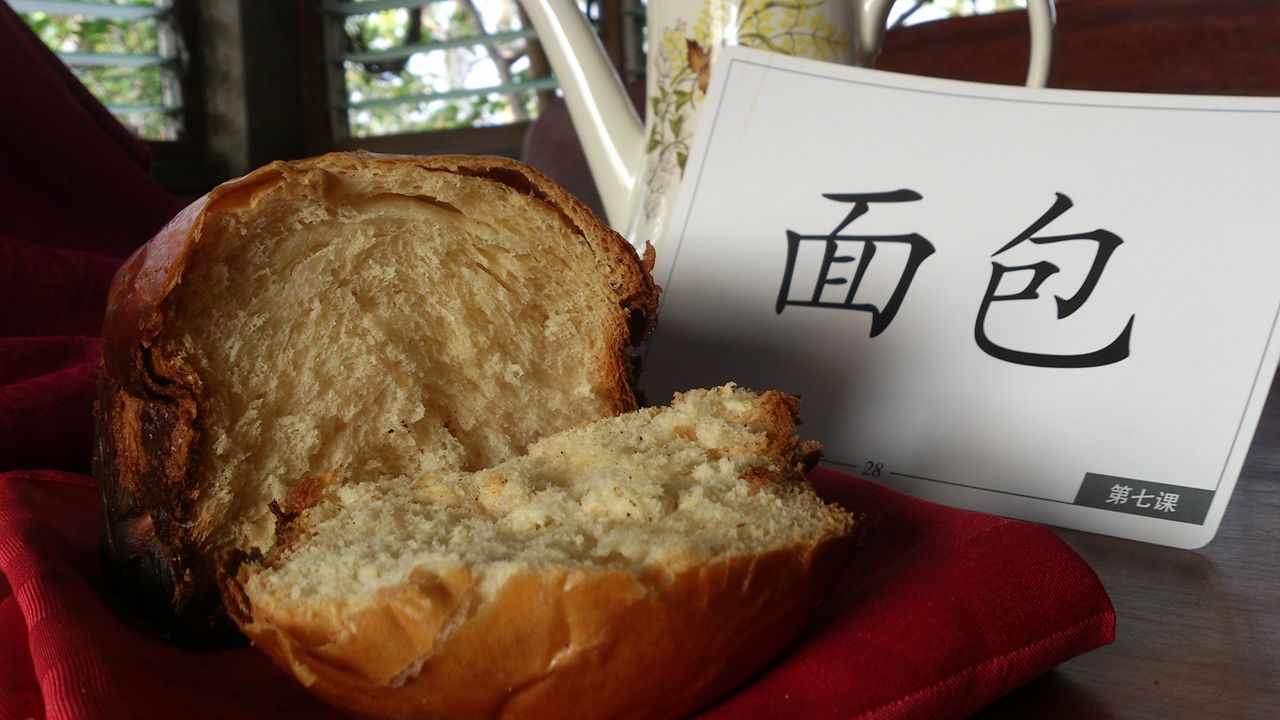
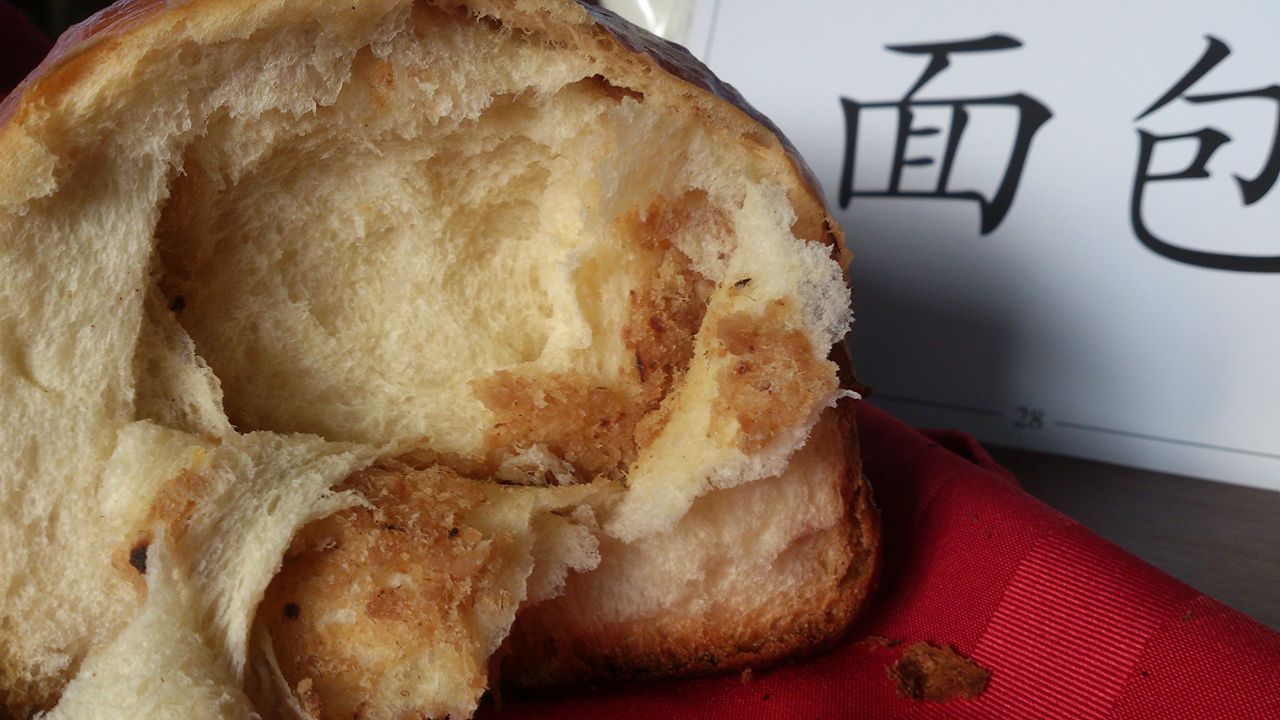


Crumb shots


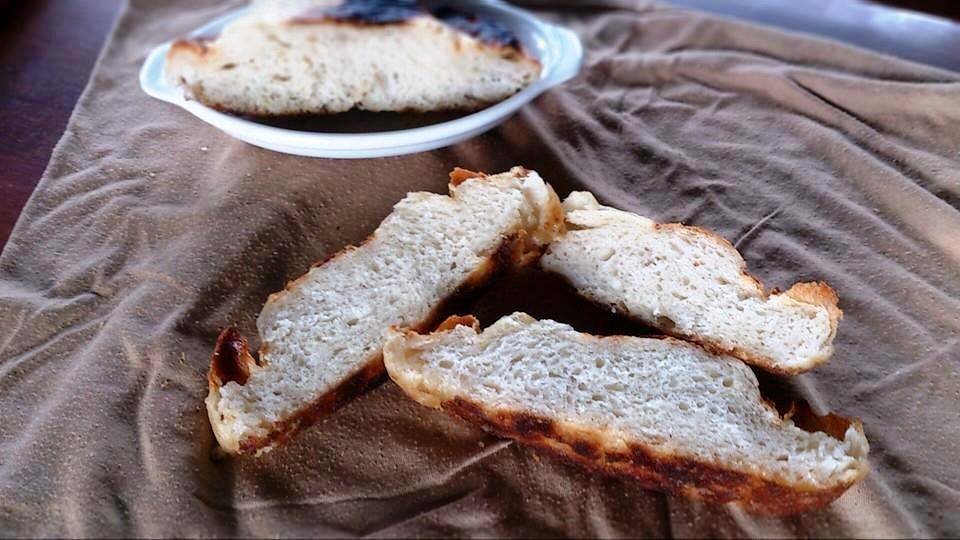
The bread is sweeter and richer than my previous attempt, the crumb is chewy and the thin crust is crisp all over. One problem though is the lack of spring because of the lower cooking temperature so the bread a little flat with a slightly tight crumb but the trade-off is worth it, I will probably try next time with a dryer dough for an already tall loaf and a better support of the structure in that wet environment.

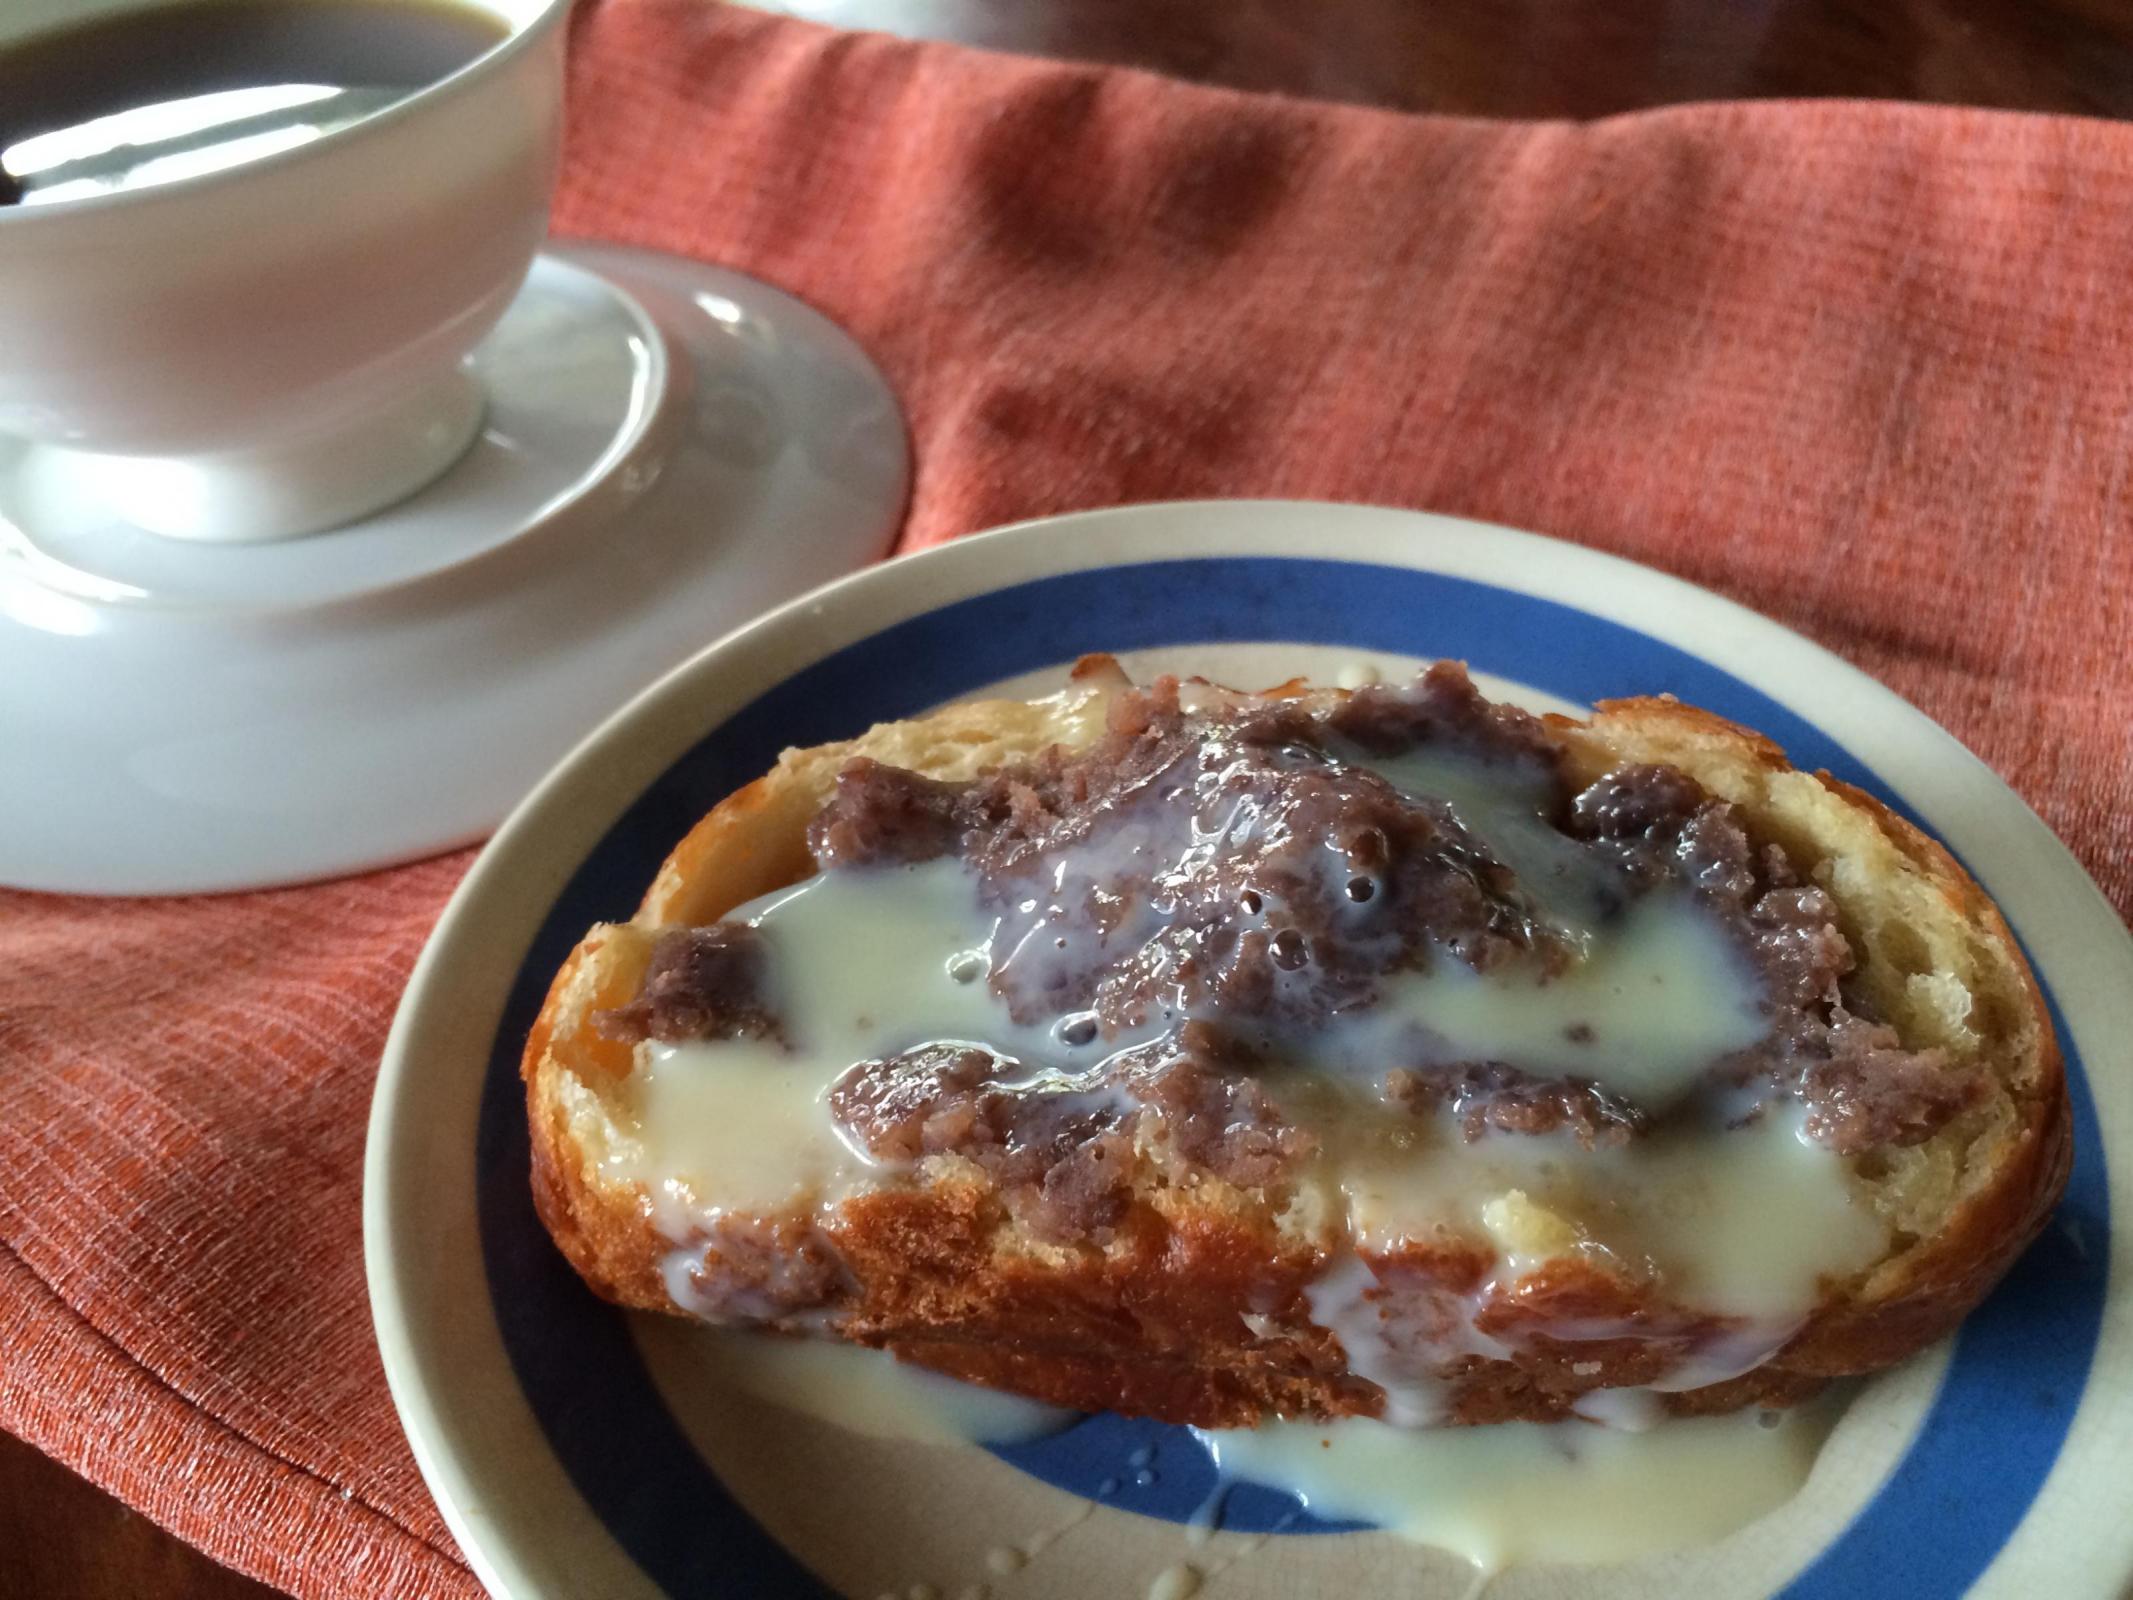
This is what was left 5 minutes after I served the bread...


Graduation is near and i will move to my dormitory in the next few days to have my on-the-job training in another town, a 3 hour drive from where I currently live. I will really miss my pot for almost two months that's why I'm baking as much as I can. 

This is my hero and my best friend since 2011. I bought it using my savings from my daily allowance without knowing if I will succeed. I'm glad I had the courage to try it, many delicious breads and baked goods that my family ate and loved came from it. Thank you very much!

PalwithnoovenP's picture
PalwithnoovenP

My father and I went to the local Chinatown here last month. There he allowed me to buy anything I want as he knows most of my favorite treats are there. It feels like we’re in an old Chinese movie as we walked along the narrow alleys witnessing exotic items being sold. There were sea cucumbers, fresh mushrooms, fresh cherries, kumquats, and HUGE strawberries; very expensive and not usually found in everyday markets. I wanted to take pictures but my hands are just busy shoveling food into my mouth. We even rode a Kalesa (horse pulled two wheeled vehicle) on our way back to the bus station, again very movie-like. XP

Of course, I wouldn’t go back home without buying my favorite stuff from my child hood, pork floss! Here, it is called ma sang/ ma hu/ ma tsang. I really don’t know the difference between them but the grocery where we bought it sells ma hu with seaweed and the ma sang without it and appears to be drier, the pork floss I grew up with. I love eating it with congee as a child but now that I’m older I love it more with rice.

The main inspiration of this bread is the Floss bread of a famous bakery chain, soft bread with special filing topped with spicy meat floss. Here it is so expensive! Yes, it’s delicious but its size makes me feel like it’s not just worth the money; so I made my own version.

I made the dough using cream as I like its taste from the breads I’ve made before with it, so soft and bouncy with an unmistakable flavor and aroma. Most recipes that I’ve read asks for condensed milk and mayonnaise for the filling; I didn’t have both so I used the leftover cream and added sugar to it and to emulate the tang of mayonnaise, I added calamansi, our local citrus here that has unique flavor that lemon or lime cannot replace.

I divided the dough into three, rolled it flat, spread the cream filling and put a generous amount of floss then I rolled it like a spring rolls before proofing it in my llanera (local flan molds). It was glazed with egg and cream before I finally baked it in my clay pot for 40 minutes. Here’s what I’ve got…


It looks like its burnt but believe me it's not, I just like a bold bake. The bottom is also crisper since the heat in the pot is more intense at the bottom. That black thing is just some pooled glaze (I don't have a brush to glaze breads, I only use my fingers) that apparently burnt on the surface.

Here are the crumb shots:


Sliced


Pulled


Pork Floss, don't be shy! Show yourself!


We can't see the cream but the inside is moist and sweet like it is saying it really there and melds well with the bread and meat. I took the center roll, smothered it with the last of the filling and scattered more floss on top, heavenly! Unfortunately that photo was corrupted so it isn't included here. I think I will make it next time as a unique cake for someone special! Haha 

By the way I am trying to improve my photos and baking! Thank you very much!

Pages

Subscribe to RSS - PalwithnoovenP's blog