The Fresh Loaf

A Community of Amateur Bakers and Artisan Bread Enthusiasts.

pmccool's blog

January 3, 2025: The Fresh Loaf is moving! Content posted after 5pm Pacific time today will not be migrated. Learn more...

pmccool's picture
pmccool

This bake took place on Labor Day weekend.  My pullman pans were silently mocking me from their perch in the cupboard, reminding me that the last time I used them, the loaves had ears.  Or eaves.  That isn't supposed to happen with pain de mie.  Chalk it up to overfilling the pans.

So, this seemed like as good a time as any to experiment again.  As before, I used the pain de mie formula from Hamelman's 2nd edition of Bread.  In checking my previous numbers, it became evident that there was, indeed, an error in the math.  Having checked the scaling factor for my 9x4x4 pans, compared to the larger ones that Hamelman uses, it appeared that 810g of dough would be appropriate for one of my pans.  From that point, the rest of numbers were quickly calculated and I set to work.

This bread departs from the formula in three ways.  First, it contains 50% whole wheat flour, rather than being an entirely white bread.  Second, I took my first stab at using the tang zhong method, reasoning that it could benefit the texture of the finished bread.  Fifty grams of flour were combined with 250g of water and cooked until it formed a soft paste or roux.  Third, I substituted honey for the sugar in the formula, in equal weight.

The balance of the bread was pretty much according to Hamelman's instructions, except that I mixed and kneaded by hand instead of with a machine.  

The finished bread was much better than my first attempt.  Look, Ma, no eaves!:

The corners are slightly rounded.  Either there should have been a few more grams of dough in the pans or it should have been allowed to proof just a bit longer.  Or the shaping wasn't quite as uniform as needed.  I'm leaning toward the latter, since the dough was almost touching the pan lid when the dough went into the oven.

The crumb also suggests that the dough was neither under weight or under fermented:

Despite the less-than-stellar focus, it's easy to see that there is a small zone of compaction around the sides and bottom of the loaf.  It appears that the center of the loaf, which is the last to expand as the heat reaches it, has compressed the outer layer.  My read is that there may actually have been slightly too much dough in the pan, though not nearly as overloaded as my first attempt.  The bread was certainly easier to chew than its predecessor.

The results of the tang zhong showed up less in the form of a "shreddable" crumb and more in the form of a non-crumbly crumb that stayed moist.  Achieving a wispy, ethereal crumb would probably have required twice as much time in kneading as I used.  I'm happy for the way that the bread didn't dry and crumble, which whole wheat breads are prone to do.

For next time, then, a small reduction in dough quantity, keep the tang zhong, and work on shaping for more end to end uniformity.  I'll probably also drop the oven temperature by 25-50F from Hamelman's recommendation.  Although he is known for his preference for deeply colored crusts, my opinion is that less is more for a pain de mie style bread crust.

Paul

pmccool's picture
pmccool

It was time for a break from the whole-grain breads that I have made, more often than not, in recent months.  Even so, I wasn't looking for an all-white bread, either.  In thumbing through the second edition of Hamelman's Bread, I came across his Sourdough Seed bread.  It calls for a bit of rye flour, and a generous helping of flax, sesame, and sunflower seeds.  Although there weren't any flax seeds on hand, I figured I could bluff my way through it with a bit of improvisation.

In casting about for something to substitute for the flax seed cold soaker, I came across some oatmeal that had been milled from oat groats while playing with the Kitchen Aide grain mill attachment.  Okay, so oats are a cereal grain, which isn't what people usually mean when they refer to seeds.  And these are ground up, not whole.  Work with me, people, this is improv.  So, flax seeds out, equal quantity of oat meal in.  Cold water out, equal quantity of boiling water in.  Now we have an oat meal scald, instead of a cold flax seed soaker.  

Since my starter was at a healthy stage of development in the refrigerator, it went straight into the liquid levain with no preliminary feedings.  By next morning, the levain was bubbly and ready to go.  The oat meal scald was also ready, although not nearly so demonstrative, which was very much in keeping with its Scottish reserve.

Before mixing the dough, the sunflower and sesame seeds were toasted in the oven.  Some stayed rather pale, others were a beautiful deep brown.  After toasting, they were allowed to cool.

Per the instructions, the soaker (scald, in this case), the levain, the seeds, and the final dough ingredients were all combined and mixed.  Mixing was done by hand, rather than by machine.  The resulting dough at first appeared to be somewhat dry, since it required some work to get all of the flour absorbed.  Once past that stage, it switched to being a rather sticky dough and stayed sticky throughout.  This may have been an artifact of the oat meal scald.  After mixing to a rough dough, it underwent another 8 minutes of slap and fold kneading.  By the end of that workout, it was showing good gluten development.  

The dough was shaped into a loose boule and placed in a plastic-covered bowl to ferment.  About an hour and a quarter later, the dough was given a stretch and fold, then reshaped into a boule and returned to the bowl for roughly an hour and a half of additional fermentation.  I was surprised when I uncovered the dough in preparation for shaping by the scent of peanut butter.  It wasn't really that, on closer consideration, but that was how my brain first interpreted the the toasty/oily fragrance of the sunflower seeds and sesame seeds in the dough.

At the end of the bulk fermentation, the dough was divided in two.  Each piece was pre-shaped, allowed to rest for a few minutes, then given a final shaping as a batard.  Final proofing was in parchment couches with side support.  It took nearly three hours of final proofing before the bread was ready for baking; kitchen temperatures were in the 70-72F range yesterday.  

Baking was pretty much as instructed, with steam.  I chose to go a few minutes longer with the bake to get a darker crust color.  The bread was removed from the oven when the internal temperature was 207F.

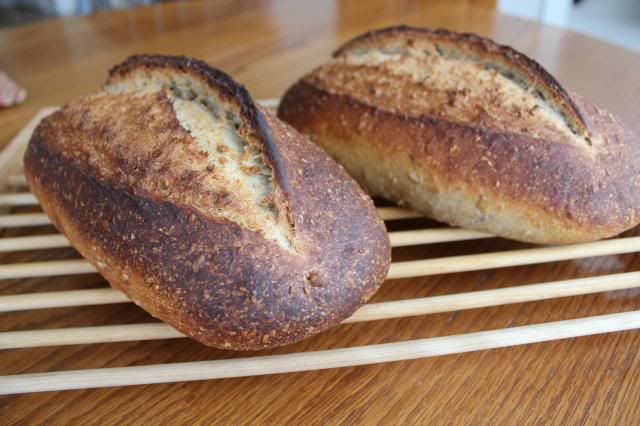
While I would have liked additional oven spring, that may not be a reasonable expectation, given the load of the seeds and the scald.  Both loaves have a lovely ear.  The coloring of the grigne shows that the bread continued to expand throughout the bake.  I had noticed a lot of condensation of the steam on the surface of the loaves a couple of minutes into the bake, which helped keep the crust soft and allow good expansion.

Here's another picture of the baked loaves:
The crumb, when I cut some slices for toast this morning, has a range of bubble sizes:
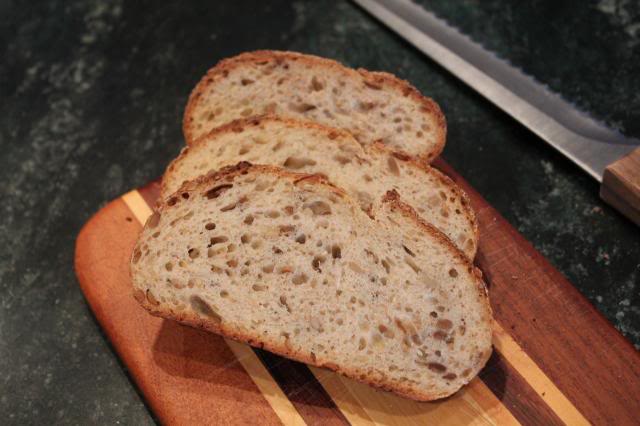
None are especially large, but, when you look at the seed distribution, there really isn't much they could have grown without banging into a seed of some kind.  The crust was initially very hard.  After 24 hours in plastic, it has softened somewhat.  The crumb is very moist and cool, some of which I attribute to the oat meal scald.  The flavor is definitely tilted in the direction of the toasted seeds,with plenty of nutty and toasty notes.  I can't distinguish the oat meal or the rye flour as individual flavors, although I am certain that they are part of the background grainy flavors.  The crust contributes hints of caramel, as well.  Overall, it's a very good bread that I enjoyed toasted and expect to enjoy as the foundation for sandwiches.  My thanks to Chef Hamelman for creating a bread that is still good in spite of my unanticipated variation.

Paul

pmccool's picture
pmccool

A little something that I put together for breakfast this morning.

Waffle batter:

1/2 cup buttermilk

1 cup orange juice

1 large egg

1/3 cup vegetable oil

1/2 cup AP flour

1/2 cup whole wheat flour

1/2 cup oat flour

1 teaspoon baking powder

3/4 teaspoon baking soda

1 teaspoon cinnamon

1/2 teaspoon ginger

Whisk together the buttermilk, egg, oil, and 3/4 cup of the OJ, reserving the rest to adjust batter thickness.  Add the dry ingredients and whisk until evenly blended.  If needed, use remaining OJ to thin the batter to your preferred consistency.  Cook in a waffle iron.

Peach topping:

2 large peaches, peeled and sliced (approximately 2 cups)

1/2 cup orange-infused simple syrup

Heat the peaches and syrup in a saucepan, stirring occasionally, until peaches are heated through.

Serve waffle with a scattering of hot peaches and their juice/syrup.  If desired, dollop some Greek yogurt on top.

And yes, we desired:

If you don't have any orange-infused simple syrup on hand (and it was only happenstance that I did), you might want to play around with 1/4 cup each of water and sugar and a bit of orange zest, instead.  Or perhaps something else will tickle your fancy.

We were pretty happy with the way these turned out.

Paul

pmccool's picture
pmccool

We were jonesing for some blueberry pancakes this morning, so I threw together the following:

2/3 cup buttermilk

2/3 cup milk

2 large eggs

1/4 cup oil

1 tablespoon honey

1/2 cup whole rye flour

1/2 cup whole oat flour

1/2 cup whole wheat flour

1 teaspoon baking powder

1 teaspoon baking soda

1 cup fresh blueberries

First I whisked all of the wet ingredients until they were thoroughly blended.  Then I added the dry ingredients and whisked them to form a uniform batter.  Then the blueberries were stirred in.  This was allowed to stand 15-20 minutes so that the flours could hydrate somewhat.

The pancakes were cooked on a dry non-stick griddle over medium-high heat.  When the first side browned, they were turned and cooked until the second side was also browned.  The first side didn't display as much bubble formation as an all-wheat batter would do.  Once flipped, though, the now-upper crust helped trap the steam, making each one puff up.  I found it helpful to loosen the edges before attempting to lift the pancakes for turning or removal but didn't experience any problems with sticking.

The flavor was wonderful, in spite of my wife's initial skepticism about rye in a pancake.  Not only were they tasty, they also gave us a good shot of complex carbohydrates and antioxidants.  This amount of batter made 7 pancakes that were approximately 8 inches in diameter.

The flour blend wasn't by design; I just used what happened to be on hand.  Some experimentation with spelt or barley or whatever else you have will probably be equally delicious.

My wife's final comment was "You did write this down, didn't you?"  And now I have.

Paul

pmccool's picture
pmccool

Maybe this should be called Hamelman's Pain au Levain, mostly, because there were a couple of small excursions from the formula presented in Hamelman's Bread, 2nd Edition. 

Having enjoyed several days' worth of the Rustic Pumpernickel from Inside the Jewish Bakery, I was ready for a change of pace.  My starter was in need of a good feeding, so I have it a healthy dose of rye flour and water and left it to its own devices overnight.  The next morning, it was ripe and ready for action.  Gotta love these warm summertime temperatures.  At this point, I had no real plan, just a vague notion of something not-pumpernickel.  Remembering that I hadn't baked from Hamelman's book for a while, I started leafing leafing through it and came across the Pain au Levain bread.  Just the ticket, since it has a small portion of rye flour in it.

Since I had fed my starter with rye flour, I calculated that I would have a bit more rye than the formula called for even if I didn't add any in the final dough.  No problem.  It would still be good.  And, the bread flour that I used was the Great River Milling Unbleached Wheat Bread Flour which still contains 20% of the bran.  Again, no problem; just more flavor.  The other thing about the GRM flour is its protein content: 14%.  That's much higher than any French-style flour's protein content.  I mixed the levain, covered it, and left it to ferment at room temperature.  It was ready for use about 3:30 in the afternoon.

Hamelman assumes a room temperature bulk fermentation and final fermentation.  As I looked at the clock, and at the instructions, I decided that I really didn't want to stay up late.  That led to the other deviation: a decision to retard the dough during its bulk ferment.  The rest of the process was pretty much by the book.  The flour and water were mixed by hand and allowed 60 minutes to autolyse.  Then the levain was mixed in.  That was a bit trickier, because the dough was stiffer than the levain, but the dough came together after the initial goopy phase and got even better after the salt was added.  The texture was still fairly firm, so I worked in another 3-4% of water.  The absorptive capability of the flour meant that I still didn't have a soft dough but it felt quite moist and tacky so I called it good enough.  That turned out to be a good decision.

I allowed the dough an hour of bulk fermentation at room temperature, then put it into the refrigerator until the following afternoon, almost 20 hours later.  The dough hadn't doubled in volume, so I gave it an hour or so to warm up somewhat, then shaped it into two batards.  Each was allowed to proof on a piece of parchment paper, covered with plastic.  The dough was firm enough that I did not provide side support for it.  Indeed, most of the doubling was in the upward direction, not the horizontal direction, which is pretty unusual for a sourdough.  When it had grown by perhaps 80%, I preheated the oven with a stone and a steam pan.  After the oven reached temperature, I boiled water and poured it into the steam pan.  The loaves were then slashed and placed on the stone to bake as directed.

During the bake, the loaves continued to expand upwards, but more sideways than they had during the final fermentation.  The scores opened nicely and gave a good ear.

The crumb is less open than might be expected for this style of bread and this level of hydration.  I think that the amount of kneading that was required to incorporate the levain had an effect, as did the high protein content of the bread flour.  I'm not at all unhappy, since the primary use for the bread is in sandwiches.  That means I don't have mayonnaise or mustard dripping into my lap while eating.

The crumb is very moist, probably attributable in part to the rye flour's moisture-grabbing traits, plus the additional water that I added to offset the dough's stiffness.  More would have been too much, so I am glad that I stopped when I did with the extra water.  The color is a bit darker because of the additional bran content not usually seen in a bread flour.  The crust, which was initially quite hard, has softened considerably as the moisture within the loaf has redistributed.  The flavor is excellent, combining wheat and rye notes with a gentle sourdough tang and the toasty/nutty/caramel notes from the crust.  My hat is off to Mr. Hamelman for devising such an enjoyable bread.

Paul

pmccool's picture
pmccool

Breakfast.  Hmm.  What to do?  Cold cereal?  Not appealing.  Omelette?  Appealing, but too fussy.  Blueberry pancakes?  Ah, that has possibilities.  Wait, wait, wasn't there a Cherry-Studded Scone recipe in Clayton's New Complete Book of Breads?  Could that be bent just a bit to feature blueberries instead of cherries?  Why yes, yes it could!  

And so it was:


And so it went:

And it was very good.

If you don't have that particular recipe to work with, you can kludge your favorite scone recipe thusly: Clayton's recipe calls for about 2 cups of flour, 1/3 of which is whole wheat.  I'm sure that oat or barley flour would also work in lieu of the whole wheat.  Half the dough is patted out in a 9-inch round on a floured or parchment lined baking sheet.  The top is covered with (in this case) blueberries.  I'm not sure how much because I didn't measure; maybe a cup?  The second half of the dough is patted out into another 9-inch round on the countertop, then lifted and deposited carefully on top of the berries.  Clayton recommends scoring the top surface for 12-16 slices; I didn't bother, figuring that I was going to cut a wedge the size I wanted afterwards, anyway.  It is then washed with an egg that has been beaten (you'll use perhaps half).  The whole thing is popped into a 400F oven for 20 minutes, or until it is a golden brown.  Cool on a wire rack.  Slice.  Serve.  Enjoy.

Paul

pmccool's picture
pmccool

The Culinary Center of Kansas City was rocking in the rye this past Friday, when I had the privilege of teaching another full-day class on rye breads.  It was a lot of fun to work with a group of students who were eager to learn and had lots of great questions about everything from flour to techniques.  We made three different breads: the Rustic Pumpernickel from ITJB, Eric’s Fave Rye, and a Vort Limpa that I customized from various on-line sources. 

However, before the class, there was preparation.  And before preparation, there was shopping.

Based on early registrations, it was apparent that this was going to be a large class.  Consequently, I decided to order 50 pounds of Great River Milling’s whole rye flour, via Amazon.  The rest of the need was made up with Hodgson Mills rye flour which is available in local supermarkets.  And, since the need was there, I also ordered 50 pounds of Great River Milling’s Unbleached Wheat Bread Flour.  The GRM rye flour is a whole rye, very finely milled, and light tan in color.  It contrasts with the HM rye flour, which is also whole rye, but coarsely ground with particle sizes ranging from dust to large flecks of bran and slightly gray in color.  The GRM rye works very well in deli rye breads (such as Eric’s Fave Rye) or others that call for medium rye while the HM rye works well in pumpernickels.  The GRM Unbleached Wheat Bread Flour turned out to be unlike anything that I have used previously and I mean that in a good way.  It contains the endosperm, the germ, and 20% of the bran.  It is a pale tan color and also very finely milled.  At 14% protein content, I thought it would make a good stand-in for first clear flour and it worked admirably in that context.  While I doubt that I will buy more, the decision is driven entirely by price.  At $1.20/pound, it’s over-priced in my estimation, especially when I can get Wheat Montana flours locally that are of comparable quality for less.

Since two of the breads require a rye sour, each at a different hydration level, both of those had to be built in the days preceding the class.  The Rustic Pumpernickel also requires a scald.  Combined, the scald + sour for the pumpernickel were nearly 50 pounds for this class.  That’s a lot of prep work to do, not to mention material to tote, so I may need to offer different breads for the next class.

If you saw my guest post on Stan’s blog, you already know that I made a world-class blunder with the pumpernickel that I prepared ahead of class.  You can read about it here.

This class was held in the ‘big’ kitchen at CCKC, which was my first time to utilize that part of the facility.  That brought a few challenges, simply because things were in different places.  We got through it just fine, though, with a lot more laughter than frustration.  There were a couple of things that could be done better, now that I know the flow of the room, such as placement of ingredient stations for easy access, so we’ll do those better next time.  Oven management presented some challenges, too, but more from the perspective of understanding each one’s behavior.  Again, now I know, so I can adjust in the future.

The students were a fun bunch.  They were eager to get their hands in the goop and I made sure that they did.  They had some great questions, too, which helped bring out more information and a better understanding of things than would have occurred to me to mention.  Fuzzy Whiskers, a TFLer, and her daughter both attended.  I hadn’t seen either of them since the KC TFL meet-up in early 2012 that Postal Grunt engineered.  We wound up having a lovely visit as we waited for the last of the breads (theirs, coincidentally) to come out of the oven.

Based on some informal polling during lunch, the hands-down favorite (volumetrically speaking) was Eric’s Fave Rye, in no small part because of its sandwich-friendly characteristics.  The Vort Limpa was a hit for most because of its flavor.  The thing has beer, orange zest and juice, molasses, anise, fennel, and cardamom in it.  That’s a flavor bomb by any definition.  The pumpernickel was much enjoyed but I think its popularity suffered in part because of most Americans’ preference for lighter breads.

All in all, it was a very satisfying and enjoyable day.  The only thing remaining was to pack up my things, put them in the truck, and head back to the house for a few hours rest before picking up our youngest daughter and her children at the airport.  Which tells you why I haven’t posted sooner.

Next up: a scones class on August 3.

pmccool's picture
pmccool

In the month since our trip to Scotland and Ireland, baking around here has been rather hit or miss.  No, scratch that, baking around here has been hit and miss.  Consequently, this post is sort of a catch-all for the this's and that's going on in my kitchen.

One bake was the honey oatmeal loaf from the KAF Whole Grains Cookbook.  I love that stuff; it's hearty and moist and hefty and just a little bit sweet.  Makes a great sandwich, too.

For the 4th of July weekend, I baked a batch of Mark Sinclair's Portugese Sweet Bread as hamburger rolls.  While soft, they are sturdy enough to stand up to a big burger with all the toppings, instead of dissolving as the store-bought buns do.  My wife also made Dilly Bread, also shaped as hamburger rolls, so we had our choice of sweet and mild, or dilly and oniony to go with the burgers.  Both worked wonderfully.  And some happy guests went home with the extras of each.

I'm in the process of tuning up a recipe to use for a Swedish Cardamom Bread class that I will be teaching at the Culinary Center of Kansas City in September.  It's such a lovely dough to work with, luxurious with milk and butter and redolent of cardamom.  There's just the tiniest hit of sweetness, which makes it a perfect foil for coffee (says my coffee-drinking spouse) or tea (says me).  I've found that blooming the cardamom in the warm milk really helps distribute the flavor through every bite.  It should be a fun class, with lots and lots of shaping options.

Not all has been sweetness and light, however.  In the spirit of full disclosure, I present you with an epic fail:

That is a sprouted wheat bread.  As in: no flour whatsoever, just ground up sprouted wheat.  (I did cheat and add approximately half a cup of bread flour because I could see that it was going to be far too wet without.)  As you can see from the knife, it is very sticky; this nearly a week after it was baked.  You should have seen how wet and gummy the core was the first day!  And the crust!  I might have been able to interest the Pentagon in a new body armor material if any of their buyers had been around that day.  I suspect that the sprouts were a few hours past their prime for this style bread.  There is supposed to be no more than a little white nub at one end of the kernel; mine were also starting to push out rootlets.  So, probably way too much enzyme activity and starch degradation.  But I persevered.  The next problem was that I allowed it to over proof, not being exactly sure what I should be looking for.  Then the sucker just would not bake out.  It was in the oven for at least half an hour longer than the recommended bake time and the core temperature was only grudgingly getting toward 190F.  I even took it out of the pan for the last 15 minutes or so, hoping that might hasten the finish.  

And the reward for all of this effort?  Meh.  The bread wasn't bad.  It just wasn't especially good.  I can make a good whole-wheat loaf for a lot less fuss and more reliably.  The recipe was reputed to have come from the Laurel's Kitchen Bread Book.  I don't know whether to take that as a slander, or as a caution.  Maybe heavy bricks were really groovy bread back in the day.  It would certainly stick to your ribs.  And your bread knife.  And your teeth.  And...

This weekend I will bake Eric's Fave Rye, Rustic Pumpernickle from ITJB, and a Vort Limpa.  All of those are the subjects of an all-day rye breads class that I will teach at CCKC next Friday.  There are still 5 openings, if any KC-area Loafers (or your friends) are interested.  The loaves will serve as a preview for the students' own finished breads and as the foundation for our lunch.  Also in preparation for next week's class:

Yep, that's 100 pounds of flour sitting in my kitchen; 50 each of Great River's stoneground whole rye and unbleached wheat flour.  I'm particularly interested in seeing how the latter performs.  It's described as having 80% of the bran removed, while retaining all of the germ.  Plus it has 14% protein.  That's not a first clear flour by any means but I hope that it may work in a similar way with the rye.  

So, things are happening around here, even if my postings are sporadic.

Paul

pmccool's picture
pmccool

Since I had Friday off last weekend, and since the weather on Friday and Saturday was rainy, it seemed like a golden opportunity for baking some bread.  While perusing Hamelman's Bread, the Whole Wheat Levain was the one that I kept coming back to as I weighed the alternatives.  

The first step was to build the levain.  Since my kitchen temperature was several degrees cooler than Hamelman's reference temperature, I elected to increase the inoculation by about 20%. I also allowed the levain a longer time to develop, by perhaps 4 hours or so.  What greeted me on Saturday morning was a fully domed levain that was showing just the earliest hints of an impending collapse.  

The next step was to build the dough.  The formula directions are based on machine mixing; I did all mixing and kneading by hand.  It appears that the whole wheat flour that I used (Great River Milling) may have a higher protein content than Chef Hamelman's.  Now that I say that, it seems somewhat improbable, given that his formula is probably based on King Arthur flours.  Regardless, for the same hydration, my dough seemed a bit firmer than his description.  While soft, it was never "loose" and no bench flour was required during kneading.  

The dough was then set to bulk ferment at room temperature, with stretch and folds at the recommended intervals.  After the bulk ferment, I shaped the loaves into boules and put them in floured bannetons for the final fermentation, with plastic wrap shielding the exposed surfaces, also at room temperature.  When the loaves were perhaps 75% expanded, my wife suggested we run some errands, so I put the bannetons into the refrigerator to hold until we returned home.  That turned out to be 3 or 4 hours later, so it is very good that I didn't leave the loaves at room temperature in anticipation of an earlier return!

Upon returning, I set the loaves out on the counter to finish their final ferment.  When they appeared to be doubled, but before they felt wobbly, I preheated the oven and stone.  When all was up to temperature, the oven was steamed, the loaves were tipped from the bannetons and scored, then into the oven they went.  The dough was still cool enough that the steam immediately condensed on the loaves' surface, leaving them glistening for the first minute or two.  A peek throught the window a few minutes later revealed a healthy oven spring in progress.

I checked for doneness at the end of the recommended bake time and pulled the loaves from the oven.  This is how they looked:

Although not readily visible in this shot, there was a small amount of tearing at one slash on each loaf, suggesting that I could have allowed even further fermentation.

The crumb, while acceptable, seconds the notion that additional fermentation would have been optimal.  The bulge at the one slash is more evident:

That, or I should have kneaded less, allowing a more open crumb.  Or some of each.

The other thing that could have been done was to allow the loaves to stay in the oven a few minutes more.  While fully baked, more baking would have deepened the color (and flavor!) and dried the crumb somewhat.

But these are small matters, the difference between a good bread and a really good bread.  The crumb is moist, but not soggy; firm, but with a pleasing softness; and eminently suited for its primary role as sandwich material.  No spilled mustard from those holes!  The flavor is primarily wheat, with distant notes of hazelnut and caramel.  There's only the smallest hint of a sourdough tang; quite suprising, considering the extended fermentation of both levain and dough.  The fragrance tells you immediately that this is the real deal, not a tricked up wannabe.  

By contrast, when my wife and I were at the supermarket (one of the errands), we happened to walk down the bread aisle and it smelled disgusting.   That's never really struck me before, even though I've baked most of our bread for 30-mumble years.  I'm not sure which thing(s) in that "bread" I was smelling but it almost turned my stomach.  And no, it had nothing to do with a lack of cleanliness in the store; this was coming entirely from the product.  Yuck!

So, color me happy with my bread and thanks to Chef Hamelman for this specific bread.

Paul

pmccool's picture
pmccool

Oven Steam Venting


Many of us get rather, well, steamed, about our inability to produce steam in our home ovens.  Some good techniques have been posted here on TFL.  While I doubt that any of us will be able to produce anything close to the blast of steam that commercial ovens can provide, we may be able to do better than we think we can.

The few seconds of video, above, show steam venting from my electric oven.  From all appearances, nothing much was going on inside the oven.  From the outside, it is evident that quite a bit of steam is present as it hits the room-temperature air, cools, condenses, and becomes visible.  Despite the apparent velocity of the steam exiting the vent, the oven fan is not turned on.  The background noise is the fan in the vent hood above the oven, which has no effect on the rate of steam production or egress from the oven.

My steaming set-up is extremely low tech: a broiler pan on a shelf below the baking stone.  It is preheated along with the oven and stone.  When I'm ready to load the bread, I pour a cup of boiling water into the pan.  A lot of the water flashes instantly to steam.  (I stay well out of the way of the erupting steam!)  The bread is loaded as quickly as possible and the oven door is closed.  Within seconds, I start seeing the steam wafting out of the oven vent.  Needless to say, I won't be blocking the vent; I don't want that steam finding its way into the electronics.

So, nothing new here, really; just an observation that confirms both steam generation and steam venting.  

Paul

Pages

Subscribe to RSS - pmccool's blog