The Fresh Loaf

A Community of Amateur Bakers and Artisan Bread Enthusiasts.

ReneR's blog

ReneR's picture
ReneR

As I had posted in reply to cfraenkel, this Easter I tried  to make a Greek sweet Easter bread that has eluded me so far in terms of a successful bake. 

They haven't been a disaster, but also not what I had tried and liked so much. 

It has a very particular flavor thanks to a combination of ground cherry seed powder (mahleb) and ground up dry mastic resin. It also has a very characteristic texture/crumb, more stretchy, chewy, and moist rather than with big bubbles and airy. 

After substantial research online, even from Greek YouTube videos/sites, I decided to try a yeasted poolish recipe I cobbled together from a variety of different sources.  

Two key insights I tried to incorporate in the bake that were new and I felt might provide that missing something from the previous attempts:

  1. Build the dough up in successive stages going from more to less liquid, at each stage of the process
  2. Bake in a reducing temperature oven

The recipe for one loaf was as follows:

Poolish: 100g milk mixed with 100g strong white flour, 5g of sugar, and commercial yeast according to how long the poolish can be left to fully ferment. I had a timeframe of about 3h, so used 1g of active yeast powder. For fresh compressed yeast that would be 2g.   

Once the poolish has doubled in size and is very active (after about 3h), I combined it with the ingredients for the intermediate dough, which was as follows:

250g (of a final total of 300g) of strong white flour, 2eggs, 100g of sugar, a pea size piece of the dried mastic ground up with a mortar and pestle with a little of the sugar and mahleb powder, some orange zest (optional) and 40g of soft butter cut into small pieces.

I mixed the poolish, flour, sugar, eggs, and spices first, let it fully hydrate, and then mixed in the soft butter.

The resulting sticky and high hydration dough was then left to again at least double in size. (it took me about 4-5h). Some recipes also add a little more yeast at this stage to get it all moving faster, but I chose to take a slower less yeasted approach.

Once the intermediate dough is fermenting strongly and doubled in size, it is time to combine with the remaining flour in order to produce a much firmer dough that is easy to handle. I started mixing in a little at a time with dough whisk and once it was firm enough to kneed, I then proceeded by hand. As soon as it has reached this stage, I continued adding a little flour at a time, until I had a dough that was just firm enough to not stick too the kneading surface. I found that this was pretty much exactly at the 300g total without counting the flour in the poolish. 

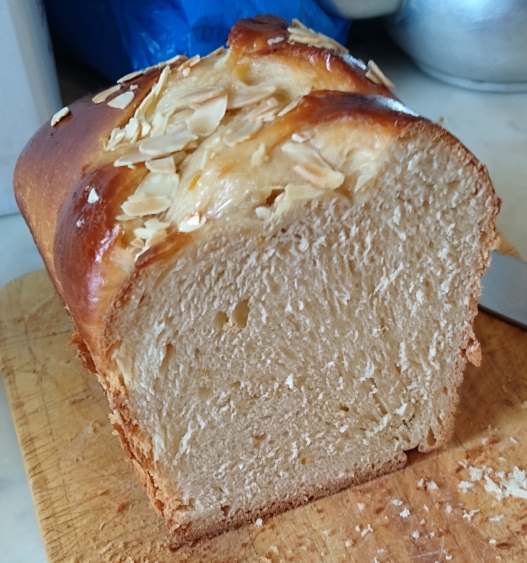
With my first bake (picture bellow), I then left the resulting final dough to bulk ferment until I got a descent poke test, but what I found was that by then, it was too slack to be able to shape/braid easily and then also hold its shape, so I put the resulting loaf in a baking tin and let it ferment till almost double in size and then baked in a 'falling' oven. So heat to 200C with fan, change to 200C bottom only for 10min once the tin was in, then reduce to 180C bottom and top for 10min, and finish, at 160C for 10min, again bottom and top. The top of the loaf was brushed with eggwash before putting it in the oven and topped with almond slivers.
Tsoureki 1Tsoureki 1 crumb

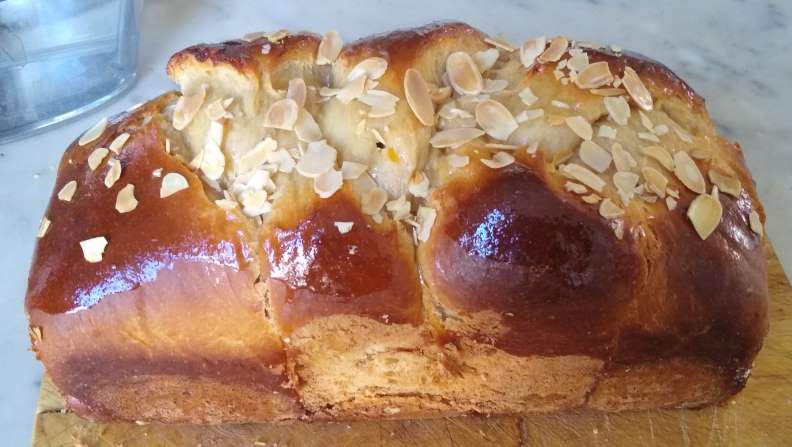
The second bake (pictured at the top of the post), was pretty much the same, but what I did instead was not bulk ferment the final firm dough, but proceed to braiding straight after it had relaxed for about 30min from the kneading.

The shaping takes the following process: cut the final dough into 3 using the dough scraper. It's important to weigh and make sure they are as equal weight as possible. Flatten out, either by hand or using a rolling pin, and then roll up into a kind of sausage shape. Do the same with the other lumps of dough. Then, starting with the first one, roll it out by hand into a kind of long thin snake shape and then do the same with the other two, making sure they are as similar length and thickness.

With the 2nd bake, once I made the 3 dough lengths and braided them into a loaf, I left the resulting loaf on a baking tray lined with baking paper and covered with a wet towel for about 6h to rise ahead of the bake. 

Once the loaf seemed to be nice and plump, but not too soft (it is important not too let it ferment too much as it becomes like brioche/cake and not chewy/stringy) , it is time to bake. I found the poke test not really much use, just the plumpness of the braids.  I started the oven heating up to 200C with fan, and then did the first eggwash. I then did one more before putting it in, sprinkling, the 2nd time with sugar and the almond slivers. Put it in and switched to 200C bottom only for 10min, then 180C for 10min top and bottom, and finished with 160C top and bottom. 

The 1st bake was OK, the crumb was not bad, but it was too much like a brioche/cake rather than the more chewy tsoureki. The shaping/bradding was problematic, and making it in a tin, while a good emergency measure, took away the nice look of the stand-alone loaf.

The 2nd bake, was almost right. Going directly from final dough to shaping without bf really worked well. The baking is where the final tweak is needed. Warming the oven to 200C was OK, but probably should have then reduced to 180C for the 10min bottom only stage, and then moved a shelf up for the two top and bottom stages but at 160C and 140C respectively. 

I'll provide updates as to how these last tweaks worked out. 

ReneR's picture
ReneR

It has been a massive source of frustration for me that, despite being able to produce pretty descent sourdough loaves, I have abjectly failed, so far, to make any remotely good pizzas and focaccias.

Even as a kid I remember trying to make pizzas and being so massively disappointed with the biscuity results. 

Every time I would come across some new technique or method that seemed to me to provide some kind of logical 'fix' for what I was thinking the underlying problem might be, I would try it, but still, that elusive soft and puffy but at the same time crunchy base would elude me.  

My Italian wife, eager to prevent my next disappointment, would tell me that it was not my fault and that without a proper pizza  oven no one can make descent pizza, that's why in Italy everyone buys them from the pizza shop!

But still, despite the recurring disappointments, my baker's curiosity (and pride) would never let me give up, much to my family's growing impatience with my, in their eyes, futile attempts. 

I was becoming more and more convinced that the problem was not in the dough or its shaping, but the oven and baking and finding a way to make the home oven mimic a proper pizza oven, even if it cannot reach the kind of temperatures a pizza oven can reach.

The latest 'hack' for how to do this, which rekindled my flagging but not entirely lost enthusiasm/curiosity, was a YouTube video by some Italian guys (Malati di pizza) who come up with and try all sorts of ways for making pizza at home.

The basic idea behind their most successful bake in a home oven was to create in the top of a home oven, a separate oven section in which a pizza oven could be simulated. They used two pizza stones (one thick ceramic, the other a thinner more stone like) on the top but one oven rack in the oven, to completely separate the upper chamber from the rest of the oven. The stones needed to reach to the very walls of the oven, both on the sides and from back to front, so as to create a high temperature section at the top with the temperature at the bottom part being much lower. They even disconnected the oven thermostat probe from the top of the oven and let it hang down into the lower chamber.

The idea was to use the grill-only function to heat the top artificial chamber to a much higher temperature than the normal range of the oven and then bake the pizza on the extremely hot stone and close to the grill, simulating the way pizza ovens work.

Defying the groans and rolling of eyes of my family when I told them that ' this time it would come out nice' I decided to give it a try. Made a 3h poolish with active yeast powder and then a 70% hydration final dough with all-purpose flour that was left to become super active and given many S&Fs and laminations in the process. I was not committed enough to move the temperature probe, but was able to create a mini sub-chamber in the top of the oven using some leftover tiles from some home decorating that were the right size to form a wall-to-wall ceramic base for the sub-chamber and cracked up the temperature of the oven to max on grill-only function and left it to warm for a long time, until it switched off (I assume at the top temperature of the oven). Meantime, I formed the base, brushed with EVO, chopped up some tomatoes from a tin, and mixed with some salt, pepper, and oregano and left the base to rise on some tin foil. Once the oven was at the highest temperature it would go to and switched off, I spread the tomato on to the base and put it into the, by now, very hot upper chamber. Put the timer for 5min and chopped up some mozzarella to sprinkle on top once the tomato had dried a little. 

I could see it all growing and puffing up almost as soon as I put it in and by the time I opened the oven to put the mozzarella on, the base and tomato looked really great. 3min later (8min in total), I took it out and let it cool on the chopping board before cutting it, bit into the slice I had just cut and ... there it was! An almost perfect home baked pizza that had so long eluded me! The picture shows what it looked like. 

Despite the good appearance, the family were still skeptical, to say the least, but as soon as they had bitten into the first slice, they all started to nod and smile and grudgingly admitted: 'this time you have finally got it'! My teenage son then proceeded to eat the entire remaining pizza himself! 

I have to say, it was a really nice feeling! These breakthroughs are what make me like baking so much I think. When, after all those experiments and disappointments one finally produces a successful result, it is a really good feeling. 

Of course, now the task of optimization begins! I think a slight tweaking of the temperature trajectory will yield an even better results. It was a little too pale underneath, so I think I will let the tiles warm up much longer at full temperature and then reduce the oven temperature a little (220C?) after I put the pizza in so it cooks slightly more underneath before the top is ready. But, apart from that, I am pretty sure that this will work from now on.


ReneR's picture
ReneR

Inspired by the Red Miso Furikake SD loaf by Benito and the Miso Light Rye Sourdough with Seaweed by txfarmer I tried the above Wakame and fermented tofu (Chao) 50% white spelt loaf.

Very interesting and satisfying bake. The ingredients were as follows:

190g white spelt flour

25g strong wholemeal wheat flour (just to use it up)

150 strong white wheat flour

1/2tsp spelt malt

20g 100% hydration liquid SD starter

20g chia seeds (fully hydrated overnight)

5g dried wakame (fully rehydrated and chopped up)

20g fermented tofu (Chao), mashed and dissolved in 10g of water

2g salt

3tsp of gomasio (an Italian version of Furikake) sprinkled on the flattened dough before each of two laminations 

234g water

I used all the spelt flour, 90g of the water and the SD starter to make a shaggy biga that was fermented for 24h and then mixed all the rest into the final dough which had 4x S&F, 2 laminations during a 5h BF and then final forming and prooving in the banneton before baking at 230C in a dutch oven, 25min lid on and 10min lid off.

With hindsight, seeing that the crust was fairly light and since the loaf was nice and moist upon cutting, I could have left it for another 5min in the oven to brown a little more.

The loaf has a lovely sea smell and flavor, with a little of the fermented tofu (Chao) coming through. The Chao is very pungent, so I was very cautious about putting too much, but it could have taken more to have even more of that super intense umami taste it has. 

Very satisfying to eat, filling (high protein and soluble fiber), and very comfortable to prepare, form, and bake. 

Will fine-tune and post changes and their results here as and when they are incorporated. 

But for next time, I want to try with miso (as per Benito's loaf) and see how it compares with the Chao used this time.

ReneR's picture
ReneR

Finally managed to make two vaguely comparable loaves, one using a 'shaggy' SD biga and the other, in effect, a SD poolish (not dissimilar to the liquid levain I was using in pre-biga bakes, minus the small regular feeds).

Both loaves were 30% wholegrain rye flour and 70% strong white wheat flour (total flour 400g). The biga loaf had 7.5% flaxseeds while the poolish loaf had 7.5% chia seeds (run out of flaxseeds). Salt was 1% in both and both had a 70% final hydration. 100% hydration SD starter at 10% of the total preferment flour was added to both the biga and the poolish, but the biga was 50% of the total flour while the poolish was 25% of the total flour. The biga was 50/50 strong white and wholegrain rye while the poolish was entirely wholegrain rye. The biga was left for 24h to ferment while the poolish took about 18h to fully rise and reach peak activity. Temperature around 19C for both.

My observations were as follows:

Bulk fermentation much faster with the biga than the poolish. Biga BF around 4h, poolish still not fully fermented after 6h, so had to leave it overnight in the fridge and make the next day.

Final dough more liquid and less strong/more sticky with the poolish than the biga. The biga dough was much easier to handle and shape. Both had 4xS&F and 2xlaminates. 

Prooving was also faster with the biga (about 40min vs. 1h40min) and the biga loaf had risen significantly more than the poolish in the banneton. 

Both were baked at 230C in a dutch oven, 25min lid on 10min lid off.

Biga bakePoolish bake

Oven spring was more with the biga than the poolish. (biga left, poolish right in the photos)

Crust thinner and more more crunchy with the biga. Color similar. 

Biga crumbPoolish crumb

Crumb was pretty open with both, but slightly more uneven with the poolish. (biga left, poolish right in the photos)

Texture was more more light and airy with the biga than the poolish, which was slightly heavier, more moist and more chewy.

Flavor was more more nutty with the biga and slightly more sour with the poolish.

Both were similar in terms of staying fresh after the bake, being reasonably moist and nice to eat even the 3rd day after the bake. 

Overall, my conclusion is that, for me, the biga has the edge in terms of convenience, ease of dough handling, speed of BF, dough structure, oven spring, crust, crumb, and texture. I also like the flavor, although the poolish is maybe more traditionally sourdoughy. 

Some final thoughts about these methods with regard to spelt

 As I was originally motivated to experiment with the 'shaggy' biga method as a way of baking free-form loaves with a high spelt flour content with good results, I also tried to make a 50% white spelt flour loaf using my previous liquid levain method , just to remember how it was and have a more recent comparator for my biga spelt bakes.

In the end, the loaf had to be converted to a focaccia type flatbread because it was not able to retain enough shape in the prooving stage to be made as a free-form loaf. While the final dough would tighten up nicely with the S&Fs and laminations and final forming, it would quickly loosen up again and spread out. 

As far as I am concerned, to make a free-standing loaf with a high proportion of the white spelt flour I have, it is only possible to do it using this 'shaggy' biga technique. The ability to hold its form and the oven spring generated make this method ideal for baking with flour with the characteristics of white spelt. 


ReneR's picture
ReneR

The 100% biga bake was not very successful. 

Got an OK loaf at the end, but was a little too heavy and chewy.

Used 30% wholegrain rye and 70% strong white wheat. 

Used all 400g for the biga, with 40g of liquid SD starter and 180g of water. Added the remainder of the water to the biga after 24h.

Biga smelt nice and looked developed correctly.

Surprisingly, just mixing the extra water to the biga was much harder than when I did it with the extra flour for the 50% biga bakes. Already from the mixing I could tell that the dough was not the same consistency as with the 50% biga bakes. Just never quite came together well.

Then, the fermentation was way too aggressive and fast, rising so fast it started to tare the dough and looked way too bubbly. I think there was not enough time for the gluten to form properly before the fermentation kicked in.

Then, after the initial very aggressive fermentation, the gas seemed to go out of the dough a little and it grew much less impressively, even though the fermentation activity was still strong.  

It felt as if the dough was already over fermented after a couple of hours. 

100% Biga

Got descent oven spring, however, but the loaf was quite heavy and hard once it had cooled down.

Funnily, it actually improved substantially as it aged, becoming moist and soft in day 2 and 3 after the bake. Maximum hardness was in day 1. 

Biga 100% crumb

The taste was OK. Slightly tangy but nice. Nice with cream cheese and ham or smoked salmon.

I am trying a similar bake but with only 50% biga this weekend to see how they compare, but I am sure that 100% biga is not the biga sweet spot. 

I know it is 30% wholemeal rye, but I've baked much better and softer 30% loaves, even with my liquid levain.


ReneR's picture
ReneR

To be honest, posting more in order to use the above tabloid-type title rather than to share some new bread breakthrough, but here goes anyway. Apologies for overdoing the biga theme in the process.

My latest bake was a 50% white spelt 50% strong white wheat flour loaf with 5% golden flaxseeds (pre-full hydration). All the spelt went into the 'shaggy' biga.

Bigger biga

The loaf had amazing oven spring. I would say at least doubled in size in the dutch oven, lifting the lid in the process.

Lovely soft texture, crunch crust and open crumb and nice, slightly sweet, taste. Kept really fresh for a long time as well. Still almost like fresh after about 2.5 days from the bake.

Bigger biga 2

I have plucked up the courage to try pushing the biga experiment to the limit as per the conversation in the previous posting with GaryBishop about whether 50% biga is the sweetspot by going for a 100% biga in the next loaf I a preparing. Trying for a 30% wholegrain rye loaf.

Will be reporting back with results.

ReneR's picture
ReneR

Following on from some posts on the Big(a) controversy thread, here are a couple more recent wholegrain wheat loaves I baked with a 50% 'shaggy' SD biga.

The first was a very simple control bake with nothing else apart from 100% UK wholemeal wheat bread flour.

100% ww biga

50% (200g) of the flour was used in the biga which was made with 90g water and 10g 100% hydration SD starter. The biga was left to ferment at room temperature for 24h and then mixed in with the remaining 200g of flour and 4g salt, with extra water added to bring the final dough mix to 75% hydration.

The bulk ferment was, again, very accelerated compared to when I used to use a liquid SD levain, and for this reason, the BF again run away from me a little and I didn't have enough time to do the number of S&Fs and laminations I was intending to do.

For 100% wholegrain wheat, it was a very nice loaf, OK crumb and reasonably moist, but a little on the crumbly side after a day or so from the bake. 

Main points for improvement in my mind were to develop the gluten more with more laminations and to shape and bake earlier.

The second, I decided to increase hydration to around 80-85% and add some mashed potato for more softness and moisture.

Carob WW Biga

I also had some carob flour (its more like cocoa powder actually) which I though might go well with the wholegrain wheat taste and make the bread nice and dark too, so added about 10g into the final dough flour. The biga was made in exactly the same way as the first loaf. The final dough had 170g wholegrain wheat bread flour, 10g carob flour, and 100g potato (assumed to provide 80g of water to the loaf), so water added to bring the final hydration to 80%. When mixing, the final dough was very dry so added some more water, taking it to around 85% hydration in the end.

The final loaf was soft and moist, with very nice taste, but again, due to external factors, was not able to do as many S&Fs and laminations as I would have like to.

Final reflections on the second loaf are that the texture is very nice and more smooth and less crumbly than the 1st loaf, the taste of the carob is actually very nice, and there is more sourness than in the 1st bake. I think the carob taste would be complemented well by some sunflower seeds, so will be trying to add some of those to the next such loaf I make. 

Subscribe to RSS - ReneR's blog