The Fresh Loaf

A Community of Amateur Bakers and Artisan Bread Enthusiasts.

txfarmer's blog

txfarmer's picture
txfarmer

This miche is from David's wonderful post here. I didn't change a thing. Even kept the weight exactly same at 2KG, which makes it the biggest bread I've ever made. I debated using high extraction flour instead, but decided to use AP and WW as SFBI specified just to see how it will come out. Can you tell? I tried to draw Tic-Tac-Toe with my scoring pattern, kinda hard to see after being baked for so long.


The dough is wonderful to handle - soft and fluid which I love, but not too wet. Crumb is very open on the edge


But denser in the middle, which I expect from a miche this size.


Crackling singing crust. It was a mess to cut because the crust was flying everywhere!


We had it for dinner, after out of oven for 8 hours. Crust is thick and chewy, crumb is moist (cool) and spongy in the middle. Not very sour. Less flavorful than my previous miche made from high extraction flour, but the texture is just perfect. Of course I do expect the flavor to deepen by tomorrow and the day after. I think I will make the formula again using high extraction flour just to compare.


David, thanks for a great formula. This is a good base to tweak from. Other than different flour combo, I would like to try larger size. I THINK my baking stone and oven can take a 3KG one, we'll see...


Submitting to Yeastspotting.

txfarmer's picture
txfarmer


Well, it's been 3 days of ice and below zero temperatures. I lived in Toronto for 5 years, this is nothing to northerners, but to Dallas, a city that has probably 2 sand trucks in total, this is "when the world stops" moment. Even my office closed for two days, which is jaw dropping since the boss is a hardy workaholic. And she's from Romania!Unexpected down time at home, what do I do? Bake breads of course! My starters are still aleep in the fridge, so I mixed up some olive oil dough from the book "Bourke St. Bakery", made two kinds of breads from it.


Olive Oil Dough (adapted from "Bourke St. Bakery")

- first dough (it's exactly the same as the main dough, so you just have to make one the first time you make this dough, after that, just reseve a portion from the final dough and use it as first dough for future loaves. it can be stored in fridge for a few days, and frozen for a lot longer.)

bread flour, 100g

salt, 2.5g, 1tsp

olive oil, 3/4tsp

milk, 1/2tsp

water, 70ml

instant yeast, 1g

1. Mix together into a dough, store in fridge for overnight.

-final dough

bread flour, 600g

instant yeast, 6.5g, 2tsp

water, 400g

olive oil, 20ML

milk, 20ML

salt, 15g

first dough, 180g

2. Mix everything togeter, autolyse, knead well.

3. Bulk rise at room temp (73F) for 1.5 hours, S&F every 30min. Dough is very smooth and soft, like silk.

4. Reserve some as preferments for later if desired, otherwise shape into focaccia. Rise for 15min, brush with olive oil, add toppings, rise for another 15min. I used two toppings: black olive+rosemary, and sliced meyer lemon+lavendar.

5. Bake at 350F for about 30min until golden.


Soft and fragrant, perfect to snack on.


The lemon+lavendar topping is my desperate calling for spring - or at least a break from "wintery mix" and "icy roads". Black olive+rosemary is just classic. Both are very delicious.


I only used half of the dough for facaccia, other other half for chorizo and thyme rolls - good thing that I had all the ingredients in the fridge, no way to get to the store!


The mixture of chorizo, onion and thyme was laminated into the dough as following:


Proof for 30 to 45min, cut into 4 parts before baking. If using the whole amount of dough, cut into 8 portions. Bake at 400F for about 20min.

Very rustic looking, very yummy.


Submitting to Yeastspotting.

txfarmer's picture
txfarmer


Another yummy loaf from Dan Lepard's "A Handmade Loaf". According to Wiki:

"Lardy cake, also known as Lardy bread, Lardy Johns, Dough cake and Fourses cake is a traditional rich spiced form of bread originating in Wiltshire in the South West of England, which has also been popular throughout the West Country and in Oxford and Suffolk.

The main ingredients are freshly rendered lard, flour, sugar, spices, currants and raisins."

As I was reading this and the formula on how it's shaped, I was struck by how similar it is to some Chinese traditional pastries. Lard was the main fat in Chinese cooking for a long time. In fact, I have fond memories of lots of traditional foods such as "lard veggie rice", "lard sugar pastries", "lard sticky rice cake", etc.  In another word, I am not "lard-phobic" like some, in fact, I probably like my pork and pork fat as much as Homer Simpson!

The recipe is pretty quick and easy since it's mostly raised by dry yeast, with some white starter to boost flavor. My only changes are: to use instant dry yeast rather than fresh, and 100% starter rather than 80% in the book.

Lardy Cake (Adapted From "A Handmade Loaf")

bread flour, 500g

salt, 10g

white starter (100%), 220g

water, 230g

instant dry yeast, 5g

lard, 150g, thin slices

powder sugar, 150g

nutmeg & powdered sugar to springkle on top


1. mix flour, salt, starter, water, autolyse, mix until smooth

2. bulk rise at room temp (70F - 77F) for 1.5 hours until double

3. roll out into rectangle, thickness about 1/2inch, spread lard pieces on 2/3 of the rectangle, then spread sugar on top.

4. fold the uncovered 1/3 to on top of the middle 1/3

5. fold to the left again to encase all of the fillings. press to seal

6. turn 90 degrees, roll out, and do the same letter fold again

7. put in a cool place (I put in fridge) for 30min to relax

8. roll out into a rectangle again, then roll up from the long side like a jelly roll


9. cut in the middle, roll one of them into a spiral, cut side up

10. put in a 10inch round mold, and continue the spiral with the other half of the dough, cut side up.

11. cover and rise until double, about 1 hour at 77F.

12. springkle with nutmeg and more sugar

13. bake at 400F for 20min, then 350 for 40min

14. cool in pan for 15min then cool on rack. some lard will leak out, I have seen instructions saying to cool the bread upside down so lard can be absorbed back into the loaf, if you want maximum lard impact, it's worth a try.


You must like the taste of lard in order to like this bread, I love it! However, it does need to be reheated (<1min in microwave will do) before eating, the combo of lard and sugar is heavenly when warm. When cold, it's just too greasy.


It reminds me of a childhood favorite: "lard sugar pastry", also full of lard, laminated, with sugar inside, burned my mouth many times eating it, but I couldn't wait for it to cool. But that pastry didn't have yeast, it was more like a danish dough.


Who knew English and Chinese foods are so similar? :P


Just to compare, here's some Chinese laminated pastries(抹茶酥) using lard as fat (no yeast), the filling here is red bean paste. I added matcha powder (green tea) in the dough, so they are green.


txfarmer's picture
txfarmer

Yet more variations on my 36 hours+ sourdough baguette formula. ((original recipe here, 3 earlier variations here, 3 more variations here) I love the taste of wholegrain, also like the nutritional value, but mostly I actually just love the rich sweet fragrant taste. I also love baguettes for their light, airy, cool crumb, and thin crackly crust. I want to use as much as wholegrain in my baguettes to maximize the flavor, at the same time still maintain the light mouthfeel. In another word, I don't just want a heavy wholegrain bread in stick shape - that's neither a baguette, nor a good wholegrain bread (they tend to have thicker/chewier crust, and the stick shape is just too much crust IMO). Since I am making these 36 hour sourdough baguette every week, I put a bit more wholegrain each time, and observe the results.

1) 20% wholegrain

AP Flour, 400g

barley flour, 25g

ice water, 325g

salt, 10g

rye starter (100%) 150g

-Mix flour, ice water and autolyse for 12 hours.

-Mix in salt, starte, then follow the basic 36 hour sourdough baguette formula here.


There are 75g of rye flour in the stater, along with the 25g barley, the whole grain ratio is 20%. The lightness of these baguette is similar to a white flour one, with much improved flavor. However, 5% of barley didn't contribute too much in term of taste, rye starter did most of the work, can't say it's much different from my usual rye starter baguette.

2) 30% whole grain

AP Flour, 350g

barley flour, 75g

ice water, 325g

salt, 10g

rye starter (100%) 150g

-Mix flour, ice water and autolyse for 12 hours.

-Mix in salt, starte, then follow the basic 36 hour sourdough baguette formula here.


Barley flour ratio is increased to 15%, along with the 15% rye in starter, this batch is super flavorful. I just love the earthy sweetness of barley flour, and it's much more detectable here. The bread did feel "heartier" and "heavier" but still qualify as "delicate".

3) 45% wholegrain

AP Flour, 275g

barley flour, 75g

whole wheat flour, 75g

ice water, 340g

salt, 10g

rye starter (100%) 150g

-Mix flour, ice water and autolyse for 12 hours.

-Mix in salt, starte, then follow the basic 36 hour sourdough baguette formula here.


15% each of ww, barley, and rye, hydration is increased to 83% (from 80% for the previous two). Rich whole grain flavor, each of the ww, barley, rye provides a different dimension. Looking at the picture, they still have open holey crumb, but, they do taste "heavy". The main culpit is the thicker crust. Even though the crust is still crispy, but when they are thick, the chew is different, even the airy crumb can't offset the "dense" feeling.


I think even more water may help, since the dough felt tighter than usual, and my scoring came out beautiful - a sure sign that the dough was not deadly wet.


So far, I like the 30% one the best, the 45% tastes great, but a bit heavy to my taste - it still qualify as acceptable baguettes though. I wonder what would happen if I increase the wholegrain even furthur.


Submitting to Yeastspotting.


txfarmer's picture
txfarmer

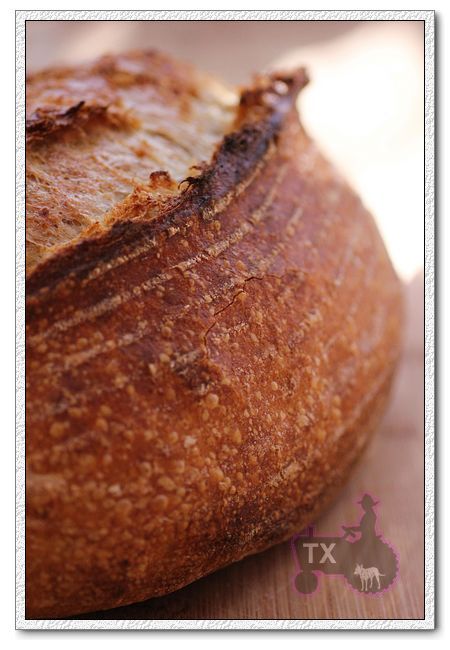
A while ago, I posted about how to make "shreddably soft" sourdough sandwich bread (see here). I got some questions regarding whether the same thing can be achieved with whole grain breads. Well, yes and no. The more whole grain flour there is in the dough, the lower the gluten is, so 100% whole grain breads won't be exactly AS SOFT AS the white flour one. However, with the right formula, and proper handling, 100% whole grain breads like this one CAN be very moist and soft - even shreddably so.This one is made using just sourdough starter, extra delicious when the rich flavor of ww is combined with the slight tang of sourdough.

First of all, there needs to be enough ingredients in the formula to enrich and moist the crumb. This bread is adapted from my all time favorite whole grain bread book "Laurel's Kitchen Bread Book" , in addition to oil, honey, and sourdough levain, oatmeal is soaked in boiling water the night before to add moisture to the final dough, which contributes to the soft crumb. My adaption to the formula is to chagne the dry yeast to sourdough, and increased hydration a tiny bit.

Secondly, ww doughs have lower gluten level, which means while you still have to knead it really well (to full developement), the windowpane you achieve won't be as strong as the white flour one. This also leads to a denser bread, which means for the same tin, you will need to add more dough to get the same volume. Since ww flour absorb more water, but absorb it slower, so it really helps to autolyse, and autolyse longer (40-60min) than for white doughs. It's easier to overknead a ww dough (in a mixer) too, so be very careful - for that reason, I usually finish kneading by hand.

Thirdly, it's also easy to over fermentate ww doughs. I kept the levain ratio in this dough pretty low, and made sure when it's taken out of fridge for proofing, the temperature is relatively warm(~72F). I found if it takes too long for the dough to finish proofing (once I left it by the window, where it's only 68F, it took 10hours instead of 6 hours to finish proofing), the crumb gets rough, and the taste gets unpleansantly sour.

Finally, the ww flour I used here is King Arthure WW, I have used other ww flour before, but KAF gives me the most consistent result.


Sourdough 100% Whole Wheat Oatmeal Sandwich Bread (Adapted from "Laurel's Kitchen Bread Book")

Note: 15% of the flour is in levain

Note: total hydration is 89%, higher than usual because of the oatmeal soaker

Note: total flour is 375g, fit a 8X4 loaf pan. For my Chinese small-ish pullman pan, I used 330g total flour. For KAF 13X4X4 pullman pan, I have not tried it myself, but I would suggest using about 600g of total flour. Obviously for pullman pans, you can bake with or without lid.

- levain

ww starter (100%), 16g

water, 26g

ww bread flour, 48g

1. Mix and let fermentation at room temp (73F) for 12 hours.

- soaker

rolled oats (I used old fashioned), 53g

boiling water, 240g

salt, 8g

2. Mix and cover for 12 hours.

- final dough

ww flour, 319g (I used KAF)

water, 60g

oil, 30g

honey, 38g

all soaker

all levain

3. Mix together everything, autolyse for 40-60min.Knead until the gluten is very developed. This intensive kneading s the key to a soft crumb, and proper volume. The windowpane will be thin, but NOT as strong as one would get form a white flour dough. For more info on intensive kneading, see here.


4. Bulk rise at room temp (73F) for 2 hours, the dough would have expanded noticably, but not too much. Fold, and put in fridge overnight.

5. Divid and Rest for one hour.

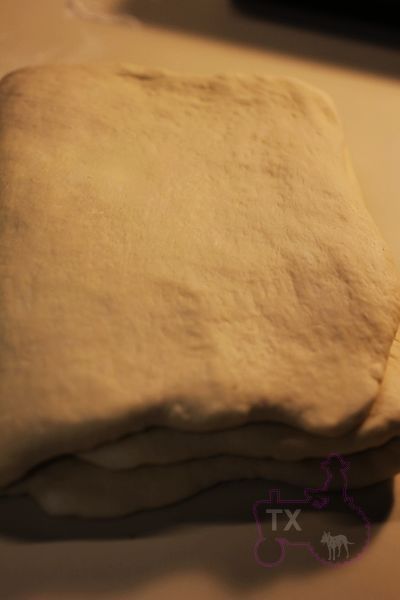
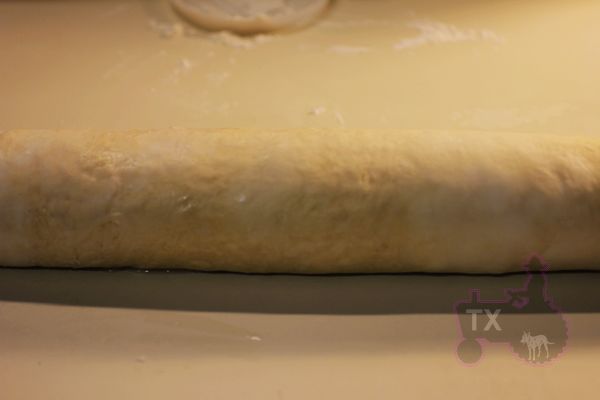
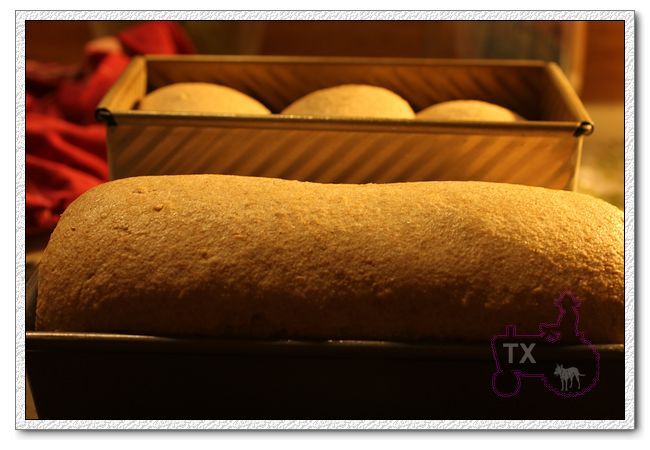
6. Shape into sandwich loaves, the goal here is to get rid of all air bubles in the dough, and shape them very tightly and uniformly, this way the crumb of final breads would be even and velvety, with no unsightly holes. For different ways to shape (rolling once or twice, i.e. 3 piecing etc) see here.

7. Proof until the dough reaches one inch higher than the tin (for 8X4 inch tin), or 80% full (for pullman pan). About 6 hours at 72F.

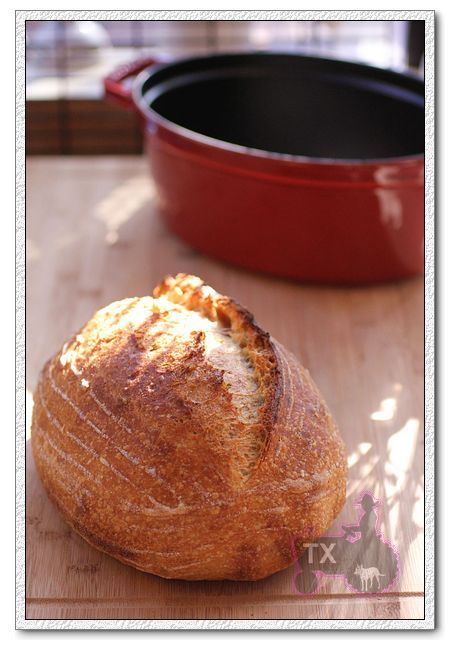
8. Bake at 375F for 40-45min. Brush with butter when it's warm.

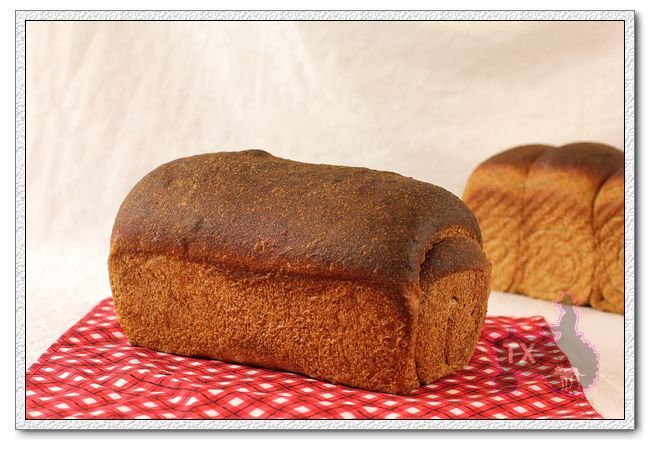
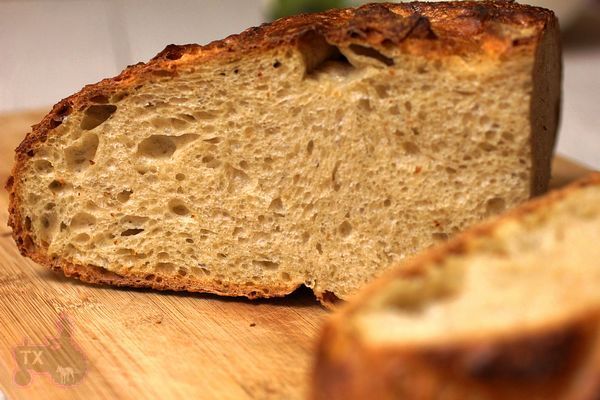
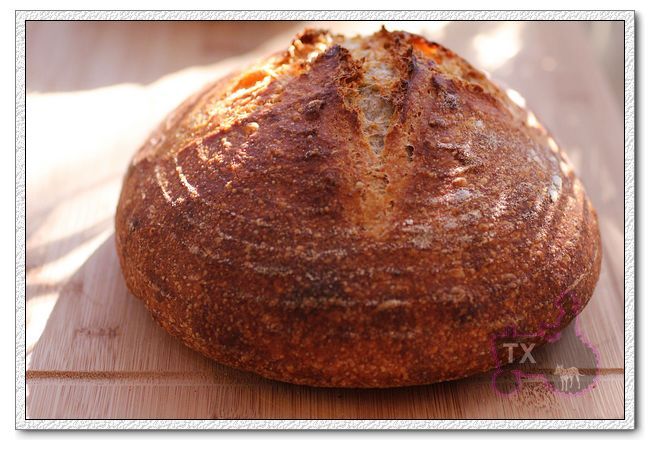
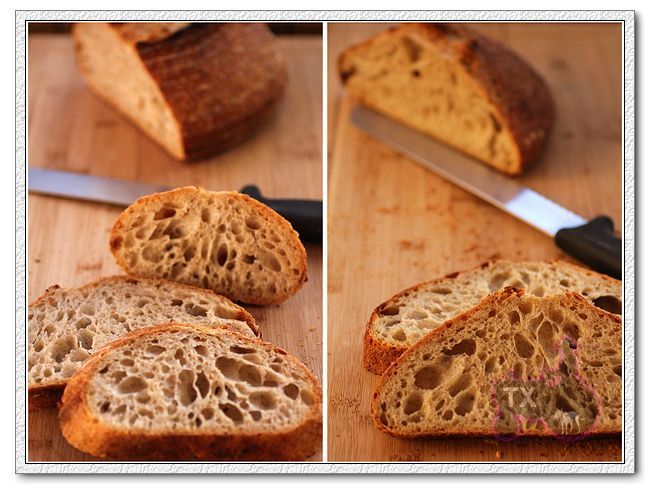
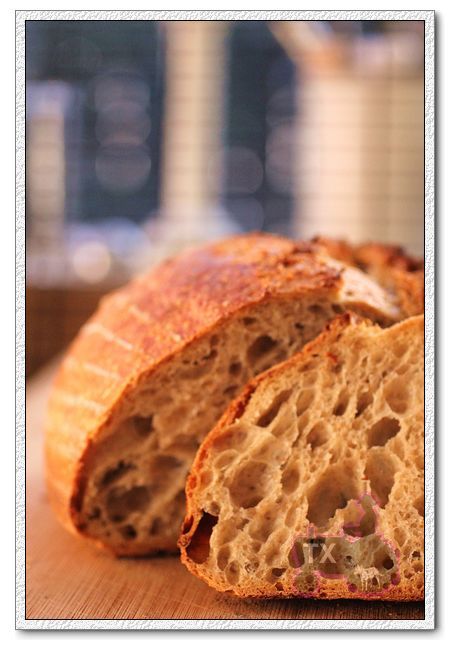
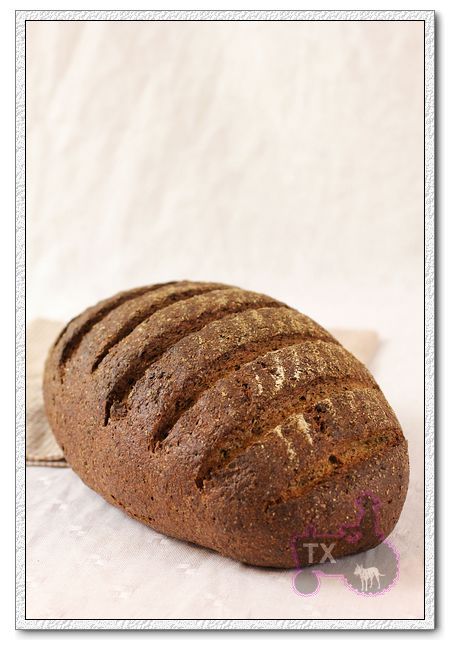
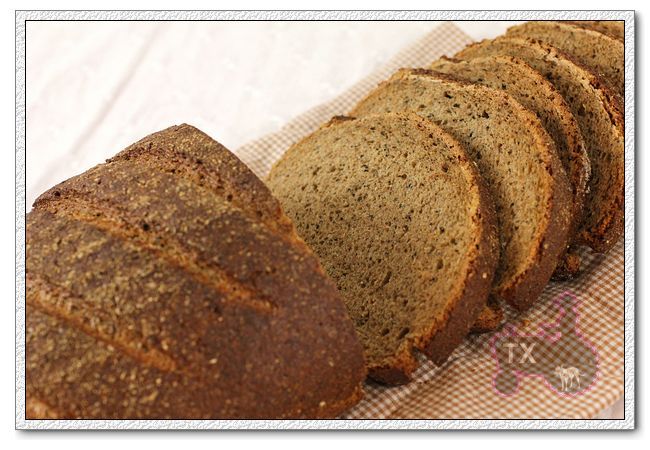
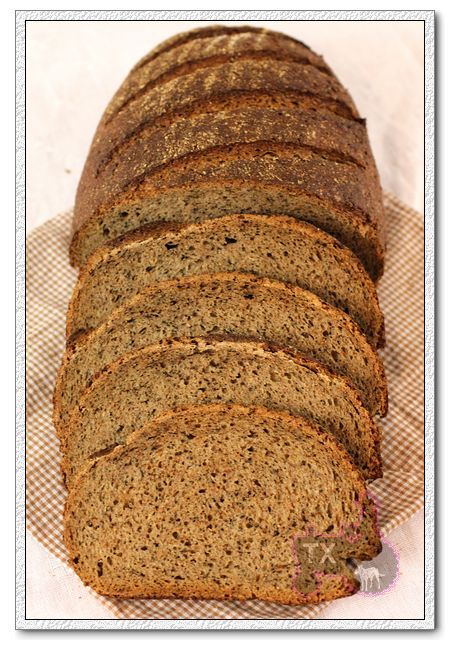
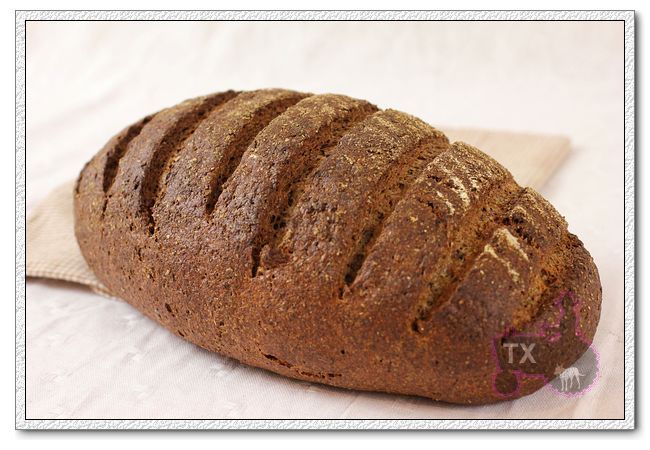
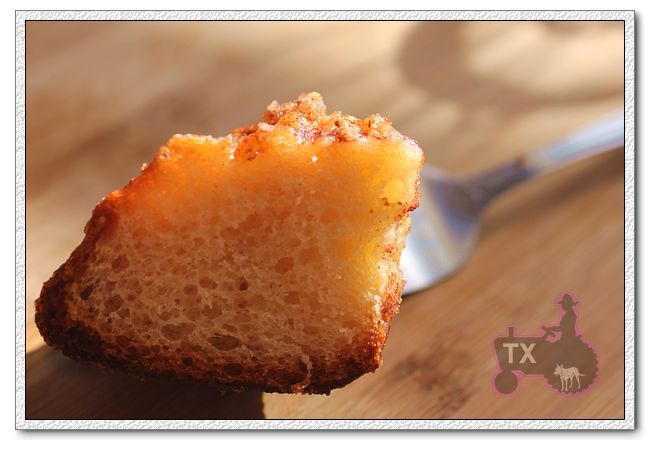
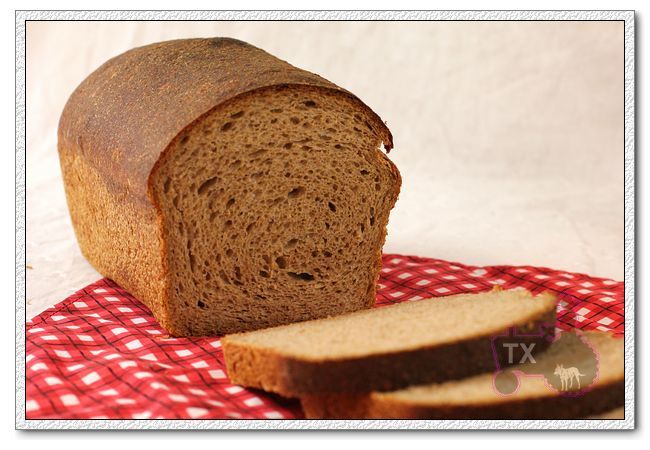
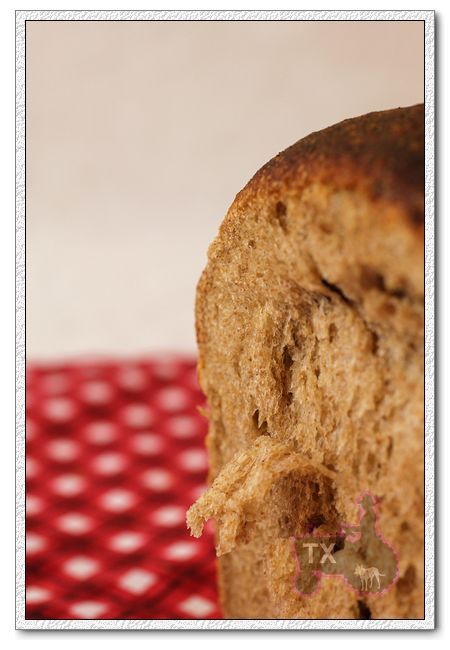
Nice and soft crumb from both the 8X4inch tin (rolling once) ...

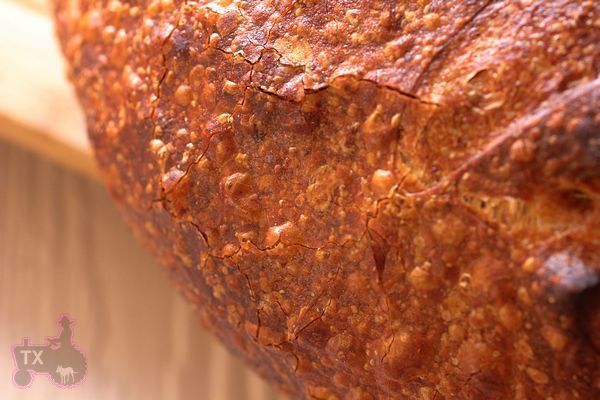
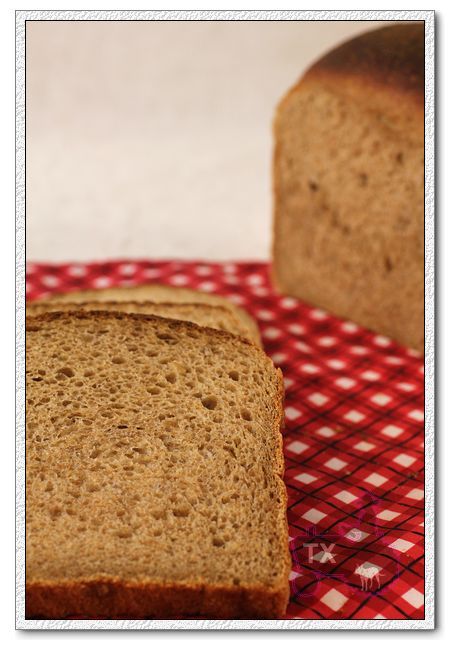
Baked another one in a small pullman tin (rolling twice, 3 piecing, baked without lid)


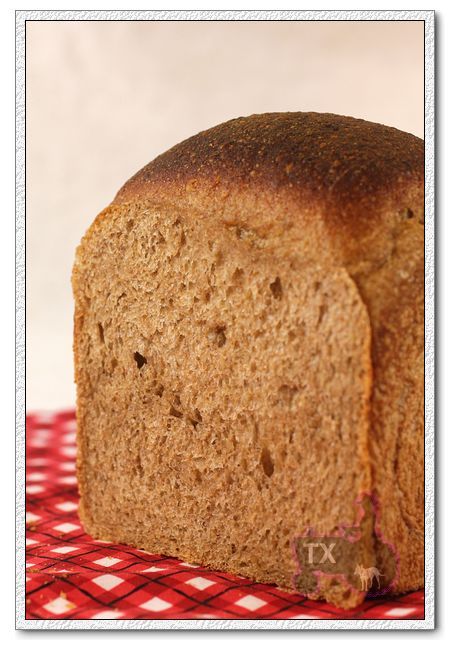
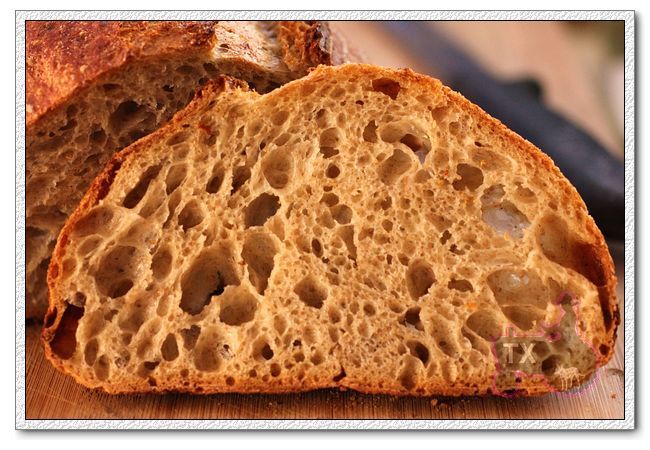
Excellent ww flavor enhanced by sourdough, without any hint of bitterness. Stays soft and moist for days.


So, yes, 100% whole wheat breads can be soft, like THIS

Sending this to Yeastspotting.

txfarmer's picture
txfarmer

There have been a lot of discussion here on TFL regarding covered baking, ranging from covering dough on stone with a roasting pan, to baking in a dutch oven like a no-knead dough, to baking in a "combo-baker" as Tartin Bread Book suggests. I recently got a 2.5 quart oval enamel cast iron pot at a very good price (William Sonoma winter sale is a gold mine!), so I finally can try my hand on covered baking.


This light rye recipe is from "Tartine Bread Book", with only 15% rye, and some ww, this is really just a country loaf. Hydration is nearly 83%, so the dough is very wet and sticky. This is actually my main motivation for using the pot, such wet dough tend to spread a bit on stone, before it gets a change to spring up. I have so far work around the problem by baking smaller loaves (500g to 600g rather than 1000g+), and manage proofing/dough strength very carefully, however the covered pot does seem to have an advantage over baking stone in that regard.

Moist and open crumb:


Here're my thoughts on baking in a cast iron pot so far:

Pros:

- Better volume and shape due to a)more direct heat all around the dough rather than just from the bottom; b)limited spreading space, which means the dough size and the pot size need to be matched well. This is especially significant with high hydration doughs.

- No need to steam. This is less important to me since the "hot water in cast iron pan trick" has always worked great for me.

Cons:

- it's dangerous (much more so than steaming the oven IMO) to handle a hot hot hot pot/lid, while trying to drop a "nearly same size" dough into it without losing too much heat. I have never used a cast iron pot before, so my head dosn't grasp the idea of "it's REALLY a bad idea to grab the lid with your bare hand after preheating it at 550F for over an hour"! Here's the damage, OUCH!

- The size and shape of the dough are very restricted. This 2.5quart one is a bit small, I have gotten a 5.5 quart one (also on sale, yipee!) online, with the bigger one I will be able to bake larger loaves with high hydration, which is the best reason to bake breads in a pot IMO.

- It's a bit tricky to play with time/temp to get a crackling crispy crust, especially with such wet dough. Here's my procedure that finally worked: preheat at 550F for over an hour, with lid on; drop in dough, cover (with a glove!), keep at 550F for 5min, drop to 450F for 15min, take out lid, bake for another 20min, turn off oven, crack the door open a little, and let the pot/dough sit in oven for another 10min. With that procedure I got a crust that cracked, singed, and remained crispy after cooling down. This is for a 600g bread, for larger loaves, I imagine more time would be needed.

Notes:

- The instruction in the book says to drop the dough from proofing basket directly into pot, then score, this seems impossible to me. Maybe because my pot is quite deep, and the one in book is quite shallow, but there's no way I can flip the dough in there without sticking to something, or missing the pot, or most likely both. So I first flip the dough out of the brotform onto a parchment paper, cut the paper quite close to the dough size, score, THEN lift the corners of the parchment paper and drop the whole thing into the pot. It was scary, but worked, the parchment inside didn't seem to negatively affect the crust.

- The pot I used was Staub, the reason I like it better than other brands is that the metal handle on the lid (the one that burned off my 3 fingers) can take heat up to 500F accoding to the manual. I called their customer service, and was told it actually can take 550F. This is a lot higher than the plastic handle on some of other brands, including Le Creuset.

- I actually baked another loaf using baking stone and normal steaming method (side by side with the pot). Since the pot was covered when I steamed the oven, I don't think it affected the dough in the pot. The following is the result for baking stone, dough size is 500g, stone was preheated at 550F for over an hour along with the pot/lid, loaf was loaded 5min after the pot, so 15min with steam at 450F, then 20min without steam at 450, also stayed in the oven for 10min after it's turned off. Good volume and crust, but it did spread a bit on the stone. Since the shape and scoring are all different from the one in pot, I can't really draw too much conclusion from it, but I imagine a well fit cast iron pot would make it rounder and a little higher.

- The following is a side by side comparison of crumb, they are identical IMO


In summary, the "baking in a pot" experiment is a success. I would definitely use thise method for very high hydration doughs, IF their shape and size match the pots I have. For the other breads, I would stick to baking stone and steaming.


Sending this bread, along with 3 well cooked fingers, to Yeastspotting.

txfarmer's picture
txfarmer

Hope everyone had a great holiday! We took the days off between Christmas and NYE, rented a RV and drove 3000+ miles round trip to Key West. It was super fun, as we were counting down with the crowd in front of Sloppy Joe's, I felt it was one of the best NYE celebrations we've had.


Before we took off, I needed some bread to take with us - there's no oven on the RV, just a microwave and stove. Being super busy, I didn't have time to do a pure sourdough loave, and this black bread from Hamelman's "Bread" was fast (it uses instant yeast, in addition to rye levain), fragrant, delicious, healthy (by that time, we needed SOME fibre to combat all the sugar and butter in my holiday baked goodies), and uses up some of my leftover rye breads, perfect!


The old bread was toasted to very dark, then soaked in coffee and boiling water overnight, I knew the bread is going to be delicious when I smelled the soaker. Coffee flavor was not prominent in the final bread, but the flavor of rye was very enhanced.

A full flavored 60% rye, went perfectly with the smoked salmon and aged gouda cheese we brought along. Beats fastfood burger anyday!

Sending this to Yeastspotting.

txfarmer's picture
txfarmer

Last year I spent nearly 90 hours to make sourdough pandoro. Twice (one failed attempt, one delicious success). And thought it was worthwhile. I must be crazy.

This year, I spent 90 hours to make sourdough panettone. Twice (one test run, one massive batch for gifts). Still think it's fun. They are coming to take me away anytime now.


Recipe is based on foolishpoolish's wonderful creation (here), with techniques from "AB&P", Wild Yeast, etc. Two days to re-activate my starter, one more day to convert to "Italian sweet starter", 12 hours for rising first dough, 19 hours for rising final dough. Up at midnight, then 2am, to check on the dough, finally at 3:30 to start baking. Like I said, who needs sleep when it's holiday season?!

Some notes:

- For some reason, no one, not even one source on this whole wide web, can tell me how much dough I should put in my paper mold. Most recipes would tell me how much dough to use, but not the mold size. Some tell me the diameter of the mold, but not the height. My molds are from here,  6.75inch in diameter, 4.25inch in height, and is supposed to be for "standard size, 2lb loaf". I know 2lb is 900g roughly, but that's after baking, how much dough would that be? Finally I found answer in "AB&P", for their 5.25X3.25inch mold, they use 500g of dough, which means I need 1080g for mine. Too bad I found that AFTER my first batch, so my test loaf (950g of dough) came out a bit short, but for my real batch, I used 1050g of dough and they came out perfect (as shown in the pictures above).

- Since my husband really loved the sourdough pandoro last year, he made me a "proofing box" using insulated foam boards, a pet temperature regulator, and a light bulb. Really helpful for keeping Italian starter and proofing the loaves! EXCEPT, when the regulateor's setting was messed up and it stayed at 70F , rather than the 85F I set. Ugh, messed up my whole timing.

- All sources say to simply mix the first dough until even - no mention of developing any dough strength. However, I do find if I mix first dough with KA mixer, paddle attachement, until it clears the bowl, the final dough would be MUCH easier to mix. However since the first dough is very wet, the kneading took a while

- The mixing of the final dough was easier than last year's pandoro, could be that I have more experience this time. It was lilke liquid silk by the end, VERY STRONG liquid silk glove.

- I used glaze for the gift loaves, and the "tuck in a pat of butter" method for the test loaf, both works great.

- I had 800g of extra dough left after making the gift loaves. Don't want to use another paper mold, I dumped it in my new kugelhopf pan, it was only 1/4 full, but the amazing power of italian sourdough starter raised it just fine.

- However, I couldn't hang the Kugelhopf loaf upside down, so I just cooled it upside down on the rack, judging from the crumb, the bottom layer got compressed/squished a bit.

While the crumb of the test loaf was even and fluffy, and I expect the gift loaves to have the same crumb. Lesson: don't skip the step of hanging upside down to cool!

- It took my dough 19 hours at 85F to reach the rim of the mold (as supposed to  12hrs in the recipe), and I got awesome ovenspring, so they weren't over-proofed. I guess my starter likes to take its sweet time. And doesn't care about my sleep time.

- I have made BBA panettone before, no comparison, the flavor and velvety texture of this sourdough version is a whole new level.

- The gifts are all packed up and mailed out, the leftover loaves have been mostly devoured, now I just need to catch up on some sleep. Happy Holidays! ZZZZZZZZZZZZZZZZZZZZZZ

Submitting to Yeastspotting.

txfarmer's picture
txfarmer

I was up at 3:30 to bake sourdough pannetones last night, thanks to my starter that has a mind of its own and dislike preset schedules. It was a sucessful bake, the breads are being hung upside down at home as I type, will take pictures and post about my yearly sourdough holiday bread "torture" in a few days. In the mean time...


I had about 600g+ brioche dough leftover from my Tartine Kugelhopf (or Gugelhupf as Mini prefers :P), defrosed overnight (it had been frozen for about a week) and made two recipes from it. The first one is based on this recipe, with different dough obviously. I didn't retard the proof either, just proofed the shaped dough at room temp for about 2 hours. Used 450g of dough (in 12 pieces) for a 9inch pie pan. Gooey and delicious, butter and sugar melted and coated the pecan pieces, turning them into "candied pecans". Combined with "soft-beyond-belief" brioche dough, it was perfect for the brunch I was hosting.

Still got about 200g of dough left, and I made tarts with some FuYu persimmon I had on hand. The presentation was based on Wildyeast's post here. Each 4inch tart pan took about 80g of dough. Very delicate flavors, perfect for a light dessert or snack.


I am in love with shooting pictures in natural light!

---------------- Other holiday baking ---------------------

Over the past months also, I have been baking up a storm, most of these are for gifts, but I did sample plenty to make sure they are good!


German Springerle, took me quite a few tries to get right.

The molds are about "Twelve Days of Christmas", adds another dimension of fun!

Scotch shortbreads, made with cake flour + rice flour, velvety smooth and crumbly.

Chocolate version, dipped in chocolate ganache, just in case there's not enough chocoalte or calorie!

Chocolate cookie with peanut butter "surprise" center, recipe here

Another peanut butter cookie with PB chips and choc chips, recipe here


Submitting to Yeastspotting.

txfarmer's picture
txfarmer

I have done 2 stollen recipes (yilding 3 big, 1 bigger-than-huge loaves), coffeebreads, cookies, now Kugelhopf. Still have a big one to come: pure sourdough pannetone, yup, after last year's sourdough pandora, I am crazy enough to take on another around of sweet starter insanity. The test run went great (with wacky timing though, I was up and baking bread at 4am), will do the real batch this weekend and report back.


Now back to the bread at hand, two years ago, I saw a beautiful Kugelhopf pan on sale at local grocery store, of all places. Hesitated, and it was back to the original price the next day. I have been waiting for it to go on sale ever since, and finally happened 2 weeks ago! With the pan in hand, I made the Kugelhopf reciep from the "Tartine Bread Book". It ueses the all purpose brioche dough in the book, with some extra kugelhopf ingredients.


Golden and beautiful out of the oven, and smell heavenly!


All dress up


With around 30% butter, it's a light brioche, I knead the dough well to pass the windowpane, which results in a light and airy crumb.


The recipe used pistachio, and I replaced some apricot with cranberries, in addition to lots of rum soaked currants, just love the colorful crumb, so festive. This shot is done under sunlight, which gives a totally different feel from the ones above (done with lights). Too bad it's so rare for me to have sunlight and finished breads at the same time.

Highly recommend it, the recipe can be found in the "Tartine Bread Book".


Submitting to Yeastspotting.

Pages

Subscribe to RSS - txfarmer's blog