The Fresh Loaf

A Community of Amateur Bakers and Artisan Bread Enthusiasts.

Bread Baker's Apprentice

linder's picture
linder

Today, I baked 2 loaves of New York Deli Onion Sourdough Rye from The Bread Baker's Apprentice.  They look ALOT better than the previous attempt.  It's amazing what can happen when you watch the bread and make sure it doesn't overproof.  I'm still getting used to my make-shift microwave proof box.  The temp in there is about 80F so proofing loaves goes really fast.  I also reduced the amount of yeast in the bread to 1 1/2 tsp. instead of 2 tsp. which had seemed pretty high considering there is also a good amount of rye sourdough starter in the bread as well.  Here are my pretties -

linder's picture
linder

In the better late than never category, I baked my first ever stollen tonight using Peter Reinhart's recipe in The Bread Baker's Apprentice.  I made up some of my own almond paste, using ground almonds, confectioner's sugar and Karo light syrup.  I am resisting the urge to sample this until Christmas. 


linder's picture
linder

Some days I don't know where my mind goes.  I was baking 2 loaves of New York Onion Rye Bread from Peter Reinhart's book Bread Baker's Apprentice.  Everything was going smoothly.  The loaves were proofing in my make-shift proofer (microwave with cup of boiled water in it) but then disaster struck. 

I didn't pay attention to the bread as it was rising.  The recipe said 90 minutes to proof so I went with 90 minutes, oh so wrong!  Bread was proofed and I hadn't even started the oven!  In my tizzy, I set the oven 30F too cool and didn't realize it until 10 minutes or so into the bake. Bleh!  So I watched my two loaves of bread meet in the middle of the baking pan as they rose (sideways) on the baking sheet. Argh!!  No oven spring for me with that cool oven.  Here are the loaves as they look, cooling on the rack.  NEXT TIME - I'll check the bread about half way into the proof time. NEXT TIME I'll read the ENTIRE recipe through several times to get it straight in my head and not ASSUME anything.


dmsnyder's picture
dmsnyder

The 100% Whole Wheat Bread from Peter Reinhart's The Bread Baker's Apprentice has been one of my favorite breads for years. I love it for it's delicious honey-wheat flavor. However, it often comes out with a dense, cake-like crumb. In April, I tried making this bread using a more intensive mix, as demonstrated by txfarmer. (See Light and fluffy 100% Whole Wheat Bread) I did, indeed, achieve a less dense, more open crumb. But I felt there was some loss of flavor due to oxidation of carotenoids. 

It is difficult to make a 100% whole wheat bread with a light, airy crumb. The pieces of bran in the flour act like little knives, cutting the gluten strands that give bread crumb its “structure.” I had heard of flour mills that grind the bran to a finer consistency after it has been separated during the normal milling process and then add the fine-ground bran back in, along with the other wheat components that re-constitute “whole wheat” flour. The smaller bran particles do less damage to the developing gluten during mixing.

Central Milling makes such a flour, and brother Glenn recently got some for me at CM's Petaluma warehouse. Today, I used CM's “Organic Hi-Protein Fine” whole wheat flour to make the Whole Wheat Bread from BBA. I followed the formula and procedures in my April 2, 2011 blog entry with one exception: I only mixed the dough for 12 minutes at Speed 2.


The first difference in the bread was the wonderfulness of its aroma. I can't say it was different in quality, but it just filled the house as never before. When the bread was cool and sliced, the crumb structure was even more open than I got with intensive mixing. The bread is chewy like a good white loaf and not at all cakey or crumbly. The flavor is delicious. I can't really say it is better than the flavor I've gotten with either home-milled flour or KAF Organic Whole Wheat flour, but the combination of crumb structure, texture and flavor was remarkable.


I am now eager to try using this flour with other breads, for example the Tartine "Basic Country Bread." Stay tuned.

David

Submitted to YeastSpotting

em120392's picture
em120392

Hey guys! it's been a while! i've been posting a lot on my blog, but not much on here!

anyway, my brother and i made english muffins, which happened to be one of the most fun breads i've made so far. i hope you guys enjoy my post on them!

you can read all the posts on our blog, http://bakingacrosscountry.wordpress.com/ i've been interning at a bread bakery as well as a bagel shop! this project has definitely been the highlight of my high school career.

__________________________________________________________________________________________________________________________________________________________


My brother, Evan, came home from his trip to Antarctica and New Zealand a few days ago. We had a lot of family events that filled the entirety of the weekend, and we had no time to really even see each other. Even though I had school today, I took the morning off to bake bread and hang out with my brother before he flew back to California. English muffins were the next on deck-and I couldn't have asked for a more interesting bread to make with Evan.

English muffins, despite their name, are not like the typical muffins we are familiar with. Yeast-risen, English muffins are cooked atop a griddle, giving it its classic, flattened shape. Once browned on the outside, the muffins are baked fully in the oven. English muffins are usually eaten for breakfast, or for sandwiches. However, to retain the texture of the crumb, English muffins are split open with a fork, revealing the trademarked "nooks and crannies" inside.

English muffins are very similar to crumpets, which are yeasted breads baked in a mould on a griddle. However, crumpets have their defining holes on the top of the bread, while English muffins have holes on the inside.

Cooking yeasted breads on a griddle was nothing new- it has been documented that in 10th century Wales breads were made like this. In the 19th century England, yeasted griddle-breads were sold door to door by a muffin man. He would come around every day, and deliver fresh breads.

English muffins were popularized by Samuel Bath Thomas, who marketed them in New York City in the late 1800s. English muffins gained their identifying trademark "nooks and crannies" in the mid-1920s.

The English muffins that I've unfortunately been exposed to are rubbery, store bought Thomas' ones. The only positives about these are that when their split with a fork, toasted, and buttered, they do not taste half bad. However, I'm sure English muffins have the potential to be a delicious breakfast and sandwich bread.

English muffins are enriched bread, with butter and milk. They are a direct bread, meaning they do not have a preferment or retardation. However, I believe that these would be great using a sourdough starter, adding a more complex flavor. Evan and I decided that we would make two batches because it only makes six at a time. If we doubled it, we would have enough to feed our bread-hungry brother, Will, and freeze some for future breakfasts.

Evan and I began mixing the dry ingredients- flour, sugar, salt and yeast- together. Since we didn't have any buttermilk, we clabbered milk with vinegar to make a buttermilk substitute. We added the "buttermilk" and butter to the dough, and kneaded it until it made a soft, tender dough.

We let the dough proof until doubled, for about two hours. The dough was so soft and supple; It was surprised that it would be used for English muffins. We scaled it into 3 ounce portions, and shaped them into balls. We sprinkled them with a really coarse cornmeal, and a finer one. Then, we let them proof for about 2 hours until they puffed up significantly.

We originally were going to use a cast-iron skillet, but the one we own is only about 8 inches in diameter. We settled on our electric-griddle which we use for pancakes. They cooked on the first side for about 5 minutes, or until they were very dark brown, but not burnt. Then, we flipped them, and baked them on the last side.

Once cooked on both sides on the griddle, we baked them in the oven for about 5 minutes, or until they were fully cooked.

They were on the big side, and a little thicker than the ones were used to. Evan and I split one open (with a fork!) and tried it. They tasted real, and delicious. Unlike store bought ones, they didn't taste chemically or rubbery, but were soft with a crunchy corn crust.

Next time (and I promise there will be a next time), I think I'll scale them into about 2.5 ounce balls rather than 3 ounce ones. It might have been Evan's presence in the kitchen, but English muffins were probably the most fun and most interesting bread I've baked so far.


em120392's picture
em120392

Hey guys! Here's my post about Casatiello, an enriched bread with cheese and meat. I'm doing the BBA Challenge for a project in my high school. My brother and I share a blog (he's going to start writing soon) where we document our journey through the Bread Baker's Apprentice. Here's the link: http://bakingacrosscountry.wordpress.com/


Casatiello, a Neapolitan Easter bread, is also known as Tortano in other parts of Italy. The word casatiello is derived from the Neapolitan word for "cheese." Casatiello is enriched bread, much like brioche, with the addition of cured meat and cheeses. Traditionally, Italians add salami and pecorino-romano and/or provolone cheeses.

Like many other breads, casatiello has religious significance. The rising dough represents the resurrection of Christ on Easter. The traditional circular shape represents Christ's crown, and the eggs on top signify His rebirth.

To incorporate the meat and cheese, Reinhart kneads in these additions. However, while researching other recipes, they call for the dough to be rolled out flat, sprinkled with meat and cheese, and rolled up like a sandwich loaf. The traditional casatiello is topped with raw eggs, covered with dough crosses. When baked, the eggs atop the casatiello are similar to hard-boiled eggs. Reinhart bakes his bread in tall mold, like a coffee can, lined with a paper bag. However, many traditional recipes call for the dough being shaped in ring and baked in a tube pan.

In comparison to many of Reinhart's recipes, this bread can be made in one day, rather than retarding overnight. However, he does use a sponge to add more flavor to his bread. I began by mixing flour and yeast, which I added warm milk to. I let this ferment for about an hour, until it collapsed when tapped the bowl.

Meanwhile, I shredded some provolone cheese, and diced some salami. I sautéed the salami for a few minutes, and it rendered some fat and became slightly crispy.


Next, I mixed flour, salt, and sugar in the bowl of my Kitchen Aid. Next, I added eggs and the sponge to the flour mixture, and mixed until it became a ball. After resting a few minutes, (known as autolyse), I added ¾ cup of room temperature butter in 4 additions. The dough was sticky and soft, and I kneaded it for about 5 minutes until it became slightly tacky and smooth.

I sprinkled the meat over the dough, and tried to knead it in the mixer. However, the salami just whizzed around the bowl, so I decided to knead by hand. After the meat was incorporated, I added the cheese, which mixed in much easier than the meat. I let the mixed dough rest for about an hour and a half, for the first rise.

Since I didn't have coffee tins, and I didn't want to stray from Reinhart's recipe, I chose to bake the casatiello in two loaf pans. I shaped it like I would sandwich bread- I flattened it into a rectangle and rolled it into a tight cylinder. Remembering my mishap while shaping the brioche, I made sure to seal these loaves extra tight. After being shaped, I let the dough rise for the final time for about 90 minutes.

The loaves baked in a 350 degree oven until they were golden brown, and the insides reached about 190 degrees. Unlike the brioche, they were not glazed, but the top was speckled with dark bits of cheese.


When I cut into the loaf, I could see the bits of melted cheese, which made this cool, web-like structure in the bread. Maybe because I'm not a fan of cured meats is the reason that I didn't really find this bread to my liking. Although I liked the rich and soft texture of the bread, I didn't like the bits of salami. I probably should have cubed the meat finer, so it was more evenly distributed. I made this bread with my mentor, Mr. Esteban, in mind. He does not like sweet breads and casatiello is the epitome of the savory kind he would enjoy.

Esposito, Mary Ann. "Neapolitan Stuffed Easter Bread/Neopolitan Casatiello." Ciao Italia. PBS, 2011. Web. 18 Jan 2011. <http://www.ciaoitalia.com/>.

Reinhart, Peter. The Bread Baker's Apprentice. 1st ed. . New York, New York: Ten Speed Press, 2001.129-132. Print.


em120392's picture
em120392

Today, I made Peter Reinhart's Rich Man's Brioche from BBA. I've never made such a rich, buttey bread, but it was delicious. I could only eat one slice, but with raspberry jam, it made the best breakfast.

I posted this on the blog my brother and I share ( http://bakingacrosscountry.wordpress.com/ ) We're both trying to complete the Bread Baker's Apprentice challenge, and also, I'm completing a high school project about artisan breads.

Anyway, here's the post!

Nowadays, we know brioche as a rich bread, enriched with enormous amounts of butter and eggs. The name brioche is derived from the Norman verb, "to pound." The Norman region of France was well known for the butter which they produced, and excessive kneading was required to incorporate all the butter into the dough.

Brioche came to Paris in the 1600s as a much heavier and far less rich bread than the one we know today. Supposedly brioche became well known with Marie Antoinette's famous quote, "qu'ils manget de al brioche" during the 1700s, which translates to "let them eat cake." This referred to the peasants who rioted because there was a lack of bread. The different butter contents of bread were baked for different classes-even the food reflected the social-class divides in 18th century France.

In the Bread Baker's Apprentice, Peter Reinhart provides three different recipes which vary in the butter content. Rich Man's Brioche has about 88% butter to flour ratio, Middle-Class Brioche has about 50%, and Poor Man's Brioche has about 20%. Since I had never made brioche, I splurged and made Rich Man's-why not? The recipe makes three loaves- In my head, the idea of three loaves somehow justified the pound (?!) of butter in the bread.

Traditionally, brioche is baked in molds as brioche a tete, which are formed with two balls of dough. Served with jam, brioche makes a perfect breakfast, and topped with meats and cheese, it can be served for lunch or dinner, thus making brioche a truly versatile bread.

I began the brioche with a sponge of flour, yeast, and milk. After the sponge rose and collapsed, I added five eggs. Next, incorporated the dry ingredients (flour, salt, and sugar), and mixed until the flour was hydrated.

After a few minutes, I mixed in a stick of butter at a time, making sure they were fully incorporated before the next addition. The dough looked smooth, and almost icing-like, because of the butter. I had never worked with such a fluffy, light bread dough, so I felt kind of intimidated in new waters.

After all the butter was added, I mixed for a few more minutes until the dough was soft, and tacky, but not sticky. I spread the dough onto a cookie sheet and put it in the refrigerator to firm up and retard overnight.

Since I don't have brioche molds, I used three loaf pans. I cut the dough into three even pieces, and with a rolling pin, I formed a rectangle. Like sandwich bread, I rolled the dough up, and placed them seam-down in the pan, and let it rise for about two hours. After it had risen for the second time, I brushed it an egg wash, to form a shiny crust.

In a 350 degree oven, I baked the bread until it was golden brown, and the internal temperature reached 190 degrees. However, when I tried to take the bread out of the pan, it kind of stuck to my not-nonstick pans, which I didn't grease. With some slight prying, I got the bread out, but slightly crushed and deflated a loaf. Also, when forming the loaves, I didn't seal the seam well, and when baked, it split on the sides.

Once cooled, I cut the bread, which flaked like a croissant, and tasted so rich and delicious. Since there is so much butter, one slice is more than enough, but every bite was so delicate and smooth. I'm glad I splurged for Rich Man's brioche, but I'm not sure how often I'll make it because of it's richness. With raspberry jam, it honestly made the best breakfast.


em120392's picture
em120392

Hey guys! I just wanted to thank you again for your encouraging comments on my bread-baking-project for school. I appreciate your thoughts very much! =]

I made bagels the other day, and wanted to share my post with you guys.

Here it is!

(my brother and i share a blog: http://bakingacrosscountry.wordpress.com/ )Originating in Poland in the 1600s, Bagels came along with Jewish immigrants to Ellis Island. Since many people of Jewish descent settled in New York, bagels have since been a tradition in the City.
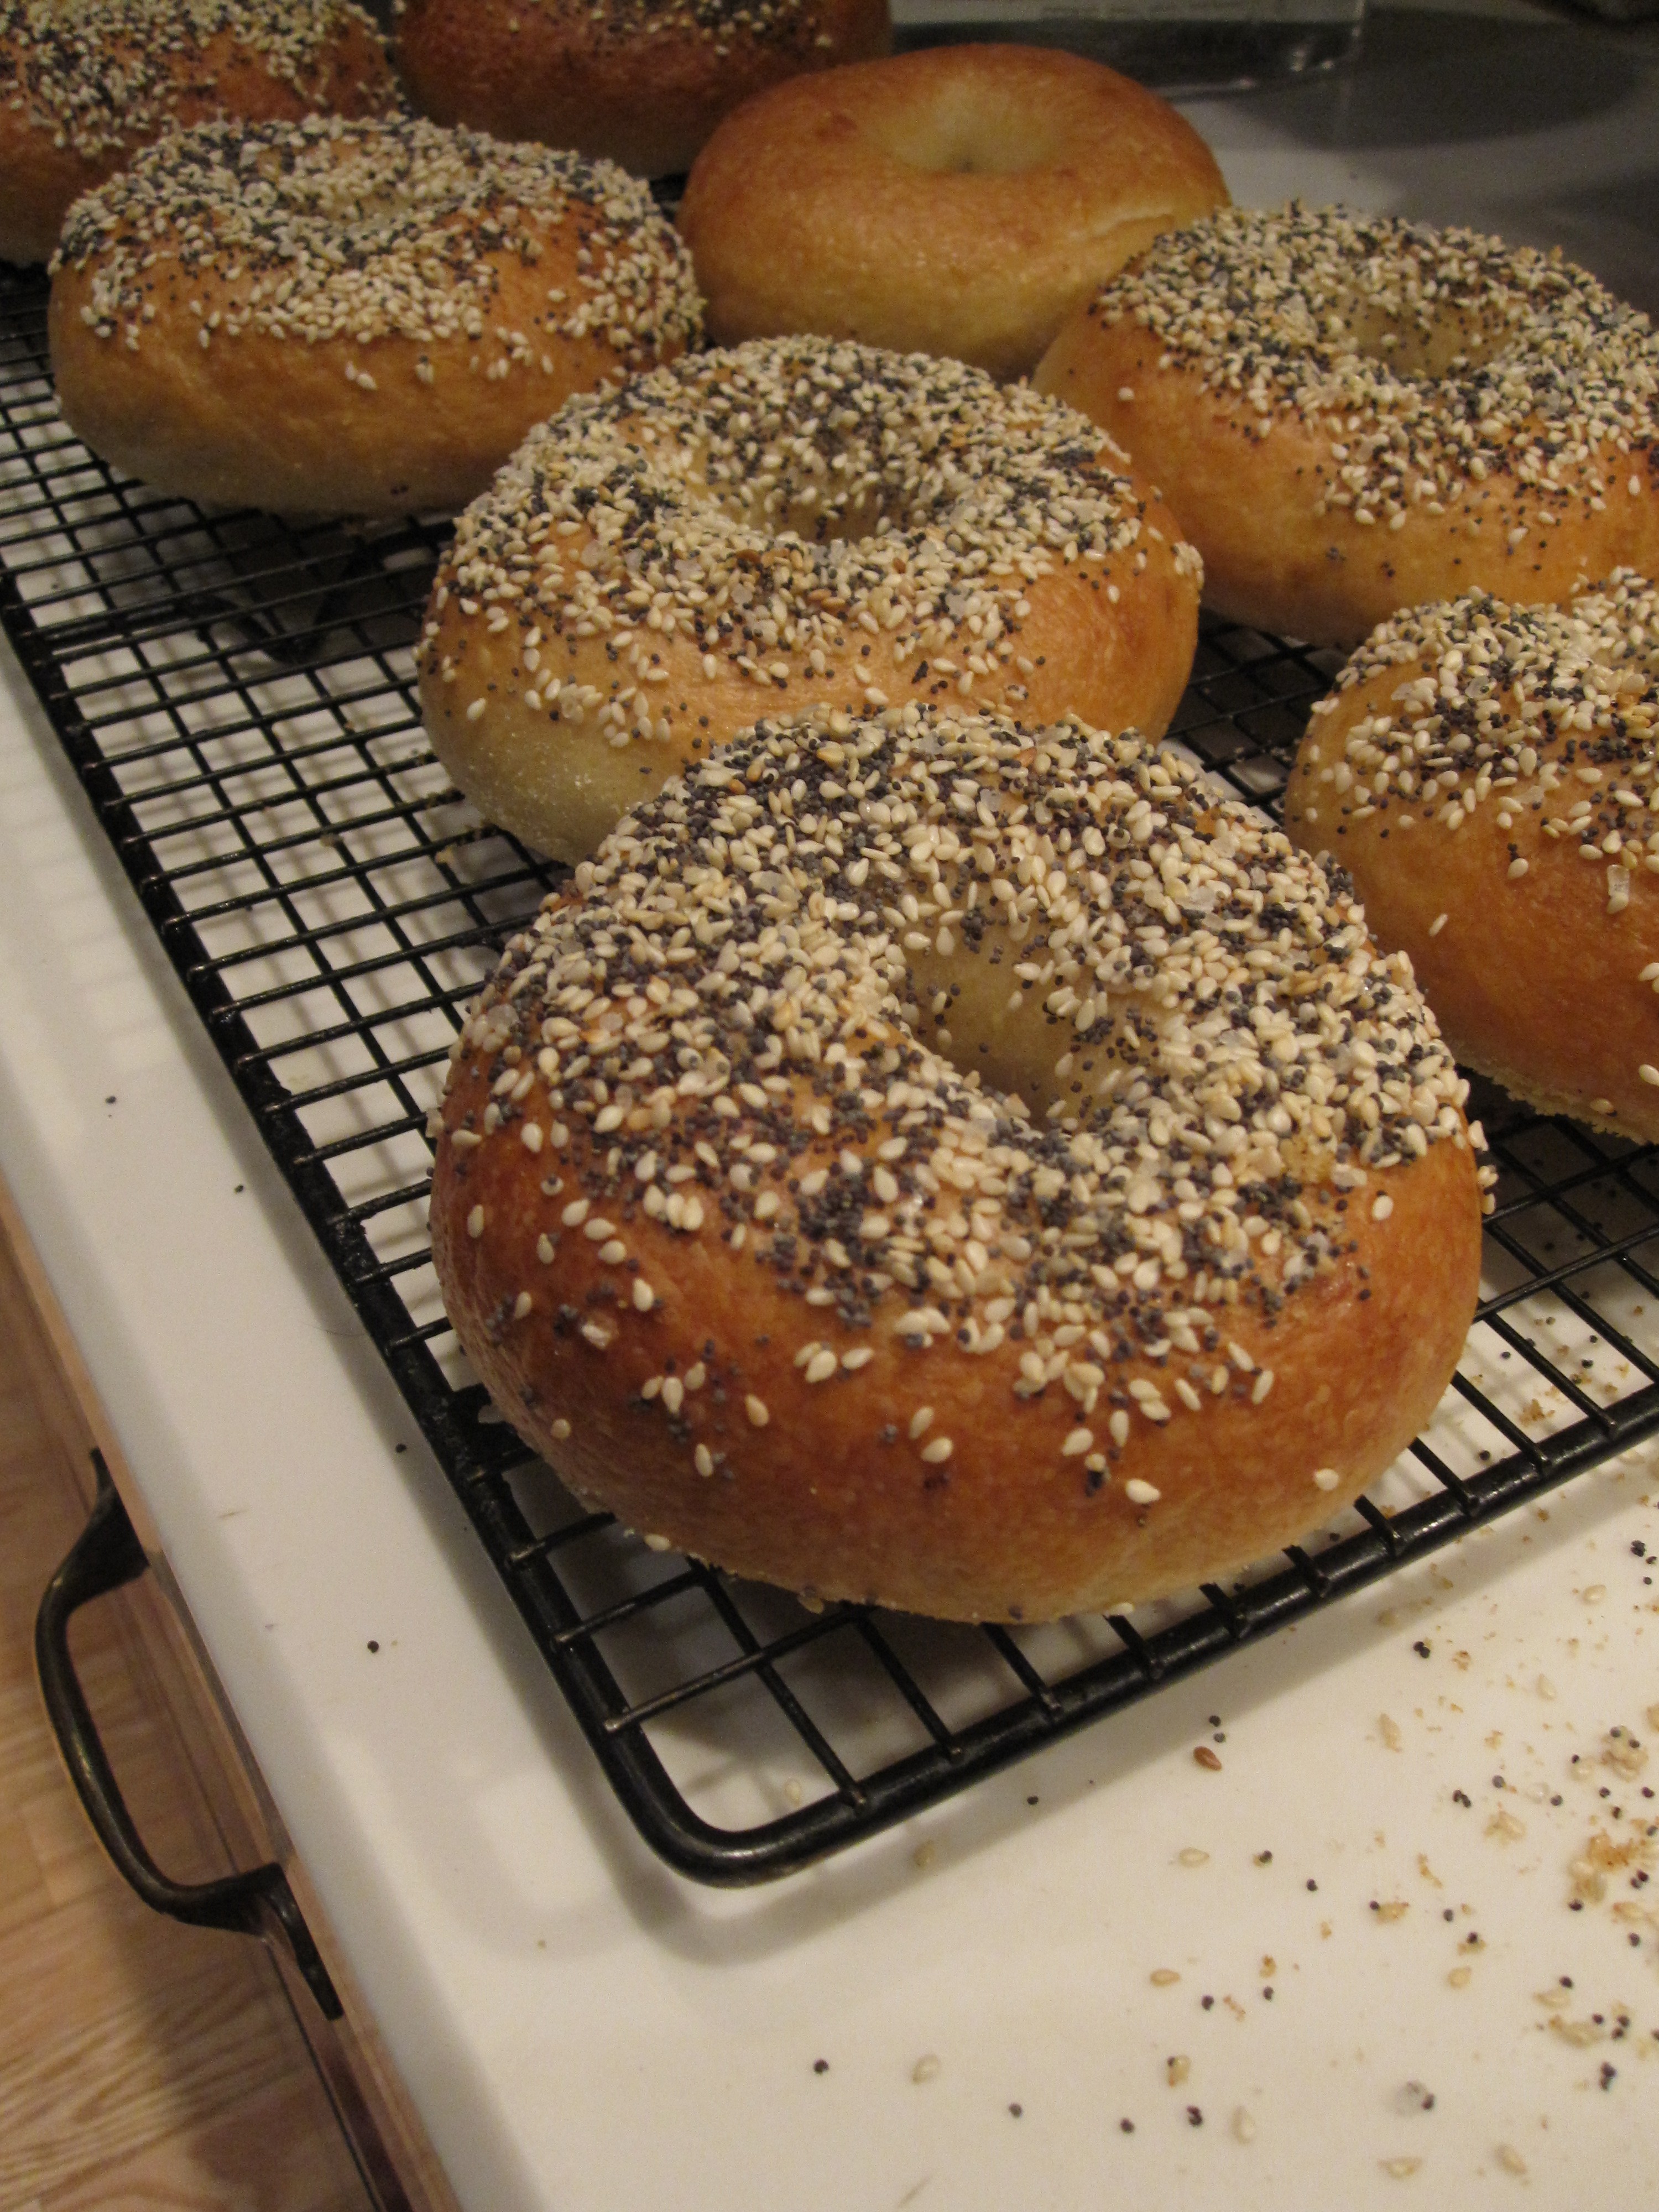
The word bagel is derived from the German word for "to bend," symbolizing the round shape of the bread. Bagels were thought to bring good luck to the receiver of the bread. Usually, women who just gave birth received them for good luck as well as a symbol representing the cycle of life due to their circular shape.

The bagel gains its distinct chewiness from being first boiled, and then baked at a rather high temperature. A prolonged, cool second rise contributes to the bagels developed flavor, as well as the "fish eyes" on the crust. "Fish eyes" are raised bumps on the surface of the bread.

The first time I made bagels a few years ago, I was foolish and used whole wheat, no-knead dough from Artisan Bread in Five Minutes a Day. Although this dough made fine boules, the bagels dissolved in the boiling water, leaving broken lumps of chewy dough. Nevertheless, I was determined to find the perfect bagel recipe.

My brother, Evan, has been baking his own bagels weekly for about a year now. Out in California, each bagel costs over a buck, and they're spongy rolls. Out here in New Jersey, we sometimes get good bagels-but mostly, they're doughy and the size of your face.

Reinhart begins his recipe with a sponge, combining water, yeast, and flour into a thick-pancake like batter. After about two hours, I added more yeast, flour, salt and honey. I tried to mix the ingredients together, but flour flew out everywhere, making a giant mess. I tried to knead the dough in the Kitchen Aid, but the dough was so stiff, I could smell the motor straining.

That's why we have hands, I guess. For about ten minutes, I kneaded the stiff dough until my arms hurt, and the dough passed the window pane test. I measured out the dough into twelve even pieces (thank goodness for a scale). However, 4.5 ounce bagels were a bit too large for breakfast, and I think making about 16 would be a better portion.

After letting the dough rest for a little bit, I shaped them into bagels. I tried both ways, by sticking my finger through the dough and stretching the hole out, and also by forming them from a coil. I found that by poking my finger through, the shape of the bagel was more consistent, but I'm sure with more practice, I could get better at the coil-method.

I let the bagels rest again for about twenty minutes. Reinhart suggests a test for readiness: I placed one piece of shaped bagel dough in a bowl of water and saw it immediately floated.

After the test, I placed them on baking sheets, covered them with plastic wrap, and put them in the fridge for two nights.

On the second night, I brought a pot of water to a boil with an added tablespoon of baking soda. I didn't want to crowd my pot, so I only boiled four bagels at a time, for about a minute per each side. Immediately after boiling, I put them on a cooling-rack to drain, and sprinkled over a combination of sesame and poppy seeds, as well as some sea salt.

After boiling all 12 bagels, I baked them in a 500 degree oven for 5 minutes, rotated the pans, and baked them about 7 minutes more at 450, or until they were deep golden brown.

The next morning, I had a bagel with cream cheese for breakfast. Wow. They beat any one of the partially-cooked ones I get from the bakeries in my town. Since there are only three of us living in my house right now, we froze half of the bagels for future use. I also gave my mentor, Mr. Esteban a handful of bagels to share with his family. I hope he enjoyed them!

Besides my finicky mixer, this recipe was super simple and didn't require all that much effort (but more utensils than normal to clean). Rather than spending 12 bucks for 12 bagels on Sunday, I can bake these (better) bagels for a fraction of the cost. Next time, I'll try to find malt barley to make more authentic bagels, but for now, these are awesome!

Olver, Lynne. "Breads." Food Timeline (2011): n. pag. Web. 14 Jan 2011. <http://www.foodtimeline.org>.


OldWoodenSpoon's picture
OldWoodenSpoon

It seems like everyone is baking Raisin-Walnut bread of one kind or another.  Me too!  With the holidays drawing to a close, we are generally "sweeted out", and wanted a flavorful loaf that is not full of sugar, to go with morning coffee and all.  This seems to fill the bill nicely.  The recipe calls for minimal sugar, and gains most of it's sweetness from the natural sweetness of the raisins.

I followed the BBA formula with only a couple of exceptions.  I am still trying to use up some powdered buttermilk from the fridge, so I substituted that here and adjusted the water accordingly.  Also, Mr. Reinhart does not instruct to plump the raisins for this loaf, but I prefer the results I get when I do so.  I soaked the raisins in about 1/2 cup of brandy and enough hot water to cover them over in the bowl.  I thoroughly drained them before hand-kneading them and the walnuts into the dough.  I hand-kneaded the nuts and raisins so they would not get torn up by the Bosch, where I did the main work of mixing the dough.

I baked the dough as two panned loaves, in 8.5" x 4.5" pans, prepared with my pan release.  The house has been much cooler these past few day, so proofing took an extra 45 minutes or so.  Baking, however, was done a bit sooner than expected, probably because I left my baking tiles in the oven.  The crust is not adversely affected, however, and the crumb is very nice.

As you can see, I did not do a perfect job of shaping these loaves for the pan.  The crumb does not seem to show the obvious lines you might expect, given the exterior appearance.

These two loaves are the end of my 2010 baking year.  Tomorrow starts a new year, and I have the rye sour working already for the BBA Pumpernickel to kick off the new year.  That is another story though.

Thanks for stopping by, and Happy New Year!
OldWoodenSpoon

Pages

Subscribe to RSS - Bread Baker's Apprentice