The Fresh Loaf

A Community of Amateur Bakers and Artisan Bread Enthusiasts.

dmsnyder's blog

dmsnyder's picture
dmsnyder

I have been baking often but have settled on a handful of breads that I most enjoy eating. I have posted on all of them here over the years, in some cases multiple times documenting minor variations. But this week I saw a bread on another online forum that grabbed my attention and instantly went to the top of my ridiculously long "To Bake" list. It turns out that my intuition was spot on. This turned out to be an extraordinarily delicious bread.


Buttermilk-Spelt Sourdough Bread

from Cecilia Agni Hadiyanto on Facebook


Total Dough

Ingredient

Wt (g)

Bakers %

Hi-gluten flour

38.5

7

Whole Wheat flour

11

2

Whole Rye flour

5.5

1

All Purpose (AP) flour

300

54

Whole Spelt flour

200

36

Water

55

10

Buttermilk

425

76

Salt

10

2

Total

1045

188


Levain

Ingredient

Wt (g)

Bakers %

Hi-gluten flour

38.5

70

Whole Wheat flour

11

20

Whole Rye Flour

5.5

10

Water

55

100

Active starter

22

40

Total

132

240

  1. Dissolve the active starter in the water. 
  2. Add the flours and mix thoroughly.
  3. Place in a clean container with a tight lid and ferment at room temperature until doubled in volume.
  4. If not ready to mix the final dough, you can refrigerate the levain for up to 3 days.


Final Dough

Ingredient

Wt (g)

Whole grain Spelt flour

200

AP flour

300

Buttermilk

425

Active liquid levain

110

Salt

10

Total

1045


Procedure

  1. Mix all of the ingredients except the salt to a shaggy mass in a medium bowl and cover.
  2. Autolyse for 30-120 minutes.
  3. Sprinkle the salt over the dough and incorporate completely. (I use the pinch and fold method described by Forkish in “Flour Water Salt Yeast.”)
  4. Bulk ferment at 76-80ºF until double in volume (about 4-8 hours, depending on temperature) with Stretch & Fold in the bowl at 30 and 60 minutes and a lamination fold on the board at 120 minutes).
  5. Pre-shape round and cover. Let rest for 20 minutes or so.
  6. Shape as boule or bâtard and place in a floured banneton. Cover with a towel or place in a food grade plastic bag.
  7. Proof for 1-2 hours at room temperature, then cold retard for 12-18 hours. 
  8. Bake in a Dutch oven at 460ºF covered for 20 minutes. Uncover.  Continue baking at 420ºF for 30 minutes. (The falling temperature approach is because this bread tends to darken very quickly due to the buttermilk. So keep an eye on it and adjust your oven temperature accordingly.)
  9. Cool on a rack thoroughly before slicing. 


This bread has an extraordinary flavor. It is a bit nutty and earthy and very sour. (Remember its hydration is basically all buttermilk.) My wife says it smells like rye, and, in fact,  it tastes like rye. It must be the spelt. I like it a lot.

Happy baking!

David 

dmsnyder's picture
dmsnyder

Medium Vienna Dough for Soft Rolls

This formula is from

 “Inside the Jewish Bakery,” by Stanley Ginsberg and Norman Berg

 As Interpreted by David M. Snyder

May, 2020

 For those who don’t know, Vienna Dough is an enriched dough that can be used for breads but is most often used for rolls - onion rolls, double knot rolls, pletzel, kaiser rolls and more. Besides differences in shaping, toppings and fillings, the various rolls differ in two respects: First, the dough can be more or less enriched with eggs, oil and sweeteners. Second, the shaped rolls can be more or less fully proofed. So, for example, rolls like onion pockets and knotted rolls are made with younger doughs (less proofed) and a sweeter dough. Kaiser rolls, where you want a less sweet dough, a crisper, thinner crust and less oven spring so the decorative shaping is maintained are proofed more fully.

 It should be noted that all of these products were made without dairy and are therefore kosher with either dairy or meat meals.

 This recipe is for a “medium vienna dough” that is ideal for knotted rolls and onion rolls. I use it for sandwich rolls. It makes a dozen 3 oz rolls. 

Ingredient

Volume

Grams

Bakers Percentage

Bread flour

4 1/2 cups

620

100

Water

1 1/4 cups

280

45

Veg. oil

2 Tbs

30

5

Egg

1 large + 1 for brushing

50

8

Sugar 

3 Tbs

40

6

Dry or liquid malt

1 Tbs

20

Instant yeast

5 tsp

20

3

Salt

1 1/2 tsp

10

2

Seeds for topping the rolls


 Note: I generally use all purpose flout with 11.7% protein. If you use a high gluten flour or if you substitute whole wheat flour for some of the bread flour, you will have to increase the water slightly to achieve the expected dough consistency which should be slightly tacky but not sticky. 

 If you use dry malt, treat it as a dry ingredient. If you use malt syrup, dissolve it in the water and then add the other wet ingredients.

 Procedures

1. Place the dry ingredients except the salt in the bowl of a stand mixer. Whisk them or use the paddle attachment to mix them together.

2. Mix the wet ingredients in a medium bowl.

3. Add the wet ingredients to the mixer bowl and mix with the paddle attachment at slow speed until all the flour is moistened. Add the salt and continue mixing for another minute.

4. Switch to the dough hook and mix at Speed 2 (on a KitchenAid Stand Mixer) until a medium gluten window is achieved (about 10 minutes).

5. Transfer the dough to the board and form a ball. Place the dough in a lightly oiled large bowl that can allow doubling of the dough volume. Cover the bowl.

6. Bulk ferment the dough in a warm place until it has doubled in volume. (45-60 minutes). 

7. Transfer the dough to a lightly floured board. Divide it into 12 equal pieces of about 3 oz. each.

8. Form the pieces into balls, cover them with a towel and let them rest for 15-20 minutes.

9. Shape the pieces as desired - flat disks for hamburger buns, long rolls for sausages, ropes to make knotted rolls, etc.

10. Places the formed rolls onto baking sheets and cover them. (I use quarter sheet pans which hold 6 rolls each and put these in plastic bakery bags for proofing.)

11. Pre-heat your oven to 350ºF.

12. Mix an egg with a tsp of water to glaze the rolls. Get out any seeds you want to put on them.

13. Let the rolls proof 3/4 of the way. (If you poke a finger in one, the hole should fill in very slowly.)

14. Brush the rolls with the egg wash. Sprinkle each roll with seeds (optional).

15. Bake until lightly browned and fully baked. (12-15 minutes or a bit longer, depending on your oven).

16. Cool on a rack completely before serving. 
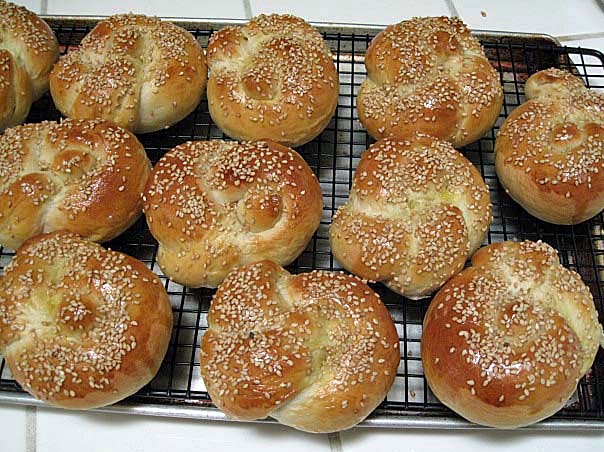


 These rolls freeze well. I wrap each in cling wrap and place them in a plastic bakery bag with a tie. Thaw in a 375ºF oven for about 7 minutes.

 Enjoy

 David

dmsnyder's picture
dmsnyder

It has been a while since I have posted on The Fresh Loaf. I have been baking just as much as usual, but I have settled on favorite breads that I have shared at least once already. I decided I would post again only when I baked something new, at least new to me, that I thought was really good and worth recommending to other bakers for them to also try.

A few weeks ago, I baked a new bread from Ken Forkish's Flour Water Salt Yeast, his “White Flour Warm-Spot Levain.” It uses a slightly firmer and all white flour levain and ferments the dough at a higher temperature than his other breads. I followed the recipe exactly as written, including going through three levain builds, although I didn't waste any “spent fuel.” It made a very nice, mildly sour white pain au levain.

As usual, I watch the behavior of the levain and dough, not the clock. More often than not, the timings Forkish specifies for various fermentation stages are just not accurate for my kitchen.

It seemed to me I would enjoy the bread more with some whole grain flours added, and I didn't see the need for the multiple builds. So, this is what I made this week.

Total Dough


Ingredient

Wt (g)

Bakers' %

All purpose flour

700

66

Hi protein flour

223

21

Whole wheat flour

80

8

Whole rye flour

50

5

Water

782

74

Salt

20

2

Total

1855

176


Levain


Ingredient

Wt (g)

Bakers' %

Active starter

50

20

Hi protein flour

225

90

Whole wheat flour

25

10

Water (85-90ºF)

175

70

Total

475

190

  1. The day before mixing the final dough, dissolve the starter in the water. Mix in the flours until the levain ingredients are evenly distributed.

  2. Ferment at 80ºF until expanded 2 to 2.5 times (6 to 8 hours for me this time).

  3. Refrigerate overnight.

Notes: The starter I used was saved from my last bake about 5 days ago. It was 50% hydration and a 1:3 mix of white and whole wheat flours. I fermented the levain in a Brød and Taylor Proofing Box. If you have a more recently fed starter, you fermentation time for the levain may be shorter.


Final Dough


Ingredient

Wt (g)

All Purpose flour

700

Whole rye flour

50

Whole wheat flour

50

Water (85-90ºF)

610

Sea Salt

20

Levain

425

Total

1855


Procedure

  1. Remove the levain from the refrigerator and let it warm at room temperature.

  2. In a large bowl, mix the flours and the water to a shaggy mass. Cover the bowl, and let the dough rest for 30-60 minutes (Autolyse).

  3. Sprinkle the salt over the dough and distribute the levain in 4-6 portions over the dough.

  4. Mix the salt and levain into the dough using the combination of pinching and stretching and folding described by Forkish in FWSY (Similar to the method of Chad Robertson described in his books).

  5. Transfer the dough to a clean, slightly oiled container that is large enough to hold the dough when it has fully expanded.

  6. Bulk ferment the dough at 80ºF until it has expanded to about double its initial volume. (3-4 hours). I did stretch and folds in the bowl at 45 minutes and 75 minutes. I then did a stretch and fold on the board (“lamination”) an hour later. The dough was then left alone until it was ready to divide and shape (another 85 minutes, in this case).

  7. Transfer the dough to a floured board. Divide it into two equal pieces and pre-shape as rounds.

  8. Cover the pieces and let them rest for 10-30 minutes.

  9. Shape into boules or bâtards and place in floured bannetons, smooth side down, if you plan to score the loaves or seam side down, if you are going to let the loaves open chaotically. (Note: Forkish says the bakery from which he took this formula used it for baguettes. I imagine that would be really good. I'll try it sometime.)

  10. Proof at room temperature for about an hour, then refrigerate for 8-36 hours. (A longer cold retardation will result in a more sour bread.)

  11. When ready to bake, transfer the loaves to a peel or to the base of your Dutch ovens. Scored as desired.

  12. Bake in cast iron Dutch ovens covered at 475ºF for 30 minutes, then uncovered for another 20 minutes at 460. Alternatively, pre-heat your oven to 500ºF for an hour with a baking stone and steaming apparatus in place. Turn down the oven to 460ºF. Bake with steam for 15 minutes. Remove the steaming apparatus. Continue to bake for another 30-35 minutes. (Note: My preferred method, after I remove my steaming apparatus, is to bake at 440ºF with the convection fan turned on.)

  13. The bread is done when nicely colored, and you hear a hollow sound when you thump the bottom of the loaf. The internal temperature should be at least 205ºF.

  14. Cool completely before slicing.

These loaves were cold retarded for about 40 hours. I tasted it when completely cooled. The crust was crunchy-chewy. The crumb was moderately chewy and moderately sour with a nice, wheaty flavor with a little sweetness.

Note that the flour mix used in this bake is very similar to my San Joaquin Sourdough. Of course, the method is very different.

Enjoy!

David


dmsnyder's picture
dmsnyder

A TFL member sent me  a kind inquiry as to my welfare, since I hadn't posted any recent baking. Well, I am fine, thank you, except for some cabin fever. I feel great and not particularly vulnerable, considering my .... seniority. My hyper-prudent spouse is suppressing my daily urges to expose myself to nasty bugs, no doubt a good thing. <sigh>

I have been baking - probably a little more than usual, in fact. And I have tried a couple of new things. The photos are all from the past 3 weeks' baking.

San Joaquin Sourdough Baguettes

A multigrain sourdough with mixed seeds on the crust

Peter Reinhart's 100% Whole Wheat Bread

Ken Forkish's White Flour Warm-Spot Levain

I apologize for any concern engendered by my lack of posting here. I hope you will find today's contribution better latte than never.

Happy baking, and stay safe and healthy!

David

dmsnyder's picture
dmsnyder

One of my TFL friends expressed concern that I had not posted for awhile. I can reassure him and you all that I am well and baking as much as ever. The thing is I have settled on a few favorite breads (if "a few" is less than ten), and I have already posted about all of them at least once. 

This weekend I baked something old and something new, so I have an excuse to report that to which I have been up.

Yesterday, I tried a new baguette recipe. For many years, I have used my San Joaquin Sourdough recipe for baguettes. And I can hardly remember the last time I baked "white bread." But the second edition of Jeff Hamelman's "Bread" has a recipe for "Sourdough Baguettes" I have been curious to try. So yesterday I did.

This is an all white flour bread that is yeasted, but it has the addition of some liquid levain. The result is a good traditional baguette in every respect with an added flavor tone of mostly lactic acid tanginess. I made half a recipe using left over liquid starter which I had fed a couple days before. I froze one of the loaves. I think I made pretty good use of the other.


For dinner: Sautéed scallops and a butter lettuce salad.  Delicious with baguette and an Anderson Valley Chardonnay from Navarro Vineyards.

For Breakfast, French Toast with powdered sugar and sour cream. I know that's different, but it's the way my family ate it when I was a kid.

For lunch, Onion soup with croutons and cheese.

We are going to a pot luck tonight for dinner, so I baked a couple loaves of multigrain sourdough bread today. (One for the potluck. One for a neighbor.)

I hope you all are having a happy and delicious holiday season!

Happy baking!

David

dmsnyder's picture
dmsnyder

I've been able to bake some pretty nice breads over the past dozen years or so. I give lots of credit to my oven which provided predictable, accurate and evenly distributed heat. It also retained humidity well when set to conventional baking. But it died.

That oven was installed 23 years ago. The KitchenAid folks told me the expected life span of a current production oven is 10 to 15 years. That seems short to me, but I've been told so many times by various appliance sales and repair people that, literally, "They don't make 'em like they used to."

Anyway, after consulting Consumers Report and a trusted appliance sales person, I ended up replacing my old KitchenAid convection oven with the current model of the same oven. It has a few differences, but most of these seem to be improvements to me. Nonetheless, any new oven needs to be tested and, I believe, requires some adjustments in procedures to achieve optimal results. I'm still learning the idiosyncrasies of this oven, but it seems capable of baking good bread.

My first bake was Jewish Sour Rye. This was baked on a pizza stone with my usual oven steaming method.

And, today, I baked a dozen sandwich rolls made with the "Medium Vienna Dough" from "Inside the Jewish Bakery."

The rolls took a long time to brown. I am not yet sure whether the oven temperature was lower than my setting or the oven needs longer to pre-heat after it reaches temperature or I need to place the oven rack lower for conventional baking in this oven.  More tests are called for. I can do that. 

Happy baking!

David

dmsnyder's picture
dmsnyder

I haven't been posting here much of late. I have been mostly baking variations on a multi-grain sourdough - some mix of heritage wheats, rye, kamut and spelt - with the whole grain flours between 30 and 50% of total flour and all home-milled.

The last few days, I've had a hankering for San Joaquin Sourdough baguettes, and this morning we made a run to our favorite Italian deli where I bought some toscana salami and caciocavallo cheese, which makes my favorite sandwich. I got home, took the retarding dough out of the fridge and had that sandwich on very fresh baked bread. As Flanders and Swann wrote in their "Cannibal Song," "A chorus of yums went 'round the table."

But, not content with plain old baguettes, I used the dough to shape 3 different versions of San Joaquin Sourdough - a small baguette, an epi de blé and a fougasse.

And, finally, the sandwich (minus a couple bites):

Happy baking!

David

dmsnyder's picture
dmsnyder

Sourdough Bread: April 30, 2019

David Snyder

This is basically the same bread I baked on March 22, 2019. The only change was to substitute spelt for the rye and some of the all purpose flour in the final dough.

I have been trying different grain blends and anticipate continuing this line of experiments for a while. All the breads have been among my favorites. The long cold retardation really enhances the acid content without resulting in too much gluten breakdown, at least with these flours and this hydration level.

Total Dough


Ingredient

Wt (g)

Bakers' %

High-protein flour

147

13

AP flour

653

56

Whole Rye flour

136

11

Whole Spelt flour

234

20

Water

769

65

Salt

23

2

Total

1962

167


Starter


Ingredient

Wt (g)

Bakers' %

High-protein flour

110

88

Whole Rye flour

15

12

Water

62.5

50

Firm starter

62.5

50

Total

250

200

  1. Dissolve the starter in the water.

  2. Add the flours and mix thoroughly.

  3. Ferment at 76ºF for 8-10 hours.

  4. Refrigerate for 12 hours or up to 3 days.


Final Dough


Ingredient

Wt (g)

AP flour

653

Whole Rye flour

116

Whole Spelt flour

234

Water

686

Salt

23

Starter

250

Total

1962

Procedures

  1. Place the flours and water in the bowl of a stand mixer and mix at low speed to a shaggy mass.

  2. Cover the bowl and let it rest (autolyse) for 1-2 hours.

  3. Sprinkle the salt over the surface of the dough. Add the starter in chunks. Mix at Speed 1 for 2 minutes to distribute ingredients then for about 9 minutes at Speed 2 to develop the dough.

  4. Transfer the dough to a lightly floured board. Shape into a ball.

  5. Transfer the dough to a clean, lightly oiled bowl. Cover the bowl and ferment at 80ºF for about 3 hours with stretch and folds at 50 and 100 minutes.

  6. Divide the dough into two equal pieces. Cover and let rest for 10-30 minutes to relax the gluten.

  7. Shape as boules or bâtards and place in floured bannetons. Cover or place in food-grade plastic bags.

  8. Proof for 2-3 hours at room temperature until the loaves have expanded by about 50%.

  9. Refrigerate for 12-40 hours (The longer the cold retardation, the more sour the final loaf).

  10. Remove from refrigerator. Check on degree of proofing. Proof further at 80ºF, as needed. (May need 1-3 hours.) If adequately proofed, proceed to scoring and baking.

  11. Transfer to a peel. Score as desired.

  12. Bake: If baking in Dutch oven, bake at 475ºF covered for 20 minutes, then uncovered at 450ºF for another 10 minutes or until done to satisfaction.

  13. Bake: If baking on the hearth, pre-heat oven at 500ºF for 1 hour with baking stone and steaming apparatus in place. Turn down oven to 460. Load loaf and steam oven. After 15 minutes, remove steam and continue baking for 20-35 minutes, until loaf is baked. (Depends on size and shape of loaf.)

  14. The bread is done when the crust is nicely colored and the loaf sounds hollow when thumped on the bottom. The internal temperature should be at least 205ºF.

  15. Transfer the bread to a cooling rack and cool thoroughly before slicing.

Today's loaves were cold retarded for 36 hours then proofed at 80ºF for about 60 minutes before being baked.

This bake was quite similar to others in this series. The crust was crunchy. The crumb was mildly chewy. The flavor was complex and very nice with a definite acetic acid tang that did not over-power the flavor of the grains.

Happy baking!

David


dmsnyder's picture
dmsnyder

Sourdough Bread: April 25, 2019

David Snyder

This is basically the same bread I baked on March 22, 2019. The changes are to use whole wheat rather than rye in the starter and to substitute spelt for the rye and some of the all purpose flour in the final dough.

Total Dough


Ingredient

Wt (g)

Bakers' %

High-protein flour

147

13

AP flour

653

56

Whole Wheat flour

15

1

Whole Rye flour

121

10

Whole Spelt flour

234

20

Water

769

65

Salt

23

2

Total

1962

147


Starter


Ingredient

Wt (g)

Bakers' %

High-protein flour

110

88

Whole Wheat flour

15

12

Water

62.5

50

Firm starter

62.5

50

Total

250

200

  1. Dissolve the starter in the water.

  2. Add the flours and mix thoroughly.

  3. Ferment at 76ºF for 8-10 hours.

  4. Refrigerate for 12 hours or up to 3 days.


Final Dough


Ingredient

Wt (g)

AP flour

653

Whole Rye flour

116

Whole Spelt flour

234

Water

686

Salt

23

Starter

250

Total

1962

Procedures

  1. Place the flours and water in the bowl of a stand mixer and mix at low speed to a shaggy mass.

  2. Cover the bowl and let it rest (autolyse) for 1-2 hours.

  3. Sprinkle the salt over the surface of the dough. Add the starter in chunks. Mix at Speed 1 for 2 minutes to distribute ingredients then for about 9 minutes at Speed 2 to develop the dough.

  4. Transfer the dough to a lightly floured board. Shape into a ball.

  5. Transfer the dough to a clean, lightly oiled bowl. Cover the bowl and ferment at 80ºF for about 3 hours with stretch and folds at 50 and 100 minutes.

  6. Divide the dough into two equal pieces. Cover and let rest for 10-30 minutes to relax the gluten.

  7. Shape as boules or bâtards and place in floured bannetons. Cover or place in food-grade plastic bags.

  8. Proof for 2-3 hours at room temperature until the loaves have expanded by about 50%.

  9. Refrigerate for 12-40 hours (The longer the cold retardation, the more sour the final loaf).

  10. Remove from refrigerator. Check on degree of proofing. Proof further at 80ºF, as needed. (May need 1-3 hours.) If adequately proofed, proceed to scoring and baking.

  11. Transfer to a peel. Score as desired.

  12. Bake: If baking in Dutch oven, bake at 475ºF covered for 20 minutes, then uncovered at 450ºF for another 10 minutes or until done to satisfaction.

  13. Bake: If baking on the hearth, pre-heat oven at 500ºF for 1 hour with baking stone and steaming apparatus in place. Turn down oven to 460. Load loaf and steam oven. After 15 minutes, remove steam and continue baking for 20-35 minutes, until loaf is baked. (Depends on size and shape of loaf.)

  14. The bread is done when the crust is nicely colored and the loaf sounds hollow when thumped on the bottom. The internal temperature should be at least 205ºF.

  15. Transfer the bread to a cooling rack and cool thoroughly before slicing.

Today's loaf was cold retarded for 40 hours then proofed at 80ºF for about 80 minutes before being baked. The crust is crunchy. The flavor is lovely – complex with a pronounced acetic acid tang. This is the most sour bread of my current series of experiments. It is rather similar to the March 22 bake. I cannot discern to absence of the rye. Even right after cooling when first tasted, the flavor was well-balanced.

Happy baking!

David


dmsnyder's picture
dmsnyder

Mixed Grain Sourdough

David Snyder

April, 2019


For this week's bakes, I am returning to my variations on Ken Forkish's “Field Blend #2.” The flour mix used is the same as that of several previous bakes, except that the Whole Wheat flour used is “Warthog” hard red Winter wheat. One of the bakers I follow on Instagram swears by this variety, so I though I would try it. What I found right away was that it seems a lot less thirsty than any of the other hard red Winter wheats I have used to date. So I did reduce the hydration slightly and still ended up with a much slacker dough than expected.

I made two loaves with this dough. One was retarded for about 20 hours. The other loaf was retarded for about 44 hours.

Total dough


Ingredient

Wt (g)

Bakers' %

All purpose (AP) flour

700

70

Whole Wheat (WW) flour

125

12.5

Whole Rye flour

75

7.5

Whole Spelt flour

100

10

Water

760

76

Salt

21

2.1

Total

1781

180.1


Levain


Ingredient

Wt (g)

Bakers' %

All purpose (AP) flour

144

75

Whole Wheat (WW) flour

36

25

Water (85-90ºF)

144

75

Active Starter (100% hydration)

36

25

Total

360

200

  1. Dissolve the starter in the water, add the flours and mix thoroughly.

  2. Place in a clean bowl and cover tightly.

  3. Ferment at 80ºF until doubled in volume.

  4. The levain can be used immediately or refrigerated for up to 3 days. If refrigerated, I take it out 2 hours before I am going to incorporate it into the final dough. In general, this means I take it out when I am ready to mix the autolyse.


Final Dough


Ingredient

Wt (g)

All purpose (AP) flour

540

Whole Wheat (WW) flour

85

Whole Rye flour

75

Whole Spelt flour

100

Water (85-90ºF)

600

Levain

360

Salt

21

Total

1781

Method

  1. In a large bowl, mix the water and the flours to a shaggy mass. Be sure to leave no dry flour in the bowl.

  2. Cover and let sit at room temperature for 1-2 hours (autolyse).

  3. Sprinkle the salt over the dough and add the levain in 4-6 portions. Mix in with a spatula, spoon or your wet hands.

  4. Continue distributing the salt and levain evenly by squeezing the dough repeatedly between your thumb and fingers, alternating with stretching and folding the dough. (Hint: I find that doing this wearing a food service glove which I dip frequently in a bowl of water works very well. The dough doesn't stick to the glove as much as it does to my hand.)

  5. Transfer the dough to a clean, lightly oiled bowl and cover it.

  6. Ferment at 80ºF for 3-4 hours. Stretch and fold in the bowl at 30 and 60 minutes. Stretch and fold on a lightly floured board 50 and 100 minutes later. Note: I bulk ferment this dough in a Brød and Taylor Proofing Box. If you are fermenting at a cooler temperature, it will just take longer. Do additional stretch and folds hourly to redistribute metabolites and equalize dough temperature. Leave the dough alone for the last hour. The dough should increase in volume to about double and be pillowy.

  7. Divide the dough into two equal pieces. Pre-shape as rounds and cover with a dish towel. Let it rest for 10-30 minutes.

  8. Shape as boules or bâtards and place in floured bannetons. Place in food-safe plastic bags (or cover with a damp tea towel).

  9. Allow to proof at room temperature for 30-60 minutes, then refrigerate for 8-16 hours.

  10. Remove from refrigerator and let sit at room temperature for 1-2 hours, depending on degree of proofing.

  11. If baking on a stone, pre-heat the oven for an hour with the baking stone and your steaming apparatus in place. If baking in Dutch ovens (DO's), pre-heat the oven with the DO tops for at least 20 minutes. Note: If baking on a stone, I pre-heat the oven to 500ºF. If baking in DO's, I pre-heat to 475ºF.)

  12. If baking on a stone turn down the oven temperature to 460ºF, transfer loaves to a peel, steam the oven, score the loaves as desired and load them onto the stone. Remove the steaming apparatus after 15 minutes. Continue baking for another 30-40 minutes. If you have a convection oven, set it to 435ºF Convection Bake for the last part of the bake. The loaves are done when they are darkly colored, sound hollow when the bottoms are thumped and have an internal temperature of 205ºF.

  13. If baking in DO's, transfer the loaves into the DO bottoms. Score the loaves as desired. Using good hot pads or oven gloves, remove the DO tops from the oven and cover the bottoms. Transfer the DO's to the oven. After 30 minutes, remove the DO covers. Continue to bake the loaves for another 20 minutes.

  14. Remove the loaves from the oven and place them on a cooling rack. Cool completely before slicing.

Note: These times and temperatures assume 900-1200 g loaves. If using this dough for smaller loaves, use higher temperatures and shorter bake times. If baking larger loaves, use lower temperatures and longer bake times.

The loaf that had been retarded for 20 hours was tasted after completely cooling. The crust was crunchy. The crumb was tender. The flavor was complex, sweet and moderately sour. A very delicious bread.


The loaf that was retarded for an additional day seemed a bit over-proofed. It had a weaker gluten sheath and spread more when transferred to the peel. It had less oven spring and less bloom. The crust did brown well though. The texture of the crust and crumb were the same as the first loaf. The flavor was somewhat more sour but also less complex to my taste when first tasted. The next morning, as usual, the flavors had melded and improved.


Now, I would not conclude that a 40+ hour cold retardation is a bad idea in general. For this particular bread, it did not provide an improved result. Not bad bread, but the first loaf was better, at least to my palate.

Happy baking!

David

Pages

Subscribe to RSS - dmsnyder's blog