The Fresh Loaf

A Community of Amateur Bakers and Artisan Bread Enthusiasts.

Blogs

ArtisanTatum's picture
ArtisanTatum

Hello!

I've been attempting to make and get familiar with laminated pastry for a while and I’ve hit a certain spot with my croissants.

It seems like I get can’t after two major hurdles, first is the oven spring, I feel like my proofing is fine, but when I put the croissant in the oven they don’t rise at all.

Second is the texture of the crust, I tried to make steam either with ice cubes or a boiling water tray, both options ended up with disappointing results.

I’ve tried to make many experiments with these variables in the past two weeks, changing the oven temperature, proofing time and environment but sadly not much change.

including images of the current state of croissants.


tpassin's picture
tpassin

A few days ago I posted about a loaf of bread that included cooked oatmeal and graham flour (see https://www.thefreshloaf.com/node/73391/oatmeal-graham-flour-sourdough-pullman-bread). I wanted to try it with buckwheat, and I found a box of Wolff kasha, which are toasted buckwheat groats.  Perfect!

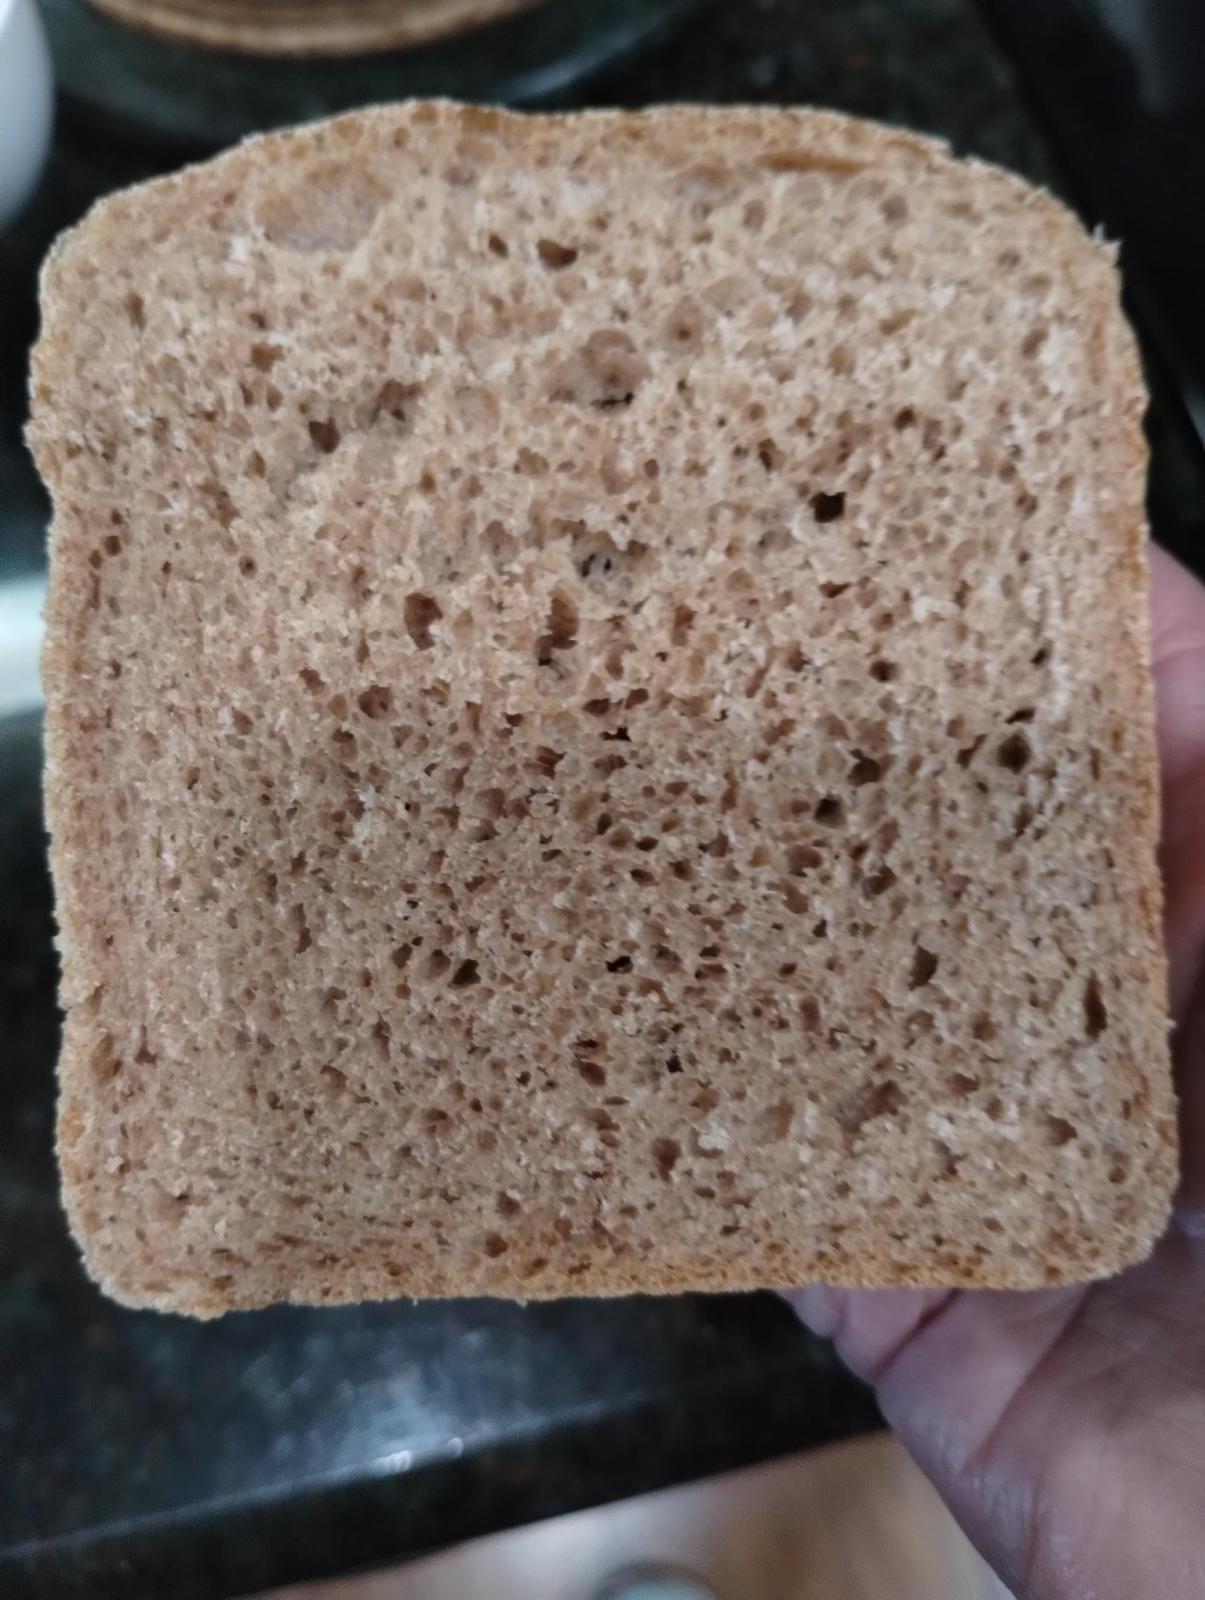
The bread is very good in taste and texture, and the striking feature I want to highlight is how very open the crumb is. I didn't think a porridge loaf could have such an open crumb.  I used less flour for this loaf compared with the earlier oatmeal one, 300g vs 370g, yet it rose as high in the Pullman pan. Otherwise the recipe is the same: 20% (pre-cooking) kasha, 30% graham flour, 65% hydration, 30% innoculation with 100% hydration starter, 2% salt.  The starter was a little old, though, and had gotten somewhat thin.

I used the amount of water the package recommended for the weight of kasha I used.  The cooked porridge had absorbed almost all the water.  I had to hold it covered in the refrigerator over night for timing reasons, and the next day it was very dry and crumbly.  I loosened it up with a little milk, maybe an ounce/30g, and squeezed the porridge between my fingers until it turned into a thick paste.  After all the ingredients were mixed, the dough was a wet, thick paste.  I didn't worry about it since the previous loaf had the same pasty consistency.

One other change was that I bulk-fermented in my proofing box at 76 deg F/24.4C since my work counter was a little cooler, enough to slow down the development.  After I put the dough into the Pullman pan, I increased the proofing temperature to 78 deg F/25.6C.  It rose very well over the next 2 1/2 hours.

I baked with the lid for 40 minutes at 350 deg F/177C.  Then I removed the lid and baked at 400 deg F/204C for another 20 minutes.  As with the previous loaf this was enough to develop a thin but crunchy crust.  I think it would have been good to continue cooking the loaf for another 10 minutes, perhaps, to drive off more moisture since even the next morning the loaf had a very moist crumb.

With the previous oatmeal-graham loaf I found that the bread grew on me as I ate more, and this new loaf with kasha instead of oatmeal has an even richer flavor. And it toasts up so well!

TomP

seasidejess's picture
seasidejess

I gave up doing bran scalds in my whole wheat bread a while back, as it didn't make much difference in my bread and I didn't enjoy all the fiddly sifting and messing about with it.  These days I just mix the dough and let it sit for half an hour to hydrate before I start kneading.

However, if I want an extra tender and soft bread I have started experimenting with doing a flour scald instead, which you can read about here: http://www.wholegrain100.com/making-yeast-bread-blog/converting-your-recipe-to-yudane

And here: https://www.marcelpaa.com/rezepte/tipps-und-tricks-zu-vollkornbroten/ This is in German but if you use the Chrome browser you can tell it to translate the page.

My current working version of how to convert a recipe to use a flour scald:

  1. Increase the liquid in the recipe to minimum 75% of the weight of the flour.
  2. Then set aside 20% of the recipe flour and an equal amount of the recipe water (by weight) to use in the scald.
    - Edit: 10 to 20% of the flour, based on info from Einfach Backen - Marcel Paa
  3. Boil the scald water and pour it over the scald flour and stir,  then let it cool before adding it all back into the dough when you mix everything together.
  4. Feel the dough after the final mix and add more water if needed or if it is meant to be a higher hydration dough.
  5. Let the mixed dough sit for half an hour for the gluten and bran in the dry flour to fully hydrate before you start kneading.

Example of Scald/Yudane Method:

  • Your recipe calls for 450 grams whole wheat flour. Multiply by .75 to get about 338 grams total liquid.
  • 20% of 450 is 90, so you'll use 90 grams of the flour and 90 grams of the liquid in the scald,
  • This leaves 360 grams flour and 248 grams water for the remaining dough.

Porridge/Tanghzong Method:

If using porrige method, make it using 3x the amount of water to flour. Then subtract 2/3 this amount water from the main dough. Overall hydration is increased with this method, but might need to be increased more since the water is so bound up in the porridge. Add some of this water amount gradually back to the dough after mixing if needed to correct hydration. - based on info from Einfach Backen - Marcel Paa

Example of Porridge Method:

Your recipe calls for 450 grams whole wheat flour. Multiply by .75 to get about 338 grams total liquid.

  1. Set aside 45 grams of flour and 3 x this amount (135 grams) of the recipe water (by weight) to use in the porridge.

  2. This leaves 203 grams water for the remaining dough.
  3. Cook the porridge until very thick and all the water is absorbed.
  4. Combine porridge with flour and remaining recipe water, and other ingredients.
  5. Also measure out 2/3 the amount of water that went into the porridge, which may be needed to correct the hydration. In this case, 90 grams.
  6. Feel the dough after the final mix and if needed, gradually add this additional water, 10 grams at a time, until the dough is soft, not stiff.
  7. Let the mixed dough sit for half an hour for the gluten and bran in the dry flour to fully hydrate before you start kneading.


-

seasidejess's picture
seasidejess

Hi everyone,  I'm happy to be back after a year of having a young person with celiac sharing my home.  They have moved on and I can mill and bake again without worrying.

To celebrate, I brought out my barely-used Nutrimill Artiste mixer and started really digging in to try and learn exactly how a fully kneaded,  fully developed 100% WW dough looks and feels.  And since spelt is my favorite-est  most delicious wheat, I've extended the project to 100% spelt.

All the flours are freshly-milled on the finest setting of my MockMill 100. So they're a bit chunky. For these bakes I am not sifting and re-milling or soaking the bran.

And,  you guys! Check it out! Spelt is not nearly as difficult to work with as I thought.  It's just more extensible.  So the funny thing is,  autolysing the dough is done to increase extensibility and flavor. Weel, when you're using spelt you get the extensibility AND absolutely delicious flavor, without needing to autolyse.

For this bake I did rest the flour without kneading for an hour after the initial mix. Because the yeast was in the dough,  it basically did a first bulk rise during that time.  It behaved the same as when I only rested it for 15 minutes,  so I didn't find an advantage in the longer rest. It didn't do any harm though. 

I have been using the Laurels Kitchen Bread Book "Loaf for Learning" formula for these bakes. It is a relatively lean dough,  with the additon of 2 TBSP oil and 1/3 cup of plain yogurt in each 450g-flour loaf.

I haven't been able to find many photos of 100% whole wheat dough at different stages of development,  so next time I'll try to take more pictures.


PalwithnoovenP's picture
PalwithnoovenP

Hello TFLers! Long time no read! It's that time of the year again for my mandatory year-end post.

2023 has been a very challenging year for me but there were many successes to celebrate too. Work schedule has been insane so I have no time to spare to make bread (it usually takes 2-3 days with planning included) so I have not made bread for a year which this site is for. I learned to cook various food from different cuisines (lots of food I've cooked but no time to post) that many might not find interesting especially in a bread site. Anyhow, I'm still posting some of them, in case someone like me might be interested.

This year, I learned how to make baklava and even the phyllo dough (yufka) from scratch. Baklava is a pastry that has mystified me  since I was young until the advent of e-commerce, that I learned to shop online. I tasted various baklavas this year but my favorite was the Turkish Baklava. I like it for its "simple and clean" flavor. Don't get me wrong, all baklavas are good, it just depends on your preference.

It's the making of phyllo from scratch that has thrilled me the most, I thought it would be impossible to make it at home without a machine (guess what, how did they make it in ancient times?). There are various methods on how you can achieve that almost transparent dough. There are various thicknesses for different applications but phyllo for baklava HAS TO BE especially thin.

In Greece, it is commonly stretched by hand from what I've seen (I've tried this method but it is time consuming and you have to be extra careful not to pierce it and that it is even); in Türkiye, they usually roll it one by one using a thin rolling pin called oklava (I've tried it too but it is not easy with an ordinary rolling pin which is the only thing I have). I decided to follow the method of professional baklava masters where they stack the dough with starch in between them and roll them as thinly as possible, then peel the layers one by one, it was faster and easier.

My first baklava, Walnut Baklava. 16 layers of phyllo, walnuts, ghee, baked until crispy then soaked in a simple sugar syrup.


I was so lucky, the phyllo came out so thin, you can read a newspaper underneath it, which is a common test to see if it is thin enough.


 I still can't believe that such gorgeousness and deliciousness emerged from my own kitchen!


Chocolate Baklava. 24 layers of chocolate phyllo, walnuts, ghee, and sugar syrup. Still far from traditional baklava, but definitely an improvement.  


I cannot find a recipe for a chocolate baklava with "chocolate" phyllo but I knew the one I ate has chocolate IN the phyllo and not just in the nut filling.


Sütlü Nuriye. Baklava's milky cousin. Layers of phyllo and nuts soaked in a milky syrup, traditionally would use hazelnuts.


Soğuk Baklava. Cold Baklava. 32+ layers of phyllo and nuts soaked in a milk-based syrup, chilled, then topped with grated chocolate. Not as sweet and crispy but lighter than traditional baklava. 


Pardon the messy fork, but look at all those layers! 


One of the best decisions I've ever made, Cold Baklava with Ice Cream!

 
A 50+ layer Cold Baklava. I think this is a case of too much of a good thing, I find some parts doughy or maybe this was just not as well-made as my other ones.


Havuç Dilimi Baklava. Carrot-slice baklava. 40 layers of phyllo, pistachios, ghee, and sugar syrup. This is the most "Turkish" baklava that I have made (even though I have to spend a fortune as pistachios cost an arm and a leg here) as Turkish baklava almost always uses pistachios. Also traditional baklava is usually made with 40-50 layers of phyllo. I even managed to make it super crispy even for days, far from perfect but this is as close as it gets to a traditional baklava from a real Turkish baklava shop. My best baklava!


 WIth some milky ice cream (wish it was some dondurma), it was otherworldly!

 
I hope you enjoyed this post and may we have a happier, heathier, and more blessed 2024! 

gavinc's picture
gavinc

Semolina bread. Two 750-gram loaves. 60% durum flour and 68% hydration. 15% of the total flour is pre-fermented in a liquid levain. Hamelman does not include an autolyzed stage and it appears that it is not required for the durum flour. I’m very happy with the result. The crumb was more open than I was expecting and the crust slightly chewy.  Eating quality excellent and very different from my usual sourdough.

Benito's picture
Benito

I recently had a birthday and decided last minute to bake myself a cake since we were meeting friends for dinner.  I LOVE chocolate and remembered seeing this recipe by the awesome Stella Parks (BraveTart).  It turns out that this is a super easy super delicious cake that is actually vegan and almost flourless (no eggs or dairy).  Also what flour is in it is all whole wheat.  It is practically healthy especially for a cake.  The cake is super tender but I’m still shocked that something with such a simple ingredient list can bake into a cake.

Why It Works

  • Acidic ingredients, like coffee and brown sugar, activate the baking soda, giving the cake its rise.
  • Dutch cocoa powder is dark and higher in fat than natural styles, making a rich and flavorful cake.
  • Olive oil can provide the cake with a mild and buttery richness or a bolder pop of flavor, depending on the style.
  • Whole wheat flour lends a subtle nuttiness to the cake, rounding out its flavor.


YIELD:

One 8-inch cake, or 8 large wedges

ACTIVE TIME:

About 5 minutes

TOTAL TIME:

About 1 1/2 hours

Ingredients

  • 4 ounces light or dark brown sugar (about 1/2 cup, firmly packed; 115g)
  • 1 1/2 ounces high-fat Dutch cocoa (about 1/2 cup; 42g); see our top Dutch cocoa picks for recommendations (see note)
  • Shy 1/2 teaspoon (1.75g) Diamond Crystal kosher salt; for table salt, use about half as much by volume or the same weight
  • 3/4 teaspoon (4.8g) baking soda
  • 4 1/2 ounces extra-virgin olive oil (about 2/3 cup; 127g)
  • 4 ounces brewed black coffee, or black tea such as Assam (about 1/2 cup; 115g), any temperature
  • 2 large eggs (about 3 1/2 ounces; 100g), straight from the fridge
  • 1/4 ounce vanilla extract (about 1 1/2 teaspoons; 7g)
  • 2 1/2 ounces whole wheat flour, such as Bob's Red Mill (about 1/2 cup plus 2 tablespoons; 70g)
  • Optional garnishes: powdered sugar, preferably organic (see our explainer on organic powdered sugar for more information), or fresh fruit


Directions

1.

Getting Ready: Adjust oven rack to lower-middle position and preheat to 350°F (180°C). Line an 8- by 3-inch anodized roundaluminum pan with parchment (see our explanation and tutorial on how to cut a parchment round) and grease lightly with pan spray.


For the Cake: In a medium mixing bowl, combine brown sugar, Dutch cocoa powder, salt, and baking soda. Whisk until homogeneous, with no visible clumps of cocoa or baking soda (although a few lumps of brown sugar may remain), about 1 minute. Under-mixing will give the cake an uneven texture and rise, so don't rush this step.


Whisk in olive oil, brewed coffee, eggs, and vanilla. When mixture is smooth and well emulsified, add whole wheat flour and continue mixing only until combined. Scrape into prepared pan. Bake until cake is firm but your finger can still leave an impression in the puffy crust, about 25 minutes. (A toothpick inserted into the center should come away with a few crumbs still attached.)


Cool cake directly in pan for 1 hour, then run a butter knife around the edges to loosen. Invert onto a wire rack, peel off parchment, and place cake right side up on a serving platter or cake stand. Serve plain, with a sprinkling of powdered sugar, or with fresh fruit.


https://www.seriouseats.com/recipes/2019/04/dairy-free-chocolate-cake.html


Now I served this with whipped cream so it was no longer vegan, but the cake was even delicious without the macerated strawberries and whipped cream so could easily be served to vegans.

My index of bakes

Benito's picture
Benito

This is my take on what is apparently a traditional Venezuelan Christmas bread that turns out to be super yummy.  As I said before, my various takes on Hokkaido SD milk bread prove to be so flexible.  I used my 35% WW version for this bake.  The dough gets rolled out and then ham, sliced green olives stuffed with pimentos and finally raisins and applied.  It is all rolled up into a cylinder and then eventually baked.  Did I say it is yummy, salty and a bit sweet from the raisins.

Filling:

2 tablespoons butter, melted, divided 

1/2 pound thinly sliced deli ham, cut into strips

1/2 cup golden raisins, divided (spritz with water, cover and microwave in 10 sec increments until warmed and slightly hydrated/softened)

1/2 cup sliced green olives with pimentos, divided 


Egg Wash:

1 large egg 1 tbsp milk pinch of salt and ¼ tsp sugar


Instructions

Levain

Mix the levain ingredients in a jar or pyrex container with space for at least 300% growth. 

Press down with your knuckles or silicone spatula to create a uniform surface and to push out air.

At a temperature of 76-78ºF, it typically takes up to 10-12 hours for this sweet stiff levain to be at peak.  For my starter I typically see 3-3.5 times increase in size at peak.  The levain will smell sweet with only a mild tang.


Tangzhong 

In a sauce pan set on medium heat, stir the milk and whole wheat flour until blended. Then cook for several minutes until well thickened, stirring regularly with a spoon or heat-resistant spatula. Let cool in the pan or, for faster results, in a new bowl.  Theoretically it should reach 65ºC (149ºF) but I don’t find I need to measure the temperature as the tangzhong gelatinizes at this temperature.  You can prepare this the night before and refrigerate it, ensure that it is covered to prevent it from drying out.


If you plan on using a stand mixer to mix this dough, set up a Bain Marie and use your stand mixer’s bowl to prepare the tangzhong.


Dough

In the bowl of a stand mixer, add the milk (consider holding back 10 g of milk and adding later if this is the first time you’re making this), egg, tangzhong, salt, sugar and levain.  Mix and then break up the levain into many smaller pieces.  Next add the flours.  I like to use my spatula to mix until there aren’t many dry areas.  Allow the flour to hydrate (fermentolyse) for 20-30 minutes.  Mix on low speed and then medium speed until moderate gluten development this may take 5-10 mins.  You may want to scrape the sides of the bowl during the first 5 minutes of mixing.  Next add room temperature butter one pat at a time.  The dough may come apart, be patient, continue to mix until it comes together before adding in more butter.  Again, knead until well incorporated.  You will want to check gluten development by windowpane during this time and stop mixing when you get a good windowpane.  You should be able to pull a good windowpane, not quite as good as a white flour because the bran will interrupt the windowpane somewhat. 


On the counter, shape the dough into a tight ball, cover in the bowl and ferment for 3 - 4 hours at 82ºF.  There should be some rise visible at this stage.


You can next place the dough into the fridge to chill the dough for about 1.5 hours, this makes rolling the dough easier to shape.  Remember, if you do so the final proof will take longer.  Alternatively, you can do a cold retard in the fridge overnight, however, you may find that this increases the tang in your bread.


Roll out the dough

Punch down dough. Turn onto a lightly floured surface and divide in half. Roll each portion into a 10×12-in. rectangle. Brush dough with the melted butter.

Layer half of the ham over one piece of dough laying the strips parallel to the direction that you’ll be rolling the dough up in, leaving a 1 inch edge around the perimeter. Sprinkle half of the raisins and half of the olives over the ham. Starting from a long side, roll up jelly-roll style, and pinch the seam to seal. Transfer to a parchment-lined baking sheet, seam side down. Repeat with the remaining dough.


Cover dough rolls with a kitchen towel and let rise for about 4-6 hours until the dough passes the poke test.  If using an aliquot jar, the dough will have risen in total from bulk fermentation about 130-140%.  Preheat the oven to 350°F when the dough is about 30 mins from being ready (rise 120% or so)


Bake pan de jamon

In a small bowl, whisk the egg yolk and sugar. Brush over the tops and sides of the loaves. Bake until golden brown, about 30 to 35 minutes, rotating the pan halfway through.

Allow the bread to cool so that the filling has time to set. Once it’s cooled, slice and serve.

I sliced the ham and placed them this way thinking that full slices of ham would prevent the dough from expanding during fermentation and during baking.  The photos I’ve seen of this bread usually have large air cavities between the ham and bread, I wanted to avoid this if possible.

My index of bakes.

joegranz's picture
joegranz

Almost exactly two years ago, I stopped lurking on this site and finally posted something - a plea for help.  I had been making panettone with a liquid sourdough starter for a few years before switching to a lievito madre and I could not figure out why my dough was turning to soup when adding the butter.  Looking back, the key thing I didn't realize was just how little I understood about the process.

Fast forward two years and another desperate post trying to make sense of all this and I've finally found some success in making panettone leavened with lievito madre.  I've lost count of how many times I've failed over those two years - primi that didn't rise, secondi that turned to soup, flat tops, blowouts, panettoni falling out of the mold - the list goes on.  I often failed spectacularly.  So many ingredients in the trash and so much disappointment and frustration often met by friends and family with "Why bother? Can't you just buy one?".


I followed EIDB's panettone recipe from Sourdough Panettone and Viennoiserie.  This is the recipe I started with a few years ago, thinking I should try the recipe by the person who wrote the book, not having realized that the book both literally and figuratively had already been written in one way or another by the maestri featured in SPV, among some others.  At the time, I wasn't familiar with the maestri or their formulas, but even after discovering them, I wanted to continue using the same formula to eliminate variables when things went wrong, as they often did.  At one point, when butter was my nemesis, I scrutinized all of the formulas in SPV to try and find one that didn't contain an outrageous amount of butter and found that EIDB's wasn't too bad in that regard, so I stuck with it.

In the past, I used whatever strong flours I had access to, which all happened to be malted.  At some point, I decided that malted flours were a bad idea, at least until I had enough experience to deal with them.  I could never get them to work, so when I created my new LM I used Caputo's Manitoba Oro, which I also used for the primo and secondo.

I did modify the formula a bit. Rather than orange paste, I used orange and lemon zest along with vanilla bean.  I did not add the bassinage water because the recipe says something like "add the bassinage water if necessary" and I was never really sure what necessitated bassinage water.  Given my history of failed secondi, I thought it best to leave it out.  For inclusions, I used white and dark chocolate since candying orange peel was something I gave up when the end product seemed to constantly be in question.

I guess the most important part, my LM, was not maintained according to any specific formula or plan.  For the most part, my LM is constantly in maintenance mode with a single refreshment before letting it rest for nearly 24 hours at 16 - 17C.  A few times a week I will expose it to heat with either a warm refreshment or hot bagnetto.  I typically keep the LM in water, but if I notice it getting sluggish or not rising well, I'll use free maintenance for a few days.  If I know that I won't be able to refresh it for a day or two, I bind it and put it in the fridge.  It's all a balancing act between my schedule and what the LM seems to need.  I do tend to push it pretty hard towards acetic since the failures still leave me with a really good loaf of bread.

I played a little bit with refreshment ratios along the way as well.  I noticed that refreshing 1:1 (starter:flour) and leaving at 16 - 17C for 20 - 24 hours would yield a pH right around 4.0, but refreshing 1:2 with all else kept the same would yield a pH of 3.8 - 3.9, but with a less dramatic rise.  Seeing how higher flour ratios would drive pH lower, I also experimented with ratios during the warm refreshments.  For this bake, I refreshed 1:1.25 at 28C (about 5.5 hrs) for the first followed by 1:1 at 28C (about 4hrs) for the second.  I didn't perform a 3rd.  Two refreshments in this way also wound up being a lot more convenient with my schedule.  Regardless of the warm refreshments, I can't seem to hit 4.0 - 4.1.  Once the starter has tripled, I've been using the LM at around pH 4.15 - 4.25, though I've been trying to get sub 4.1 to see if it helps at all with primo acidification.

I still had issues, of course, the main one being the seemingly infamous primo acidification.  I think my primo was about pH 4.3 by the time it had tripled.  It also tripled in only about 10 hours which is very fast considering I closed the primo at about 22C.  The panettone also seemed to get a bit darker than I wanted.  I set my oven according to a thermometer placed on the rack where the panettone would go, but I guess that means that maybe higher up in the oven, where the panettone would rise, was too hot.  In the past, I glazed most of the panettoni I've baked and hadn't had this problem, but after many flat tops I decided not to glaze, thinking that the glaze was maybe hardening early and preventing some oven spring.

In any case, the panettone was delicious.  So light and delicate that it was almost difficult to slice, yet strong enough to hold its shape and pass the "cotton candy test".  Not quite where I want it to be, but a massive success for me nonetheless.

Edit: A picture of the crumb from the second loaf from the same batch, cut one week after baking.  I didn't butcher this one as much when slicing it.  This one was a bit darker on the outside and cooked to a higher internal temperature (unintentionally - used a different oven that I'm not as used to), so I thought this one would be in rough shape but I'm very happy with this crumb.

I really went for it - the bake right before this resulted in the panettone falling out of the mold when I hung it. So, a few days later I decided to change almost nothing and bake 2 instead of 1 😅.  The previous bake was glazed - I wonder if I went too heavy on the glaze, weighing down the dome and causing it to fall.  My LM was not significantly different between the two bakes - certainly not "fall from the mold" lactic.

tpassin's picture
tpassin

I received a sack of graham flour for Christmas.  It is from Burkett's mill.  If you read up on graham flour you usually read that is whole wheat ground more coarsely than the usual WW.  If you find the right site, it will tell you that the endosperm is ground finely and the bran and germ are ground coarsely, I think the flour I have must be the latter.  It's color is lighter than the water wheel-stone ground flour I have, with larger flecks and dark bits.

For this loaf I cooked some rolled (porridge) oats in the microwave, and added them to the dough. The flour content is 70% bread flour, 30% graham flour, and the uncooked oats weighed 20% of the total flour.

A picture of the crumb, then ingredients -

Ingredients
=========
70% bread flour (KA)
30% graham flour (Birkett's Mill)
20% oatmeal (rolled oats uncooked weight)
50% water (for cooking oatmeal)
60% other water
36% starter (100% hydration)
2.2% salt

---------------------
370g flour (exclusive of starter)
990g Total dough weight

It is always hard to know how much of the water in cooked grains, scalds, etc. will contribute to the effective hydration.  In this case, I had trouble wetting all the flour so I added some water.  Apparently I added too much because I ended up with a thick, pasty batter.  A few sets of coil folds over the next 2 1/2 hours added some strength, but I still had to scrape the dough into the Pullman pan.

The loaf rose well in the end and has a surprisingly open crumb.  The crumb is a little delicate; the flavor is richer than the usual WW, and a little sweet, which I think is partly down to the graham flour and partly to the oatmeal.

I baked the loaf for 50 minutes at 350 deg F/177C without the lid.  The internal temperature had reached 208 F/97.7C but the loaf was pale and I knew it had a lot of moisture still to give off.  So I baked it at 400 F/204C for another 10 minutes.

Overall, a very nice loaf.

Pages

Subscribe to RSS - blogs