I’ve seen these Dutch Babies before but never had one let alone made one. Most of the ones I have seen are sweet, I decided to make this savory one for us tonight for dinner. It was quite easy and delicious. It is sort of like a pancake but made more like a Yorkshire pudding in a way.
I do not recall where I found this recipe unfortunately. But here it is.
SERVES 4 TOTAL TIME: 50 MINUTES
A traditional 12-inch skillet may be used in place of the nonstick skillet; coat it lightly with vegetable oil spray before using.
Ingredients
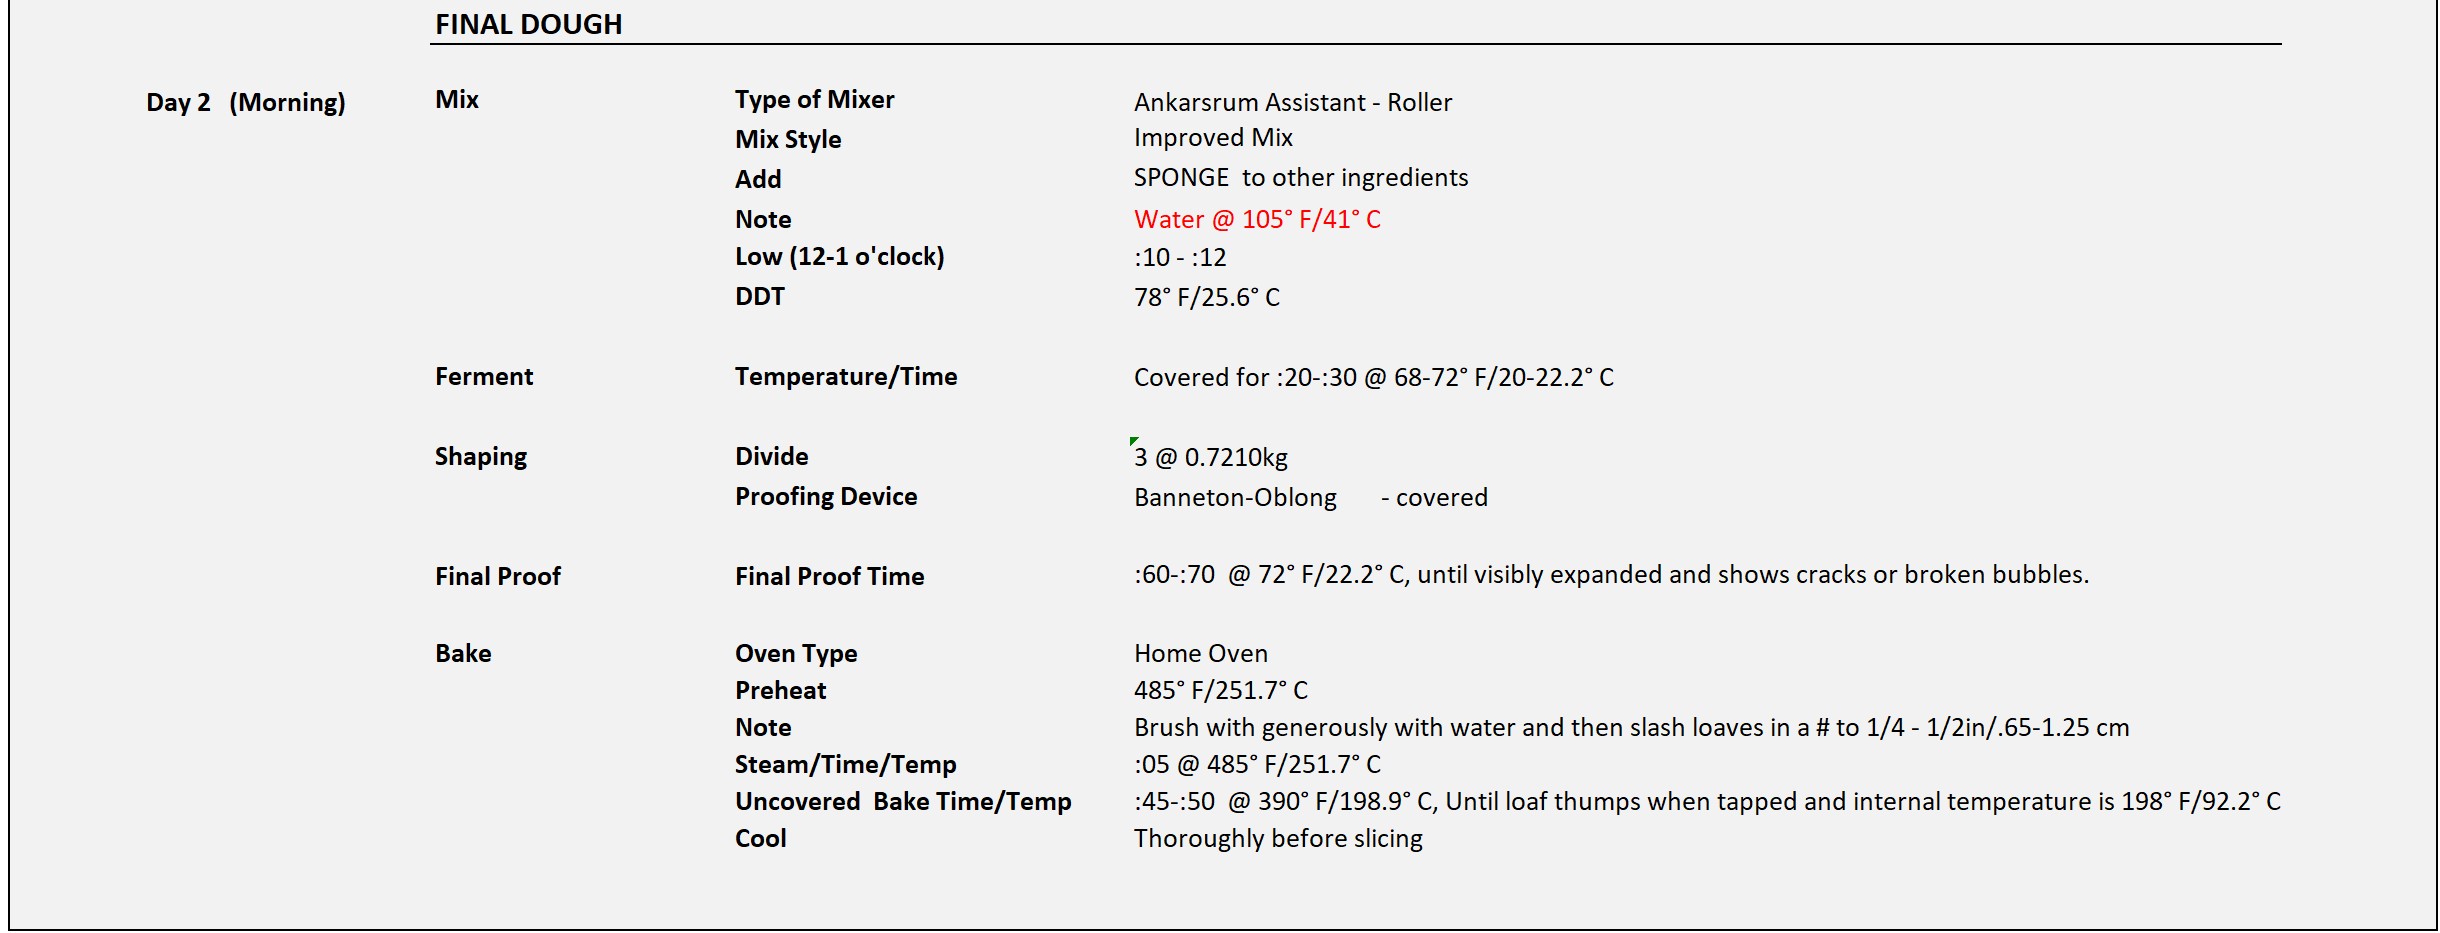
1¾ cups (8¾ ounces) all-purpose flour
1 tablespoon sugar
½ teaspoon table salt
1½ cups milk
6 large eggs
3 tablespoons unsalted butter
10 inch skillet
1.5 cups AP flour
0.83 tbsp sugar
0.4 tsp salt
1.25 cups milk
5 large eggs
2.5 tbsp unsalted butter
1. Whisk flour, sugar, and salt together in large bowl. Whisk milk and eggs together in second bowl. Whisk two-thirds of milk mixture into flour mixture until no lumps remain, then slowly whisk in remaining milk mixture until smooth.
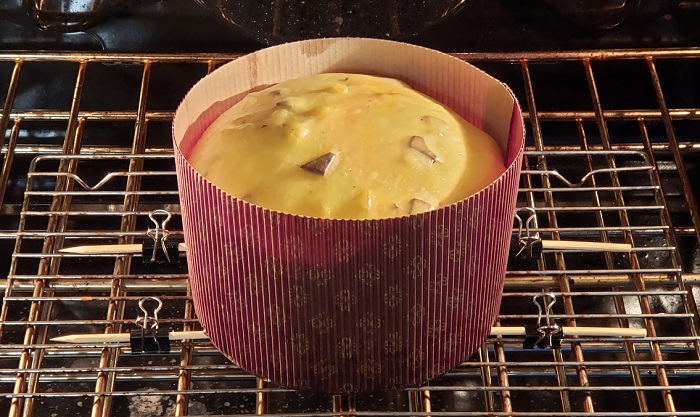
2. Adjust oven rack to lower-middle position. Melt butter in 12-inch ovensafe nonstick skillet over medium-low heat. Add batter to skillet, immediately transfer to oven, and set oven to 375 degrees. Bake until edges are deep golden brown and center is beginning to brown, 30 to 35 minutes.
3. Gently transfer Dutch baby to cutting board. Let cool for at least 5 minutes before topping. (Dutch baby will deflate.)
For a Lush, Custardy Dutch Baby, Start in a Cold Oven
Most Dutch baby recipes call for baking in a preheated oven, but that can lead to a thin, insubstantial center. In a hot oven, heat immediately begins to set the gluten and egg proteins on the surface of the batter, forming a flexible shell. Water inside the shell then turns to steam, prompting the pancake to balloon. Meanwhile, the batter at the circumference, which is in direct contact with the sides of the hot skillet, rapidly rises up and out of the pan, drawing some of the batter from the middle of the skillet with it and resulting in a paper-thin center. Starting in a cold (not preheated) oven means the batter warms gradually, so the center has more time to set (and maintain its stature) before the oven gets hot enough to inflate the rim. Not only is the substantial center luxurious to eat, but it’s also able to support a generous amount of toppings.
SAVORY DUTCH BABY WITH SMOKED
SALMON, SOUR CREAM, AND CUCUMBER
SERVES 4 TOTAL TIME: 25 MINUTES
Prepare the topping while the Dutch baby bakes.
1 small shallot, sliced thin (3 tablespoons)
½ teaspoon table salt, divided
½ cup sour cream
1 tablespoon capers, plus 1 tablespoon brine
1 tablespoon chopped fresh dill, divided
1 English cucumber
1 recipe Savory Dutch Baby
8 ounces smoked salmon
1. Combine ½ cup water, shallot, and ¼ teaspoon salt in small bowl. Stir well and let sit for 5 minutes. Drain shallot and discard liquid; set aside. Combine sour cream, caper brine, 1½ teaspoons dill, and remaining ¼ teaspoon salt in second bowl.
2. Using vegetable peeler, shave cucumber lengthwise into ribbons on 1 side until you reach seeds. Turn cucumber 180 degrees and repeat on other side; discard core.
3. Spread sour cream mixture evenly over Dutch baby. Arrange smoked salmon on top of sour cream. Scatter cucumber ribbons over Dutch baby. Sprinkle with shallot, capers, and remaining 1½ teaspoons dill. Cut into wedges and serve.
My Index of Bakes.