The Fresh Loaf

A Community of Amateur Bakers and Artisan Bread Enthusiasts.

Most bookmarked

Anonymous baker's picture
Anonymous baker (not verified)

unbromated flour vs. regular flour

Hello,

About two months ago I discovered "unbromated" flour. I had never heard of this before nor did I know what it meant. So I did a little research about it and found out what the difference is. Based on what I learned, I decided to buy a bag of it to try. I made a focaccia using some of this and was really amazed at the difference. The focaccia came out soft and chewy (but firm). I was really happy with the results. A week prior to this I'd made a focaccia using what I'll call "regular" flour and the results weren't as good. The crust was rather hard and crunchy (kind of hard to chew).

So I guess I'm wondering if anyone else here uses unbromated flour? What your experience is.

Please let me know. Thanks.


Tory 

verminiusrex's picture
verminiusrex

I've Gone Semi-Pro, Update 2

I've been selling bagels at the local Farmer's Market for about 6 months, in another month we'll be closed for the season (darned Kansas winters!) But I though that I'd give a quick update.

I sell about 12 dozen or more bagels every Saturday (which takes me most of Friday to bake), I have a slew of regulars who rave about my bagels, and people love everything bagels over most other flavors.

I just sold my 2000th regular sized bagel on Sept 27th, and so far this year I've used over 450 lbs of flour baking all of the bagels and breads.

Here's a picture of my humble little booth, sporting the FRESH BAGELS banner I scored on eBay for only $20.

Bagel BoothBagel Booth

Anonymous baker's picture
Anonymous baker (not verified)

Rising in cooler -- why didn't I think of this long ago?

Maybe this is a well-known trick but I'm still patting myself on the back for thinking it up recently, and I want to make sure you all know about it:

Let your dough rise in an insulated cooler! I have a small soft-sided one that works great, but any small cooler would work. The yeast generates heat as it eats and multiplies, and the cooler holds it in, keeping the dough nice and cozy (but not so warm that it speeds up the action to the detriment of the flavor, as happens when you put it into a warm oven). I used to wrap towels around the bowl, but the cooler is easier and more efficient. Do not stick dough that you've just removed from the fridge into the cooler, though, or you'll just be keeping it cold. Wait until it warms to room temp and then place it in the cooler. Happy baking! bluesbread

Chavi's picture
Chavi

Sourdough Starters

Hi,

I just had a question on sourdough starters.

I was just wondering if there is any real difference in using liquid starter in place of a stiff starter and just adding more flour in the final dough to compensate. I feel like converting my liquid starter is a pain. Hehe, didnt mean to make that pun ;)

Anyway, if anyone has a recipe for a simple sourdough boule that requires liquid starter, do share. Thanks and happy baking!

Chavi

berryblondeboys's picture
berryblondeboys

What is the yield for wheat berries to cups of flour?

I guess there are two ways to look at it, 5 lbs of flour is the same as 5 lbs of wheat, but what is the yield? Like, how many cups of flour do you get from a cup of wheat berries?

Or, for baking purposes (and I do use my scale a lot), is it better to just weigh my wheat berries and then grind them and use that as my guide for making a loaf?

Consensus seems to be either use it IMMEDIATELY or have it wait a few days (more than three?)

I don't have a mill right now, but have been thinking about it for YEARS and now that I'm baking daily AND i make cakes, I'm wondering if it's more economical in the long run to grind my own wheat?

Melissa


SteveB's picture
SteveB

Croissants and Pain au Chocolat

For any who might be interested, I've detailed my latest foray into croissants and pain au chocolat here:

http://www.breadcetera.com/?p=117

Please note that the post is video intensive, so it might take a while to load.

SteveB

Stephanie Brim's picture
Stephanie Brim

Yet Another White Sandwich Bread

I've been experimenting lately with sweet baking and haven't done much bread unless we needed it. My daughter's birthday is coming up and I'm trying to find a chocolate cake recipe and another flavor that will appease the non-chocolate folks. I've also been trying out cookies by the gross. I didn't know how much it would limit my bread baking time. Add to that the fact that I've had a cold for most of this week and it pretty much means that I haven't wanted to bake anything at all. Add to *that* the fact that I still don't have a decent digital camera and taking all the photos with film and then developing them later on in the week once I have a full roll is a little frustrating when you want to share things right away. But this thing is so tasty that I wanted to share. Had to.

I love butter. Butter makes almost anything better. I'm finding out that it makes bread especially tasty. I wanted a recipe today that gave me the taste of butter in the bread as well as on the outside of it.

This is what I call my Buttery White Bread. It's moist on the inside without being too dense. It's strong enough to hold up to tomato slices. The crust is soft without being overly so. It's soft enough to go well with about any sandwich filling. It's about the perfect sandwich bread for us.

Only took me a month of trying to come up with the right recipe. :p

You Will Need:

3.5 cups of unbleached bread flour (I used Gold Medal as I'm trying to get rid of it)

2.5 teaspoons yeast

2/3 cup milk

1/2 cup water

1/4 cup butter

salt to your taste

Directions:

In your bowl, combine the flour and yeast. I used active dry that I knew was good. Make a well and add your milk, water, and butter. Comebine to form a shaggy mass. Knead until a coherent ball of dough; about 7 minutes. Rest for 20-25 minutes. Stretch your dough a little bit and sprinkle on your salt. Depending on your butter being salted or not, adjust to your taste. Knead the salt in for about 7 minutes. Rise twice. Shape into loaf and put in greased loaf pan. Bake in a 400 degree oven until a thermometer reads 200 degrees. Cool. Cut. Eat.

This is the first loaf that I'm really proud of. Now it's time to work more on artisan breads. :)

Pablo's picture
Pablo

Quick proofing box from available materials

I've moved from the couche sitting on the peel on top of a 2 x 8 over the bathtub with hot water, to the couche on a serving tray inside a large plactic bag.  After visiting a bakery and seeing their stand of trays covered in a zippered plastic bag I've been thinking.  I saved some zippered plastic bags from the department store when I bought some sheets.  One of them is almost the exact size of my baking stone.  No sense proofing more than I can bake. 

Materials:

1 14" x 17" piece of scrap plywood -small hole drilled in each corner

1 zippered plastic bag that a sheet set came in

2 coat hangers, trimmed and rebent

1 small piece of duck tape

open proofing box

open proofing box

closed proofing box

closed proofing box

:-Paul

scottfsmith's picture
scottfsmith

Pain Ancienne WW version?

Hi I have been baking bread for many years but only recently decided to try to bake artisianal breads.  I also decided I wanted to stick with WW flour, or at least no white flour, since I am already eating too much of that.  My first goal is to make a simple WW "baguette" in the pain ancienne style.  Here is more or less my current recipe:


400g flour 100%

340g water 85%

8 g salt 2%

<1/8 tsp yeast


You will see I am also trying to keep it simple.. get the simple version right first I figure.  I am using no starters bigas etc - just instant yeast.  The low amount of yeast and the high hydration are techniques I have gotten enamored with in my pizza dough making, along with a very long room-temperature fermentation.  


The recipe itself is pretty simple (and partly inspired by JMonkeys recipes here): mix all together in the early evening and leave out.  When it has risen do a stretch-and-fold.  If still awake when risen again do another.  Next morning early do another s&f, rise, and one last s&f.  After the final rise I gently dropped it on to parchment and gently stretched into a crude loaf shape with wet hands.   Immediately baked the loaf at 450F (no proofing following pain ancienne) and steamed the oven following pain ancienne again.  The final products have been nice, with a crumb that is quite airy, similar to a baguette.  I like the taste a lot.  However, they are too flat and wide.  I was planning on working on slightly less hydration and/or using a lot of bench flour when the final loaf is shaped to help hold it a bit perhaps (this also follows the pain ancienne recipe in Reinhart).  The loaves initially have a very nice crisp crust, but it quickly softens.  I am wondering if the high hydration is also keeping the final loaf on the moist side. Your thoughts appreciated.  I would particularly like to know if there was some recipe for a WW pain ancienne style baguette out there which I could draw from.  I have Reinharts WW book and did not find anything in there.


Scott


JMonkey's picture
JMonkey

Poolish baguettes and a flying sourdough round

It's been a while since I posted, mainly due to ramped up work and family obligations, but I've not stopped baking. And, despite the fact that both of these breads are white, the vast majority of my baking is still 100% whole grain.

But, dangit, white bread -- I just can't quit ya.

I was particularly pleased with the poolish demi-baguettes that I made for dinner last night. I had my first acorn squash of the season, and had made a soup with it. For some reason, poolish baguettes seemed just the right accompaniment.


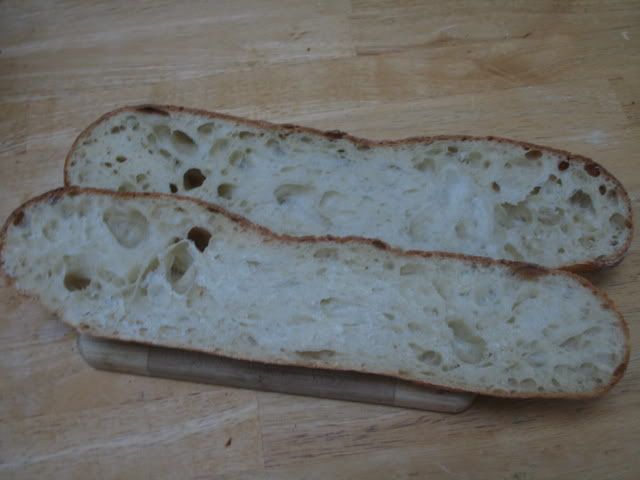
These are, without a doubt, the best looking baguettes I've ever made. Took a lot of less-than-perfect loaves, but I think I now understand how to shape these buggers so they don't look like a string bean with big bulbous ends, how to time them so they still have some room to spring in the oven, and how to slash them so they look like ... well ... a baguette.

The insides were lovely.


Today, they were starting to get stale, so I cut the leftover baguette in half and broiled it with some mozzarella, which we ate with a chopped up tomato from the garden. These were about 12 oz each, with 33 percent of the flour in the pre-ferment and a hydration of 66%. I used about 1/16 tsp of yeast in the poolish (135g of water and flour, each) and then about 2g instant yeast in the final dough (270 flour, 135 water, 8g salt). The poolish ripened for about 12 hours, but it's pretty cold in my house -- mid 60s at bestt.

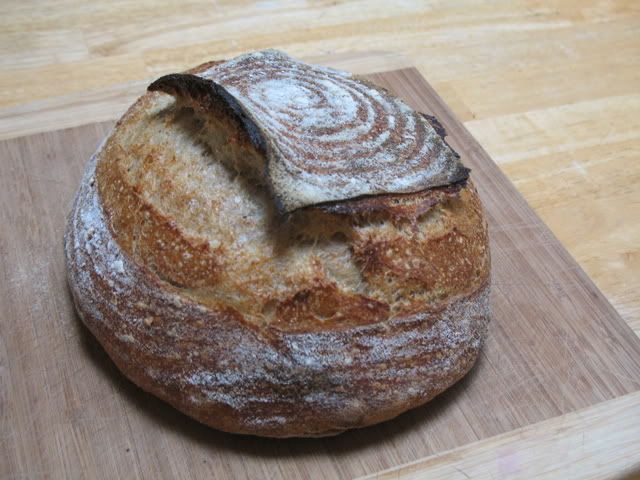
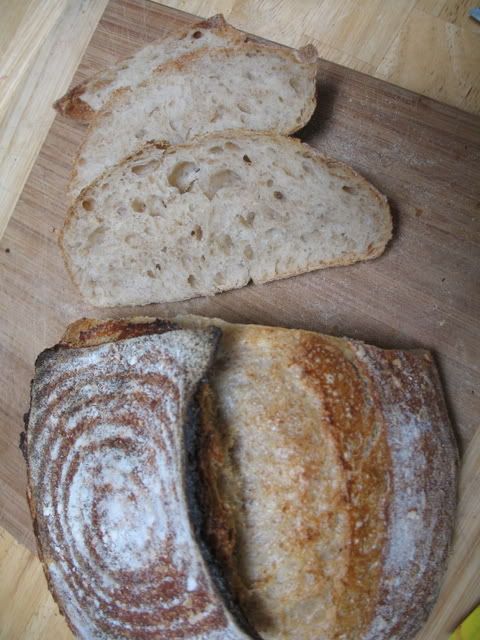
Earlier in the week, I also made a white sourdough (20% of the flour in a thick starter at 60% hydration -- the starter was 100% whole wheat, and the overall hydration was about 75%) which I let retard overnight outside. It was lovely, but the top seemed as if it wanted to peel away. Was probably a little underproofed.


Again, I was pleased with the crumb.


Hopefully, things have calmed down enough so that I can post a little more frequently. I've missed this community!

Pages