The Fresh Loaf

A Community of Amateur Bakers and Artisan Bread Enthusiasts.

Recent Blog Entries

Martadella's picture
Martadella

Day before, afternoon:

2 cups whole grain rye flour, 1 teaspoon of rye starter from the fridge, enough water to form a ball of dough; cover and leave to ferment in a lukewarm spot 

Baking day, late morning:

All preferment,  2 cups whole wheat flour,  2 cups whole rye flour,  enough water to form very soft dough, salt to taste (around 2-2½ teaspoons), favorite seeds (flax, etc.)

Let ferment until nicely expanded 

Place in prepared pan, let fully

proof,  brush with thin dough,  sprinkle with more seeds

Bake covered with another pan in descending temperature 475/425/390°F, about 1 hour 

GaryBishop's picture
GaryBishop

I'm a cheapskate and an experimentalist so I'm always thinking of ways to cut corners. I wondered how well I could control temperature using a crockpot and a cheap controller.

So, I got the Inkbird C206T controller and used a rubber band to strap its sensor to a quart jar with 500g of water and my floating bluetooth thermometer inside. I filled the crockpot with enough water to match the water level in the jar, covered the whole thing with a "shower cap" and a small blanket. I set the controller for 43.5C. 

My reasoning is that the thermal transfer between the water outside and inside should be very efficient and the large mass of water should make the average temperature very stable.

My thermometer records the temperature every minute and compares very well with my ThermaPen's readings. Below I include a graph of the temperature readings over night while the room temperature varied from 20C/69F to 17C/63F. The X axis is minutes and the Y axis is degrees C. 

As you can see the temperature inside the jar is very stable around the 43.5C set point, varying only 0.6 degrees C. The default "swing" on the Inkbird is 0.3C which perfectly matches this result. 

I'm confident I can get very accurate and repeatable temperature control with this approach. 

When I get some time I want to evaluate the variation in the period of the cycles to see if the room temperature variations are detectable. 

alcophile's picture
alcophile

I made Fleischmann’s Rye Batter Bread a couple of years ago as I was easing back into bread baking. It was an easy recipe that produced a decent loaf of rye bread. I revisited this recipe a couple of months ago because a shoulder injury limited the amount hand mixing and kneading I could do.

I wanted to increase the level of rye in the formula (and use up some of my rye stock), so I modified the recipe to use a sourdough sponge of medium rye meal (Bay State Milling) and added Wingold Dark Rye flour (Bay State Milling) in the final dough. (Note: The dark rye flour is not whole rye flour, but a flour leftover after lighter grades have been removed by sifting. It has a higher ash content than whole rye and is equivalent to Austrian R2500 rye flour.)

Sponge:

The sponge matured for 17 hours at 23 °C.

The sponge was combined with the remaining dough ingredients and, after adding all the flour, mixed for 5–6 minutes at low speed with a new Bosch Compact mixer. I realized after the fact that I had read my calculations wrong and didn’t add as much water as planned (target: 88%; actual: 81%). A previous loaf at 88% hydration had a more open and moist crumb.

The dough was allowed to rest for 20 minutes, mixed on low speed for about a minute, and scraped into a 23×10×10 cm Pullman pan. The dough was allowed to proof for 50 minutes and was baked for 10 minutes at 220 °C then for 30 minutes at 190 °C. I forgot to take pictures of the dough before and after proofing (just getting used to this blog thing), but here is the final product:


The bread has a mild sour that makes it suitable for toast and sandwiches. The crumb is not the greatest as it’s just barely holding together at the top. I think more mixing and a longer bulk fermentation might help.

trailrunner's picture
trailrunner

Delicious! I wrapped the finished 13” Pullman loaf in linen towels and left it 24 hrs. Like a tender rich cake. Very cool mouth feel and a lovely crisp  deep toasted crust due to plenty of butter to prevent sticking. This dough was WET! It contained 2 YW levains one white and one Rye . It also contains my trinity of EVOO -honey - yogurt. 

I saw it rising in a VERY uniform fashion as I did the bulk ferment in the pan. I counted the ridges on the pan sides to watch the progress. At one hour I saw one bubble break the surface! Triumph Paul said stop the room temp ferment immediately and I did. It continued to rise in the fridge with the cover on while it retarded till the next morning. Baked at 450 top on 20 min lowered to 400 for 20 min top on then 25 min top off. Couldn’t be happier. Such an easy rye . One bowl one pan stir proof retard bake. Can’t ask for more balanced flavor or a more beautiful crumb. 


Make levains 35g white starter feed with 125g YW 125g T65 ( or other white flour)

                      35g rye starter     feed with 125g YW 125g rye flour ( all rye was ground slightly coarse in Mock Mill) 

ferment till fully developed. Overnight in the microwave with light on produced great growth. 

Dough. I autolysed the the dough ingredients separately from the levain at room temp overnight due to the coarse grind. 

627g coarse rye Mock Mill

557 filtered room temp H2O

90 g total Trinity - 30g each EVOO/honey/yogurt

18g salt

Mix everything together the next AM making sure it is all blended. Easy to do by hand. Butter your large Pullman and lid very very well. Place dough in and smooth top with a wet spatula. Leave in a warm place, I used the radiator in a sunny window. Mine took only one hour to see the " first fermentation bubble". Put lid on and place in fridge overnight. Bake in 450 preheated oven for 20 min covered. Lower to 400 and continue covered bake another 20 min. The slide cover off and say " whoa" as it will be so brown and full to the top and continue to bake 25 min. Remove from pan after about 10 min to let it loosen. Wrap in linen for 24 hrs. Slice and enjoy. c

JonJ's picture
JonJ

Weet-bix (in South Africa and Australia, or Weetabix in the UK, apparently available in the US too...) is a breakfast cereal of 'biscuits' of wholegrain wheat biscuits. The usual way we eat it in my family is with a sprinkle of sugar on top and then allow it to soak up the milk. It can really soak up the milk. It's quite a comfort food, and would be a great way to increase dietary fibre and be fairly healthy too (if it wasn't for the aforementioned sugar).

Because of the comfort food thing, thought it might be great in bread. I know it is used in biscuit and rusk recipes here. I found this recipe from Australia for a bread made with self-raising flour which gave me some ideas how to create a sourdough bread recipe.

That recipe allowed the weet-bix to soak up the milk overnight and then used that in the dough the next day, so I followed along with the idea making an overnight soaker with some sugar and the raisins too. The soaker had already soaked up all the milk even before it went into the fridge. If I was to rework the recipe I'd use the dry biscuits in the initial dough mix instead. The problem with adding an ingredient that soaks up moisture is similar to the oat porridge recipes, you end up crafting a recipe with a high nominal hydration, or the final dough is of such a low hydration to compensate for the wet soaker that will be eventually added that it is pretty stiff and it is difficult to combine the components together.

This is what happened here, my final dough was pretty stiff, even after it was mixed with the levain. The Weet-bix soaker was added to that and my poor mixer struggled to combine with the stiff dough. I had made a yeast water preferment to act as insurance in case I needed it, so that was also included to try and loosen up the dough mixture.The raisins, walnuts and cinnamon were added at the end to the mixer.  Mixed for a total of 20 minutes.

The resultant dough had a horrid texture, unlike anything I've ever worked with before. From the mixer it went into a Pyrex dish in the proofer, but trying to coil fold it was a nightmare. There was lots of gluten visible, sheeting of the dough, but trying to lift and stretch it didn't work - it was more like working with a rye dough that fails to 'stretch' or show cohesiveness. Someone who was visiting called it a primordial gloop bread.


In a moment of temporary insanity of struggling with the gloop I threw it into the large loaf pan (a 30cm Zenker) which was a mistake as the pan was too large, so I ended up with a flat bread. It was baked for 60 minutes in the pan at 200°C(392°F), covered for the first 20 minutes with foil.

The bread itself is really interesting. In some ways it is like a giant Weet-bix. The crust crackles when you bite it, and the texture of the interior is a little like a creamy weet-bix biscuit that has been allowed to soak up all the milk. Being flat isn't such a bad thing, as it has given me more crust per slice. I do like eating the bread, but on the other hand a whole loaf of it may be a bit much so most of the loaf has now been sliced and frozen. I'll have toast made with it when I need a comfort food snack.

-Jon

Yippee's picture
Yippee


To learn more about concentrated lactic acid sourdough (CLAS), please see here and here


Among the cuisines of various regions of China, there are two sauerkraut dishes that I really like, and both are made with seafood. One is called "sauerkraut squid", a popular stir-fry dish in Hong Kong, and the other is called "sauerkraut fish", a famous soup from Sichuan. In both recipes, we use sauerkraut made with mustard green, or in the absence of mustard green, a vegetable called "snow red".  We refer to sauerkraut as "Haam Shuen Choi" in Cantonese, or "Suan Cai" in Mandarin. This Choi (veggie) is both salty and sour, as the name denotes. When I was a kid, if I remember correctly, we always bought Haam Shuen Choi from the marketplace, where they were displayed in the open and sold whole. 


These days, I can find packaged Haam Shuen Choi in Asian supermarkets in the U.S. While they may look similar to the Haam Shuen Choi from my childhood, they taste terrible, probably because they are preserved with chemicals. So, I've stopped buying them and made my own with CLAS in the Instant Pot. To make pickled veggies, I've tried using mustard greens, "snow red", carrots, cabbage, cucumbers, etc. The IP-CLAS combo works perfectly for them all. In just 24 hours, I can have crunchy, sour veggies ready to go. In the past, we always had to soak the Haam Shuen Choi first and add a fair amount of sugar to balance out the flavor during the cooking process. Otherwise, it would be too sour and salty. There is no such problem with IP-made Haam Suen Choi; I can use them as-is. 


It's super easy. All you need to do is put the veggies in the Instant Pot, cover them with water (Measure how much water is used. I usually fill it close to the rim, then put a porcelain plate on top, and loosely cover with the IP lid to weigh it down so that the veggies are fully submerged.), and season the water to your liking (I usually use 2.5% sugar and 2.5-3% salt of the water used, and plus whatever spices I feel like adding at the moment). Then add some CLAS (3% (liquid + whole rye flour) ) and some fresh whole rye flour (3%). Then select the "yogurt" function (42C), wait 24 hours, and you're done. By that time, the pH is ~3.5. How easy is that! I strain the liquid and drink it daily as my "probiotic drink". I can use the filtered sediment as a second starter for the next batch, but of course, this step is not necessary. 

P.S. On second thought, I'll probably backslop the sediment, so I don't have to use my CLAS every time. I'll use CLAS initially and hope it will self-propagate in each batch as new food (fresh whole rye flour, sugar, etc.) is added. I'm hoping this is doable and not just wishful thinking.


💕💕💕 my Instant Pot. It is a handy tool to have in my kitchen. I use it to make my beloved CLAS, and I also use it to simplify the process of making marmalade.
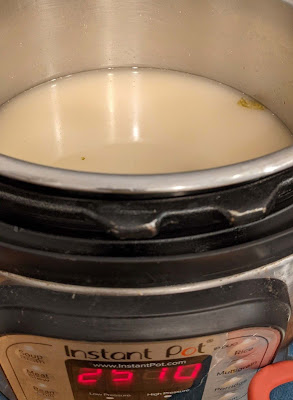


24-hr "snow red" Suen Choi


36-hr  "snow red" Suen Choi


Sauerkraut Squid

https://youtu.be/mW-WTDV58DQ


Sauerkraut Fish

https://youtu.be/h_RtbERVPg8


My simplified version of sauerkraut fish using fish filet 😁😁😁 


I can slice the filet thinly when it's still slightly frozen. 


Isand66's picture
Isand66

I decided last month to try and revisit making baguettes again. I had not made any in quite some time and my shaping and scoring skills were not up to snuff.

I decided to follow David Snyder’s famous recipe from The Fresh Loaf.com and baked them several times with a few modifications (because I just can’t help myself :)). I’m still not happy with my shaping and scoring so no pictures here…but the crumb came out excellent just like you want with a nice open honeycomb and crispy light crust.

Next I decided to add some additional % of whole grains and see if I could achieve a similar crumb and flavor but bake them a regular loaf using my brotforms. I used freshly ground whole wheat sifted 2x as well as freshly ground Spelt also sifted 2x. I added black and white sesame seeds which really tasted great.

I used the same timing and method as described in David’s post. The bread tastes great and was amazing grilled with some Havarti with dill cheese.

Grilled Bread with Havarti Dill Cheese–with Grilled Steak

The crumb was disappointing. I’m not sure why it was not more open. I may have handled it too roughly but I’ve always found it odd that when making baguettes I’m able to get such an open crumb, but if I use the same dough for a regular loaf it’s rarely as open.

In any case, the increased amount of whole grains in this bake really brought the flavor up a notch in my humble opinion.

Here are the formulas for anyone interested:

albacore's picture
albacore

Inspired by a picture of Derek's (Yozzause) recent Chelsea bun bake and also by some Fitzbillies of Cambridge UK buns that our daughter sent us, I thought it was time to try my hand at them.

Similarities to cinammon buns of course, but a surprisingly steep learning curve to get them right. I will need a couple more bakes to get them nearer how I think they should be. But I'm happy enough for a first attempt.

The Fitzbillies have a sugar glaze top and bottom and I prefer this to the iced version we usually see. Also I used Derek's trick of soaking the dried fruit in fortified wine to soften it up a little and give a good flavour - a spot of cream sherry in this case, as I was out of tawny port.


Ready for rolling up:


Lance

anmoo's picture
anmoo

Tried a cold oven start today...Interestingly I baked for 30min on stone, covered with a pot, when I removed the lid, there was hardly any oven spring. But after another 25min, it came out not too  bad I suppose. :)

Crust was crispy and interior soft and moist. I suppose I could have proofed the loaf a little longer. Anyone uses the cold oven start method? Have a great sunday!

alfanso's picture
alfanso

Still playing around with my new toy, the Pullman pan, I wanted to bake the Hamelman WW levain loaf.  At this point I've baked it many times before but not in the Pullman pan shape.  Post-mix, I made a slightly dopey but not costly error.  I decided to add cinnamon and golden raisins to the loaf.  Not being incorporated into the formula, the percentages were now off, but likely not by much.  

This turned a 1500g mix into a 1700g mix, my plan being to fill the loaf pan with 1000g of dough and then divide the remainder for two baguettes/long batards.  I slathered on the cinnamon and soaked raisins on the first of three letter folds.  After an overnight retard, the dough was divided and shaped, the two baguettes placed on the couche and back into retard until the loaf pan bake was completed.

The inclusions almost always makes for a slightly craggy baguette shaping experience.

Pages

Subscribe to Recent Blog Entries