The Fresh Loaf

A Community of Amateur Bakers and Artisan Bread Enthusiasts.

Recent Blog Entries

trailrunner's picture
trailrunner

 There are pictures in this thread of the YW and levains 


https://www.thefreshloaf.com/node/70160/yw-challah#comment-505885 

 The crumb is very much like the Hokkaido bread!!! Wow that 10 min intensive mix really worked. So tender and light and so fragrant. Amazing bread


This is more like what I usually get when I bake this decades old ,originally ADY , yeast bread. 

I changed a few things. I used my YW without refreshing it as the fruit was still floating and it was fizzy. I made 2 levains subtracting from the total flour and water of the original formula. The levains were made using YW from the surface for one and sludge with added clear YW for the second. I used YW as the remaining liquid in the formula as well so essentially three forms of  the same rising agent. 

I always autolyse all ingredients for one hour and did so today. I always use my Kitchen aid mixer on 2 for 5 min after the autolyse but today I decided to try what others have been doing and head toward an intensive mix so I did 10 full minutes at level 2. Pulled a lovely windowpane! 

Amazing plush dough. Rising time was 2 hrs to double. Shaped easily and 2 hr rise again. Egg wash baked 350/ 35 min. 

Rich pastry fragrance fat well risen browned braids. I had stopped making Challah as I was pursuing other multigrain breads and techniques. This is how my Challah looked from the 70’s on until recently when I wasn’t really paying attention to details. 

My YW  with fruit and a batch of YW  flour starter in the fridge will both be traveling to FL next week for a month. I’ve never done this before but I want to solidify the things I did today. Guess I will pack the KA mixer too 😩

Benito's picture
Benito

Here is the video I made recently to show the steps involved in making my 100% whole wheat sourdough Hokkaido milk bread.

Please enjoy.

You might enjoy reading the article I wrote for Breadtopia Whole Wheat Sourdough Hokkaido Milk Bread

Benny

Benito's picture
Benito

This is the video I just created to show how I’m currently shaping and scoring my baguettes.  There are so many different ways to do this and I don’t pretend to be a master of any of them.  I am using the technique that Scott Megee shows in his video and this is only my second time using it.  I am quite pleased with the quality of the baguettes I made using this shaping method. 

Hope you enjoy the video.

Benny

yozzause's picture
yozzause

Yesterday i baked what i will call a generosity loaf , i call it that as the flour was from the red wheat and Tim's generosity and then that was milled with the Flour mill that Margaret very generously gifted me, and i put it to good use straight away. This is the first ever loaf that i have made using 100% fresh home milled wheat and i have to say i am not disappointed. i also included red wheat sprouts that were blitzed.The bread has that wonderful dark brown that was in evidence from the bread we made at big loaf, i baked it in the Romantoph for 15 minutes lid on and then the rest of the time off. i extended the baking time and the heat. When i sliced it this morning it had the great aroma and a nice open texture, there was some evidence that it was sticking to the serrated knife and was very moist. It reminded me a bit like malt loaf in that respect, and i think that is in fact where that characteristic is coming from, i added 2% Saunders malt to the mix and the addition of the sprouted red wheat berries 20% that were sprouted earlier and had been slowed in the fridge were definately very sweet when tasted had probably converted a good deal of the starch into Malt for its growth. Taste wise the bread was excellent and it has almost a cake like mouth feel. i guess i will need to make a bog standard 100% Wholemeal without the sprouts to comfirm my thoughts. Thanks again to Tim and Margaret The fun continues.     

StevenSensei's picture
StevenSensei

I've been using a LeCreuset Dutch Oven for most of my baking, but I really wanted to make some sandwich bread. I have a few glass pans but figured with the popularity of shokupan (Japanese white bread baked in Pullman style pans) that it was time to invest in a pan and give it a try. 

I settled on this pan made by Majimaya Baking Supply in Tokyo. They do a lot of metal production for baking. I hope to visit the retail shop one day. Ordering online was not a problem and soon enough I had a 1.5斤 pan, which of course let me down a rabbit hole of actually how to use such a thing.

くろがね塗テフロン加工1.5斤勾配有食パン型フタ付き

1.5斤 is a Japanese measurement of volume that is then applied to mean this tin is good for a 1.5 sized loaf of bread. Which is appropriate for 2-4 people. 

The pan has a volume of 2774ml and the manufacturer recommends using 374g of flour. In this case they do not mean total dough weight but the amount of flour in the recipe for a yeasted loaf of white bread. This works out to approximately a 964g total dough weight loaf of bread. 

To scale recipes to different pans we get to do some bakers math. 

  • 1.5斤 has a capacity of 2774ml and recommends 373g of flour
  • OR
  • 134.46g of flour in a recipe per litre

This is a handy starting point to then scale other recipes using tools like the Foodgeek Bread Calculator

StevenSensei's picture
StevenSensei

As a home baker in Japan there are quite a few constraints that can make baking more challenging than baking in a full western kitchen. With a bit of effort and improvisation good bread is still quite achievable. 

Let's start with fermentation. For the first few years I've used a digital temperature controller connected to a kotatsu (traditional heated table) to maintain a somewhat consistent temperature for doing bulk fermentation or growing sourdough starter. And it worked...surprisingly well. 

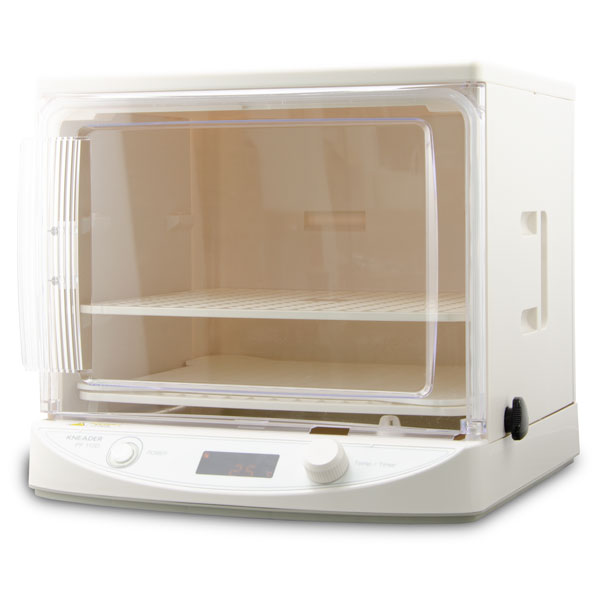
I spent some time searching for a better alternative and finally came to the conclusion that I needed (ok really really wanted) a Brod & Taylor folding proofer. After extensive searching I came to a sad conclusion. This device is not available in Japan. If I wanted to make this upgrade I would have to find a way to import one or to go to America and carry one back on a plane with me. Neither were ideal, but here we are. Then very recently I found a Japanese company that makes their own version of a tabletop proofer. The Japanese Kneader Company mostly produces products for commercial bakeries but have released a mini version for home use. I snapped one up and am THRILLED with it. I contacted their support division for a minor issue and they were extremely responsive. Through that experience I also learned that their partner business in the USA and Europe is in fact Brod & Taylor. So near as I can tell, this is the actual manufacturer and that agreement also explains why I couldn't find the B&T in Japan!
Now the elephant in the kitchen so to speak is the oven. Western style and sized ovens are really NOT a thing here. In such small living areas any kind of functional kitchen is a rarity. Many apartments, especially in city locations may only have room for a very small refrigerator and a SINGLE BURNER for warming food. As someone who loves to cook the adjustment has been difficult. I consider myself lucky in that I have a gas stove with 2...yes TWO burners. Counter space is also non-existent. I ended up purchasing two different kitchen storage cabinets / bar counters to create counter space. Once that was sorted it was time to tackle the oven issue. 

This wonderful little device fits the bill. It is a combination oven, broiler/grill, and microwave that will go up to 300c. Even more importantly, it is just large enough for me to put a 24cm LeCreuset dutch oven inside. While I will never be making full size french baguettes, with an interior that is  H30cm x W41cm x D29cm it is enough to do pretty much everything else. The ability to have 2 baking sheets in at the same time is also quite nice for things like bagels. 

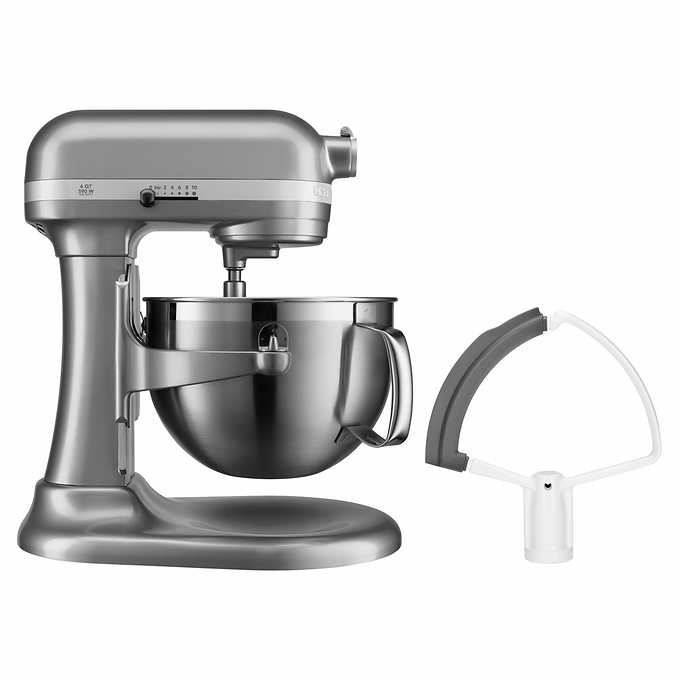
Have you made brioche yet? I have a few times now. The first 2 times I did it by hand. That was an experience and one that I don't care to repeat. A mixer became a priority. Thankfully I had some family who was going to come to visit and were willing to fly one to me. Unfortunately that trip didn't happen, but I eventually had them ship the mixer to me. Yes, importing kitchen goods from overseas. The crazy thing is, after the cost of the mixer, and the ridiculous shipping costs. It was still a few hundred dollars cheaper than buying the same exact mixer locally. Worth It! KitchenAid Professional Series 6 Quart Bowl Lift Stand Mixer with Flex Edge. This has also enabled me to make marshmallows in my kitchen and after doing that I will never buy them in a bag again. 
 View Larger Image 1

Of course beyond these big things there is the standard assortment of bowls, spoons, dough whisks, lames, bread pans, cooling racks, and other things that are necessary but not worth actually listing and talking about. 

The take away from all of this. If you have an oven, a way to mix ingredients, and a way to provide consistent temperatures (not required but very nice)....you should be able to bake bread. The rest is up to practice, skill, experience, and time. 


StevenSensei's picture
StevenSensei

This blog post is used as an index to the bakes I've done and posted here for quick reference in the future

Equipment, Books, and other General PostsBread Recipes Completed (Commercial Yeast)Bread Recipes Completed (Sourdough)Quick Breads (Chemically Leavened with Baking Soda / Baking Powder) Bread Adjacent Items 
Benito's picture
Benito

I’m continuing to explore the uses for the stiff sweet levain and today’s bake is my first use of it in a baguette. So I made adjustments to the Yorkville Sourdough Baguette recipe (the original recipe is posted here Poppyseed Crusted Yorkville Sourdough Baguettes – Breadtopia)
to accommodate the stiff sweet levain and to increase the hydration somewhat. I have gradually been changing how I develop my dough for baguettes. I have found so far that I can more thoroughly develop the gluten early on allowing me to do a longer final proofing (increased aliquot jar rise from 30 to 35% at time of baking). By doing this I can open up the crumb whilst achieving the grigne and ears that one desires in a baguette. In order to combat the dough being less extensible from the greater dough development I have gradually increased the hydration now up to 74%.

A reminder if you aren’t familiar with the stiff sweet levain about the science behind how it allows you to bake a sourdough bread with less acidity. As you know it is the LAB that create most of the acid in our sourdough breads. The LAB are more affected by the dehydrating effects of low hydration and in particular the osmotic pressure exerted by sugar. So by using a levain with a sugar concentration of 50% in this case and a hydration of 60% one can create a sourdough bread with less LAB and thus less acid. For my all white levain, the starting pH was 4.93 and the pH at peak was only 4.37. That is a drop of only 0.56. In general, my levains at peak would have a far greater drop of between 1.0-1.3 in pH so that is quite remarkable that the levain pH dropped by so little.

In addition, the dough when mixed with this levain had a starting pH of 5.52, again this is an all purpose flour with essentially no bran to buffer the acid. At the time of baking just the pH was about 4.5. Again this is remarkable as typically for mostly white flour breads the pH at bake for me would be lower around 3.8 or so. That difference of 0.8 is substantial and the baguettes should still have some complexity of a sourdough but have less of the sour tang if you aren’t interested in that profile to the flavour of your bread.

IMG_1602IMG_16021920×1003 190 KB


Overnight levain
18 g starter + 16 g white sugar + 23 g water + AP flour 51 g. 78°F


Fermentolyse - mix 378 g water with all the levain, salt 11 g and diastatic malt 5.7 g to dissolve, then add 521 g AP flour to combine. Slap and fold x 100 then add hold back water 23 g gradually working in until fully absorbed then slap and fold x 100.

Bulk Fermentation 82*F until aliquot jar shows 20% rise.
Do folds every 30 mins doing 2-3 folds
Could do cold retard at this point for up to overnight. (Aliquot jar 20% rise)

Divide and pre-shape rest for 15 mins
Shape en couche with final proof until aliquot jar shows 35% rise then cold retard shaped baguettes en couche for at least 15 minutes for easier scoring.

Pre-heat oven 500F after 30 mins add Silvia towel
Transfer to peel on parchment
Score each baguette and transfer to oven bake on steel
Bake with steam pouring 1 cup of boiling water to cast iron skillet dropping temperature to 480
F
The baguettes are baked with steam for 13 mins. The steam equipment is removed venting the oven of steam. Transfer the baguettes from the baking steel to next rack completing baking directly on a rack to minimize the browning of the bottom crust. The oven is left at 480ºF but convection is turned on and the baguettes bake for 10 mins rotating them halfway. The oven temperature is then dropped to 450ºF and the baguettes rotated again if needed and baked for another 3 mins to achieve a rich colour crust.

image
image
image
image
image
image
image
image  I’m not mad at the broken straps, I’ll take those for great bloom any day.


foodforthought's picture
foodforthought

A few days ago, @pul posted some lovely pics of creamy, yellow semola loaves that reminded me of the community bake of a year or so ago and my good results from that exploration. ...which got me ruminating and scheming on following @pul's lead.

So down the rabbit hole of @dmsnyder's, @Franko's and @dabrownman's meanderings on Pane Tipo Altamura I dropped, deciding eventually to follow @pul's lead with a few modifications.

  1. Planned for 1.5 kg  of 73% hydration dough to build 2 batards
  2. Prepared 220 g of 56% hydration biga per @pul
  3. Prepared 300 g of semola poolish (because it's what i do)
  4. 1 hour fermentolyze(?) incorporating biga, poolish, 900 g flour and 400 g (to get to 95%) of water
  5. Added remaining water and increased salt to 1.7%
  6. 3 (more?) hours of bulk with 4 stretch and folds
  7. 18 hour retard at 37º F
  8. Preshape with 30 minute rest, then final shape and 1 hour bench rest
  9. Bake with convection/steam 20 minutes at 450º, then convection only 18 minutes at 425º

A few observations of note:

  1. This semola biga showed quite a bit more growth than I expected. The flour really liked liquid though the dough seemed quite easy to work with.
  2. 100% hydration semola poolish, on the other hand, grew but less vigorously than my usual AP poolishes. Suspect that the gluten was just holding on tighter.
  3. Machine mixing the flour went well until the very end. I had to really work on getting the last 100+/- grams incorporated. Once again, gluten seemed quite tight though, visually, an absence of the stringy fibrous gluten matrix you see with white flours.
  4. The dough, on the other hand was very silky and nice to handle. I would hesitate to call it highly extensible, though, in the end, it was cooperative enough on shaping.
  5. Loaves seemed smallish before loading, but they really took off, exposing beautiful ears. I keep relearning that I tend to get better ears on lower hydration loaves like these.
  6. Thicker and crunchier crust then I was expecting. Lovely cream(?) colored crumb. Distinctly different and pleasant flavor

In conclusion, I'm not seeing a lot of reason to handle this dough a whole lot differently than I would for standard sourdough loaves. I think next time around, I'll try getting to 80% hydration with a normal 100% hydration levain as I do for my 50% semola ciabatta.

Thanks to @pul for the inspiration and TFL community (alfanso!) for a million insights.

Benito's picture
Benito

I love miso if you haven’t noticed from some of my posts including my most recent Miso 100% WW Sourdough.  Not running out of miso requires advanced planning for a couple of reasons.  First it takes about a year to ferment the rich red miso that I love and having the koji rice on hand to make the miso.  We have a sake maker here in Toronto in the Distillery District which is a good walk from where I live and that is where I have purchased the frozen koji rice.

Making miso is actually quite simple the Aspergillus oryzae does most of the work albeit slowly.  For those unfamiliar Aspergillus oryzae is a type of mold that is really important in Japanese cuisine.  It is needed to ferment the soybeans to make miso and also to make good soy sauce.

Rather than post the recipe I followed again I’ll just link to my previous post which has all the details.

Homemade miso recipe.

Koji rice and salt

Cooked soybeans in food processor

processed soybeans

processed soybeans mixed with koji rice and saltmiso in jar and salt sprinkled on topmiso in jar with a bag of salt to weigh it down and now ready for 365 days of fermentation.

Pages

Subscribe to Recent Blog Entries