The Fresh Loaf

A Community of Amateur Bakers and Artisan Bread Enthusiasts.

Most bookmarked

Anonymous baker's picture
Anonymous baker (not verified)

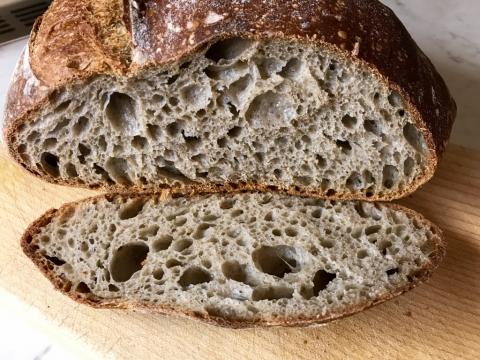
A very simple sourdough recipe...

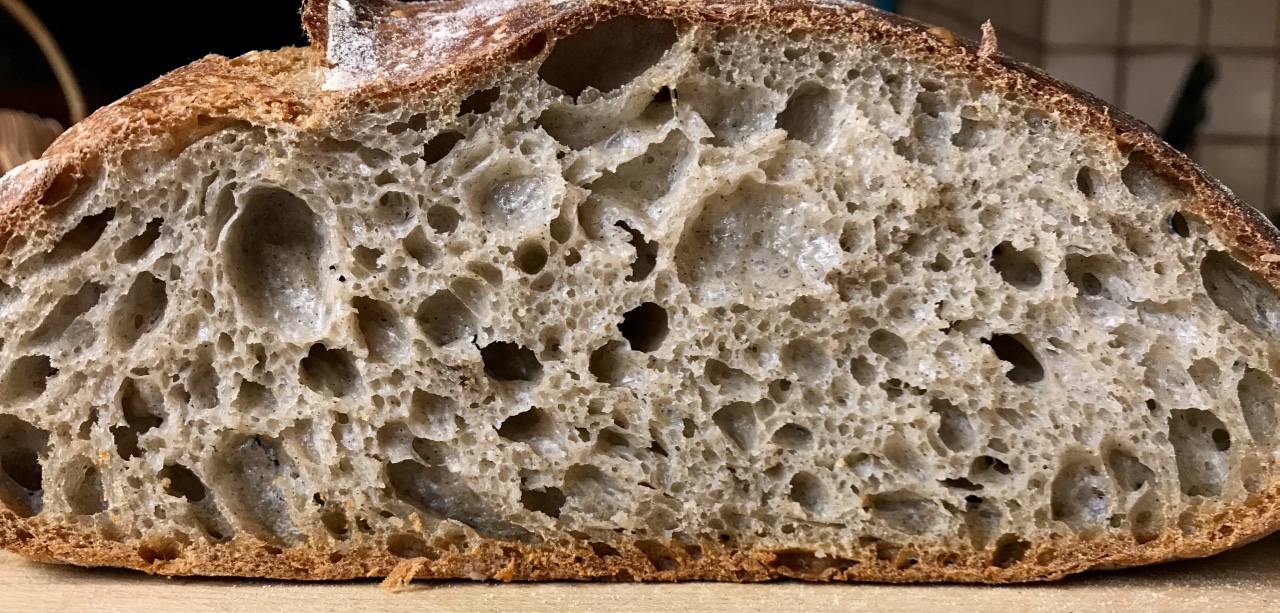
A very simple sourdough recipe with great results. It doesn't focus on special techniques or open crumb etc. Rather it's minimal hands on with an old fashioned way of handling a dough approach but very flavoursome. First of all you'll need to build a stiff starter like so...

  • 45g flour (40g bread or AP flour + 5g whole wheat or whole rye)
  • 20g water
  • 10g starter @ 100% hydration 

Based upon a 100% hydration bread flour or AP starter. 

Allow the starter to fully mature and peak then refrigerate for at least 24 hours before moving onto the recipe. 

RECIPE:

  • Bread Flour 200g
  • Whole Wheat Flour 300g
  • Water 325g + extra
  • Salt 10g
  • Stiff Starter 15g*

*after its been in the fridge remove the top of the starter as it might be a bit dried out and use the fresher starter beneath. 

 
  1. In a bowl mix the flours and salt then make a well. 
  2. To the well add the starter then water. 
  3. With your hands break up the starter in the water then slowly mix in the flour forming the dough. 
  4. Knead the dough till full gluten formation. As you are doing this slowly add in more water till you're happy with the hydration. We aren't aiming for as high as possible, rather... just slightly stickier than tacky. It should still be kneadable. 
  5. Once the gluten formation is fully formed then leave it to bulk ferment overnight for 11-12 hours. The dough will have about tripled. It might look over done but it will still have a lot of strength. You'll see when it comes to shaping and utilising folds to build the structure back up. 
  6. Pre-shape and bench rest till the dough relaxes then shape into banneton. 
  7. Final proof till ready - will take about 2 hours but watch the dough and not the clock.
  8. Bake in a pre-heated oven either with steam or in a Dutch Oven for 25 minutes then without steam or lid till there's a lovely golden crust. Allow to fully cool before cutting.

Bon Appetit. 

 
Ade's picture
Ade

Underproofed/Overproofed - Sourdough video resources

Hello everyone!

Recently found The Sourdough Journey YouTube channel and I've been binge watching all the videos.

He has an amazing one hour and a half (I know it sound like much, but it's sooooo informative) masterclass video about bulk fermentation...pure gold. Lots of information, advice and visual examples.

The mystery of bulk fermentationhttps://www.youtube.com/watch?v=nYCS5BFA_sM

Hope you enjoy and give the guy some likes because the quality of his content is quite impressive.


Some other channels that I personally watch (all of them related to sourdough), feel free to share some of your favourites:

Proof Bread: https://www.youtube.com/channel/UCPYHRKEqMycep7r5kO-1org

Bread by Joy Ride coffee: https://www.youtube.com/channel/UCcLCX8VIcNWIu6BJyjWQDww

Foodgeek: https://www.youtube.com/channel/UC7eLtGAzNECUqurqMdiNYJg

Trevor J. Wilson: https://www.youtube.com/channel/UCRK2AFfEfjhFcpYtu44Uzvw


Have a great day,

Ade


DanAyo's picture
DanAyo

Tip - Ankarsrum Mixing & Kneading

The tip below comes from Doc, aka Doc.Dough. It is ingenious, and as far as I know, there is no better way to incorporate ingredients for an autolyse or initial mix when using an Ankarsrum mixer. The second paragraph deals with the actual kneading of the dough.

Weigh the levain, water, and flour and put them into the mixing bowl.  Transfer the bowl to the mixer and install the scraper (only). Turn on the motor and set it to a low enough speed that you don't get flour flying all over (typically 2 or 3) for 30 sec or so (just until the flour is fully wet), then turn up the speed to 6 and mix (still with the scraper only) for the remainder of 1 minute.  Now remove the scraper, put the salt on top of the dough so you don't forget it and cover it with a shower cap or bowl cover.

Allow the dough to sit for a 20 min autolyse before the final mix at speed 6 (with both roller and scraper) for however long it takes to get a dough that has pulled itself off the side of the bowl and is almost totally smooth.  This may be 3 minutes (rarely and only with low hydration dough), to a more typical 6-7 minutes for a ~70% hydration dough and a fairly strong flour, to 12-18 minutes for a sloppy high hydration ciabatta or coccodrillo (80-100% hydration).

DanAyo's picture
DanAyo

Community Bake - The Approachable Loaf by The Bread Lab

As of late there has been interest on the forum about an organization called, "The Bread Lab". It is an extension of Washington State University with a laser focus on wheat, people who process the wheat, bakers that work with the wheat, and consumers that eat the wheat. 

The Bread Lab has instituted a program to encourage commercial bakers to offer a basic whole wheat sourdough bread that is targeted for the average consumer. They named the bread, "The Approachable Loaf". A simple name for a basic loaf of natural and nutritious goodness. 

quite a few bakeries have joined to participate in the vision.

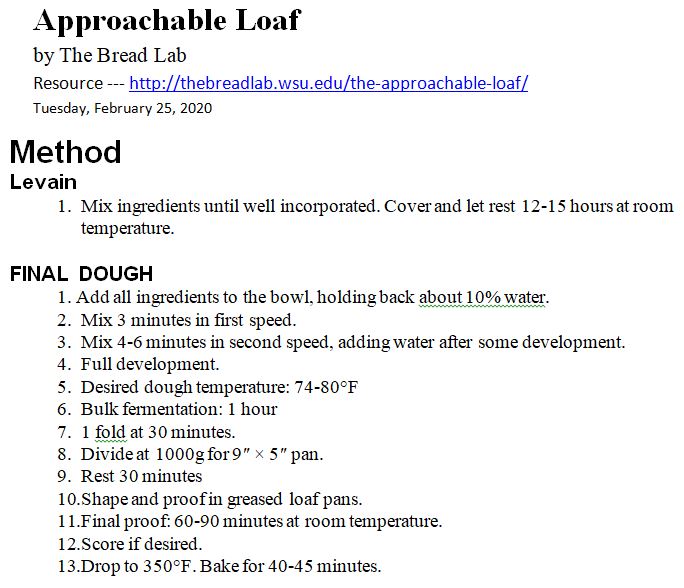
Here is a brief write up detailing a common recipe for the Approachable Loaf. NOTE - the formula and method is not meant to be an absolute. Bakers are free and welcomed to develop formulas and methods that meet the minimal criteria. This bread is intended to be a sandwich type bread with a nice airy crumb that will hold the condiments on the bread and not drip down into your laps. Forget the Instagram holes. <LOL>

Basic Criteria -

  • is baked in a tin and sliced.
  • contains no more than seven ingredients.
  • contains no non-food.
  • is at least 60% whole wheat—preferably 100%.
  • is priced under $6/loaf. (Bakeries)
  • 10¢ of every loaf sold returns to The Bread Lab to support further research of other whole grain products. (Bakeries)

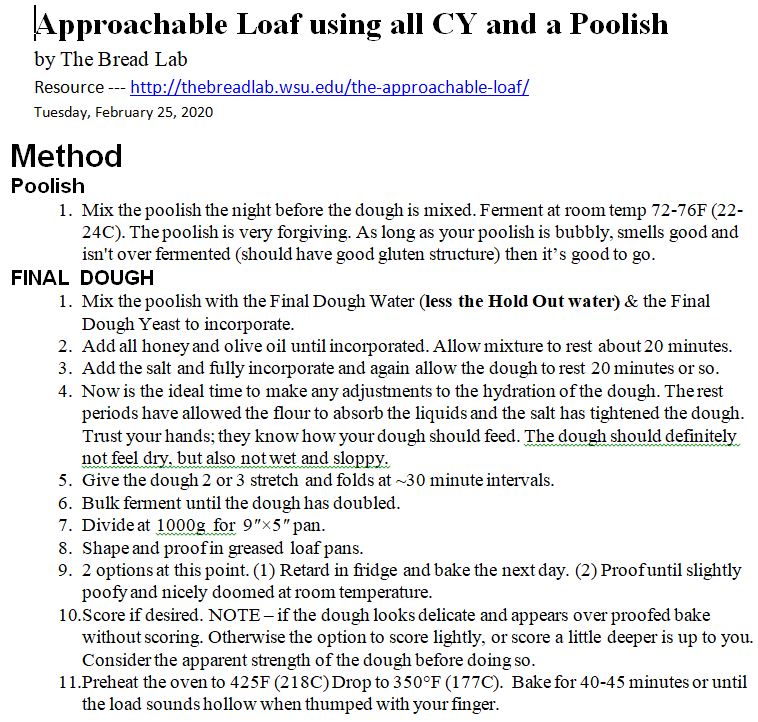
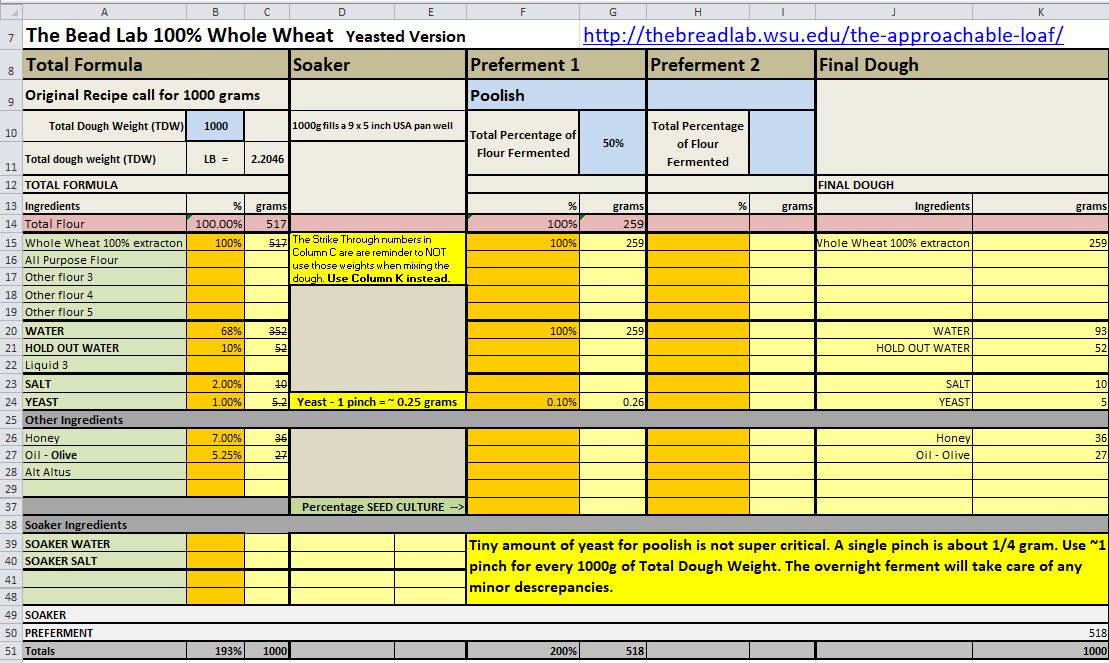
Great News for bakers that don’t use sourdough. An Affordable Loaf can be baked using commercial yeast. The main goal is to promote whole grain breads. If you plan to bake using commercial yeast only, a poolish (preferment) would be a great idea.

Everyone is welcome and encouraged to join in and participate in the event. For those that are new to Community Bakes, it is a great opportunity to share and learn with and from others.

Some bakers, including myself decide to get a jump start on the bake. See this link for early bakes.
http://www.thefreshloaf.com/node/62438/community-bake-whole-wheat-bread-multitudes-starts-next-week


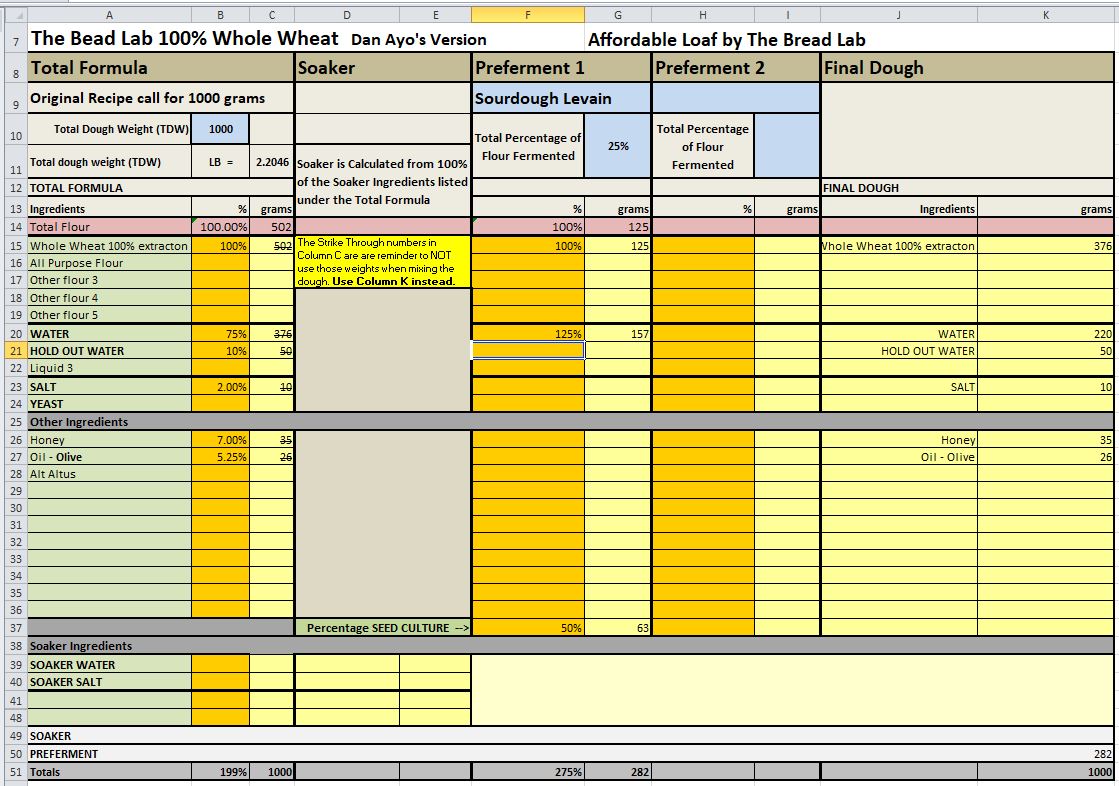
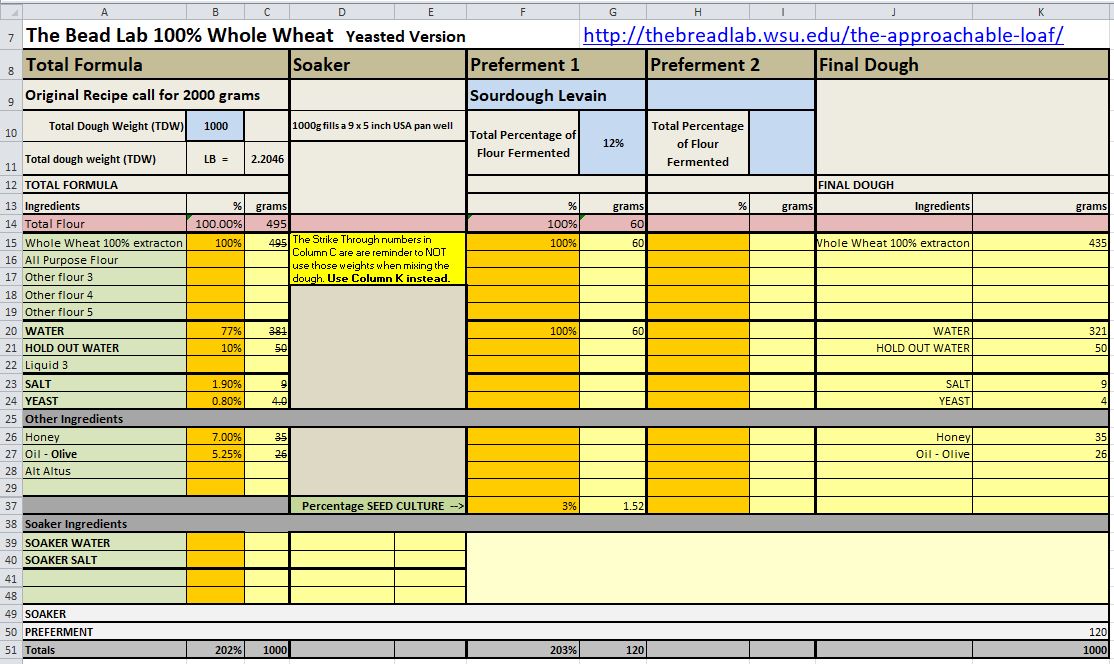
Below are a few variations of the Approachable Loaf. All spreadsheets are shown with 1000 grams for the Total Dough Weight. If you choose to bake 1 or more breads of a weight other than 1000 grams using any spreadsheet below, do the following in order to figure the weight of each ingredient. Suppose you want to bake a single loaf with a Total Dough Weight of 750 grams. Simply multiple each ingredient by .75 to get the correct weight. Or lets say you want 2 loaves that weigh 900 grams a piece, then multiple each ingredient by 1.80. During my experimentation I found that 1000 grams was a good weight for a 9" x 5" bread pan.

The spreadsheets below are examples. You are free to come up with your own version. 


The formula below is for sourdough with no Commercial Yeast.
The version below is a hybrid version using both sourdough and Commercial Yeast. Make sure you watch the bulk ferment and the final proof like a hawk. CY ferments much faster than what sourdough bakers are accustomed to.

The next version uses Commercial Yeast with no sourdough.
For those that are new to the Community Bakes (CB), see this link to get an idea of how things work. Browse the post to get a feel for things. 

The CB is not competitive. It is a learning event where bakers from all of the world share their ideas and learn from others. All bakers are encouraged to share "the good, the bad, and the ugly". We learn much more from our failures that we do from our successes...

A word about email notifications. The Community Bakes garner lots of participants and post. Because of this the thread grows very large, very fast. Those that reply to the CB will be notified via email whenever new replies are posted to the thread. If you click the link in the email notification and you are not brought to the post mentioned in the email, just refresh your browser window. This will correct the issue. 

Danny

dabrownman's picture
dabrownman

Notes on Glazing - a Primer - - Lucy is watching us

I wanted to put this  where I could lose it and possibly find it again using search for Glazing or Primer

Here is the Rose Levy Beranbaum’s take on brushing on a crust

Type of Glazes and Toppings
A crisp crust: Water (brushed or spritzed)
A powdery, rustic chewy crust: Flour (dusted)
A soft velvety crust: Melted butter, preferably clarified (1/2 tablespoon per average loaf)
A crisp light brown crust: 1 egg white (2 tablespoons) and 1/2 teaspoon water, lightly beaten and strained (the ideal sticky glaze for attaching seeds)
A medium shiny golden crust: 2 tablespoons egg (lightly beaten to measure) and 1 teaspoon water, lightly beaten
A shiny deep golden brown crust: 1 egg yolk (1 tablespoon) and 1 teaspoon heavy
cream, lightly beaten
A shiny medium golden brown crust: 1 egg yolk (1 tablespoon) and 1 teaspoon milk, lightly beaten
A very shiny hard crust: 1 1/2 teaspoons cornstarch and 6 tablespoons water: whisk the cornstarch with 2 tablespoons of the water. Bring the remaining 1/4 cup
water to a boil and whisk the cornstarch mixture into it; simmer for about 30 seconds,
or until thickened and translucent. Cool to room temperature, then brush on the bread
before baking and again as soon as it comes out of the oven.

Note: When using an egg glaze, it goes on most smoothly if strained. I like to add a pinch of salt to make it more liquid and easier to pass through the strainer.  An egg glaze will lose its shine if using steam during the baking process.  My preference is to use Safest Choice pasteurized eggs.

DanAyo's picture
DanAyo

Acetic vs. Lactic Flavor

My latest endeavor is learning to bake a sourdough bread that heavily favors the Lactic Acid flavor. In an effort to achieve this goal I have baked about 2 dozen loaves back to back and often 5 or so days a week. I’ve come to some conclusions.

For me, it is informative to read that a certain method will produce a particular outcome. But where I learn best is by actually performing the method and then seeing (and in this case tasting) the results. I believe most would agree.

After said testing I know that warm ferments produce Lactic (smooth, creamy, yogurt-like) flavors and cold ferments produce Acetic (sharp, tangy) flavors. And the longer each dough ferments under either warm or cold temperature, the more prominently flavored the bread will taste.

I have also learned that it is possible to use both warm and cold fermentation on the same dough to bring out both spectrums of flavor. 

I last experimented by baking 2 identical loaves. All things being equal EXCEPT one loaf under went a total of 18 hr (counting BF and proofing time) of fermentation @ 77F. The other loaf BF for 16 hr @ 77F and cold proofed for 22 hr in the frig @ 39F. The flavor of the first bread was mild, creamy, and yogurt-like. The second bake was more complicated to describe. It had back tones of the previously described flavors, but in the forefront it tasted tangy and somewhat sharp. From this test I know now that I enjoy the Lactic flavor but not at all the Acetic side. I have the same affinity for cheese. I much prefer mild cheddar instead of the sharp version.

If you are still reading, know that I appreciate your patience. I’ve gone long to set the stage.

Now that I know I want as much Lactic and as little as possible Acetic, how can I maximize this?  My best method thus far is 16 hr BF @ 77F followed by a 79F Proof. The dough will generally tolerate 1.5 hr proof. The length of the BF is limited because the enzymatic action along with the building acid degrades the dough over time. From much testing, it seems the temperature and times are maxed out. Much more (either time or temp) and the dough falls apart, degrades. If I increase the temperature, I’ll have to decrease the time and vice-versa. In upcoming test I may BF for 15hr @ 77F and then proof @ 82 - 84F until properly proofed. I’ve learned so much from dabrownman. I’m excited to give his high temp (82 - 84F) approach. Should I push the proof even higher?

Any thoughts and suggestions are very much appreciated. Thanks for taking the time to read this long drawn out post.

Dan


Elsie_iu's picture
Elsie_iu

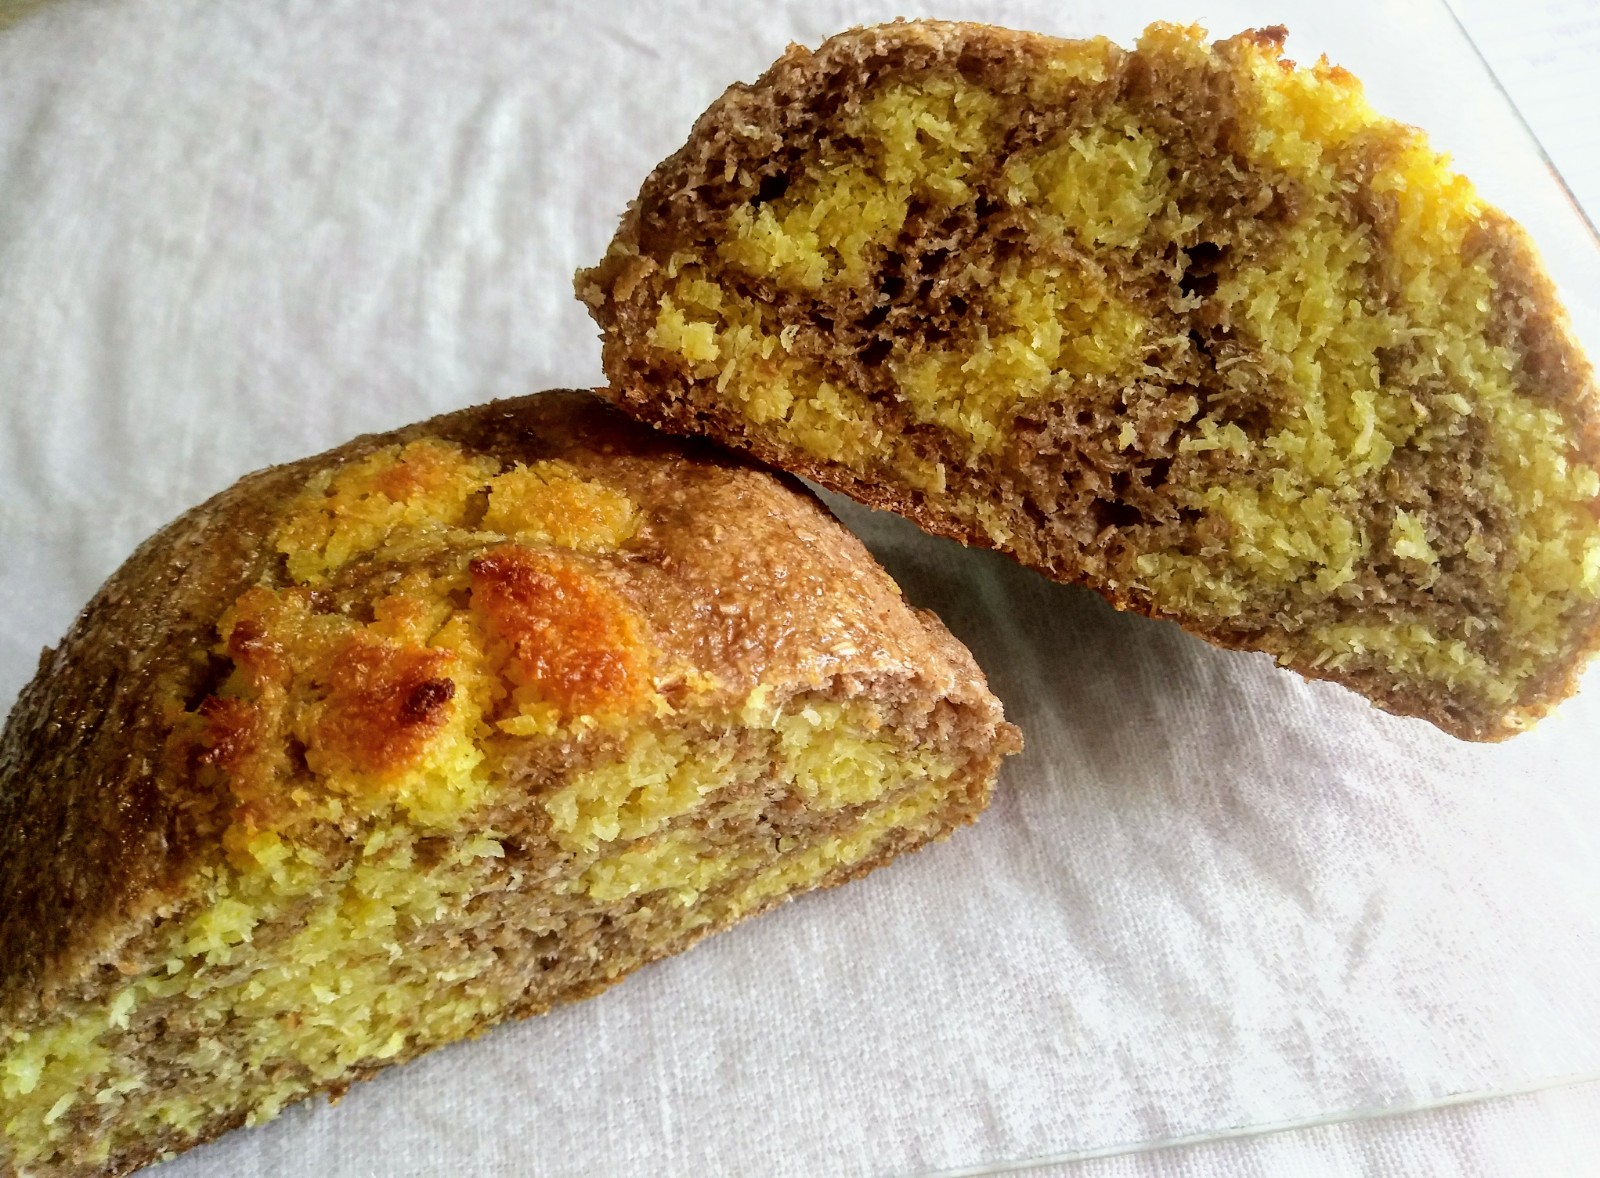
For Mom: HK Style Coconut Bun with Tang Zhong and Sourdough

I feel like I should share a HK style bread recipe on this site as someone from HK so when my mom requested some coconut buns, I decided to make it immediately. This is a kind of very typical and popular enriched bread in HK and though I only crave it at very rare occasions, my mom adores it wholeheartedly. I modified the traditional recipe by nixing butter and decreasing sugar in the dough while adding sourdough and tang zhong for flavour and tenderness respectively. An egg is skipped in the filling and condensed milk replaced the sugar. 


For Mom: HK Style Coconut Bun with Tang Zhong and Sourdough 


For filling:

150g     43%      Desiccated coconut

150g     43%      Sweetened condensed milk

50g      14%       Melted butter or ghee

1/4 tsp     -         Vanilla extract

A pinch    -         Salt

A pinch    -         Turmeric (for colour since eggs are used traditionally)


For tang zhong:

20g       6%      Whole wheat flour

100g     29%    Water

10g       3%      Sugar


For dough:

350g    100%     Whole wheat flour

150g     43%      Water

50g       14%      Evaporated milk

30g        9%       Starter

10g      2.8%      Vital wheat gluten

5g        1.4%      Salt

<120g      -         All of the tang zhong


For glace:

15g       4%      Honey

15g       4%      Warm water

______________

370g     100%     Whole Grain

300g      86%     Total hydration (some water in the tang zhong is evaporated)


Combine all ingredients for the filling and adjust the consistency to a thick but spreadable paste by adding just enough water. Keep refrigerated until needed. Mix together the flour and water for the tang zhong and heat over medium-low, stirring continuously until thickened, about 2 minutes. Stir in the sugar. Let cool to room temperature.

Mix thoroughly the starter and the tang zhong. Pour in the water and evaporated milk slowly while stirring at the same time. Combine roughly the flour, vital wheat gluten and salt for the dough with the wet mixture and let ferment overnight for 10 hours.

Stretch and fold the dough for a few times then let rest for 20 minutes. Flour the dough and stretch it lightly into a 30x30cm square. Dot the filling onto the dough, leaving some space on one edge then spread it evenly with a spoon. Roll the dough from one of the edges with filling to the edge with reserved space and pinch the edges together gently. Divide the dough into 4 equal cylinders and place them on a parchment lined baking sheet with the side with fillings exposed facing up. Flatten them slightly and let proof for 1 hour. Meanwhile, combine the honey and water for the glaze and preheat the oven to 400°F.

Bake at 400°F in the middle rack for 30 minutes or until the internal temperature reaches 190°F. Brush the honey mixture over the hot buns and let cool for 30 minutes before serving.

The coconut, condensed milk and butter produce a wonderful aroma which makes this bread addictive and irresistible. As much as we want to cut down on the fats, you just cannot skimp on the butter as it is what gives this bread its signature flavour. This recipe is already a healthified version with very few compromises but any more reduction on the fats or sugar would yield an unpleasant result. The bread is very soft and moist which goes especially well with this somewhat chewy filling.

As this is a pretty heavy kind of bread, this to me is only a once-in-a-while treat but as for my mom…that might be a different story!

joc1954's picture
joc1954

20% buckwheat bread

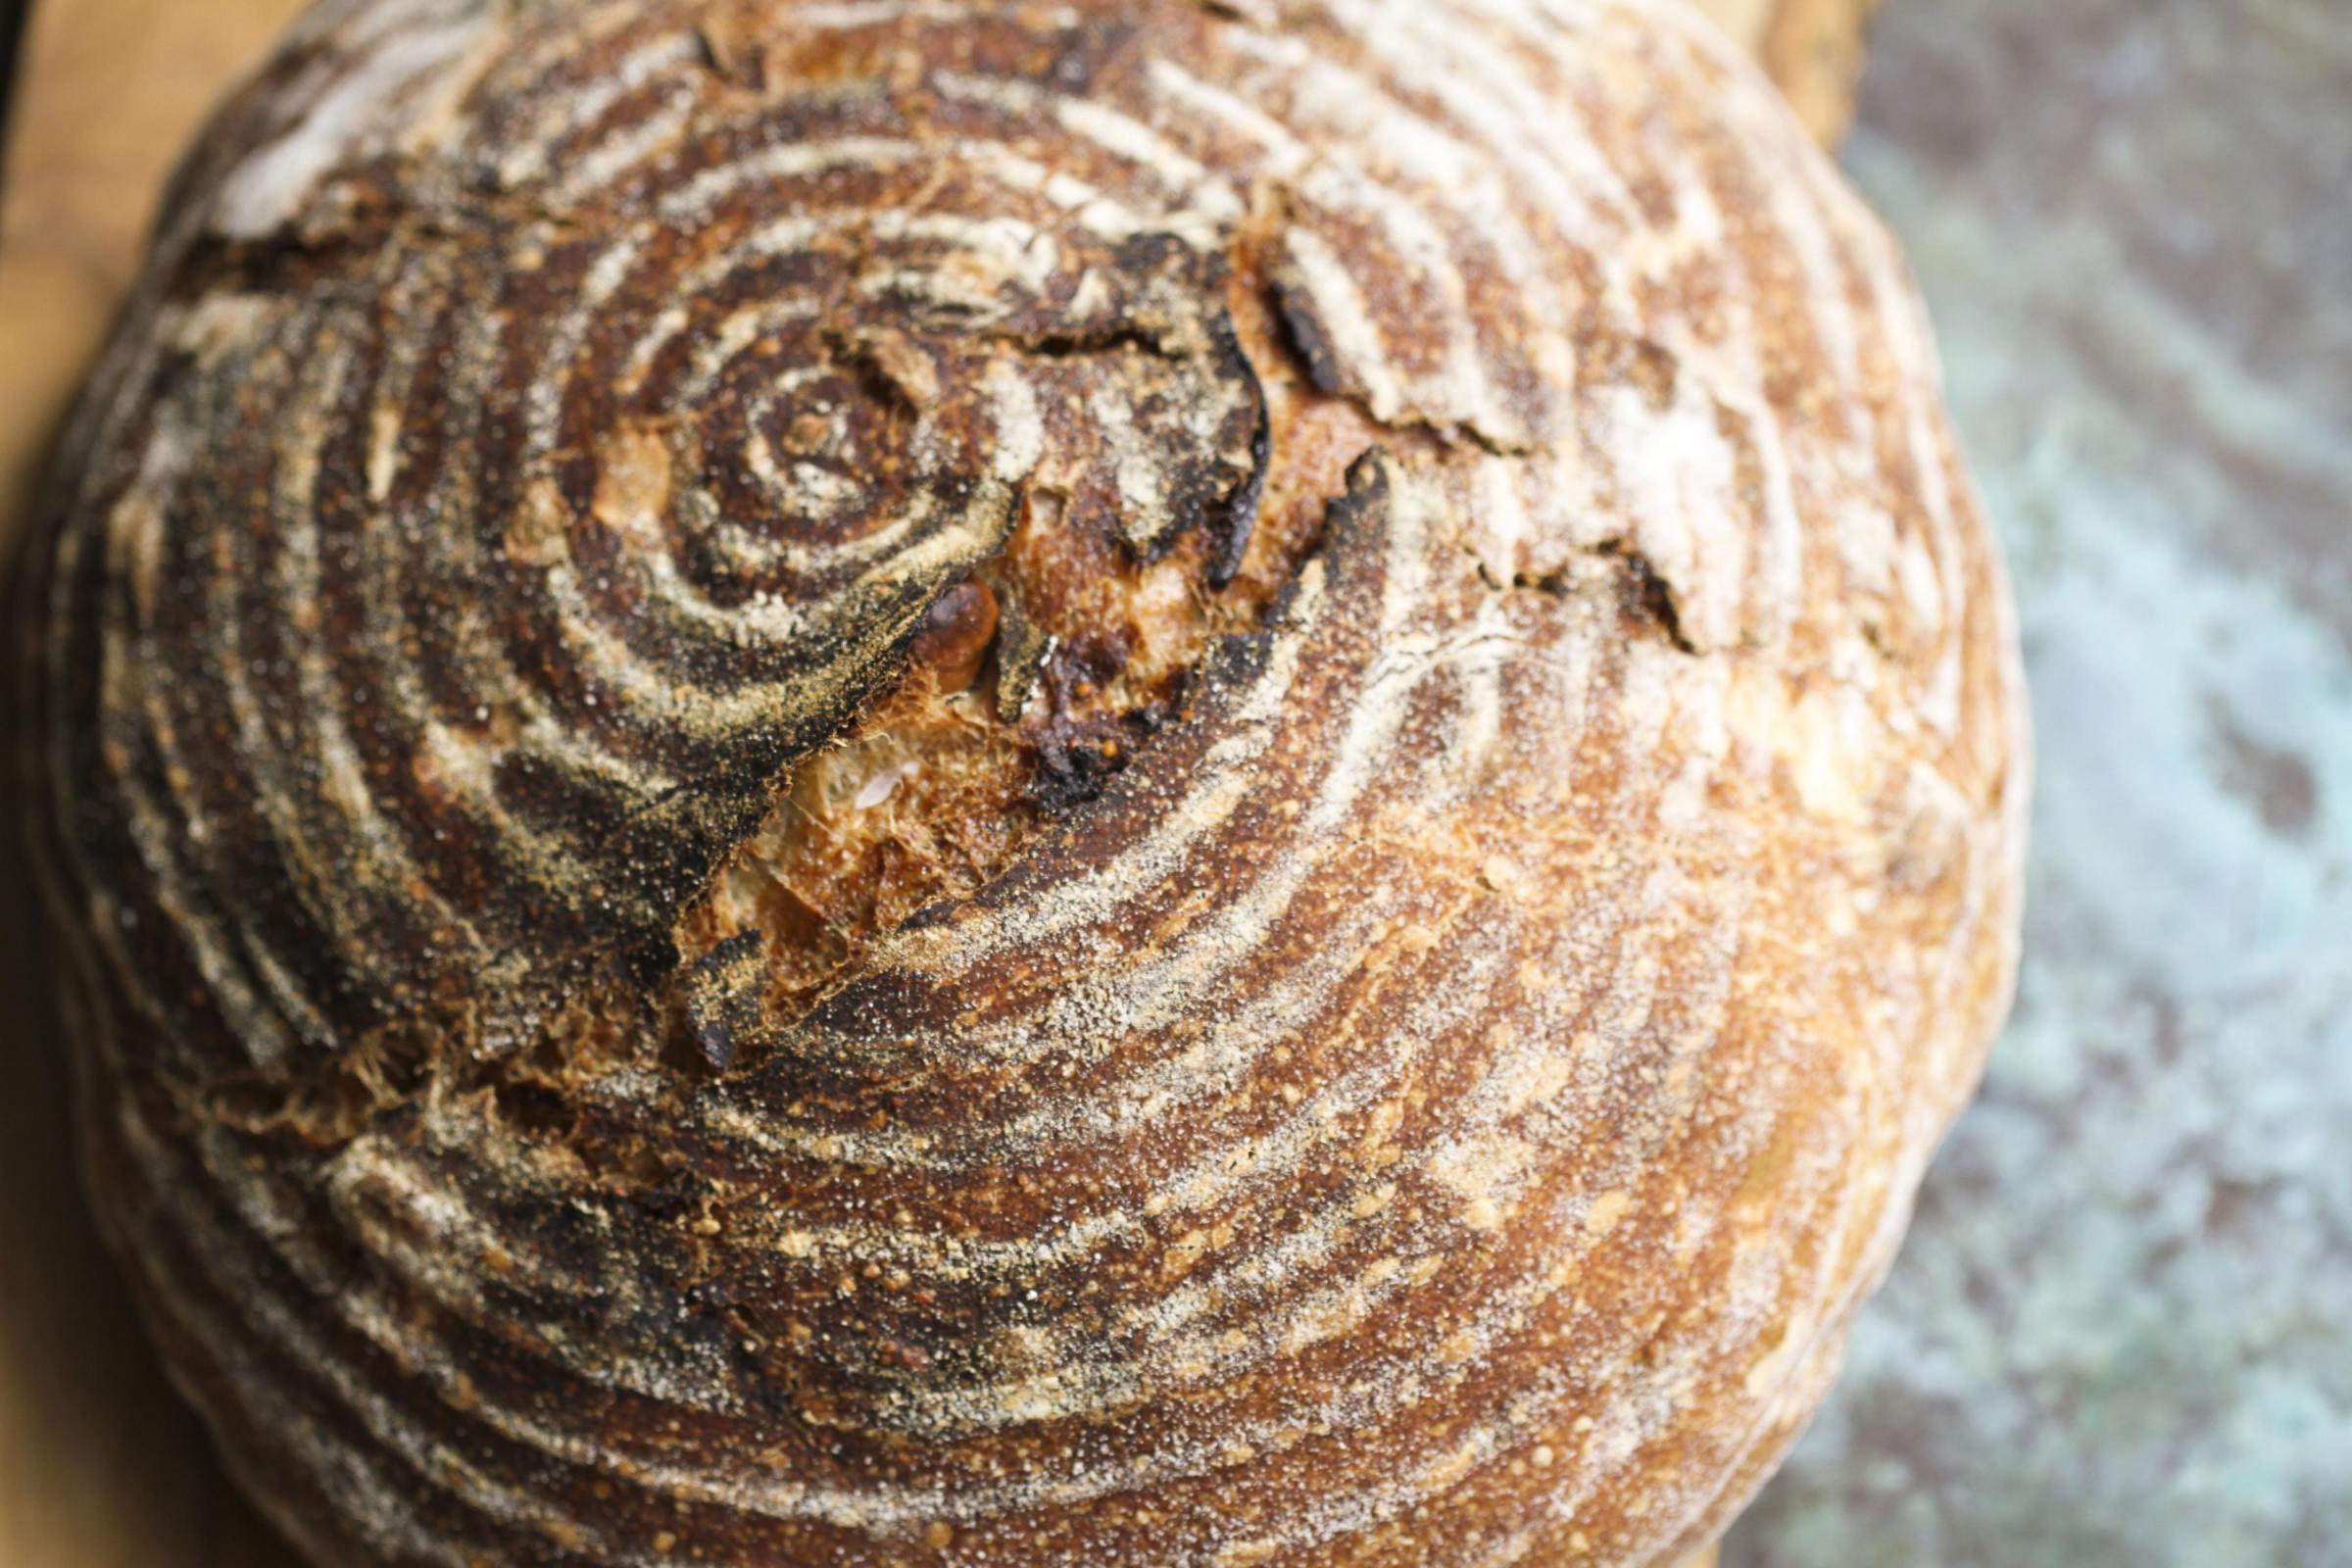
This bread contains 20% of buckwheat flour and 80% of strong bread flour (in my case it was Italian Costa d'Amalfi).


Hydration about 75% and cold retarded.

The procedure is as follows: slightly roast the buckwheat flour in a pan until starts smelling and then scald it with all water from the recipe, wait until it cools down and then add bread flour, salt and starter and mix by hand until all ingredients are well incorporated. After 30 minutes rest period use scoop & stretch method or French slaps and develop gluten and then perform stretch & folds every hour until you are through bulk fermentation. I shape it using stitching method and the cold retard and bake it as you bake any other sourdough bread.

You can add walnuts or pecans, what gives this  bread even more taste.

Happy baking!

Joze 

Abelbreadgallery's picture
Abelbreadgallery

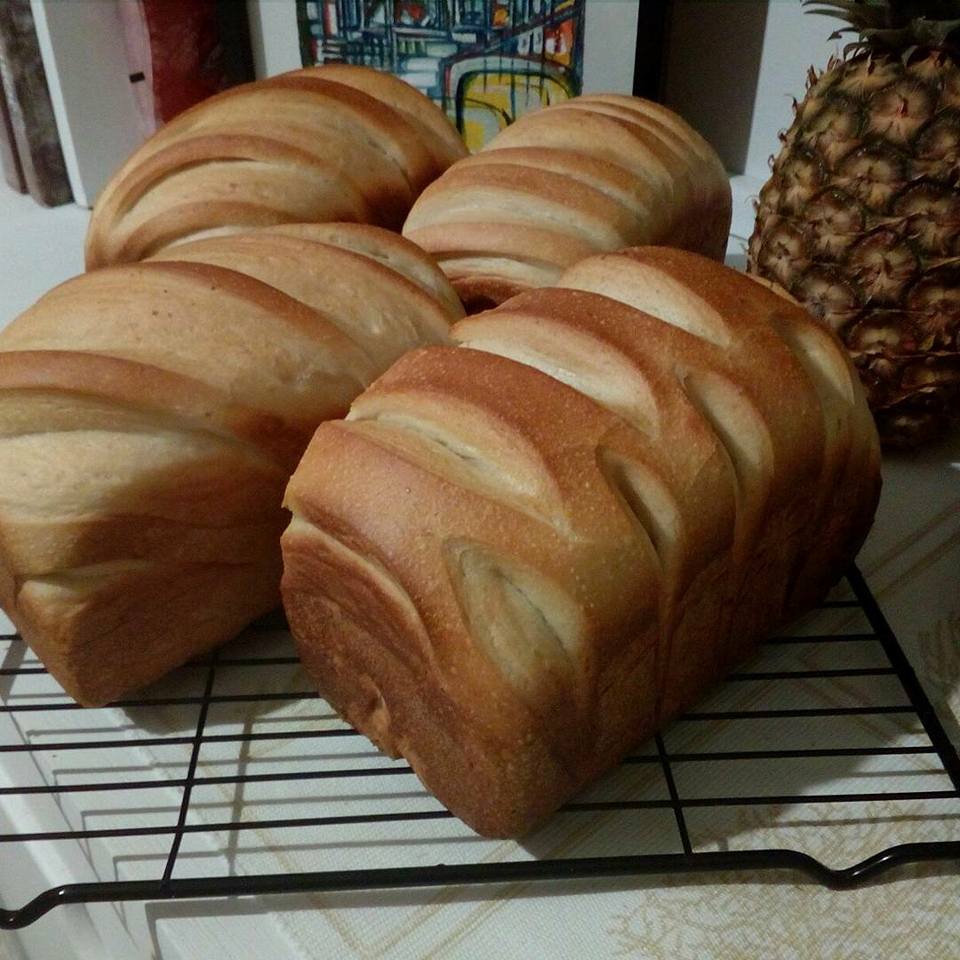
Pain viennoise

I like soft, tender and light bread, from time to time. This is one of the recipes I have learned last summer in Miami, working in the bakery of a friend of mine. This is based on a pain au lait or pain viennoise recipe.

This is 1 kilo of bread flour, 550 ml cold milk, 100 gr stoneground levain, 20 gr salt, 50 gr sugar, 100 gr butter and 20 to 35 gr fresh yeast, depends on how fast you wanna ride. The technique for this decoration is just scoring after shaping the loaf, just before putting the dough inside the tin. It's good to use a sharpen blade.

Enjoy!

Abel, Mexico.

Flour.ish.en's picture
Flour.ish.en

Fig Hazelnut Bread and Reheating

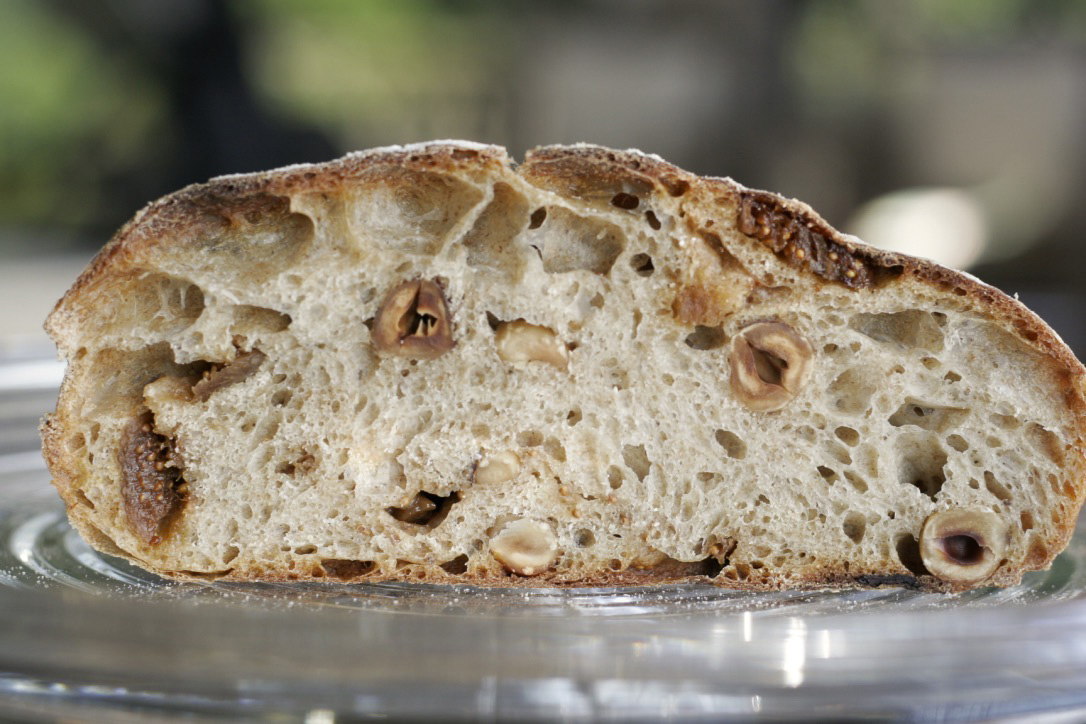
If you like the flavor of licorice in jelly beans or fennel in sausages, you may like ground anise in breads too. I have not used anise seeds before in breads. But, why not? This unique and warm spice enlivens the fig and hazelnut bread. For the start, the sweetness of dried figs and the smoky nutty notes of roasted hazelnuts bring big flavor to the bread. Just the right amount. The surprising finish of anise is merely the icing on the cake, I mean, the bread. There is just so much to like about this bread.

The specifics of the fig hazelnut bread are shown in the cheat sheet below. In summary, a 12-hour stiff levain build, 20% in whole wheat flour, about 70% hydration, one fold half way through the 2 ½-hour bulk ferment and a 2-hour final rise. This is a straight-forward formula I’ve borrowed and adapted from Bread by Jeffrey Hamelman.

I made two loaves, ate one and froze the second one (which I forgot to score late at night.) Once reheated, the second loaf develops an unexpected crunchy crust, even better than the freshly baked loaf (the slice standing up, right below) as I can remember. Hard to believe.

Here is the bread reheating setting which have worked well for me: full steam at 212°F for 7 minutes, then convection bake at 320°F with 20% humidity for 35 minutes. The timing may differ depending on the size of the bread. The bread usually goes directly from the freezer to the cold oven. In case you wonder, there are countertop convection steam ovens which are fairly affordable and priced competitively. They are not heavy duty enough for baking breads, but perfect for reheating.

What goes well with the fig hazelnut bread? A fig salad tossing together fresh figs, baby kale leaves, prosciutto and a simple dressing. On its face, I’m convinced that the sum is better than the parts, including the bread!

https://www.everopensauce.com/fig-and-hazelnut-levain-bread/


Pages