The Fresh Loaf

A Community of Amateur Bakers and Artisan Bread Enthusiasts.

Most bookmarked

Debra Wink's picture
Debra Wink

Flouring the Work Surface

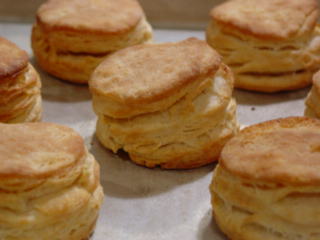
A couple weeks ago, I got the urge to bake some biscuits to go with the big pot of vegetable-beef stew I had simmering on the stove. I rarely make biscuits because we don't eat refined carbs most days. But once in a while, I just get a craving for old-fashioned comfort food. And, light biscuits are still on my list of things to master before I die. Both the fluffy kind, and the flaky kind. So now, I probably have you thinking this post is about biscuits, and it really isn't. I found this recipe for Flaky Buttermilk Buscuits in Cook's Illustrated (Jan/Feb 2006), and decided to give it a whirl. Not too bad, huh?

The biscuits were higher and flakier than I ever thought possible, but I screwed up a couple steps, and they were not quite as great as they could have been. I forgot to heed the warning to not open the oven door, which I did to rotate the pan halfway through baking. The biscuits immediately fell about half an inch--if you can believe it, they were actually taller than this! Then I didn't pull them out of the oven soon enough, and they turned out a bit too overdone. But what potential these have, so hopefully there will be another post about them in the future. When I've mastered them...

What today's entry's about, is the technique utilized in this recipe for flouring the counter. It worked so well for me, I thought I should share. Ordinarily, I just sprinkle or dust the flour over the surface, as evenly as I can, but sometimes I get a few "drops" that need smoothing out. And sweeping your hand over the top, really just wipes the flour away and it ends up too thin to keep wet or soft dough from sticking. The author, Sean Lawler has you first spray the counter lightly with non-stick spray, and spread the oil evenly with a cloth or paper towel. It really gives the flour something to adhere to, but the dough releases easily. It worked really well for laminating this sticky biscuit dough, and I think it would be great for rolling out pie pastry too. Try it.


dmsnyder's picture
dmsnyder

Susan from San Diego's "Ultimate Sourdough"


Last week, I baked Susan from San Diego's “Original Sourdough.” My description can be found at:

http://tfl.thefreshloaf.com/node/11321/susan-san-diego039s-quotoriginal-sourdoughquot

Susan also shared her formula for her “Ultimate Sourdough,” which has replaced the “Original Sourdough” as her personal favorite, I gather. The “Original Sourdough” was so good, it was hard to imagine a bread that would outdo it, and I was tempted to just make it again. But I thought the other deserved a try. So, this week, I baked Susan's “Ultimate Sourdough” - again, with some variations I will describe.

Susan's formula for her “Ultimate Sourdough” is described in her blog, here:

http://www.thefreshloaf.com/node/6927/well-i-finally-did-it

Susan's formula makes “one small boule.” I doubled the recipe. I wanted to make two boules, one to bake after overnight cold retardation, as I did with the “Original Sourdough.” I also added a bit more WW flour than Susan called for and used a different mixing and fermentation approach.


Ingredients


Active 65% hydration starter

24 gms

Water

350 gms

KAF White Whole Wheat Flour

75 gms

KAF Bread Flour

425 gms

Sea Salt

10 gms


Procedures

  1. I dissolved the starter in the water in a large bowl.

  2. Both flours were added to the water and mixed thoroughly.

  3. The bowl was covered tightly and the dough was allowed to rest (autolyse) for 60 minutes.

  4. The salt was then added and folded into the dough using a flexible dough scraper.

  5. After a 20 minutes rest, the dough was stretched and folded in the bowl for 20 strokes. This was repeated twice more at 20 minute intervals.

  6. The dough was then transferred to a lightly oiled 2 liter glass measuring “cup” with a tightly fitting plastic cover and allowed to ferment, undisturbed, until doubled. (10 hours, overnight).

  7. The next morning, the dough was very soft, puffy and full of bubbles. I divided it into two equal pieces, gently rounded them, and allowed them to rest for 10 minutes.

  8. The pieces were then formed into boules and placed in well-floured coiled reed brotforms, each of which was then placed in a food-grade plastic bag.

  9. At this point, one loaf was allowed to proof on the bench, and the other was placed in the refrigerator to retard until the next day.

  10. The first loaf was allowed to expand by about 75% (3 hours).

  11. The oven was preheated to 500F, with a baking stone in place for1 hour.

  12. The loaf was transferred to a peel dusted with semolina, transferred to the baking stone and covered with a stainless steel bowl preheated with hot tap water. The oven was turned down to 460F.

  13. After 15 minutes, the bowl was removed. The loaf was baked for another 10 minutes, then left in the turned-off oven with the door ajar for another 5 minutes to dry the crust.

The retarded loaf was baked the next day. It was allowed to proof in a warm (75F) place for 4 hours. It was baked covered for 12 minutes, then another 15 minutes uncovered. It rested in the turned off oven for 10 minutes.

Susan's Ultimate Sourdough (Not retarded)

Susan's Ultimate Sourdough (Not retarded) - Crumb

Susan's Ultimate Sourdough (Retarded)

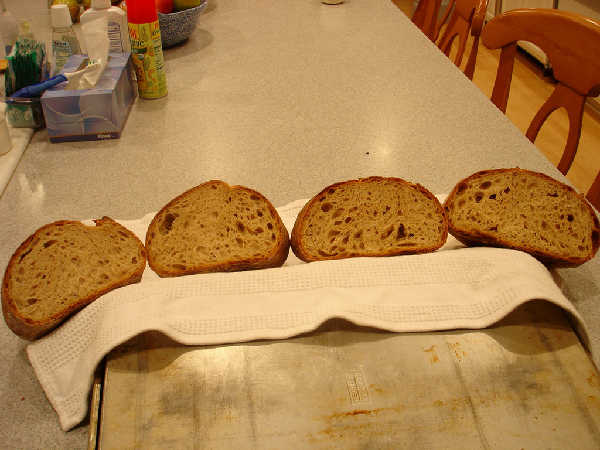
Susan's Ultimate Sourdough (Retarded) -Crumb

The boule that was baked without retardation was very similar in taste to the one I had made using Susan's “Original Soudough” formula. It had a nice flavor and was mildly sour. The sourness increased the next day, as expected. The crust was relatively thin but crunchy the first day and chewy the second day.

The boule that was retarded had a lot less oven spring. I think it was proofed more fully than the other had been. It was a bit more sour than the un-retarded loaf, as expected, but less sour than the “Original Sourdough” retarded loaf was. Tasted 5 hours after baking, the whole wheat flavor was coming through. I expect this to mellow out by tomorrow.

Bottom line: Both of Susan's sourdoughs are wonderful. I can't say I prefer one over the other after making each once. I expect I'll be making both regularly.

Thanks again, Susan!

David


pmccool's picture
pmccool

Sweet Vanilla Challah

I wanted to make a bread for a recent gathering of friends.  My preference was for something sweet but not a sticky, gooey kind of sweet.  After paging through a number of books, I came across a recipe in Beth Hensperger's The Bread Bible for a sweet vanilla challah that sounded like it would fit the bill.  The recipe called for just 1/2 cup of sugar in a two-loaf batch of bread, so it wasn't excessively sweet.  The flavor, though, was driven by 1-1/2 tablespoons of vanilla extract in the dough and another teaspoon of vanilla extract in the glaze.  How could it be anything but good?

The dough ingredients include:

1 tablespoon yeast (instant or active dry)

1/2 cup sugar

1 tablespoon salt

6-1/2 to 7 cups of flour

1-3/4 cups hot water (120 F)

4 large eggs at room temperature, lightly beaten

1/2 cup vegetable oil

1-1/2 tablespoons vanilla extract

The glaze ingredients include:

1 large egg yolk

1 teaspoon vanilla extract

1/2 teaspoon sugar

Process

Combine the yeast, sugar, salt and 2 cups of the flour; mix by hand or by mixer.

Add the hot water, eggs, oil, and vanilla.  Beat hard until smooth.  Add the remaining flour, 1/2 cup at a time.  Continue beating until the dough is too stiff to stir.

Turn out on a lightly floured surface and knead until soft and springy and a layer of blisters shows under the skin, about 4 minutes.  (Note: I did not see any blisters forming, but kneaded until the dough was smooth and elastic.)  The dough needs to be slightly firm for free-form loaves.

Place the dough in a greased deep container.  Turn the dough once to coat the top and cover with plastic wrap.  Let rise at room temperature until doubled in bulk, 1-1/2 to 2 hours.  (Even with room temperature at a relatively cool 65F in my kitchen, it did not need this much time to double.  I could see this doubling in less than an hour with warmer, summer-time temperatures.)

Grease or parchment-line 1 or 2 baking sheets.  (I went with 2 sheets, not wanting to risk the two loaves growing together while they baked.  It turned out to be a good choice.  Note that Ms. Hensperger also offers the option of using springform pans.)  Gently deflate the dough.  Turn the dough onto a lightly-floured surface.  Divide the dough in 2 equal portions.  Roll each portion out into a smooth, thick strip about 30 inches long, with one end 2-3 inches wider than the other.  (Picture a shorter, thicker billiard cue stick.)  Roll to to lengthen and taper the thinner end.  With the wide end on the work surface, lift the tapered end and wind the rest of the dough around the thick end 2 or 3 times, forming a compact coil.  Pinch the thin end to the body of the coil and tuck it under.  Place the coils, with the swirl pattern facing up, on the baking sheet(s).  Cover loosely with plastic wrap and allow to rise until nearly doubled in bulk, about 30-40 minutes.  Because of the eggs, this loaf does not need to double completely; it will rise enough in the oven.  (And how!  It sprang up to double or treble its original height.)

Twenty minutes before baking, preheat the oven to 350F.  To make the vanilla egg glaze, whisk together the egg yolk, vanilla and sugar in a small bowl.  Beat until well blended.  Gently brush the dough surfaces with a thick layer of the glaze.  Place the baking sheet(s) on a rack in the center of the oven and bake 40-45 minutes, or until a deep, golden brown and the loaves sound hollow when tapped with your finger.  Carefully lift the turbans off the baking sheet(s) with a spatula and transfer to cooling racks.  Cool completely before slicing.

The finished bread looks like this:

Now, any bread smells good when it's baking.  This bread's fragrance while baking is over the top; our whole house was perfumed with vanilla. 

The flavor is also marvelous.  The crumb is fine-textured, smooth and moist.  It's good all by itself, with a dab of butter, with jam or marmalade, and toasted.  It will never last long enough to go stale, but it would make a wonderful base for either French toast or bread pudding.

The results were every bit as good as I had anticipated and a big hit with my friends.

Paul

lisah's picture
lisah

Big Holes

Hi Everyone,

I've been baking bread for 20 years and I've yet to achieve what some of you seem to have done so well.  I can't seem to find a formula that will result in a very open crumb (i.e. big holes) and also a very nice brown artisan crust.

I have all the tools, and a La Cloche too if needed.  I have a stone in my oven.  I have a Kitchenaid mixer and dough hook.  I have a good old starter in my fridge.  I have King Arthur flour (several types) and instant yeast.  I also have many of the major bread cookbooks, but I don't know which of the formulas will yield what I'm after.  My water is well water and from what I can tell, is very good for baking and it tastes very good too.

Can anyone tell me how to make a nice artisan loaf in my home oven that will have big holes, a nice flavor, and a nice artisan crust?

Thanks so much.

holds99's picture
holds99

Dan Lepard's Cider Vinegar English Muffins

Dan Lepard has hit a home run with these English muffins.  They're what I imagine English muffins should be and, in my opinion, they're about as good as it gets.  Mr. Lepard posted a link to his recipe in The Guardian newspaper article, which I have inserted below the photo. 

I used an electric skillet to cook them.  No oil, just "dry-fry/bake".  Preheat the skillet, with the cover on to get it heated like a small oven, before placing the muffins into the skillet.  The lid goes on the skillet while they're cooking, which holds the heat nicely and allows them to steam a bit.  I followed his directions and they're very easy to make and, as I said, his recipe produces terrific muffins.  For those who like a nice sour bite, you'll really like these muffins.  The dough needs to be prepared the night before, as it has to stay in the regrigerator overnight. 

Mr. Lepard calls for 50 ml of cider vinegar in his recipe, which gives the muffins a nice crisp, slightly sour taste on the order of a sourdough.  For my taste the sourness was fine.  However, I think next time I will reduce the vinegar slightly to about 30 ml vinegar mixed with 20 ml water just to see the difference.   I took the liberty of adding/imbedding some conversion notes (without making any changes to the original recipe) i.e. ml to ounces and cm to inches, etc.  Hope it was alright to do that.  I [bracketed] my entries and italicized them so it would be clear as to what I added.  Mr. Lepard says they can be made either in rectangles or rounds.  I chose 4 inch rounds because that was the largest cutter I have.  Mr. Lepard calls for 12 cm diameters, which is close to 4 3/4 inches.  He make them large to compensate for shrinkage after cutting. As for the leftover dough, after cutting the rounds, I simply rolled it up, kneaded it a bit and rolled it out and made 2 more muffins, for a total of 9 muffins.   They're great toasted with the holes absorbing the butter and marmalade.

Dan Lepard's Cider Vinegar English Muffins

Dan Lepard's Cider Vinegar English Muffins

Cider vinegar muffins

What the Americans call an English muffin we used to call, well, a muffin. But since those little cakes in paper cases have invaded the supermarket shelves and stolen the name, our own little plain bread muffin has become neglected in Britain. In the US, bakers have raised the quality of their English muffins to something close to perfection. Crisp on the outside, sour and holey inside, and chewy when toasted and slathered with butter. Make these and you'll see what we've been missing all these years. In this recipe, the dough gets mixed and lightly kneaded the night before and is left in the refrigerator overnight to rise slowly. You can even leave it until the following evening if that works better for you.

Makes 8-10 muffins

50g unsalted butter

100ml warm water (by weight: approximately 4 oz. or 116 g.)

50ml cider vinegar [by weight: approximately 2 oz. Or 58g.]

100ml plain live yoghurt [slightly less than ½ cup]

1 large egg

1 level tsp salt

375g strong white flour

2 tsp easy-blend yeast [I used instant yeast and it worked fine]

Oil for the bowl

The night before, melt the butter in a saucepan [use stainless steel with the vinegar], then remove from the heat and beat in the warm water with the vinegar, yoghurt, egg and salt until smooth. Measure the flour and yeast into a bowl, tip [pour] in the butter and vinegar mixture and stir to a thick batter. Cover the bowl and leave for 10 minutes. Lightly oil the work surface and knead the dough gently for 10-15 seconds (see Basic techniques). Scrape the bowl clean of scraps of dough, wipe the inside with a little oil, place the dough back in the bowl, cover with a plate or cling film and place in the refrigerator overnight.

The following morning (or evening), lightly oil a dinner tray and upturn the dough on to it. Stretch and fold the dough in by thirds (see Basic techniques), then cover with a tea towel and leave to rest for 1-2 hours until it warms and begins to rise again. [It takes a full 2 hours at 75 deg. F.]

Line a dinner tray with a tea towel and dredge the surface liberally with flour. Gently roll out the dough [on a work surface] about 1½ cm [approximately 5/8 inch] thick, trying not to knock too much of the gas from it. Cut the dough into discs using a 12cm-diameter [approximately 4 ¾ inches] cutter (yes, that large, as they'll pull inwards as they bake), or take a sharp knife and cut the dough into 6 rectangles or something close to that. Carefully lay the cut dough on the floured cloth. Dust the tops with flour and cover with a tea towel. Leave for 1½-2 hours [they’ll take the full 2 hours at 75 deg. F.] or until doubled in height.

Get a large heavy-bottomed frying pan with a snug-fitting lid if possible. Place on a moderate heat until the surface is hot but not scorching.

Uncover the muffins and flip them one by one on to your hand with the cloth, then slide them into the pan. You should be able to fit 3 or 4 in at a time. Cover the pan with the lid to create a bit of steam to help them rise and cook for 2-3 minutes.  Then check to see that they're not burning. If the bottom is a good brown, flip them over using a spatula. Cook on the other side for about 3-4 minutes. [I used an electric skillet with a lid, set at 340 deg. F. cooking them in a dry pan for 6 minutes on side 1 and 4 minutes on side 2 until they reached an internal temperature of 190 deg. F.] When done, remove to a wire rack, drape a tea towel over to keep them soft, and continue with the remaining muffins. Freeze in a zip-lock bag as soon as they're cold.

Variation

Crispy bacon muffins

Add 250g smoked streaky bacon, cooked until crisp and chopped finely, in with the flour, then continue with the recipe above.


dmsnyder's picture
dmsnyder

More baguettes - best crumb yet (for me).

Anis Bouabsa baguettes with Sourdoug

Anis Bouabsa baguettes with Sourdough

Anis Bouabsa baguettes with Sourdough Crumb

Anis Bouabsa baguettes with Sourdough Crumb 

KAF French Style Flour........500 gms

Water..............................370 gms

Starter.............................100 gms

Salt..................................10 gms

Instant yeast.......................1/4 tsp


I activated my starter and let it ferment for only about 4 hours. It did double but was not at its peak. While the starter was noshing, I mixed the flour and water and let it autolyse for about 40 minutes. Then I added the starter, yeast and salt and mixed well in a bowl.

I used Pat's (proth5) method of mixing: In the bowl, stretch and fold using a plastic dough scraper 20 times, rotating the bowl 1/5 turn between each stroke. Repeat this every 20 minutes for an hour. At the end of that time, I had the best window pane I've every achieved. This is a great technique for somewhat slack doughs!

I then moved the dough to a 2 liter glass measuring pitcher with a tight fitting cover and refrigerated for 20 hours.

 The dough was then emptied onto a large wooden cutting board, well dusted with flour and divided into 3 sort of equal parts. It was less slack than my last batch and easier to shape. I gently preshaped into rounds and rested the pieces, covered with plastic wrap and a towel for 20 minutes. I then shaped into baguettes very, very gently so as to minimize bubble popping. The loaves were proofed for 1 hour on a parchment paper "couche."

 I had preheated the oven to 500F. I scored the baguettes. After loading the loaves onto my pizza stone and pouring hot water in a heated skillet, the oven was turned down to 460F on convection bake. After 10 minutes, I removed the skillet and turned the oven up to 480F, regular bake. I baked the baguettes for 25 minutes total. 


The loaves "sang" louder and longer than any I've baked. The crust was nice and crunchy. The crumb was the most open I've yet achieved in baguettes. I attribute this in large part to my shaping the baguettes more gently then ever before. I credit Janedo for the inspiration (as well as for the recipe).

I still need to work on scoring baguettes. *sigh*


David 

dmsnyder's picture
dmsnyder

Reinhart's San Francisco Sourdough from "Crust & Crumb" with some new variations

San Francisco Sourdough variation Boule

San Francisco Sourdough variation Boule

SF-SD-Variations-Boule Crumb

SF-SD-Variations-Boule Crumb

San Francisco Sourdough variation Batard

San Francisco Sourdough variation Batard

San Francisco Sourdough variation Batard Crumb

San Francisco Sourdough variation Batard Crumb

San Francisco Sourdough: Variations on a theme

The formula for San Francisco Sourdough Bread in Peter Reinhart's "Crust & Crumb" has been my favorite recipe for my favorite bread for some time. I have varied the formula, using different starters and various mixes of white wheat, whole wheat and rye.

All of the breads have been good. I can say that my favorite loaves have been made with bread flour with a small amount (10-12%) of rye flour.

I have not varied the techniques for mixing or proofing in Reinhart's instructions to date, and, with a single exception, I have always baked this bread as boules. Reinhart's instructions indicate that this bread can be formed as boules, batards or even baguettes.

This time, I decided to try some new variations in ingredients, procedures and loaf shape. The dough was mixed in a Bosch Universal Plus.

Starter Feeding

1 part mother starter

3 parts water

4 parts flour (70% AP flour, 20% whole wheat and 10% rye)

Intermediate firm starter

3 oz starter (formula above)

9 oz water

13 oz First Clear Flour

Dough

All of the intermediate firm starter

2 cups of water

23.50 oz King Arthur European Artisan Flour

3.5 oz Guisto's Organic Whole Rye

0.25 oz Diastatic Malt powder

0.75 oz salt

Procedure

Day 1 - Make the intermediate starter

Mix the Intermediate firm starter. Ferment tightly covered for 9 hours (overnight) at room temperature, then refrigerate for 10 hours.

Day 2 - Mix, Bulk Ferment, Divide and Scale, Shape and Retard

Take the starter out of the refrigerator 1 hour before use.

Mix the water, the diastatic malt and the flours until it forms a shaggy mass. Cover and autolyse (let the flours absorb the water and the gluten start to develop) for 20 minutes.

Add the firm starter cut into 10 pieces to the dough and mix at Speed 1, adding the salt while mixing. Continue to mix at Speed 2 until the gluten is well developed and a window pane can be formed. (7 minutes).

Empty the dough onto the bench and fold the dough into a ball. Place the dough in a lightly oiled bowl, at least twice its size. Roll the dough ball around to coat with oil, cover the bowl tightly, and allow the dough to ferment for at least 4 hours. (If rising too quickly, do a fold to de-gas the dough, but plan on leaving the dough alone for the last two hours, at least.)

Gently transfer the dough to the bench. Scale and divide the dough as wished, according to the type and size of the loaves you want to bake. (The total weight of the dough is around 4-1/2 pounds.)

Let the dough rest, covered with plastic wrap, for 10 minutes, then form loaves. These can be place in bannetons or on parchment or canvas "couches." In either case, cover the loaves air tight and refrigerate overnight.

Day 3 - Proof and Bake (two methods)

Take the loaves out of the refrigerator and allow to warm up and rise for 3-4 hours until expanded to 1-1/2 times their original volume.

Baking method 1

One hour before baking, pre-heat the oven with a baking stone and cast iron skillet in it to 475F.

Slash the loaves as desired, spritz with water and transfer the loaves to the baking stone.

Immediately pour 1 cup of boiling water into the skillet and close the oven door. If desired, spritz the oven walls with water 2-3 times spaced over the first 5 minutes of the bake. After 5 minutes, carefully remove the skillet from the oven, empty any remaining water and dry it. Put it somewhere to cool. After the last spritzing, turn the oven temperature down to 450F.

Baking method 2

Alternatively, set the oven to 450F.

Slash the loaves as desired, transfer them to the stone and bake the loaves covered with a bowl or a roaster for 15-20 minutes. Then remove the cover.

Continue baking until the loaves are nicely colored and their internal temperature is at least 205F. The loaves will be done in 30-40 minutes total time, depending on their size and shape. Then, turn off the oven but leave the loaves on the stone for another 5-10 minutes to dry the crust. Allow the loaves to fully cool (1-2 hours) before slicing.

Comments:

With this particular combination of flours and the procedure as described, the dough was quite sticky at the end of mixing. After a couple of foldings, it was extremely elastic, and I wondered if I had mixed it more than I should have. However, after bulk fermentation and dividing, the dough was quite relaxed and remarkably extensible. It was not at all sticky at this point. This has been characteristic of doughs made with KA European Artisan Flour, in my experience.

The batard pictured above was baked uncovered with steam from water poured into a hot skillet. The boule was baked under a stainless steel bowl without additional steam. Although the boule was baked about 45 minutes after the batard, the latter rose more quickly on parchment and acted as if over-proofed. The boule rose more slowly in a banneton. It did not seem over-proofed, and it had much better oven spring and bloom. The batard had a more open crumb. My hunch is that how I shaped the boule (too tight) was the major determinant of the differences in proofing time and crumb openness. (Other analyses would be welcome.)

Eating (Batard)

The crust is crunchy but not at all tough. The crumb is tender with a delicious complex pain de compagne-type flavor, except with more assertive sourness.

David

bwraith's picture
bwraith

Comparing Sourdough Fermentation Strategies

I thought it would be interesting to compare four different approaches to sourdough fermentation. I've baked four test loaves, each with 500 grams total flour (using a 50/50 blend of Heartland Mill Strong Bread Flour and Heartland Mill Golden Buffalo for a blended ash content around .85%), 72% overall hydration, and 2% salt. All loaves started with 18 grams 80% hydration white flour storage starter.

The difference in the loaves is in the fermentation method. In one loaf a direct inoculation of storage starter in the final dough (one-step method) was used. In the others a sourdough preferment was built and fermented for different amounts of time. The final loaf includes a spike of instant yeast.

Fermentation Methods Used

  1. Build final dough including 18 grams of starter, bulk ferment for 11.75 hours, final proof for 3 hours all at about 70F. (xls and html spreadsheets)
  2. Build a sourdough preferment constituting 35% of total flour and ferment until just doubled, about 8 hours at 70F. Soak remaining final dough ingredients overnight in the refrigerator. Mix preferment and soaker and bulk ferment for 3.75 hours at 70F then final proof for 4 hours at 70F. (xls and html spreadsheets)
  3. Build sourdough preferment same as in step 2 and ferment for 4 additional hours after it has doubled, about 12 hours at 70F. Proceed same as in step 2. (xls and html spreadsheets)
  4. Build sourdough preferment same as in step 3. Add 1/4 tsp yeast to soaker. Proceed same as in step 3. (xls and html spreadsheets)

The idea is to compare a long fermentation from an initial very small amount of starter to using a sourdough preferment that is immature (just doubled) or more mature (peaked). Finally, in the last one, the idea is to add in a spike of yeast to improve the rise in the case where a large, mature (35% of total flour and fermented until peaked) preferment is used.

In all cases, the final dough was shaped into a loaf when it had a little less than doubled during bulk fermentation.

Photos of the crust and the crumb from left to right:

Test Fermentations 1-4 From Left to Right - Crust

Test Fermentations 1-4 From Left to Right - Crumb

Comparison

Crust

I couldn't tell any real difference in the crusts. It's possible the first one was a touch darker than #2 even though both were baked at the same time. Maybe there was a little more enzyme action in it since the entire dough was hydrated at room temperature for about 14 hours.

Crumb

Although they are more similar than different, the crumb was slightly lighter going from 1-4.

For loaf #1, this may again be a function of the enzyme action, which may have in some way hindered the gluten development. Another explanation might be that I needed to fold #1 one or two more times earlier to improve the gluten development over the longer fermentation, as it did seem a little too relaxed at shaping time, relative to the other loaves.

For loaves 2-4, the more mature preferments did not hurt the gluten in this case. I believe the very strong flours contributed to the better results with the more mature preferments. The more mature preferments probably had a larger organism count than the preferment for loaf #2, as they weren't at the collapsing stage yet. So, with higher organism counts, higher fermentation byproducts, but very sourdough tolerant flour, the more mature preferments ended up with slightly larger loaves in the end.

The oven spring went in opposite order to the loaf volume, not surprisingly, which explains why the result after baking is not as different, but the overall loaf volume before baking was significantly larger for loaf #3 than loaves #1 or #2. In the case of loaf #4, the yeast clearly had a big effect on gas production before shaping. I did deflate it a little during shaping, of course. It again was significantly larger pre-bake than loaf #4, but after baking it was only a little bit larger. In summary, the loaf volume before baking increased significantly from loaf 1-4, but the oven spring, which was greater in 1 and much less in 4, offset much of the difference. Nonetheless loaf #4 had a noticeably lighter feeling in the mouth.

Flavor

All of the loaves were fairly mild in flavor. However, without a doubt, loaves #3 and #4 were more sour than loaves #1 and #2. Everyone who I had test the loaves was able to discern the more sour flavors in #3 and #4. There was some debate about the order of #1 versus #2 and #3 versus #4. My youngest son, William, noted a sweetness he seemed to like in loaf #1. I believe he may be detecting, once again, some effect of the enzyme action that was probably greater in that loaf, which soaked for so long at room temperature, and may have resulted in more starch broken down into sugars. My oldest son thought #2 was more sour than #1, which may be correct, given that it had a slightly longer total fermentation time. My son's girlfriend felt the order was 1,2,3,4 from least to most sour, but others had no opinion on #3 versus #4.

Comments

I believe the following are true, all other things, particularly the temperature and amount of enzyme action in the process, being equal.

The difference between #1 and #2 is minimal. You can do a one-step or two-step process timed for convenient stopping points, and the results will be nearly alike, provided that the preferment is not allowed to get very ripe. A two-step process where the preferment is allowed to ripen significantly more will have a more sour flavor.

The least sour result comes from a one-step process run from a very small initial amount of starter.

At some point, I would like to test out effect of temperature in a side by side comparison. I believe if you adjust the fermentation times so that the relative ripeness of the preferments is similar to the loaves above, that the results may not be very different from above. I suspect the slight favoring of lactobacillus versus yeast at temperatures around 65F will have a smaller effect on flavor than overall relative ripeness of preferments and final dough, but I don't know if that test will get done at my house any time soon.

zolablue's picture
zolablue

Concord Grape Focaccia


Fall is in the air and beautiful blue-violet grapes are in the market and I could not resist the cartons of gorgeous, sweet scented concord grapes.  What better to do with them than to bake a grape focaccia.


The only other focaccia I’ve baked so far is Bill W’s wonderful sourdough raisin focaccia which I highly recommend.  I wanted to do a sourdough version of this one but being a bit inexperienced in this area I was unsure of how the sugar and oil may impact the sourdough so for this first grape focaccia I decided to use a small amount of starter and treat it more as an added ingredient for extra flavor.  (Me too chicken…?)  I also wanted to use some spelt flour and turbinado sugar so here is the recipe.


Concord Grape Focaccia


255g Concord grapes, seeded

310g water

76g liquid levain

300g bread flour
150g spelt flour
8g instant yeast
4g salt

1 tablespoon honey
2 – 3 tablespoons extra virgin olive oil
2 tablespoons turbinado sugar

1 tablespoon sanding sugar


Add sourdough starter to the water and dissolve.  In a mixing bowl, add the flour, instant yeast, honey, salt, and water (with starter mixed in).   Mix on medium speed for about 10 minutes.  Place in container and let rise until double.

Turn dough onto lightly floured counter and press into a round a little bigger than the oven form you will be using for baking.   I used a 9” x 2" round cake pan.  Pour 1 - 2 tablespoons of olive oil into the pan and swirl around to cover the sides.  Dump any excess oil onto the top of the dough in the center and spread to cover.  Pick up the dough quickly and place it over the baking pan allowing some of the dough to overflow the sides.  You will use this to flap over the grapes inside.

Place roughly 2/3 of the grapes into the form and press slightly into the dough.  Gather the edges of dough hanging over the pan and bring them together over the top of the grapes and slightly pinch together pressing down on the dough in the pan to make sure it is against all the sides.


Add the remaining grapes over the top slightly pressing them into the dough.  Drizzle about 2 tablespoons extra virgin olive oil over the top.  Then sprinkle 2 tablespoons of turbinado sugar followed by 1 tablespoon of sanding sugar over the top of that. 


Preheat the oven to 400°F while the dough begins to rise again – about a half hour.  The dough had reached the top of the cake pan. 


Bake for 20 – 25 minutes until golden brown on top. 


Remove from oven and take focaccia out of pan to cool on rack.  Cut into wedges and serve.


This was as if I’d filled it with grape jelly and it smelled amazing.  The dough was very soft and I suppose that was due to the sourdough starter I added.  I’m not sure if the spelt had anything to do with that as I’ve only baked with spelt a few times adding it to other sourdough loaves.  It was really gooey and delicious.


I am going to make this again later in the week but try and press the dough out flatter and bake on a stone so the bottom gets nice and browned as well.  I also think I’ll add more spelt and reduce the bread flour just to see how that tastes.  This was almost like a cake bread, very spongy and soft and moist.  Not too sweet either even with the sugars sprinkled on top. I think for the size and shape I baked the amount of grapes was perfect although I think if I flatten it into a larger shape I will increase the amount of grapes used just to make sure it covers the dough adequately.  Ugh, they’re so much fun to seed…not.  But it is well worth the effort. 


This was really fun and I don’t know how I can improve on the flavor of it but we’ll see. I think it will be a fun recipe to experiment with.  I’ll post more results here as I tweak and see what works best because the concord grapes won’t be here forever.


http://zolablue.smugmug.com/gallery/3648690#208178433

   
Kjknits's picture
Kjknits

Soft, white-ish sandwich bread

There was a request recently for soft sandwich bread, and I actually have been baking my own soft sandwich bread for several years now. It began as a recipe from my MIL, but I have made some changes to suit our family better. It's a white bread, but there is a pretty hefty amount of wheat bran in the dough, which gives it a pretty appearance and also boosts the fiber content.  Anyway, here it is. If you try it, I'd love to hear how it went for you.

Katie's Sandwich Bread

Makes two 1.5 pound loaves

2 C water
1/4 C butter
2 TBSP sugar
1 package active dry yeast, or 2-1/4 tsp active dry yeast, or 2 tsp instant yeast
1/2 C wheat bran
2 tsp kosher salt
about 6 C bread flour

Warm water and butter in a glass bowl or measuring cup in the microwave until just warmed.  The butter doesn't have to be completely melted--it will mix just fine into the dough later on. (My microwave warms the water and butter just enough in 1 minute and 10 seconds on high power. You can also do this in a pan on the stove, if you don't have a microwave.) Place yeast in bowl of stand mixer with 3 cups of flour, wheat bran, sugar, water/butter mixture, and the salt. (See note.) Combine thoroughly with the dough hook. Begin adding remaining flour in 1/2 C increments until a cohesive dough forms. Knead for 5-6 minutes with your stand mixer using the dough hook (mine kneads in this time at speed 2). The dough is fully kneaded when it passes the windowpane test.  Round dough out, then place in a lightly oiled bowl. Cover with oiled plastic wrap and let rise in a warm place until doubled, about 1 hour and 30 minutes.  I place my bowl in the oven with the light on.

When dough has doubled, punch down dough, divide in half, and form into loaves. I just flatten each piece of dough out to a rectangle, then roll it up, being sure to seal it tightly while rolling to increase the surface tension on the final loaf.  Pinch the seal, turn under the ends, and place loaves in greased pans (I use 9 x 5 heavy metal pans).  Cover (I use the same oiled plastic wrap from the first rise) to rise for another 35 minutes. Bake at 375 for about 27 minutes, or until browned and hollow-sounding when thumped.

Note:  when using active dry yeast, I put it in the mixing bowl with the water/butter and sugar and let it proof for a few minutes, till it gets foamy.  When using instant yeast, I just mix it in with the first addition of dry ingredients and then go on from there.

I have found that greasing my loaf pans with Crisco (I know, but what can I say, it works) provides the best release after baking.  Also, I use a Misto olive oil sprayer to oil the bowls and plastic wrap.

Here are the two batches of bread I baked today:

sandwich1

sandwich3


sand2

For some reason these loaves rose a little higher than usual.  The highest one was 5.5 inches!  I don't know what causes the "blowouts" on the sides of the loaves, but I don't mind them.  The bread is mildly-flavored, soft, and moist.  Only caveat is that it stales quickly, so I slice and freeze the loaves on the same day I bake them.  Then we just pull off slices as needed.

Enjoy, Katie in SC 

Pages