The Fresh Loaf

A Community of Amateur Bakers and Artisan Bread Enthusiasts.

Recent Blog Entries

Benito's picture
Benito

I love baking challah breads so whenever we host a brunch recently it has given me an excuse to bake another challah in order to make a strata.  Strata for those unfamiliar with it is essentially a way of making French toast for the masses and somewhat like a bread pudding.  It is best that the challah is a couple of days old and a bit firm.  In fact, to have a firmer challah I particularly like using 50% WW for the challah used to make a strata.  The formula for my most recent challah I used for this strata is here.


 12 cups challah cubes

 225 g cream cheese, cubed

 2 cups frozen fruit

8 large eggs

1 tsp (5 mL) vanilla

1/4 tsp (I mL) salt

3 cups homogenized milk

80 mL maple syrup

2 tbsp granulated sugar

1/2 tsp  cinnamon

1.  Place bread cubes in a large bowl.

2. Whisk eggs in a medium bowl.  Then add vanilla, salt, milk and maple syrup and mix.  Next pour the liquid mixture over the cubed bread and fold them in so that every cube gets soaked with the egg mixture.

3. Grease a large heat proof pan.  Spread half of the soaked challah cubes over the pan.  Sprinkle cream cheese chunks and half the fruit of the challah.  Then spread the remaining half of the soaked challah cubes over the pan. finally spread the other half of the fruit over the challah cubes.

4. Combine sugar and cinnamon; sprinkle over top. Cover with foil and refrigerate overnight.

5. Remove from refrigerator and let stand 30 minutes.

5. Preheat oven to 350 F (175 C).  TOTAL BAKE TIME 60-65 mins.  Bake, covered, for 30 minutes. Uncover and continue baking for 25-30 minutes or until a knife inserted in centre comes out clean. Let stand for 5 minutes before serving.

CalBeachBaker's picture
CalBeachBaker

Rye January continues

Today's bake: Ginger-Plum Bread   Zwetschgen-Ingwer Brot (Germany)

The Rye Baker by Stanley Ginsberg

This bread is made from a majority of  Organic Rye-80% Extract (~medium rye flour), some Organic Heirloom Turkey Red Wheat-Cracked and a bit of whole rye which is in the culture.

There are in addition some prunes (Dried/Pitted), grated ginger, and chopped almonds as add-ins that provide a nice flavor and texture to this bread.

I'm using a large pullman pan (15-3/4" x 4" x 4").

This is my 1st attempt making this bread.

Changes/Recommendations - When I make this bread again I will use dehydrated prunes, the ones I used were to soft and broke down a little bit when I was mixing. Also I'll reduce the amount of rye flour by 30% in the toppings.  I had an excess after rolling the loaf in the toppings and added it on the top after placing the dough in the pan which was to much.


Tasting Notes

Crumb - Sour/Dairy with notes of plain yogurt, a blend of the prune and ginger make for nice tangy/fresh fruit notes.

Crust - Roasted - tasting of a dark deer and almond.

Grain Character - Moderate - like cooked oatmeal.

Day 1 flavor was nice but a little muted, day 2 the flavors really had time to mature and became more pronounced. This is a really nice bread which I will be making again.

Recipe and Process are below for those that are interested.


MTloaf's picture
MTloaf

I have been switching my limited repertoire of breads over to the "Don't be a bread hostage" way of doing it from the King Arthur website. It has certainly simplified bread making for me and I really like how this recipe makes a more manageable high hydration bread to work with and produces a very soft and fluffy crumb.This is the Trevor Wilson recipe for cranberry spelt bread that I made a few changes to approximate a compromise of both recipes.

  • 800 grams Total flour 85% King Arthur BF 15% home milled spelt
  • 640 ml water (80%)
  • 18 grams sea salt
  • 180 grams dried cranberries (soaked)
  • 65 grams salted pumpkin seeds
  • 32 grams starter (a couple days old from fridge that was stirred again and warmed up until it was rising again)

Mix everything together but wait until the first fold to add the cranberries and seeds. I did two compass folds around the bowl and then two coil folds 20 minutes apart then bulk ferment until doubled about 12 hours. Divide, shape and proof partially on the counter before retarding in the fridge for 12 hours before baking.

The container I mixed in and the baskets they were proofed in. They baked up extra dark from the dried fruit but that is also recommended for higher hydration bread.

cranberry

I have made this recipe countless times with the former way of doing it including using a mixer but the crumb has never been this soft when using KABF before. When toasted and slathered with Nutella it's like having a slightly healthier pastry with my morning coffee.

A guess as to why this is making better bread for me is that the long slow bulk ferment is giving it more time for the gluten and the flavor to develop. I haven't found a reason for going back to the standard way of making bread. I thought I was going miss the more hands on process of making bread but now I have more time to make other things like this.

Don 

purple and partridge soft hackle

Benito's picture
Benito

I have a big birthday for my partner to plan.  So part of that is to bake one of his favourite cakes, carrot cake.  You will notice that baking cakes isn’t something I do very often, in fact I probably bake fewer than one per year.  So I thought it would be prudent to do a test bake and ensure that the recipe I’m doing tastes good and that I can turn out a decent cake.  I hope to make this a three layer cake and decorate it better, although my decorating skills aren’t that great.

I found a recipe a while bake called a tropical carrot cake in Southern Living magazine.  The addition of bananas, coconut and pineapple (which isn’t that unusual) I guess are what make it tropical.  

Ingredients


CAKE

  • 3 cups all-purpose flour 
  • 2 cups sugar 
  • 1 1/2 teaspoons kosher salt 
  • 1 teaspoon baking soda 
  • 2 teaspoons ground cinnamon 
  • 1/2 teaspoon ground ginger 
  • 1/2 teaspoon ground cardamom 
  • 1/4 teaspoon ground nutmeg 
  • 3 large eggs 
  • 1 1/2 cups vegetable oil 
  • 1 1/2 teaspoons vanilla extract 
  • 1 (8-oz.) can crushed pineapple in juice, undrained about half a 540 mL can. 
  • 2 cups chopped ripe banana (might be 2-3 bananas)
  • 1 cup shredded carrot, pressed dry 
  • 1 cup sweetened coconut, plus more for garnish 
  • 1/2 cup chopped pecans, plus more for garnish


CREAM CHEESE FROSTING

  • 1 (8-oz.) package cream cheese, room temperature 
  • 2 sticks unsalted butter, room temperature 
  • 1/4 teaspoon kosher salt 
  • 1 (16-oz.) package powdered sugar 453 g


According to Better Homes & Gardens, the best way to soften cream cheese is by letting it sit in a warm water bath. This is a quick process, as the cream cheese shouldn't need to sit for longer than 15 minutes. Leaving the cream cheese in its foil wrapper, simply place the block in a bowl of warm water and let the softening begin. Hot water out of the tap works best because you don't want it to be boiling, Cheese Knees notes. You can simply let the block sit until it's soft, or you can flip it every few minutes -- either way, you want the whole thing to be submerged in the water (via The Pioneer Woman).


How to Make It


Step 1

Preheat oven to 350°F. In a large mixing bowl, whisk together flour, sugar, salt, baking soda, and spices. Add eggs, oil, and vanilla extract; whisking until fully incorporated.


Step 2

Fold in crushed pineapple, banana, carrot, coconut, and pecans. Divide batter evenly among 3 well-greased and floured 9-inch round cake pans.


Step 3

Bake until golden brown and a toothpick inserted in the center comes out clean, 25-30 minutes. Cool in pans on wire racks 10 minutes. Remove from pans to wire racks, and cool completely, about 1 hour.


Step 4

Prepare Cream Cheese Frosting: Combine cream cheese and butter in mixer and beat until well combined. Add salt and powdered sugar, and beat on low until incorporated, then increase speed to medium high and beat until light and fluffy, about 3 minutes.


Step 5

Assemble Cake: Cut domes off cake layers to create 3 even layers. Place 1 layer on a cake stand and evenly spread 3/4 cup cream cheese frosting across the layer. Place another layer on top of that one and repeat with another 3/4 cup frosting. Add final layer, and spread remaining frosting across the top. Decorate with shredded coconut and pecans.


I made only a single layer for this test.  I made this with 8” round pan.  In order to avoid the usual hump in the center of the cake, I made a makeshift cake strip.  Essentially wet paper towels in the center of a folded strip of aluminum foil.  This prevents the rapid baking of the outside of the cake so that the whole cake bakes evenly and there is no hump.  It works really well, you also don’t get overly crispy outside of the cake, it is just evenly baked all the way through.

The cake is quite good, but my banana wasn’t ripe enough so it didn’t really contribute enough to the tropical feel of the cake.  I may also have skimped on the pineapple in my measurements, I hate volume measurements! But this was definitely good enough to warrant a full bake.  Oh the orange decoration is candied orange zest that I made.

squattercity's picture
squattercity

I've been eyeing this one for some time -- http://theryebaker.com/vitebsk-rye/. My partner doesn't like the heaviness of whole grain ryes, so I figured a 100% light rye might intrigue her. Also, in a different thread, where I foolishly argued that I could see no reason to use light or medium rye when you could use whole grain, Ilya recommended that I try a light rye to see how it showcases flavors like fennel and anise. What's more, Alcophile, Benny and WatertownNewbie all recently baked the Latgalian Rye ... and this one, calling for a pale rye malt scald as well, seemed like a not-so-distant cousin. Finally, another thing to recommend it: it's relatively quick -- 12 hours max from starting fermentation to pulling the finished loaf from the oven.

Still, assembling the ingredients took some time. First, had to I pick up rye malt at a brewing supply store (interestingly, the proprietor asked if I was growing mushrooms, as rye malt is apparently in demand as a medium for fungi.) Then, the quest for light rye was somewhat complicated: my relatively local Polish grocery has gone out of business and the three other places nearby had no rye flour at all. I was about to give up, but checked one last store and discovered two fornlorn bags of mąka żytnia typ 720 on the shelf. Success!

As usual, I wasn't totally on the mark with the temperatures. I don't have an oven thermometer (or indeed, any cooking thermometer at all) -- so I just winged it. To approximate an 85F/30C environment, I just preheated my oven on low for a bit and then turned it off. I did this every 2 or 3 hours.

I knead all the breads I make by hand and, when the final dough didn't seem to be moistening all the flour quickly enough, I dipped my hands in water to help. This turned out to be a mistake, because it transformed the dough into a ferociously sticky mass. Perhaps because of this, I didn't achieve the milestones that the Rye Baker blog describes in terms of dough growth and holes. But I plowed ahead.

I baked it in a dutch oven, 5 minutes covered at 500F/260C, 33 minutes uncovered at 450F/232C.

With a lovely anise-infused flavor, a wonderful shattery crust, and a moist, light crumb -- incredible given that we cut into it half an hour after pulling it from the oven -- this is a bread to be savored. My partner has finally endorsed a 100% rye, calling the flavor "amazing." I concur.

Come to think of it, I'm sure we're not going to savor it. We're going to gobble it up.

Rob


Benito's picture
Benito

My family has a lot of birthdays from December to January.  My mother’s is one of them so we are having her over for brunch this weekend.  My favourite thing to make for brunch is a strata, I’ve made a few now and they are always tasty.  One thing I should do but haven’t is bake the challah a couple of days ahead so it can stale a bit.  So I decided I’d bake a slight variation of challah by adding the zest of half an orange to my sourdough challah 50% whole wheat.  I worked at getting the strands longer than usual, the challah ended up so long that it wouldn’t fit on my baking steel, so I shaped it into an S which I think looks nice.  The strata I’m going to make will be strawberry mango.  It won’t use the whole challah so I’ll be able to taste the bread on its own to see if the orange is a good addition or not.

Zest of one small orange or zest of half a large orange.


Overnight levain 78°F 9 hours peak 2.5x 


Procedures

  1. The night before baking, mix the levain and ferment it at 76-78°F for 8-12 hours.
  2. In the morning, in a large bowl or the bowl of a stand mixer, add the levain then water, then mix in the 4 eggs, salt and honey and mix until completely combined.
  3. Mix in all the flour until it forms a shaggy mass.
  4. Knead the dough on the bench or in a stand mixer until it is smooth and there is moderate gluten development. The dough should be quite firm.  Gradually add the oil, the dough may break down, wait until it comes back together and before you add more.  Mix until gluten is well developed.
  5. Transfer the dough to a lightly oiled bowl and cover it tightly. Ferment for about 2 hours. It may not rise much.  At 82°F it rose 20-25%
  6. To make one loaf, divide the dough into two equal portions, and divide each portion into the number of pieces needed for the type of braiding you plan to do, so divide each by 3 to make 1 six strand braided loaf.
  7. Form each piece into a ball and allow them to rest, covered, for 10-20 minutes to relax the gluten.
  8. Form each piece into a strand about 14” long. (I like Glezer's technique for this. On an un-floured board, flatten each piece with the palm of your hand. Using a rolling pin, roll out each piece to about ¼ inch thickness. Then roll up each piece into a tight tube. Using the palms of your hands, lengthen each piece by rolling each tube back and forth on the bench with light pressure. Start with your hands together in the middle of the tube and, as you roll it, move your hands gradually outward. Taper the ends of the tubeby rotating your wrists slightly so that the thumb side of your hand is slightly elevated, as you near the ends of the tube.).  You can consider rolling each rope of dough in two different types of seeds at this point for a decorative effect, or only a few of the strands.
  9. Braid the loaves.  Braiding somewhat loosely, not too tight. 
  10. Place loaf on parchment paper on a sheet pan. Brush with egg wash. Cover well with plastic wrap (brush with oil so it doesn’t stick to the dough) or place the pans in a food grade plastic bag, and proof at room temperature until the loaves have tripled in volume. About 4-6 hours.
  11. If it's quadrupled and when poked the dough only springs back a little, preheat the oven to 180°C/350°F.  Gauge the dough again. Stick a finger lightly in the dough. If it makes an indentation that doesn't spring back, the dough is ready to be baked. If not, wait a bit more.
  12. Pre-heat the oven to 350ºF with the rack in the lower third of the oven about 30 mins before final proof is complete.
  13. Brush each loaf with an egg lightly beaten with a pinch of salt.  I do this twice.
  14. Optionally, sprinkle the loaves with sesame seeds and/or poppy seeds.
  15. Bake until done – 30-40 minutes rotating half way.  If baking as one large loaf may take a bit longer, bake until sounds hollow or reaches 190ºF in the middle.
  16. Cool completely before slicing.

My index of bakes.


CrustyJohn's picture
CrustyJohn

      Well, 9/40ths Rye to be exact, but that doesn't roll off the tongue so well.  I haven't had rye flour on hand in a while, so I've been wanting to do a partial rye loaf for a while.  I did a full rye loaf two weeks back, which was tasty but a whole different beast.


      I also wanted to try baking on a pizza stone since I'm staying with my parents for a bit, and they have one.  I typically bake batard loaves in a dutch oven that is just slightly larger than the loaf, and it tends to constrain the bottom on the loaf, making a slightly rounded bottom.  

350g (78%) bread flour

100g (22%) rye flour

315g (70%) water

1/4c. wheat germ

~tbsp salt


      I pretty much did my usual approach.  I left the dough in the basement overnight to finish bulk fermentation because I was afraid it would progress too quickly at room temperature (mid-low 60s), but I ended up needing to give it a couple hours more at room temperature in the morning.  


      To bake I preheated a pizza stone in the oven (500) as well as a pot.  I put a little cornmeal on the stone, turned on the dough directly on the stone, scored it, and inverted the pot on top.


I liked the outcome quite a lot!  As I was hoping for, the loaf splayed wide with a nice flat bottom.  The bottom crust also caramelized nicer than usual, giving a nice flavor.  The crumb is nice, soft, airy, and has good rich flavor.  That big air pocket in the top is a bit of eye sore.  I imagine sub-par shaping is to blame, but I also read a recent comment on a post that suggested that a too hot oven can be a source of this as well, though I always bake as hot as I can, and have never run into that being an issue.  

Benito's picture
Benito

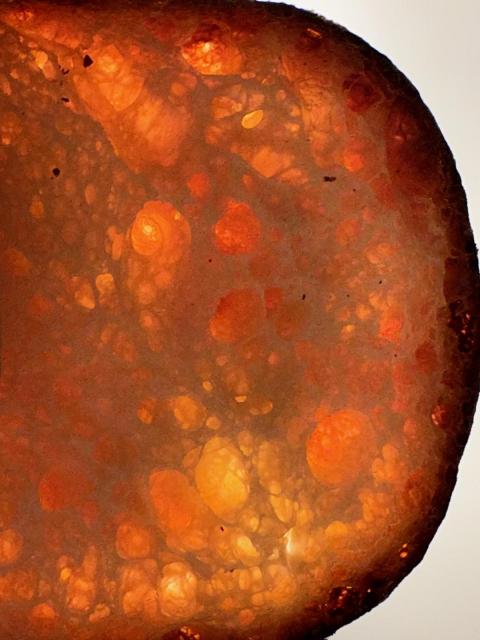
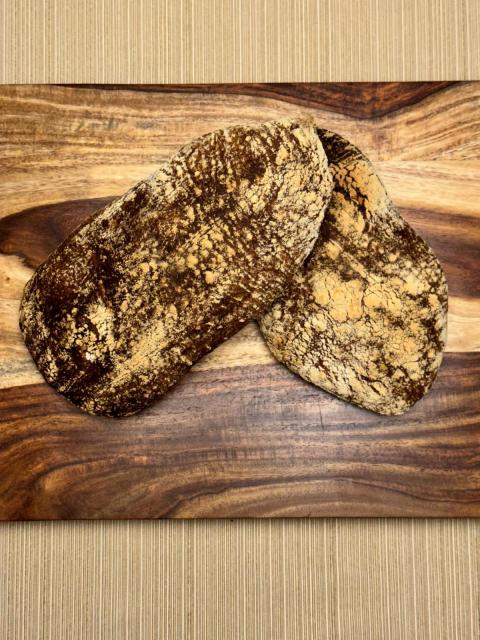
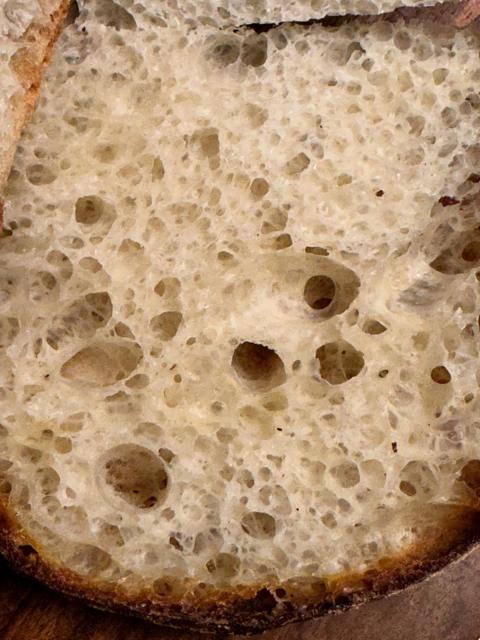
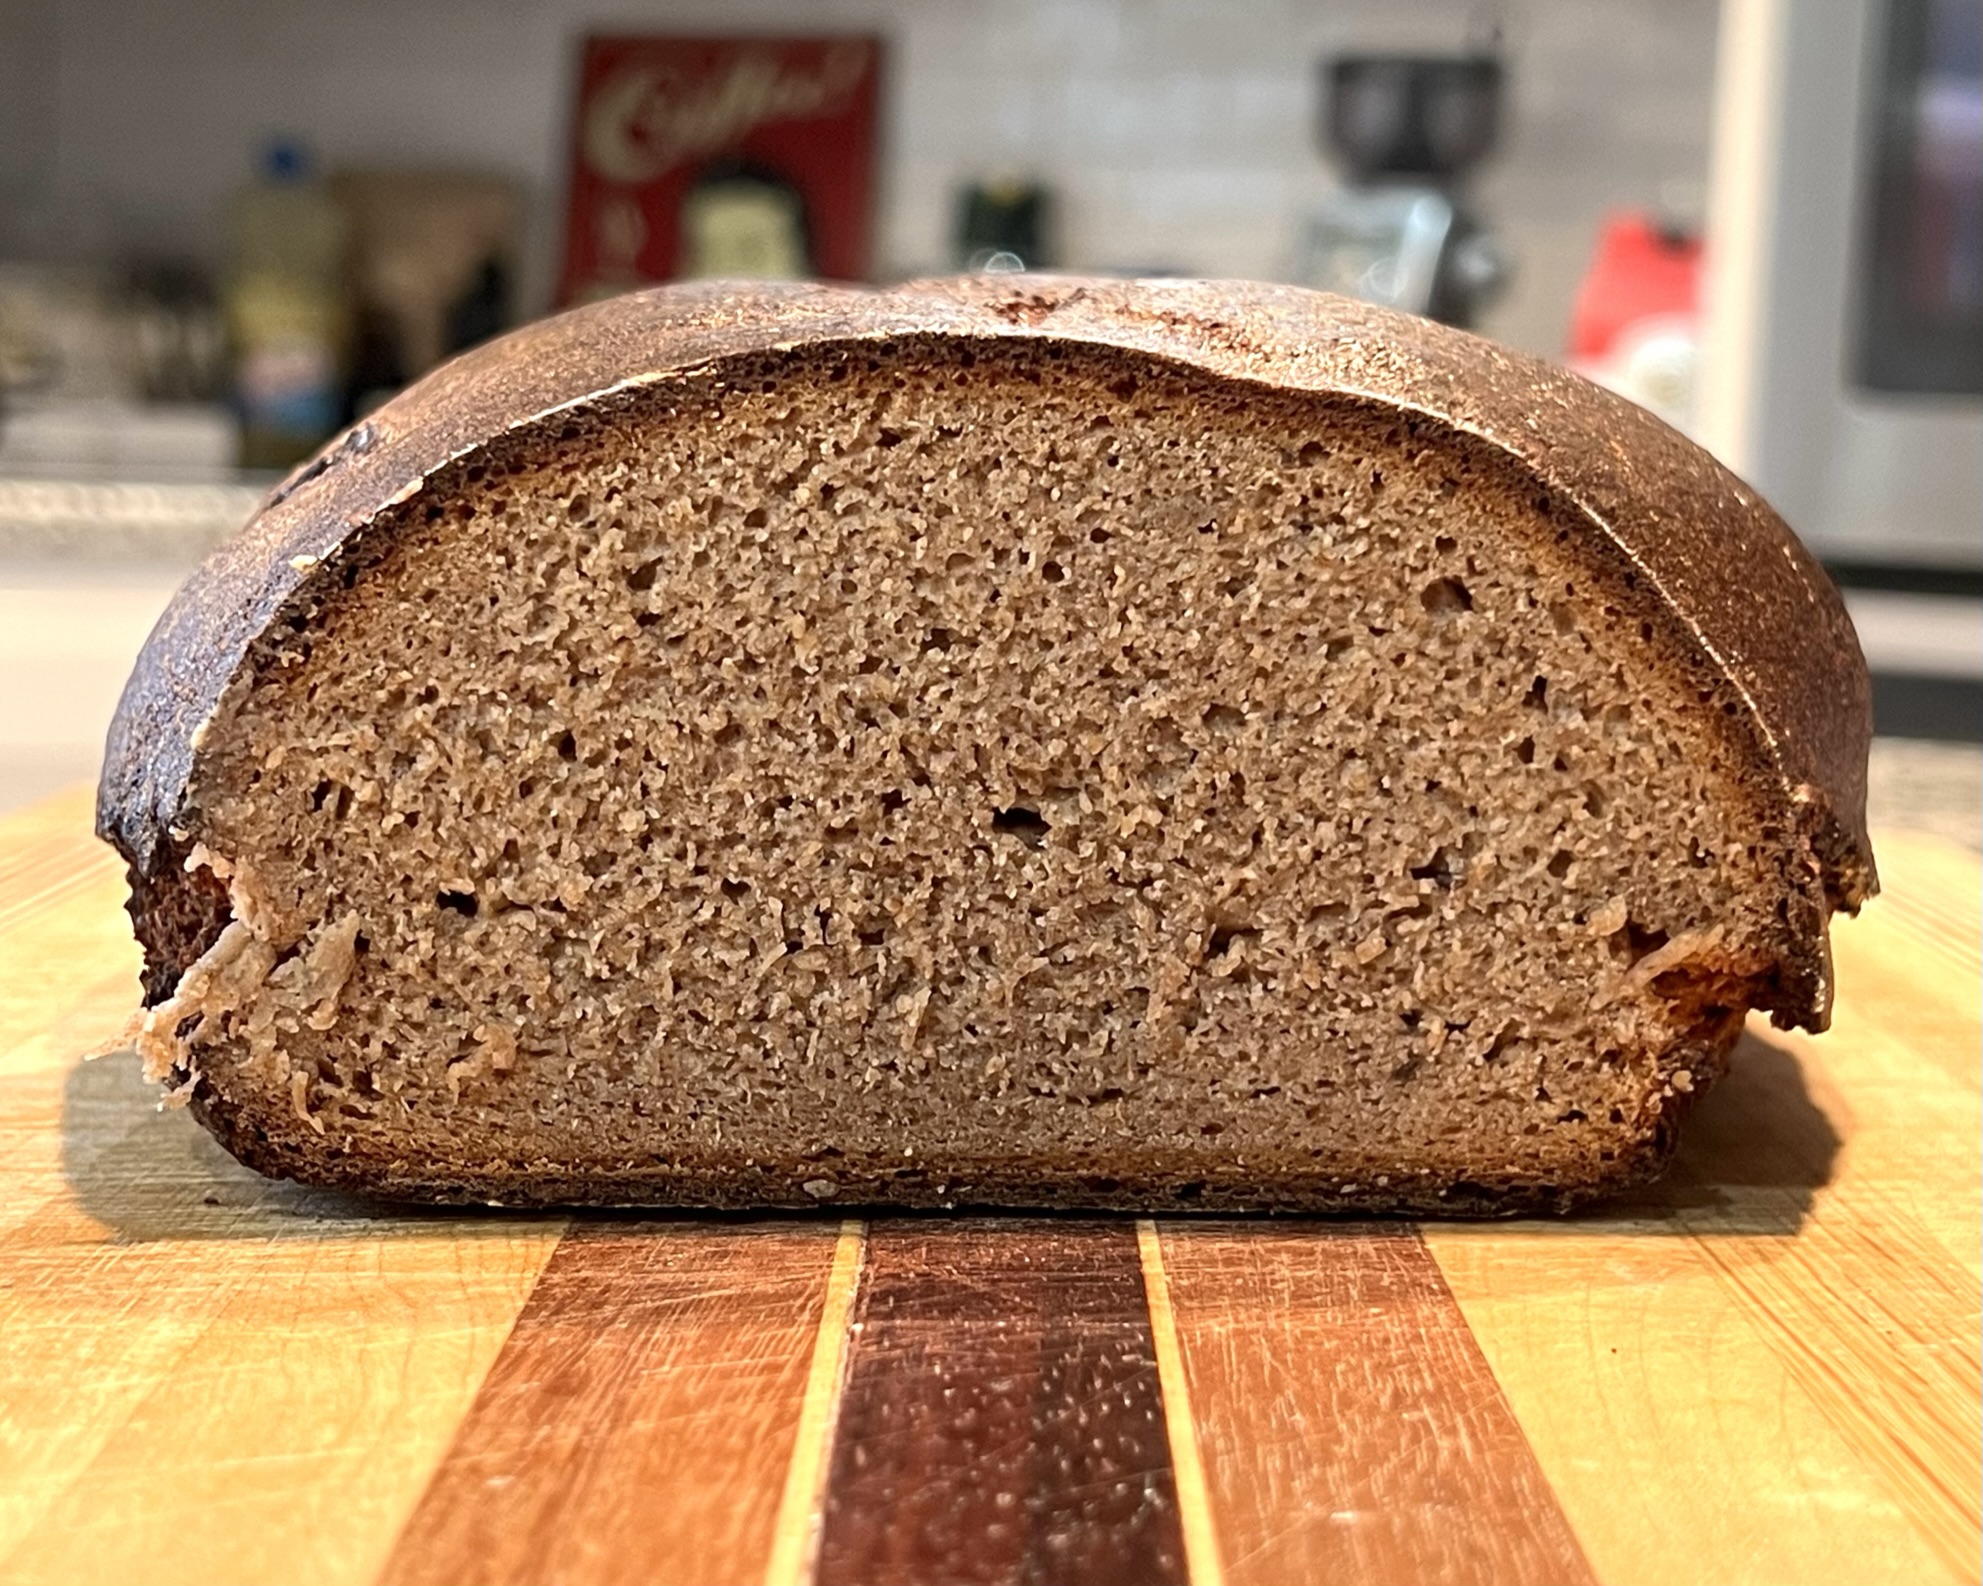
Ilya recently started a thread linking to Martin Philip’s recipe on the King Arthur website for a IDY Pan de Cristal.  I’ve always wanted to try baking this unique bread and I’m glad that I have now.  I believe most recipes for this bread have some olive oil in them, so I added that.  Also rather than mixing all the water at once, I bassinaged the water gradually.  I used my Ankarsrum Assistent to mix since I am still learning to use it and want to get as much experience as possible.  It does an awesome job with bassinage.  It is said to be gentle on the dough and I believe it is.  I might have thought that the crumb would be tight having used a mixer to mix, however, I don’t think the crumb shows that at all. This bread has the finest crumb and a thin shattering crust.  You can see why it is named Pan de Cristal, you can shine a light through the bread, even the bottom crust can show light easily through it.  Each loaf feels like air, it weighs so little yet tastes so good and has such satisfying texture with the contrast of the crisp crust and soft open crumb.

Light through the bottom half of the loaf!

For 2 medium breads

250 g water (175 g for mix) then bassinage 75 g

250 g bread flour

1.25 g IDY

5 g salt

6.26 g olive oil


Mix all flour and 175 g of water then rest 15 mins.

Dissolve 1.25 g IDY in 15 g of water add to mixer and mix until well absorbed.

Dissolve 5 g of salt in about 15 g of water and then add to the mixer until well absorbed.  The addition of the salt will tighten the gluten a bit.

Bassinage the rest of the water in small aliquots waiting until the water is well absorbed before adding more.

Once all the water has been added the dough appears to be well developed, drizzle in the olive oil while the mixer is running.  Mix until well incorporated, this will not take very long.

Grease a Pyrex dish with olive oil and then pour the dough into the dish.  Do a few folds to get the dough into a nice roundish shape.

Place the dough in a warm place, 78°F and every 20 mins do a coil fold, stop when the dough seems to have good structure.  I did three sets of coil folds.

Allow the dough to rest 2 hours.

After 2 hours the dough will have risen nicely, about double volume.

Flour the top of the dough especially around the edge of the dish.  Sprinkle a generous amount of dough onto your countertop.  Using a bowl scraper release the sides of the dough from the dish, then gently invert the dish so the dough releases onto the floured countertop.  Generously flour the top of the dough.  Using a bench scraper cut the dough carefully into two or four pieces (depends on whether you made a full or half batch).  Ensure the cut edges are well floured, then gently transfer two pieces onto one piece of parchment, repeat if a full batch was made. 

There is no need to cover the dough at this point, just keep it away from drafts.  The development of a thin skin is actually fine and may help with the oven spring.

Allow the loaves to rest at room temperature for 2 hours, uncovered. While the loaves are resting, preheat the oven to 475°F with a baking stone or steel on a lower rack. 

1 hour before final proof is complete, pre-heat your oven to 475°F with a baking stone or steel on the lowest rack.  Place the other rack in the upper half of the oven.

The dough is ready to bake when it looks puffy and there are large bubbles visible in all pieces of dough on the surface.

To bake the bread: Carefully slide the two loaves (still resting on the parchment) into the oven onto the preheated stone or steel. If space is tight and the full sheet of parchment won’t fit on the stone or steel, cut the parchment between the two loaves and arrange them as best you can. Allow the other two loaves to continue to rest.

Bake the loaves for 15 minutes, then transfer them, from the stone or steel, directly onto a rack in the upper third of the oven for an additional 13 to 15 minutes. (Leave the stone in place.) Moving them to the rack allows the baking stone or steel to become hot again in preparation for the next two loaves. After a total of 27 to 30 minutes of baking, remove the loaves from the oven and allow them to cool on a rack.

Repeat the process with the two remainingloaves. Cool the bread fully before slicing.

My index of bakes.

pmccool's picture
pmccool

The trip was a gift to our oldest grandson for his high school graduation--two years after the fact.  Yup, COVID got in the way of that, too.

Since it was Josh's trip, we built it around his interests.  Much fun and lots of great memories but bakeries didn't figure into the mix.  In spite of that, my wife and I were both blown away by the bakeries/patisseries that we did notice in our perambulations.  The creativity and craftsmanship of the bakers who turn out such beautiful loaves and pastries is beyond impressive.

Since most of our dining was done in restaurants, our exposure to baked goods was limited to what was available with our meals.  Overall, quality was pretty good, some even very good.  Even the French version of a cheeseburger that I had in one bar came on a bun that was delicious in its own right.

Assuming that we get back to Paris at some future date, I definitely want to devote part of our time there to a bakery crawl, or two.

Paul

WatertownNewbie's picture
WatertownNewbie

This bread continues my adventures with rye bread, having done a couple of Borodinsky recipes as well as Lithuanian recipes.  The inspiration to give it a try came from the recent posting by alcophile, and I actually began this loaf before Benito posted his bake.  The process differs from almost anything else that I have baked and involves essentially a forty hour poolish followed by one hour for the final mixing, shaping, and proofing.

For the most part I followed the steps outlined in Stanley Ginsberg's recipe.  One deviation was to mix the final dough by hand, but I could feel the dough gain some strength as I worked it and do not believe that a hand mixing cost me anything.  The dough is fairly dense and could be done in a stand mixer for those who prefer that approach.  I also did not return the loaf to the oven after applying the cornstarch glaze.  The heat from the loaf itself seems sufficient to set the glaze.

Here are views of the top from an angle and of the side.

There were more cracks than in the other types of rye bread that I have made, and my general sense is that perhaps a slightly longer final proofing (mine was 43 minutes) might get the bread closer to its final height and avoid the sudden expansion from oven spring.  The loaf weighed 1537 grams, and the dimensions are 10" x 6-1/2" x 3".  Despite being fairly dense, the bread has a tender crumb and great flavor.

Here are views of the crumb and of a slice.

This is yet another rye bread that I will be baking again.  Thanks to alcophile for his posting and for the others who have baked this bread and shared their experiences.

Happy baking.

Ted

Pages

Subscribe to Recent Blog Entries