The Fresh Loaf

A Community of Amateur Bakers and Artisan Bread Enthusiasts.

Recent Blog Entries

HeiHei29er's picture
HeiHei29er

My first use of teff flour came during our Gluten Free Community Bake.  Comments made here intrigued me, and I finally got around to experimenting.

To get a good taste of the teff flour, I kept the recipe simple.  I created a teff flour starter over a 3-day period by using my white flour starter and then doing a 1:4:4 refresh every 8 hours.  From there, I used my standard sourdough loaf approach but used a 100% teff flour levain for the 15% prefermented flour.

As Gina mentioned in her comment, the teff flour goes through a range of aromas as it ferments.  It is actually quite sweet smelling after maybe 5-6 hours and then gets noticeably tangy sour after 8+ hours.  Even though it was 100% teff flour in the levain, it had no trouble with wheat flour and leavened the dough right on target with a 15% PFF taking about 4 hours to reach 75-80% volume increase at 76 deg F.

As expected with 15% gluten free flour, the crumb is even/closed, but is not at all dense.  It is moist but not gummy.  The teff almost has a shortening effect.  The taste of the loaf is excellent!  Whole grain, nutty flavors/aromas.

Levain
67.5g    Teff flour
64.1g    Water
9g         Teff starter
Combine and ferment at 70 deg F for 12 hours

Final Dough
225g    All Purpose Flour
157.5g Bread Flour
228.4g Water
9g        Salt

1)   Excluding salt, combine final dough ingredients with levain until just wet
2)   Fermentolyse 20 minutes
3)   Fold in salt and any bassinage water (if needed).  Use Pinch and Squeeze to fully mix.  Bowl knead until dough comes back together.  Rest 10 minutes.
4)   Three sets of bowl kneading with 10 minute rests
5)   Bulk ferment at 76 deg F.  Folds every 30-45 minutes until "puffy".  Preshape at 75-80% rise
6)   Preshape at rest 20 minutes
7)   Final proof at 76 deg F
8)   Preheat oven to 465 deg F with oven setup for steam
9)   Bake with steam at 465 deg F (2 minutes); 400 deg F (18 minutes); vent oven; 435 deg F (15-20 minutes); bake until hollow thump

CalBeachBaker's picture
CalBeachBaker

Today's bake: Semolina Bread

Bread - A Baker's Book of Techniques and Recipes - Jeffery Hamelman 2nd Ed.

This bread is made from a majority of fresh ground durum wheat along with bread flour and a bit of whole rye which is in the culture. This is my first time making as well as tasting a semolina bread. The durum has a really nice nutty flavor that makes the sesame seeds really stand out. I baked this 2 mins longer than optimal which I've adjusted in the process section. I really like this bread and will definitely make it again.

Tasting Notes

Crumb - Sweet/Dairy with notes of butter

Crust - Toasty with notes of malt and nuts

Grain Character - moderate with a taste of cooked spaghetti

Recipe and Process are below for those that are interested.


Isand66's picture
Isand66


 I wanted to try  another new grain I purchased from Barton Springs Mill called Butler’s Gold Whole Wheat.  The whole wheat berries are harvested from a small farm in Texas.  It’s supposed to be a good neutral flavored whole wheat perfect for mixing with other stronger flours.  I decided to use this exclusively and only mixed it with a small amount of BF.  I did use KAF BF in the Levain so overall it ended up being a  50% WW bread.  I milled the Butler’s Gold berries to a high extraction sifting and milling twice.

I was very happy with the final outcome on this one.  The Butler’s gold flour had a nice buttery earthy taste profile and the crumb was moderately open.  I really enjoyed using this to make some grilled cheese sandwiches and it made some nice toast as well.

Formula

Levain Directions 

Mix all the levain ingredients together for about 1 minute and cover with plastic wrap.  Let it sit at room temperature for around 6-7 hours or until the starter has almost doubled.  I used my proofer set at 76 degrees so it took around 5 hours for me.  Either use in the main dough immediately or refrigerate for up to 1 day before using.

 Main Dough Procedure

Mix the flour and water (leave about 50 -70 grams to add after the first mix), together in your mixer or by hand until it just starts to come together, maybe about 1 minute.  Let it rest in your work bowl covered for 20-30 minutes.  After 30 minutes or so  add the salt, starter (cut into about 7-8 pieces),  and olive oil, and remaining water as needed and mix on low for 5 minutes.   Note: If you are using the Ankarsrum mixer like I do, add your water to the bowl first then add in the flours.  After your autolyse add in the starter, salt, remaining water and mix on low to medium low for 15-20 minutes.

Remove the dough from your bowl and place it in a lightly oiled bowl or work surface and do several stretch and folds.  Let it rest covered for 10-15 minutes and then do another stretch and fold.  Let it rest another 10-15 minutes and do one additional stretch and fold.  After a total of 1.5 hours place your covered bowl in the refrigerator and let it rest for 12 to 24 hours.

When you are ready to bake remove the bowl from the refrigerator and let it set out at room temperature still covered for 1.5 to 2 hours or if using a proofer set at 80 degrees for one hour.  Remove the dough and shape as desired and cover with a moist tea towel or plastic wrap Sprayed with cooking spray and let rise at room temperature for 1 1/2 – 2 hours.  (I use my proofer set at 80 F and it takes about 1 hour to 1.5 hours).

Around 45 minutes before ready to bake, pre-heat your oven to 500 degrees F. and prepare it for steam.  I have a heavy-duty baking pan on the bottom rack of my oven with 1 baking stone on above the pan and one on the top shelf.  I pour 1 cup of boiling water in the pan right after I place the dough in the oven.

After 1 minute lower the temperature to 450 degrees.  Bake for around 35 minutes or until the breads are nice and brown and have an internal temperature around 200-210 F. 

Take the bread(s) out of the oven when done and let them cool on a bakers rack for as long as you can resist. 

SueVT's picture
SueVT

Panettone can be made is a wide variety of flavors, not just the classic raisins and candied orange peel. In this case, I used apple chunks, caramel bits, and cider donut spices, which combine beautifully with the light buttery and fermentation notes of the panettone.


Another Girl's picture
Another Girl

After seeing some nice bakes based on the Pain de Campagne in Martin Philip's post, Don't be a bread hostage at the KAF website, I decided to give it a try. It seems in keeping with my recent effort to simplify my baking. Besides, after all the more neutral pan breads I've been making lately, I was in the mood for a sourdough. 

I followed the instructions on the KAF site for the bread as originally made by Martin's friend Maura, scaling it down to make one 750g loaf. The flour mix was 80% Ceresota AP, 10% KAF whole wheat, and 10% Arrowhead Mills whole spelt. The starter was last refreshed on Monday. My doughs always seem to get sluggish when the outdoor temperature drops, proofer or no, and I wasn't sure it would double in the proscribed 12-hours. In the end, everything happened just as the writeup at KAF said it would. The dough was mixed yesterday morning at 9:30, shaped last night at 9:00, and baked today at 9:00 a.m. It looks good and has a nice sourdough fragrance and flavor and, like others who've tried the bread, I'll be making it again.

Benito's picture
Benito

We had some friends over for dinner and had to have some nice soft rolls to go with my chicken with artichoke hearts and sun dried tomatoes.  I decided that I wanted something with rosemary since the chicken dish has rosemary in it.  So I prepared a mashed Russet potato and added rosemary and black pepper to taste.  Of course the mashed potato had butter and milk as well, make sure that the butter and milk are hot when adding it to the mashed potato for the best smooth texture.

Pan 7.5 x 11.5” = 4 rolls by 6 rolls about 37 g each x 24

egg wash: 1 yolk and 1 tbsp milk, beaten…


Cook Tangzhong mixing flour and milk constantly until it becomes a thick roux.  Let cool before adding to final dough.  Or add to cold milk and egg to cool it down.


Blend room temperature butter and flour together and set aside to incorporate after the dough is well developed.


Whisk together dry ingredients flour salt and yeast. 


To mix by hand, add the salt and yeast to the wet ingredients (milk, tangzhong and egg) to dissolve.  Next add the flour and mix with a silicone spatula until no dry flour remains.  Rest 10-20 mins.  Next perform French folds until the dough is well developed.  Smear the blended butter/flour onto the dough and then fold to incorporate and then perform further French folds until well developed.  Gradually add the mashed potato and knead to incorporate it well into the dough.  Form into a tight ball and place in a bowl covered with plastic or a damp cloth and place in a warm place until doubled (about 1hr 30 mins).  Alternatively, you could mix the mashed potato and butter and then add the mixture to the developed dough until well incorporated.


Butter a large baking pan.  Punch the dough down and then divide into 12 equal portions.  Form each into tight boules.  Place in the buttered baking pan seem side down.  Cover them and allow them to fully proof about 1 hour to 1 hour and 20-30 mins, they should pass the poke test.


After about 30 mins of proofing time, whisk your remaining egg and milk and then brush the small boules.


About 30 mins prior to end of final proof preheat the oven to 350°F. 

Immediately prior to baking brush the dough again with the egg and milk mixture.


Bake the rolls uncovered for 30 minutes or until the internal temperature is at least 190F. Cover if your rolls get brown early in the baking process.


Remove the bread from the oven but not the pans, brush the tops with butter while hot, and then let cool for 10 minutes before pulling the bread from the pans. You may need to slide a butter knife down the sides of the pan to loosen the bread, but I have found parchment paper to be unnecessary.  Sprinkle with fleur de sel if you wish after brushing with butter. 


My index of bakes.

Benito's picture
Benito

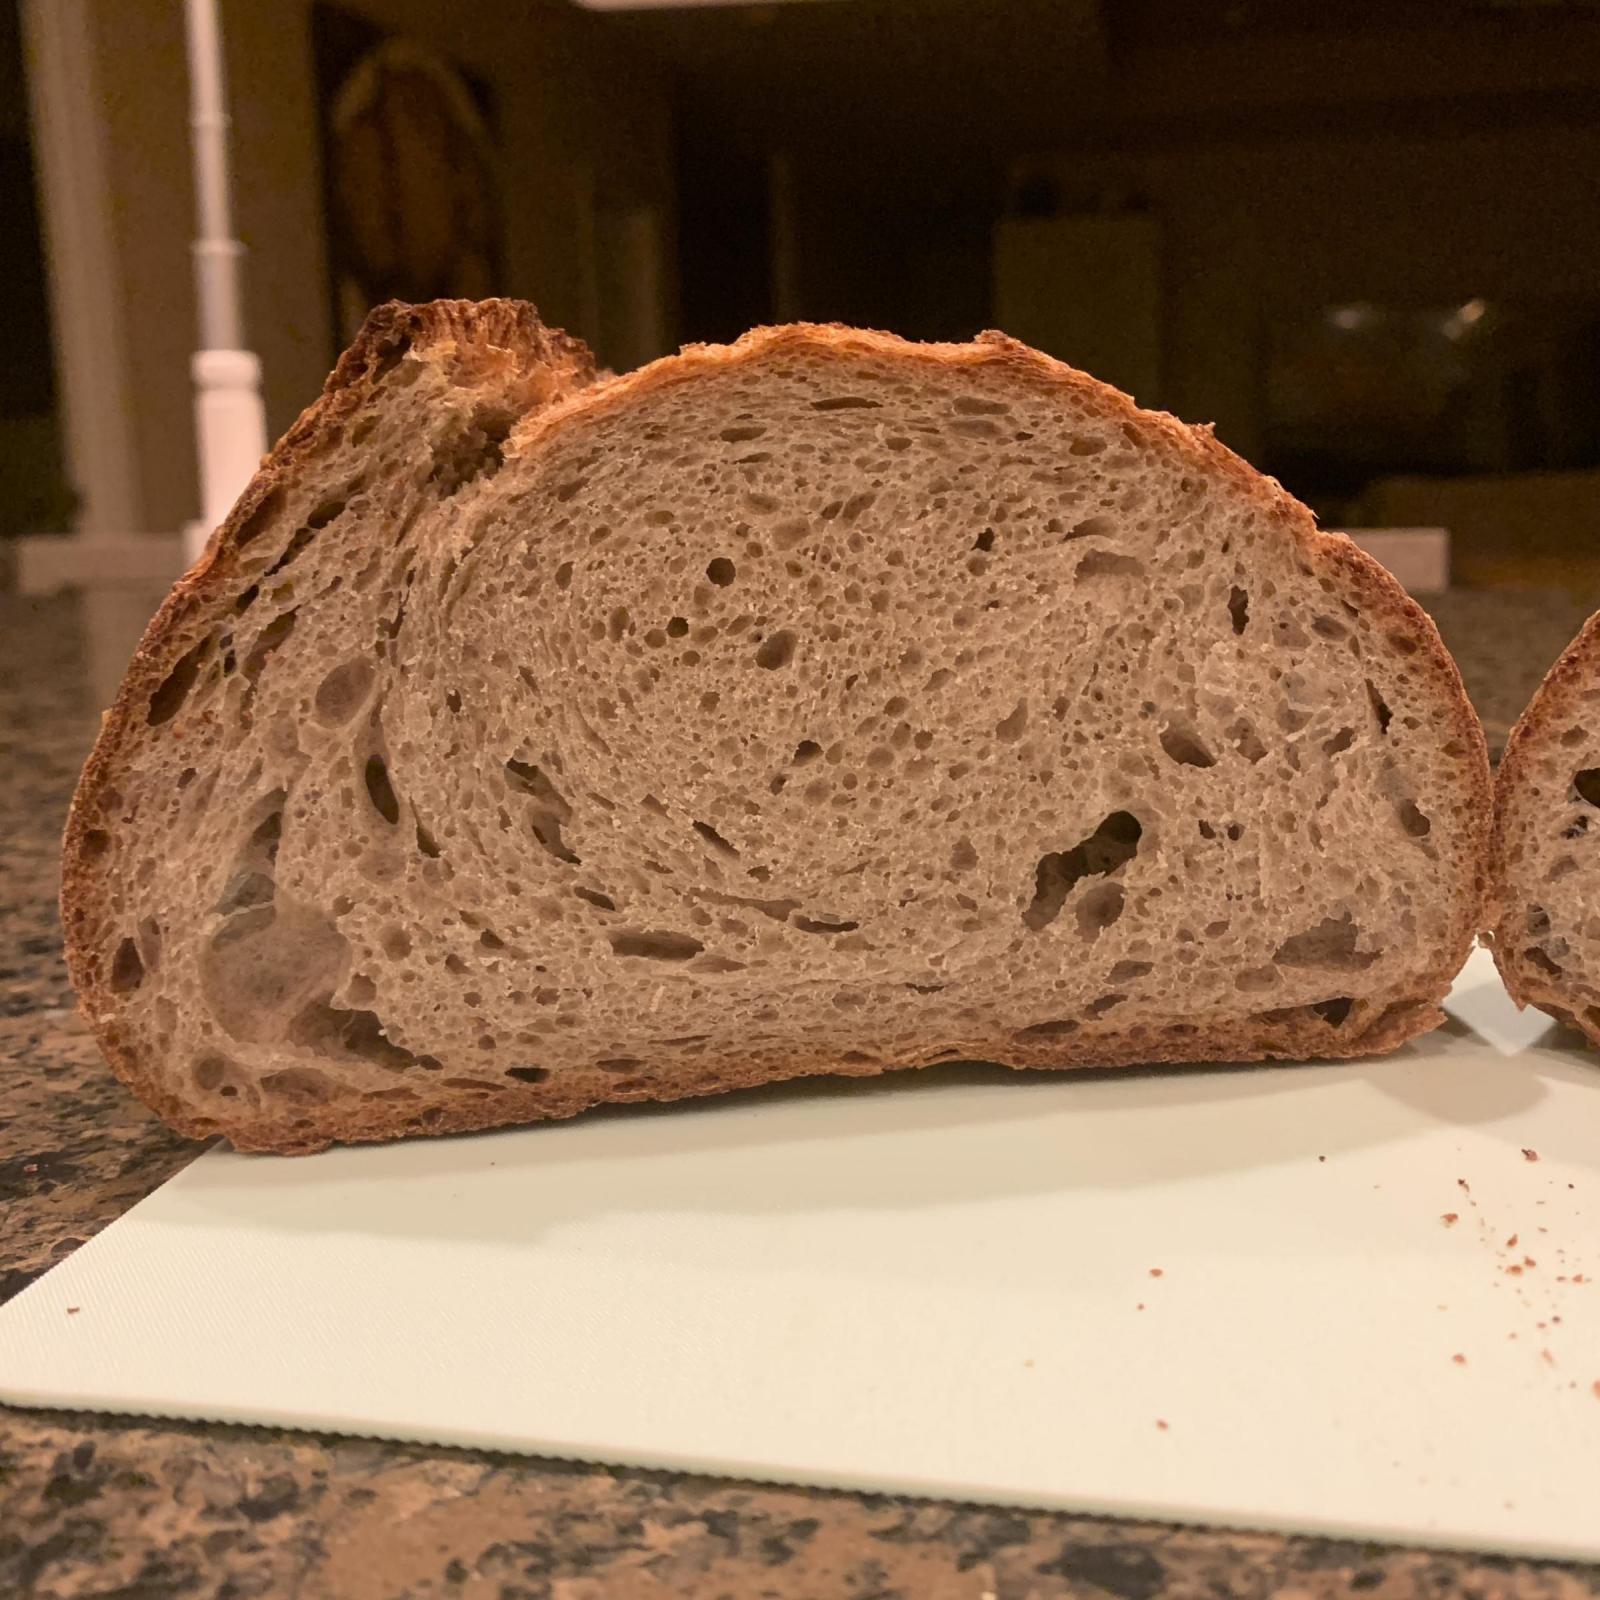
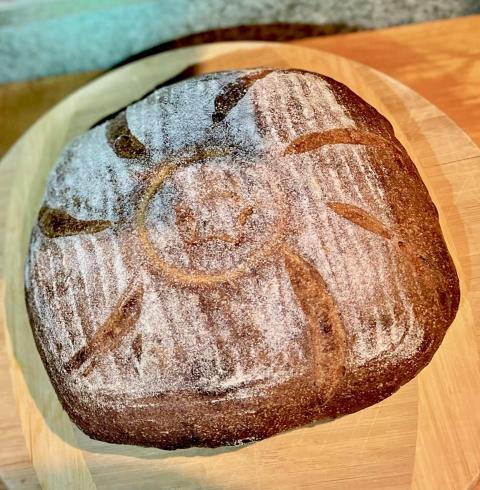
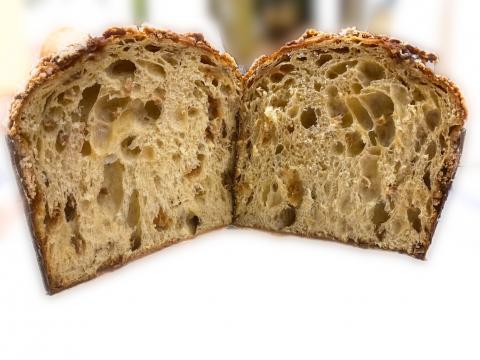
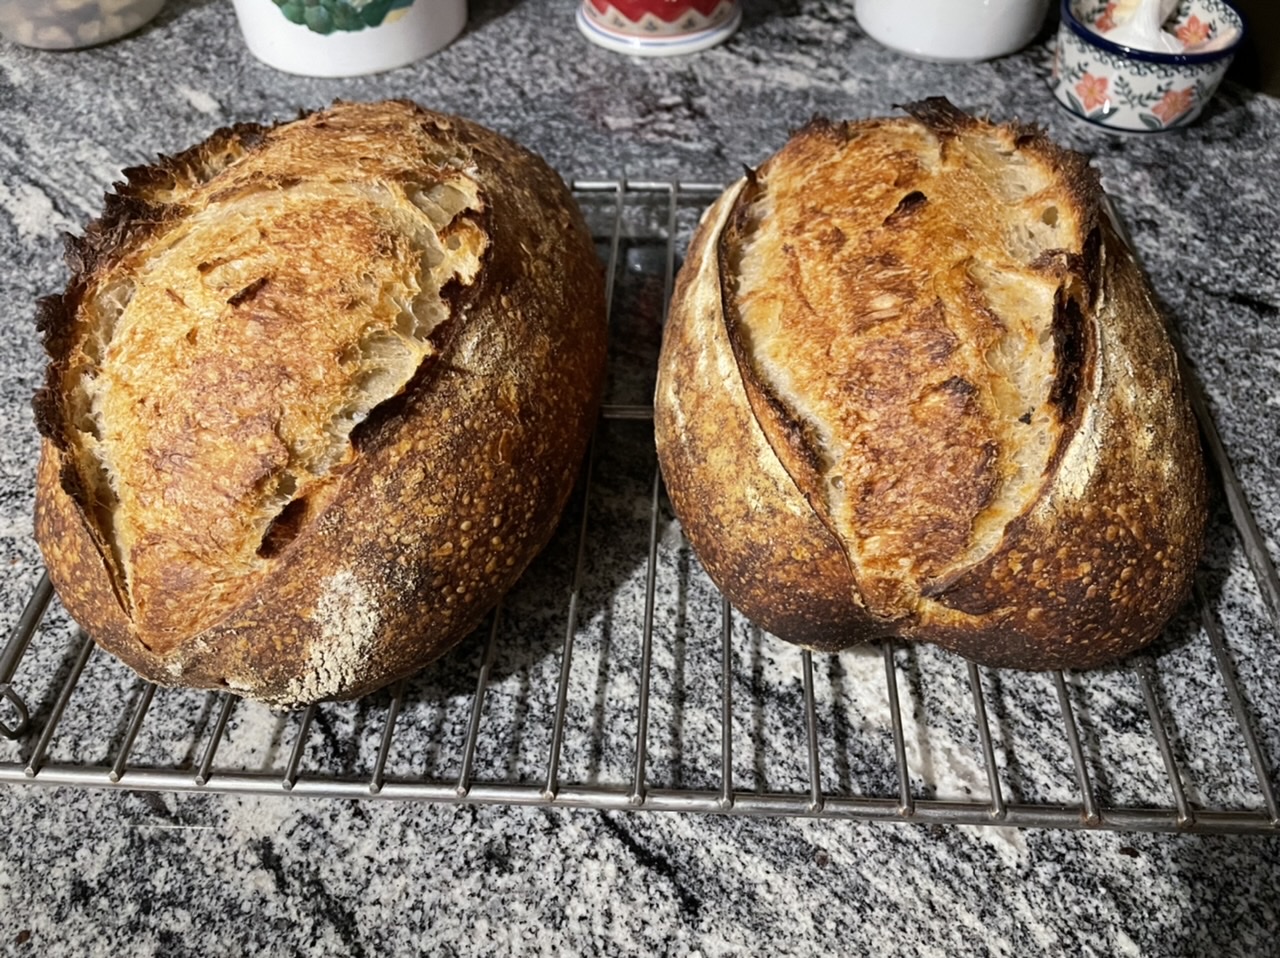
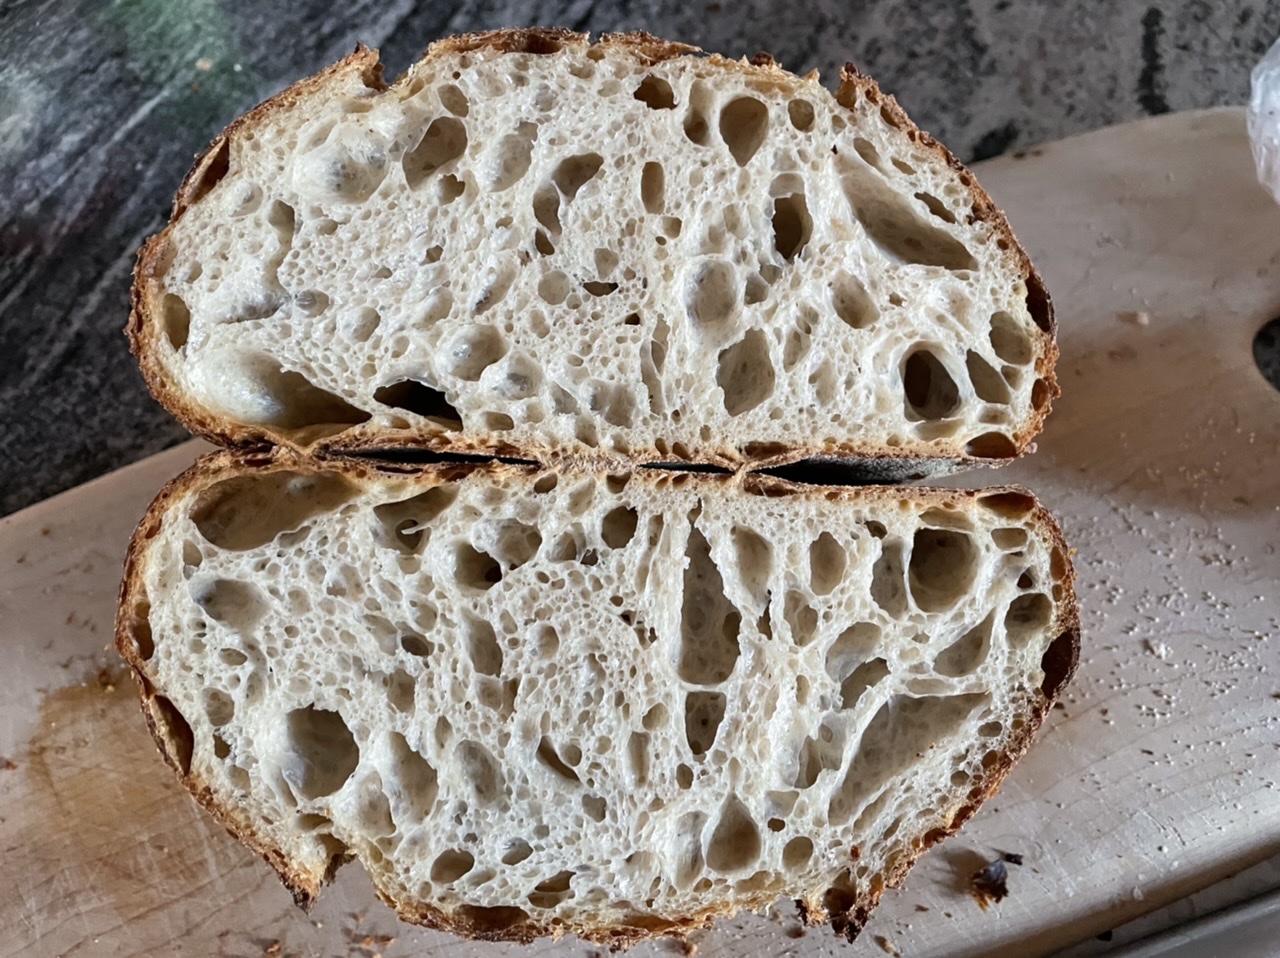
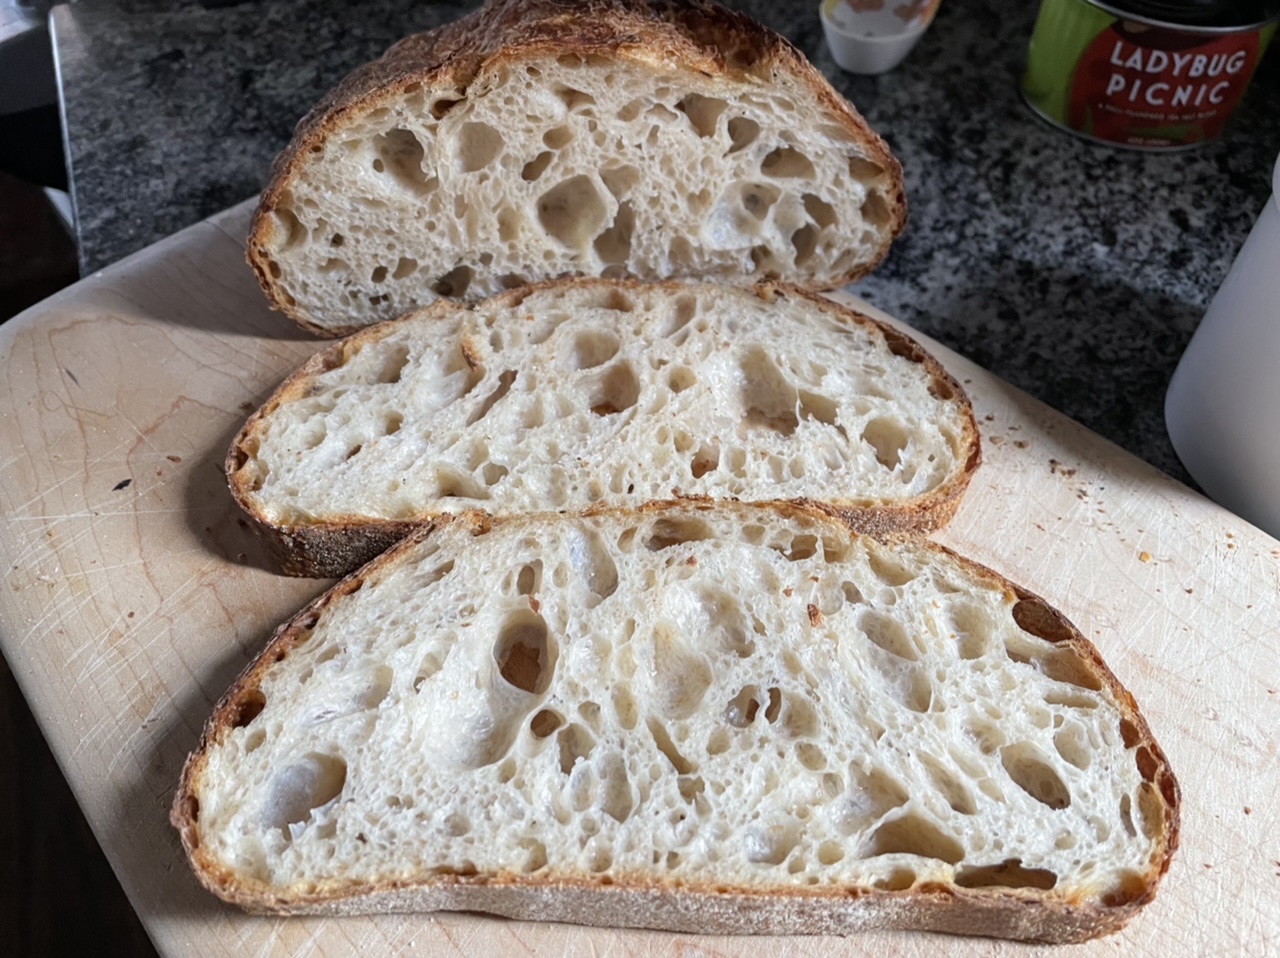
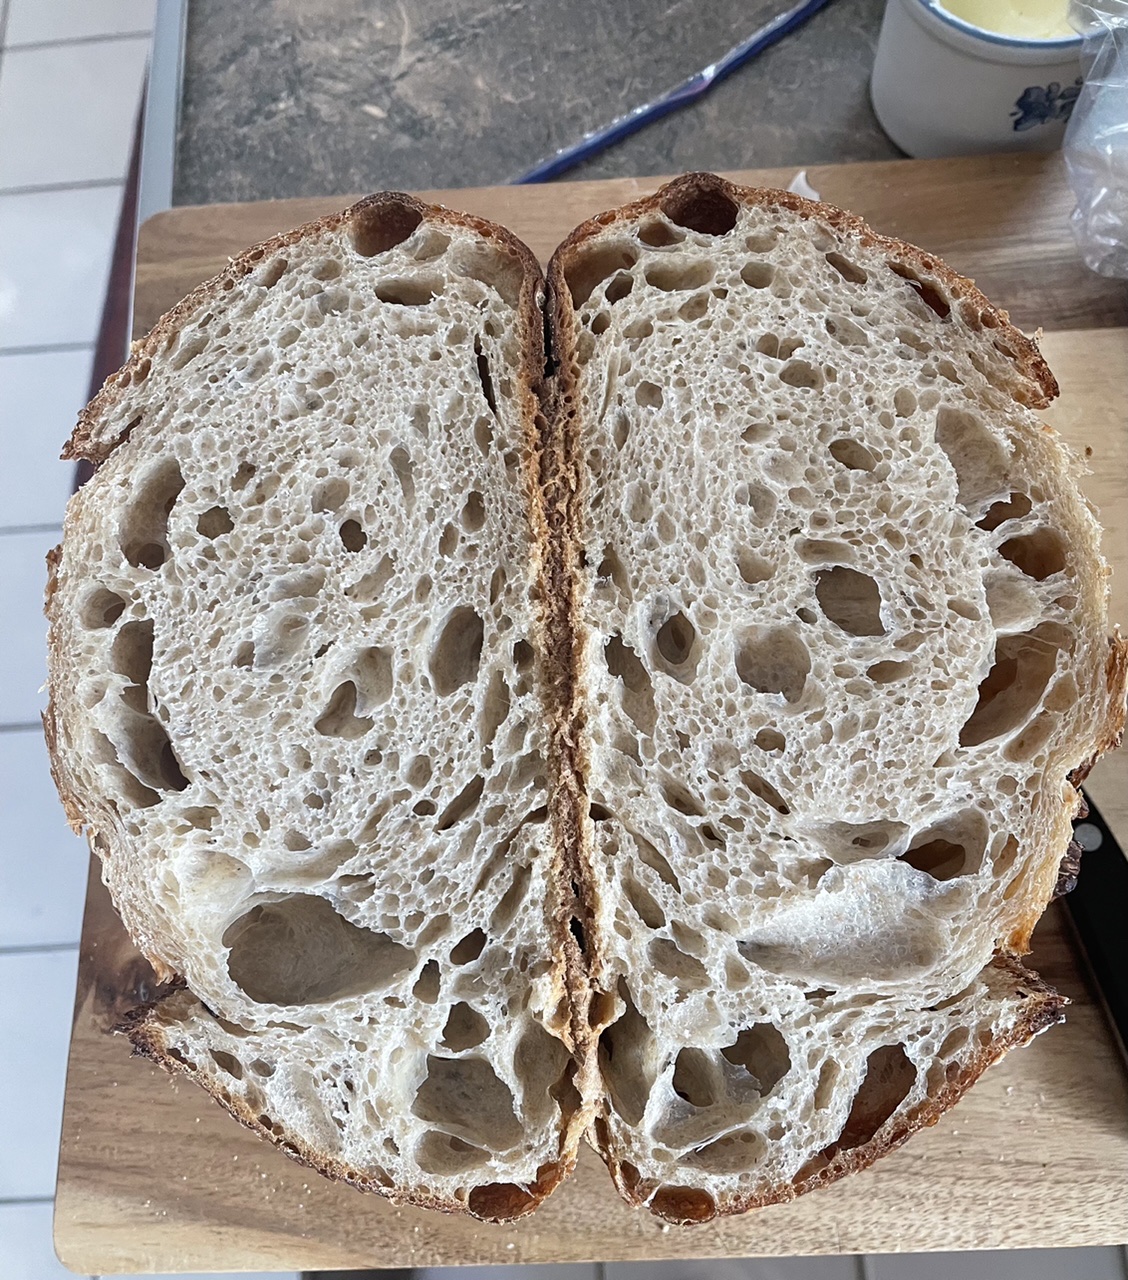
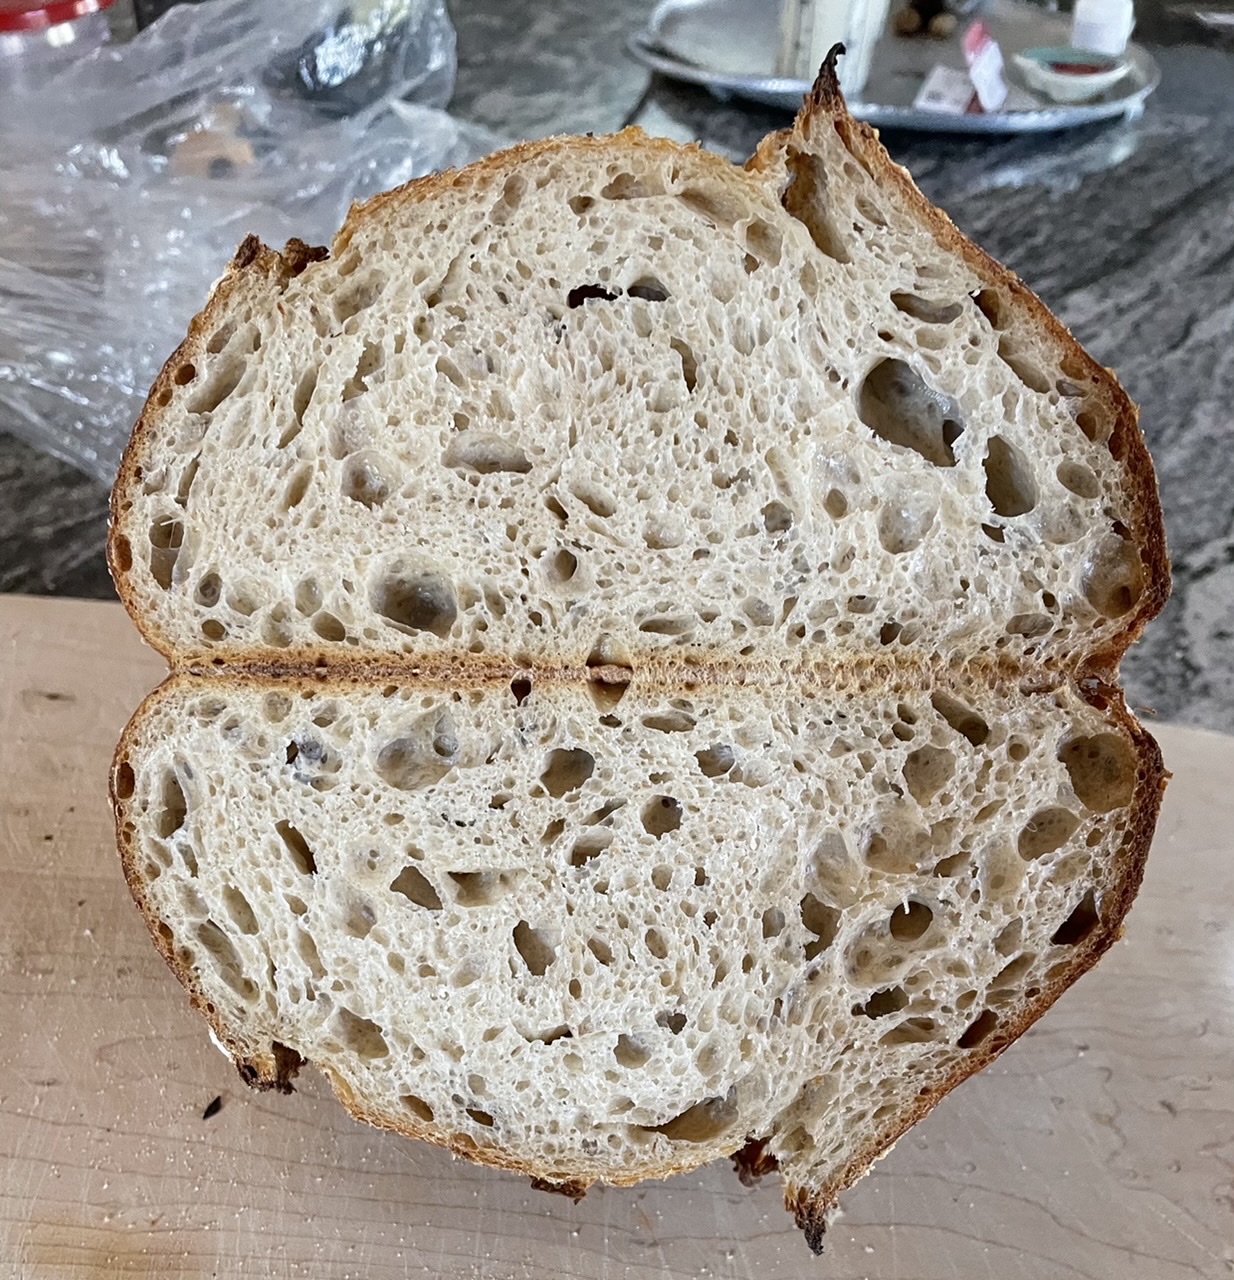
I am still trying to get used to our oven down here in Florida.  For this bake, I wanted to see how I might add steam to a bake.  I wanted some more sandwich bread, but thought I’d make a loaf that used a tangzhong with milk but without milk in the mix or butter in the dough.  I decided to use olive oil instead for the enrichment.  To add some flavour there is King Arthur whole wheat in the dough and the three types of sesame seeds on the crust.

I think that the large baking pan I used to add water to create steam should have been above the loaf rather than below.  I believe it’s position below compromised the oven spring and also you can see that the bottom crust didn’t achieve the caramelization that I usually want and the crumb at the bottom is a bit off.

For 9x4x4 Pullman Loaf Pan


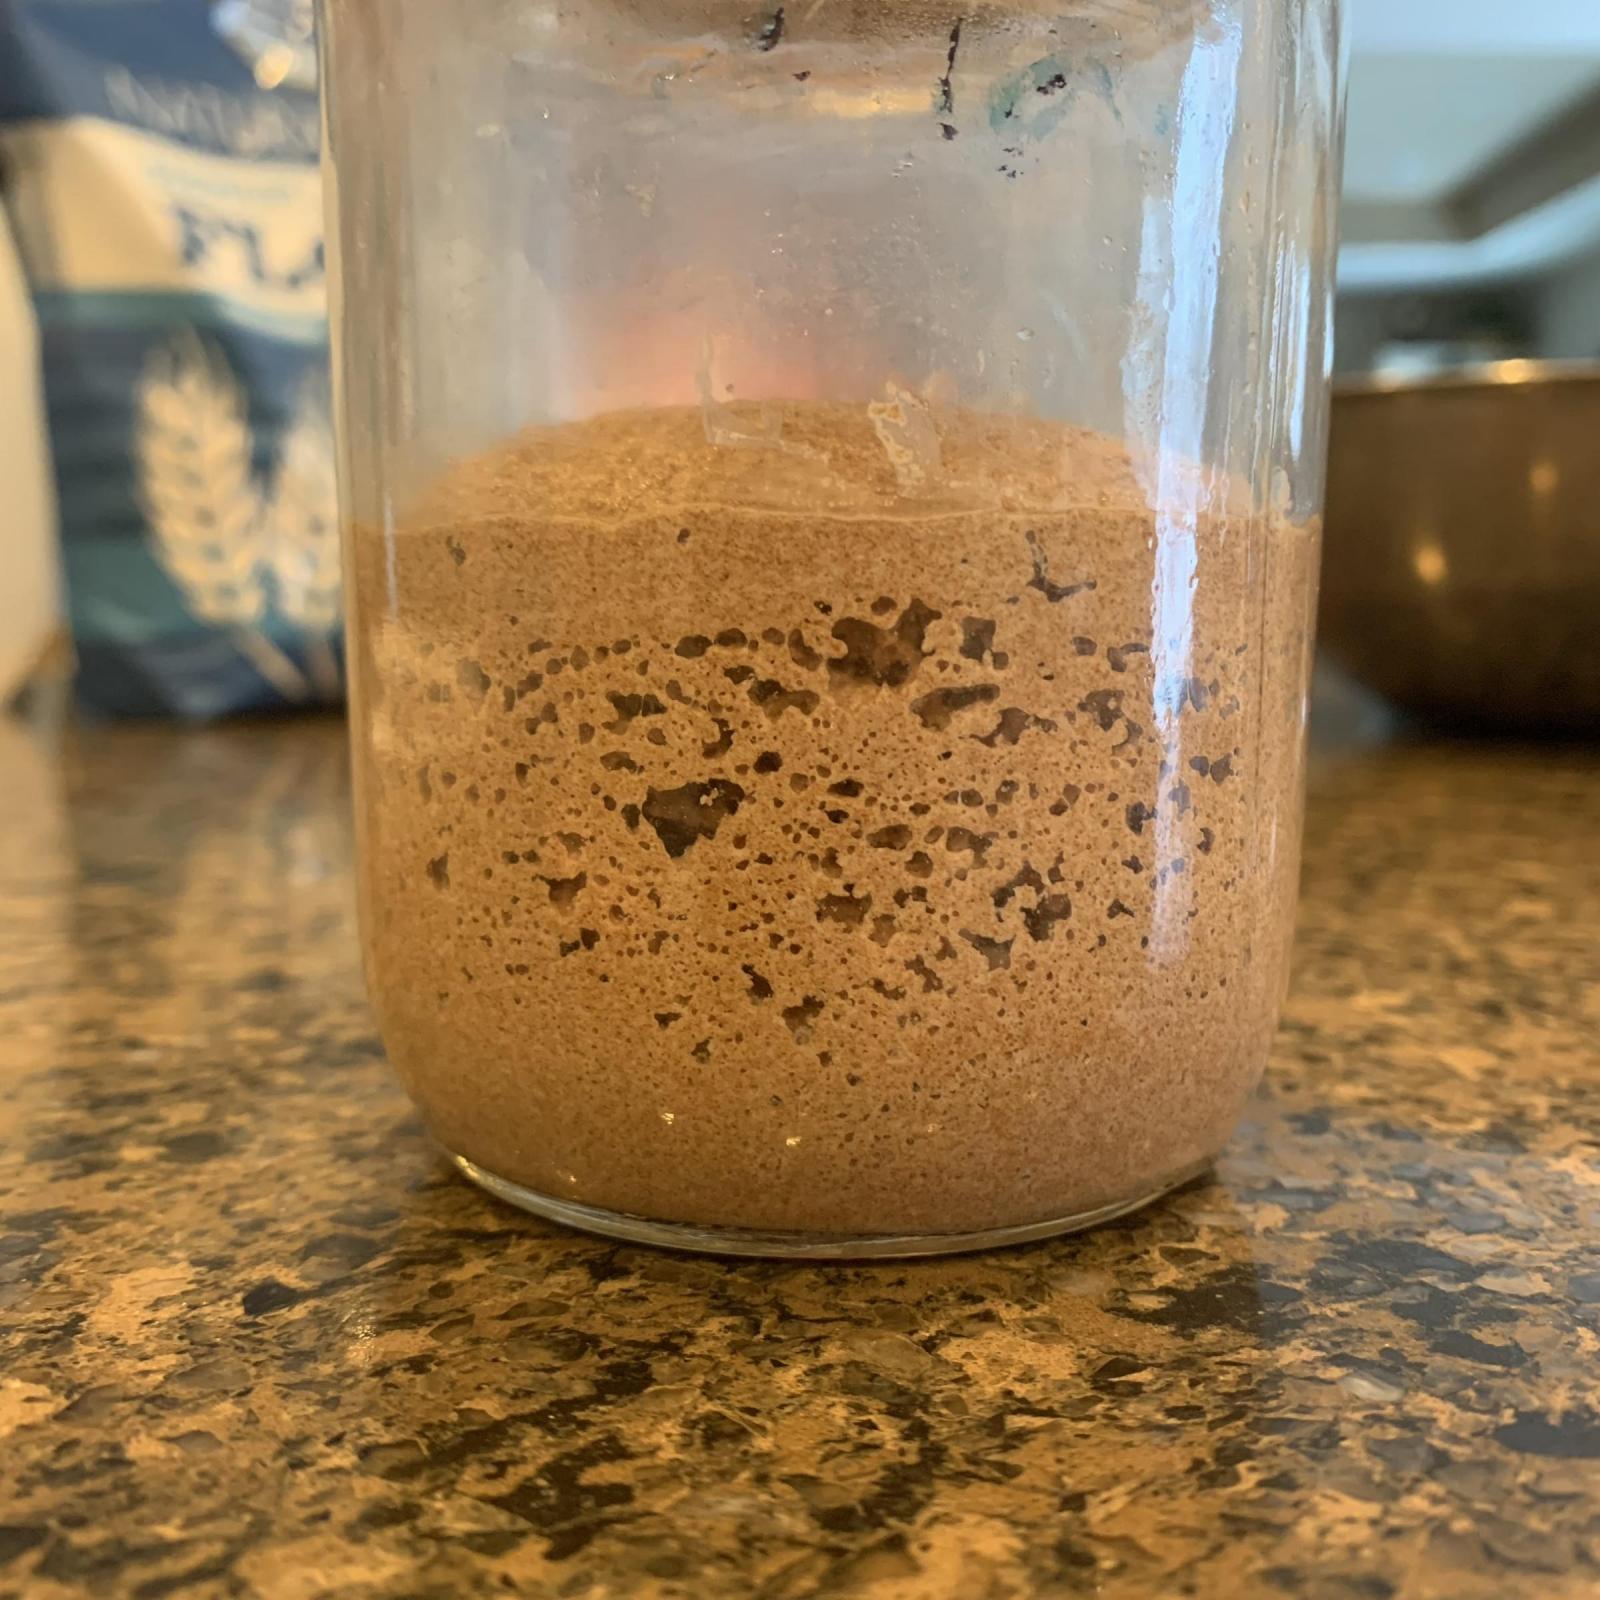
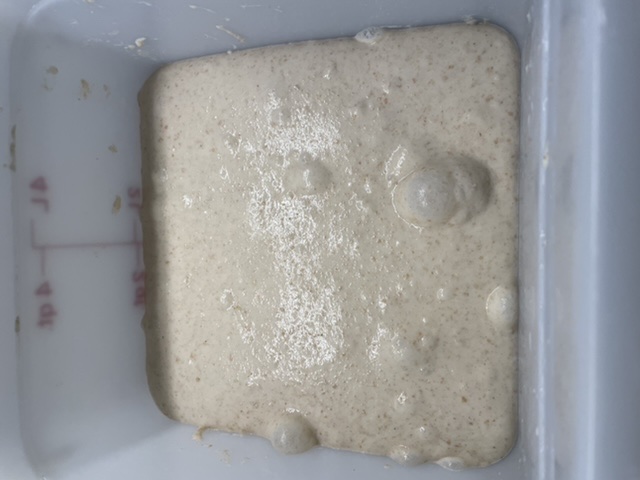
Prepare Poolish – Night before mixing

Mix the poolish ingredients in a container and leave covered to ripen at about 78°F (25°C) for 12 hours overnight.


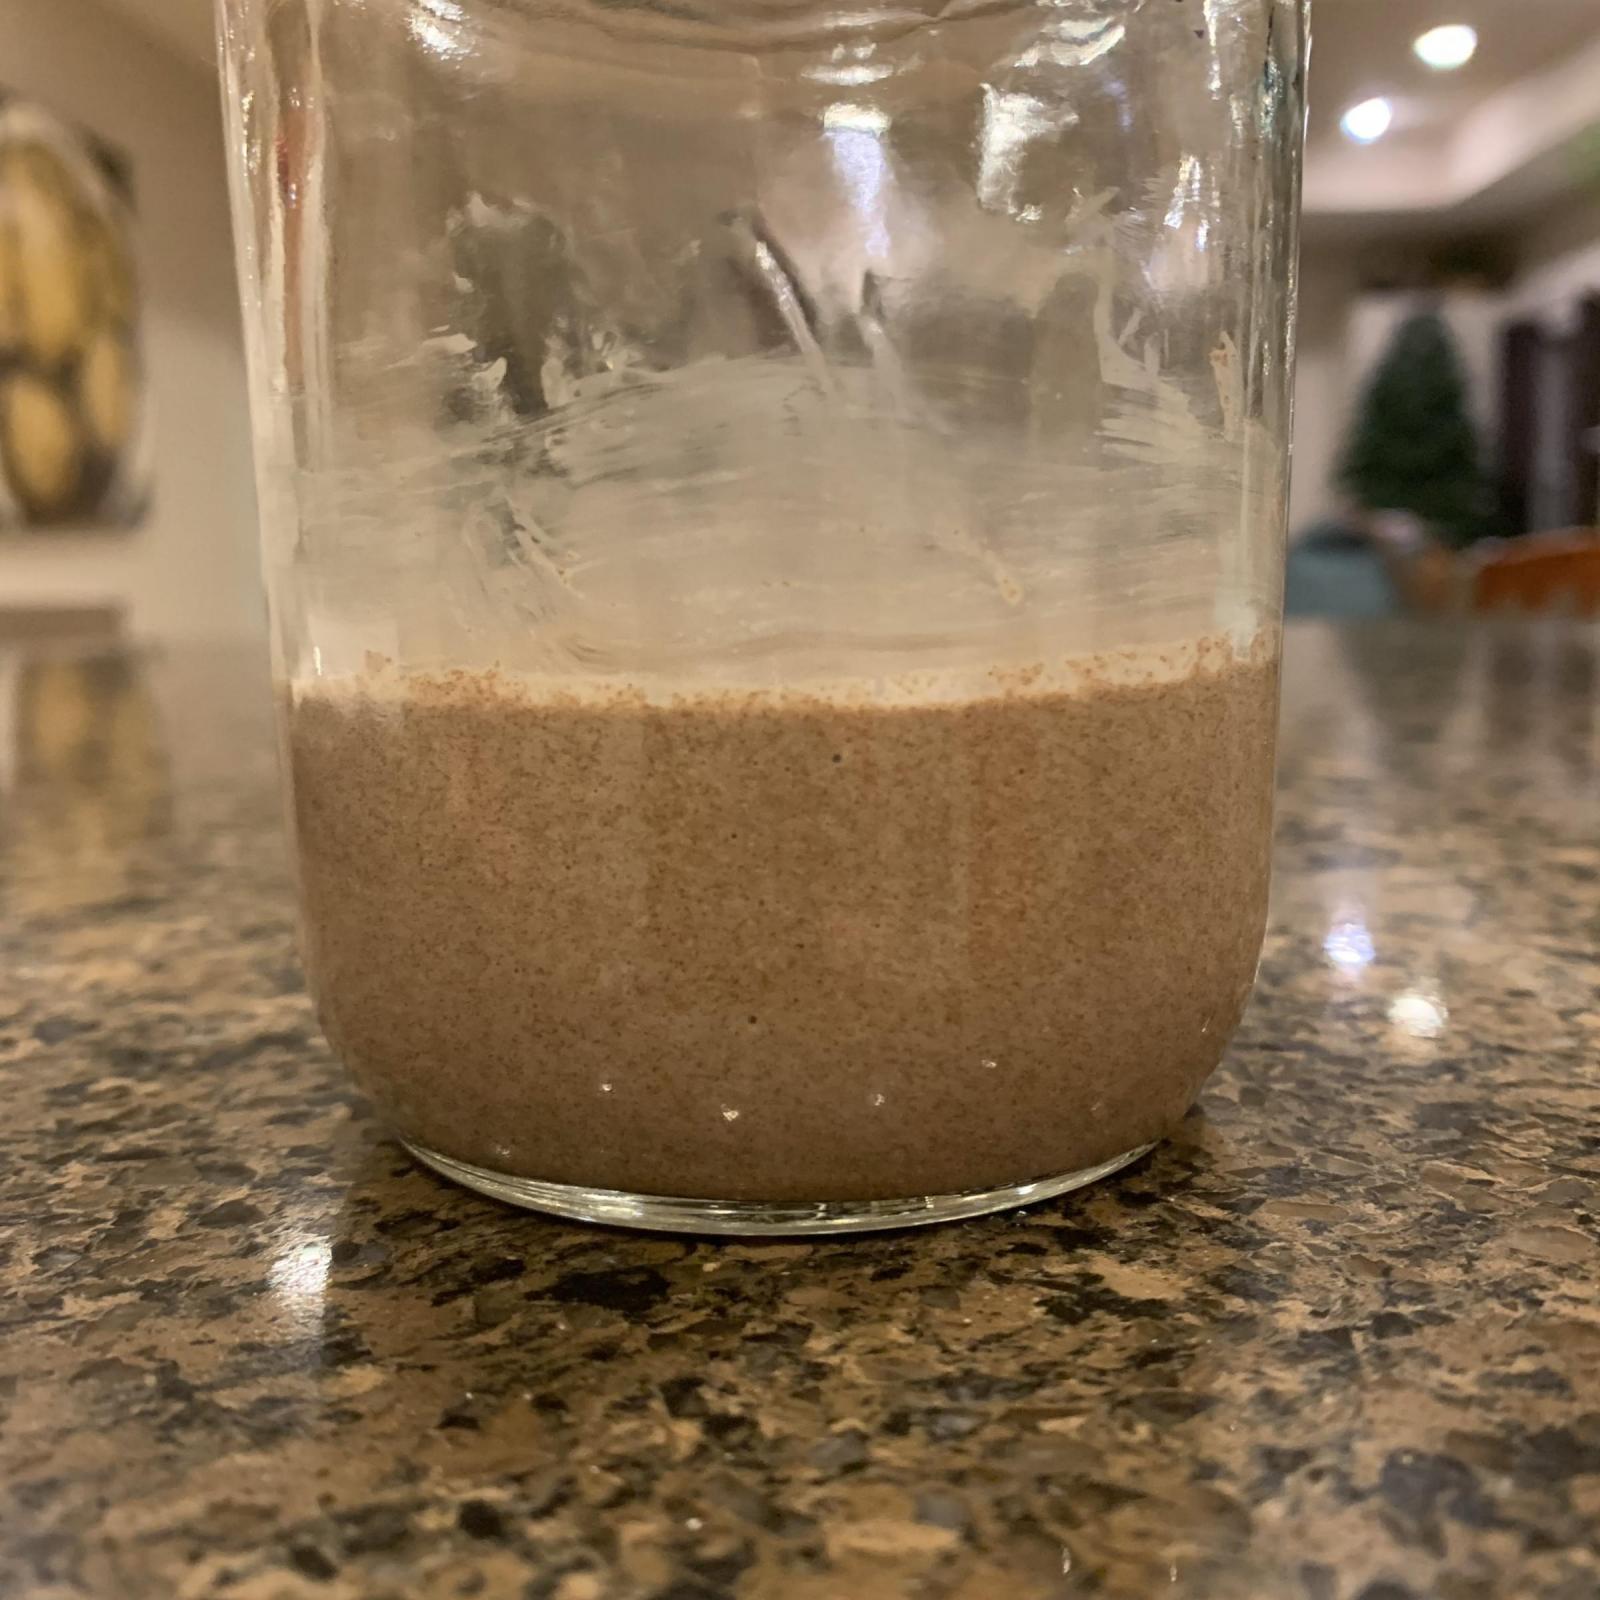
Tangzhong - night before to allow to cool

Be sure to do this ahead of time to give the pre-cooked flour time to cool before mixing.

Milk alternative: If you want to avoid using milk in this recipe, substitute out the dairy milk in the roux, below, for water (or something like oat milk).


To a medium saucepan, add the flour and milk listed above. Turn the heat to medium-low and cook, whisking continuously, until the mixture thickens and becomes like a paste, about 5-8 minutes. In the beginning, whisk vigorously to break up any flour clumps, and be diligent about this near the end to avoid burning. The mixture won’t seem to do anything until it reaches a critical heat point, be patient; it will thicken.

Once it transforms into a viscous paste (something like oatmeal porridge), remove the pan from the heat and spread it out on a small plate to expedite cooling. Set the tangzhong aside until called for when mixing.


Mix in the morning when poolish is ready

It is easiest to mix this dough using a standmixer, but it’s possible to make this bread without a stand mixer by mixing everything together by hand in a mixing bowl. To do this, you’ll need to mix for around 10-15 minutes, depending on your technique (slap and fold will work really well!).


To the bowl of a stand mixer fitted with the dough hook attachment, add the pre-cooked flour, flour, water, ripe poolish, sugar, olive oil, and salt. Mix on low speed for approximately 2 minutes until the ingredients come together, and no dry bits remain. Increase the mixer speed to medium (2 on a KitchenAid) and mix for 8-10 minutes until the dough starts to clump up around the dough hook. It won’t completely separate from the bottom of the bowl, and it will still be shaggy. 


To mix fully by hand, to a large bowl add the tangzhong, water, ripe poolish, sugar, salt and olive oil.  Stir to breakdown the poolish and dissolve the sugar, salt and poolish.  Add the flours and mix until no dry flour remains.  Rest for 10 mins.  Slap and fold the dough until the gluten is well developed and you can pull a good windowpane.  This required about 700 slap and folds for me.


Bulk Fermentation

On the counter, shape the dough into a tight ball, cover in the bowl and ferment for 2-2.5 hours at 82ºF.  There should be some rise visible at this stage.


You can next place the dough into the fridge to chill the dough for about 1.5 hours, this makes rolling the dough easier to shape.  Remember, if you do so the final proof will take longer.  Alternatively, you can do a cold retard in the fridge overnight, however, you may find that this increases the tang in your bread.


Prepare your pans by greasing them or line with parchment paper.  A tip if you’re using very soft butter to grease your pan, after greasing the pan, place it in the fridge for a bit to firm up the butter that way the butter won’t just melt into the dough.


Shape 

Prepare your pans by greasing them with butter or line with parchment paper.  


Lightly oil the countertop.  Scrape the dough onto the oiled countertop. Shape tightly as a batard or roll.  On a small cookie tray, add the sesame seeds.  Roll the batard seem side down on the sesame seeds, then roll onto the sides and ends to get the dough well covered with seeds except for the top of the batard.   We will be applying an egg milk wash to the top of the dough twice before baking and will then add the sesame seeds after this wash is done.  I have found that egg washing onto the seeds affects their colour more than I prefer.


Proof


Cover and let proof for 3-4.5 hours at a warm temperature.  I proof at 82°F.  You will need longer than 3-4.5 hours if you chilled your dough for shaping. Proof until the dough passes the finger poke test.  For a loaf the dough should reach within 1 cm of the rim of the pullman pan.


Preheat the oven to 350°F setting it up for steam baking  and brush the dough with the egg-milk wash when the dough is 30 mins away from fully proofed.  Just prior to baking brush with the egg-milk wash again.  Finally apply sesame seeds to the egg washed top of the dough, then bake.


Bake 


Bake for a total of 50 mins at 350°F.  Pour 1-2 cups of boiling water into the roasting pan and bake with steam for 20 mins.  After 20 mins vent the oven and remove the roasting pan.  Rotate the bread and bake for another 30 mins. 

My index of bakes.

MTloaf's picture
MTloaf

This recipe was brought to my attention in a recent post here with a link to the King Arthur blog post. 
https://www.kingarthurbaking.com/blog/2020/04/06/dont-be-a-bread-hostage 

I was curious because the recipe makes a similar version of my weekly bread and requires little to no prior planning and the schedule frees up the shorter daylight hours for other things like fishing or the neglected chores around the house. I was skeptical at first that it would produce only a passable bread but would be lacking something that a more hands on approach would provide. I was wrong about that.
I am one of those bakers that believe a starter has to be well maintained and developed to make an open crumb country bread similar to the Tartine style. I used the warm days of this past summer getting my starter and bread to be like the version that Chad Robertson writes about in his latest Bread book and what he refers to as a boosted leaven required for his signature country bread. It requires a bit more time and effort but it did work better and it made some pretty good loaves. 
This so called “don’t be a hostage bread” might need a more catchy name but it has worked very well without fail in my few recent attempts at it. So well in fact that it may become my new go to method for my weekly bake. 
The recipe is fairly simple:

1000 grams total flour The recipe specifies KAAP for the white flour and 10 to 20% whole grain ( I have reduced it to 900 gr because the loaves wouldn’t fit in my bread bags)

80% hydration (which seems to work well for me) 

2% salt

40 grams starter recently fed but can be used straight from the fridge. (I have used a fresh fed and a few days old and both worked well.)

I mix the starter in the water first and then the flour and salt.The recipe calls for 4 compass folds 15 minutes apart. I used 3 coil folds 20 minutes apart. 
Bulk ferment for 12 hours at 72 degrees or until it doubles. I would normally ferment to 50% but without the intermittent folds during the bulk it will easily double. After which it is divided and shaped for another 12 hours in the fridge. 
Starting in the evening works best for me rather than putting it together first thing in the morning. 
There is something about the long slow fermentation that produces a silky beautiful dough to work with like no other I have had before and brings out the flavors as well. 
No hostage

Dough End of bulk
This is after the final fold and 11 hours later at the end of bulk fermentation. 

15% spelt

This loaf is 15% home milled spelt and the crumb is as good or better than the old way of doing it. 

Sliced spelt

Campagne
This is last weeks with 10% WW  5% spelt 5% rye

I would encourage others to try this method and come up with a better name but be aware of the “Stockholm Syndrome” because it has definitely changed my beliefs!

Don

edit:

The other loaf from the Campagne dough which was shaped with a different method resulting in a more even crumb. Country

Sourdough_Hobby's picture
Sourdough_Hobby

Found the CB page on ciabatta over the weekend, thought the Biga recipe from mwilson looked interesting. In the past my ciabatta was all over the place, the flour I was baking with was inconsistent. Slightly adapted, wanted to see how much water the flour could take, could have probably pushed it slightly more, but this is one of the better ciabatta I have made, definitely the softest. Ended with a very strong dough if I understand correctly this if from the large portion of Biga. 

Could have probably proofed it for an extra hour, but was getting late.

Ciabatta #1

Biga (12h)

  • 600g Flour 
  • 250g Water
  • 60g LM

Main

  • 200g Flour
  • 35g Oil
  • 18g Salt
  • 500g Water

Mixed and folded 3 times over 3 hours. Cut into rectangles and proofed on linen for 1,5h on a cold counter. Will change this next time, slowed things down as I could feel dough got cold. 

justkeepswimming's picture
justkeepswimming

We're (finally) getting settled in our new home, and I have mostly figured out what needs doing for a successful bake at 6,000 ft. My starter had been on (to borrow a medical term) "comfort measures only" for about 4-5 months. It was fed just often enough to prevent death by neglect, but it wasn't exactly thriving. After series of feedings a few weeks ago, it was back to it's robust self. 

Lately I have been wanting to bake something other than loaf pan breads, so I invested in some new toys: an oblong banneton and oblong clay baker from Breadtopia. 

After baking mostly pan loaves for about a year, my shaping needs work.... I have a hard time getting dough to have the same thickness at the ends. One end is usually fatter than the other.  

Dough specs: 

Dough flour 460 gm. (50% bread flour, 50 % home milled flour {half hard red spring wheat, half spelt}). 

Water 330 gm

Starter 75 gm (1:1:1)

Salt 9 gm salt

Process:

Mixed everything together and kneaded it in a Bosch compact mixer for 10 min. I was busy and knew I wouldn't have an opportunity to do anything else for developing/organizing gluten. Bulk at 70F for 6 hours, about a 50-60% rise.

Preshaped/rest/shape and into banneton. The dough was pretty stretchy and on the verge of slack, I was glad I didn't push hydration any further. On a whim, I did that flour on a paper towel decoration thing that was popular for a while.... flip the dough out of the banneton onto a well floured paper towel. I used it as a sling to put it in the banneton. Rested on counter for about 15 min then into the fridge for 12 hours. Flipped onto parchment (seam down), scored, and placed into preheated clay baker. Baked at 490F for 20 min with the lid on, then at 450F lid off to internal temp 199F. That's the highest I can get at this altitude. It's cooling now, no crumb shot since it's a gift. 

This is only my second loaf using the baker, the first one came out just like this. The shape is more helpful for our usual bread uses (toast, sandwiches) than a boule. And the clay baker is much easier than a dutch oven for my arthritic joints to deal with. It's nice to have something different! This bread a gift for a brother visiting from out of town so no crumb shot. 

Pages

Subscribe to Recent Blog Entries