The Fresh Loaf

A Community of Amateur Bakers and Artisan Bread Enthusiasts.

Recent Blog Entries

Isand66's picture
Isand66


   I’ve made breads in the past using Guinness but I have to say this version by far was the best one yet.  I combined fresh milled rye, spelt and whole wheat which were all sifted to a high extraction.  I added some mashed potatoes with a little bit of honey and some olive oil for good measure.

A double build was used for the levain but you could easily just do one build if you desire.

I made one large Miche which ended up being over 2000 grams.  I brought this over as a gift for Rosha Shana for my Cousin’s first dinner at his new house and everyone seems to enjoy it.

The crumb was nice and open and the crust was deep and dark  and flavorful.

Formula

Levain Directions Build 1

Mix all the levain ingredients for build one (including the seed starter) together for about 1 minute and cover with plastic wrap.  Let it sit at room temperature for around 6-7 hours or until the starter has almost doubled.  I used my proofer set at 76 degrees so it took around 5 hours for me.

Levain Directions Build 2

Add in the flour and water as indicated and mix until incorporated by hand.  Cover and let sit another 3-5 hours until doubled and you should see plenty of activity.

Either use in the main dough immediately or refrigerate for up to 1 day before using.

 Main Dough Procedure

Mix the flour and Guinness together in your mixer or by hand until it just starts to come together, maybe about 1 minute.  Let it rest in your work bowl covered for 20-30 minutes.  After 30 minutes or so  add the salt, starter (cut into about 7-8 pieces),  olive oil, honey, potatoes and mix on low for 5 minutes.   Note: If you are using the Ankarsrum mixer like I do, add your water to the bowl first then add in the flour and potatoes.  After your autolyse add in the starter, salt, honey  and olive oil and mix on low to medium low for 15-20 minutes.

Remove the dough from your bowl and place it in a lightly oiled bowl or work surface and do several stretch and folds.  Let it rest covered for 10-15 minutes and then do another stretch and fold.  Let it rest another 10-15 minutes and do one additional stretch and fold.  After a total of 1.5 hours place your covered bowl in the refrigerator and let it rest for 12 to 24 hours.

When you are ready to bake remove the bowl from the refrigerator and let it set out at room temperature still covered for 1.5 to 2 hours or if using a proofer set at 80 degrees for one hour.  Remove the dough and shape as desired and cover with a moist tea towel or plastic wrap Sprayed with cooking spray and let rise at room temperature for 1 1/2 – 2 hours.  (I use my proofer set at 80 F and it takes about 1 hour to 1.5 hours).

Around 45 minutes before ready to bake, pre-heat your oven to 500 degrees F. and prepare it for steam.  I have a heavy-duty baking pan on the bottom rack of my oven with 1 baking stone on above the pan and one on the top shelf.  I pour 1 cup of boiling water in the pan right after I place the dough in the oven.

After 1 minute lower the temperature to 450 degrees.  Bake for around 35 minutes or until the breads are nice and brown and have an internal temperature around 200-210 F.  Note: if making a Miche lower the temperature to 435 F and bake for close to an hour or until the internal temperature is 200-205 F.

Take the bread(s) out of the oven when done and let them cool on a bakers rack for as long as you can resist. 

JonJ's picture
JonJ

Psyllium husk is usually used in gluten-free or keto style breads where the gel that it forms can act as a binder and helps the loaf to retain its structure without slumping.

For a long time now, I've tried using psyllium husk together with my lower protein flours (around 11.5%) to see if I could make a better bread with these weaker flours and the results have been usually somewhat unclear.

So this post is my attempt to describe in one place some things that I've learnt, both good and bad, about the use of psyllium husk in baking in a non-gluten-free context.

The thing is, you don't need to add psyllium to a wheat bread. The benefit really is that it is a simple way that allows you to dramatically increase the hydration without risk of the dough slumping or baking a flat loaf. The dough becomes super easy to handle, the flow/rheology changes, and the dough holds shape. The crumb retains more moisture to it as well.

What are psyllium wheat breads like, is there an improvement? Initially I was adding around 2g of psyllium husk per approximately 500g of flour, and for these breads the results were unclear. The dough became much easier to handle, but beyond that it was difficult to pinpoint exactly if this was beneficial to the final bread.

Lately I've been reading gluten free recipes that use about ten times as much, around 20g of psyllium. And so I moved up to 20g of psyllium, and whilst it made a beautiful wheat bread with 20g of psyllium, with a beautiful shape, in some ways the crumb looked a lot like those pictures you see of gluten free breads, a little too homogeneous, somewhat unnatural, and not at all like what you expect:

The unnatural looking crumb is visible in the photo above; it must be said though the texture of the bread was quite lovely, soft to the touch and without any noticeable taste change. The shape was good, almost as if the bread was formed in a mould. For this bread the psyllium gel was added at the same time as the levain to the autolysed dough using the dough hook, and the hydration was 87%.

______________________________________________________________________


In another, later experiment I reduced the amount of psyllium down to 6g, and wanted to compare adding a psyllium gel versus adding water by bassinage.

The loaf on the left used bassinage to increase the hydration to 75%;  the loaf on the right used Psyllium gel as the way of increasing hydration to 83% (the initial dough had a hydration of 70%, and was divided in half).


Note the Psyllium loaf had 'snail trails' on the surface, or deposits left on the surface from the gel. It also spread at the score rather than lifting the crust to make an ear, and had a softer crust and moister crumb, although the bassinage loaf had a nicer chew. Besides that they were fairly similar breads. The effort to add the psyllium gel addition by hand is a lot easier than bassinage is.

_____________________________________________________________________________________


Finally, psyllium has its uses to help with recovery from an over hydrated dough - I had issues with my scale and inadvertently mixed up a dough at a hydration of about 86% which was way too high for the flour used. To recover, I added 5g of psyllium husk into the dough, which stabilized it enough to continue to shaping and it kept its shape without slumping when it came out of the banneton. There were lumps from the psyllium, so the dough was not smooth when worked by hand, but this did not seem to carry through after baking.

Once again there is no ear, and there is an unusual upright shape and way in which the loaf opens up. Interestingly, for this bread, the crumb was noticeably moister even one or two days after baking and quite nice to eat.

Benito's picture
Benito

I’ve just uploaded a new video to my YouTube channel about dough development.  Novice bakers might find it useful.  In the video I demonstrate some of the techniques I use to develop dough strength.  Hopefully someone finds it useful to them.

My index of bakes.

trailrunner's picture
trailrunner

Fermentation is everything.Photo is of dough right out of fridge after 48 hrs. Amazing movement still after that length of time. Formula has 40g of levain in 400g of flour. TDW 700g. Fed old rye starter from cold storage 2 feedings of T80. Let ferment 24 hrs. Stirred up usual formula with 1 hr fermentolyse and 3 folds in 90 min. Bulk ferment went over but will be a habit from now on! They just get better and better. Amazing crumb and crisp crust with beautiful crumb color due to the bit of rye and wow the flavor. Dough handles so beautifully. Can’t get over this flour. L’Epicerie has been amazing to work with. Give them 5 ⭐️
Glistening crumb

JonJ's picture
JonJ

Roosterkoek (or roosterbrood) are a traditional bread or bread rolls cooked over the braai (BBQ). The name is Afrikaans for rooster ("grilled")  plus either koek ("cake") or brood ("bread"). They are usually eaten piping hot together with the meat.

Many of the recipes are fairly similar and usually include sugar and oil in the dough. Where I differ a little is I like to give mine a little bit of shaping and bake them as pull apart rolls. Also, I'm not a great fan of them if they're cooked directly over the coals, which is the traditional way.

My method is to mix all the ingredients except the oil, with a Danish dough whisk, usually I mix the yeast, water, and sugar together and then add the flour and sugar to that. Then olive oil is kneaded into the dough after about 20 minutes. About 40 minutes after the initial mix the dough is weighed and divided into 9 balls that are shaped into rolls and placed on the dutch oven lid. About 1h15m - 1h30m after the initial mix they have normally puffed up enough to be baked. I like to bake 20 minutes on the cast iron base in the Weber with coals to the side and parchment underneath. Might turn it every 5 minutes so that it bakes evenly.


The lovely thing about them is that not only are they enjoyable to eat, they're also super convenient. If you forget to buy rolls. Or have run out of potatoes, they'll still be there for you.

HeiHei29er's picture
HeiHei29er

Inspiration for this loaf came this fall while canning up some of the many cucumbers we grew this year.  Garlic dill pickles are something I really enjoy and felt that combination had potential as a bread as well.  Happy to say that it turned out quite well.  A friend tried it this morning as buttered toast for breakfast and then again as avocado toast for lunch.  He's tried many of my breads and said he thought that this was one of my best.  I'll run with that for now...  :-)

For this bake, I wanted to do something to really bring out and blend the dill and garlic flavors.  To do that, I added both of them to the whole wheat mash.  The mash helped to both increase the sugar content in the whole wheat as well as fully hydrate and soften the bran.  It also helped bring out the dill and garlic flavors and give them time to meld.  In my mind, it's similar to how a soup just seems to taste better the next day after the flavors have had a chance to combine.

For the last 5-6 months, I've been trying both Wheat Montana and KAF flours for my All Purpose and Bread.  To me, the Wheat Montana feels finer and has more flavor (the flour itself is noticeably more yellowish), but the KAF is stronger and forms better gluten.  Over time, I've started blending them 50:50 on many of my bakes and that's the case with this loaf.

Levain
67.5g   Bread Flour (WM/KAF)
67.5g   Water
13.5g   White Flour SD Starter

1)    Combine all ingredients and ferment at 68 deg F for 12-14 hours

Mash
45g    Whole Wheat Flour (freshly ground - Janie's Mill (Blend of Glenn, Red Fife, Turkey Red, and Warthog)
90g    Water
9g      Whole Dill Seed
13.5g Garlic Cloves, minced

1)    Preheat mash equipment to 150 deg F (I use Crockpot with water bath and an Inkbird controller)
2)   Combine flour, dill seed, and minced garlic in a bowl.
3)   Preheat water to 165 deg F.  Add the water to the ingredients from Step 2 and stir.  Immediately cover and place in Crockpot water bath.
4)   Cook the mash for 3-8 hours.  I went for about 6 hours overnight.
5)   Heat the mash to 180 deg F to denature the amylase.  (This step took about 90 minutes for me.  After 1 hour I checked and the mash temp was at 180 deg F.  I held that for another 30 minutes)
6)   Remove from water bath and cool to room temperature.

Final Dough
247.5g   All Purpose Flour (WM/KAF)
90g        Bread Flour (WM/KAF)
247.5g   Water
67.5g     Blueberry Yeast Water
9g          Himalayan Pink Salt

1)    Combine all Final Dough ingredients but salt with the levain.  It will be stiff but workable
2)    Fermentolyse for 15 minutes
3)    Add mash and salt in small amounts and fold into the dough.  After all the mash is folded in, pinch and squeeze dough until the mash is mixed in and the dough is uniform.
4)   Perform 4 sets of bowl kneading with 10 minute rests to form good gluten.
5)   Perform bowl stretch and fold every 45 minutes until dough starts to feel puffy.  Let dough rise 80-100%.
6)   Pre-shape and shape.
7)   Pre-heat oven to 465 deg F for 1 hour.  Immediately steam the dough after loading into the oven.  Bake at 465 deg F for 1 minute and then lower temp to 400 deg F for 19 minutes.  Vent oven and remove steam sources.  Increase oven temp to 440 Deg Fand bake for 20-25 minutes more until you have a hollow thump. 


Benito's picture
Benito

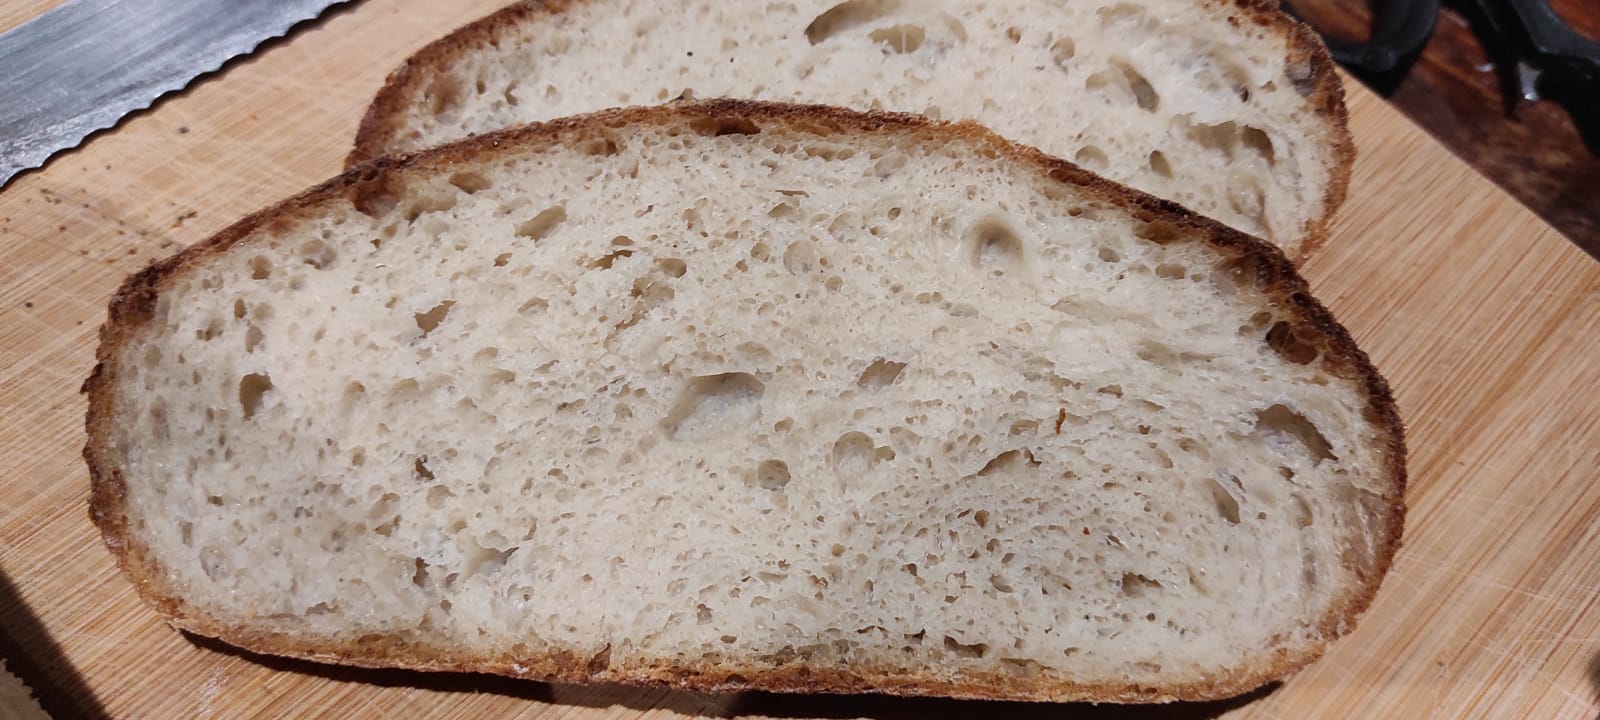
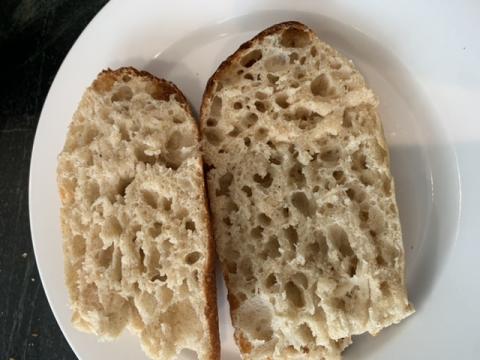
These are the perfect buns to have with your Thanksgiving dinner which we just had this year in Canada.  At 30% whole wheat they have that extra flavour without being too whole wheat for those in your family who don’t like 100% whole wheat breads.  The tenderness achieved by the tangzhong, butter and milk make these so soft and fluffy and delicious, everyone will love them.

450 g for six or 900 g for 12 buns baked in cupcake pan

Levain

Mix the levain ingredients in a jar or pyrex container with space for at least 50% growth.

Press down with your knuckles to create a uniform surface and to push out air.

At room temperature, it typically takes 7-9 hours for this sweet stiff levain to be at peak.

Tangzhong 

In a sauce pan set on med heat with about 1.5 cm of water, place the bowl of your stand mixer creating a Bain Marie, whisk the milk and flour until blended. Then cook for several minutes until thickened, stirring regularly with a spoon or heat-resistant spatula. Let cool.


Dough

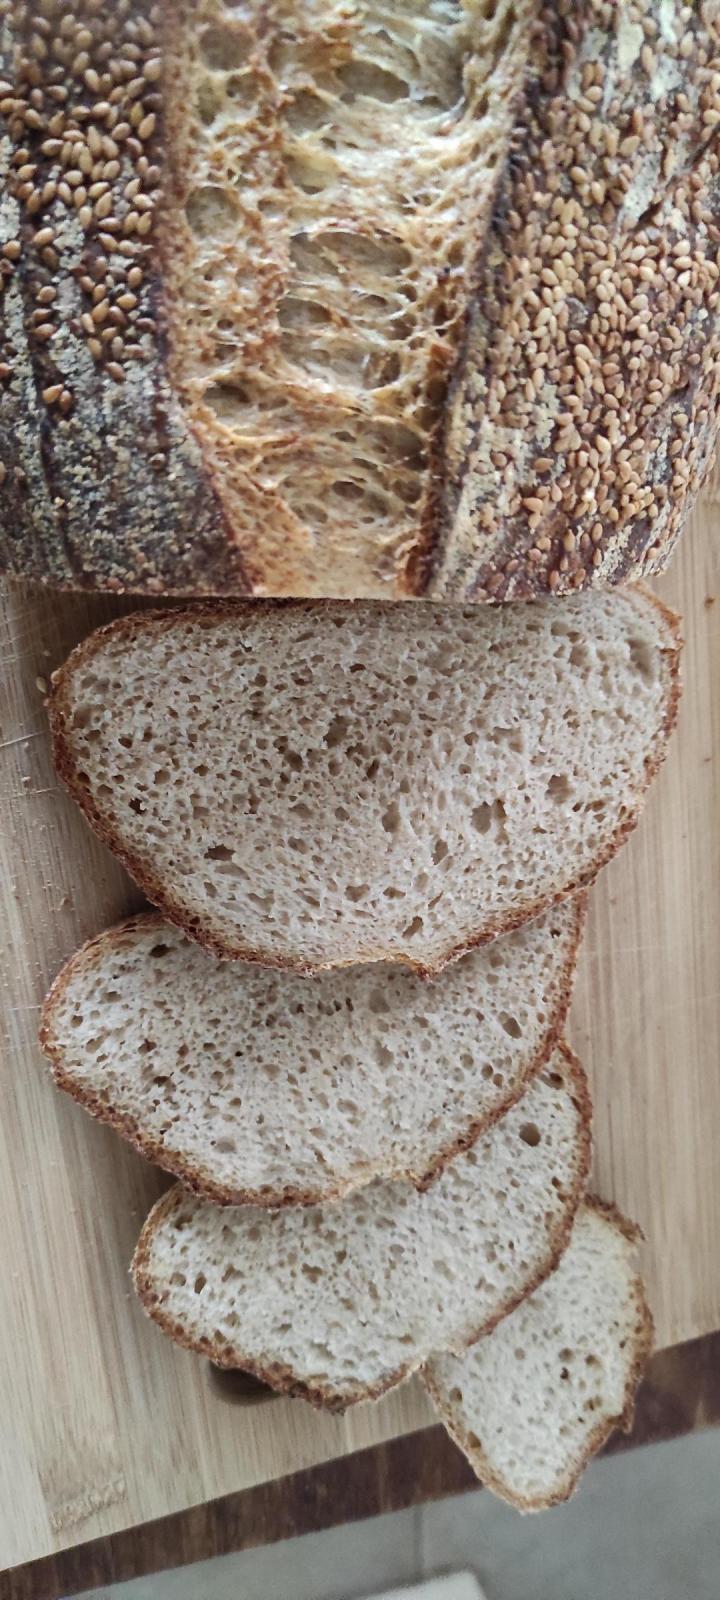
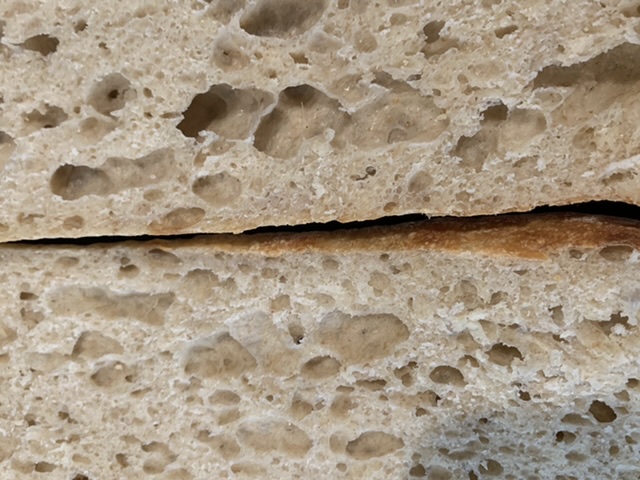
In the bowl of a stand mixer, add the milk (consider holding back 5 g of milk and adding later if this is the first time you’re making this), egg, tangzhong, salt, sugar and levain.  Mix and then break up the levain into many smaller pieces.  Next add the flour.  I like to use my spatula to mix until there aren’t many dry areas.  Allow the flour to hydrate (fermentolyse) for 20-30 minutes.  Mix on low speed and then medium speed until moderate gluten development this may take 5-10 mins.  You may want to scrape the sides of the bowl during the first 5 minutes of mixing.  Next add room temperature butter one pat at a time.  The dough may come apart, be patient, continue to mix until it comes together before drizzling or adding in more butter.  Once all the butter has been added and incorporated increase the speed gradually to medium.  Mix at medium speed until the gluten is well developed, approximately 10 mins.  You will want to check gluten development by windowpane during this time and stop mixing when you get a good windowpane.  You should be able to pull a good windowpane, not quite as good as a white flour because the bran will interrupt the windowpane somewhat.  This is a good time to add inclusions such as my favorite black sesame seeds, that way they do not interfere with the gluten development.  If you add inclusions mix until they are well incorporated in the dough.


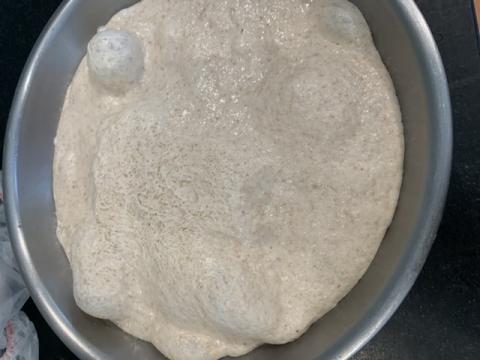
On the counter, shape the dough into a tight ball, cover in the bowl and ferment for 2.5-3.5 hours at 82ºF.  There may be some rise visible at this stage.


You can next place the dough into the fridge to chill the dough for about 1.5 hours, this makes rolling the dough easier to shape.  Remember, if you do so the final proof will take longer.  Alternatively, you can do a cold retard in the fridge overnight, however, you may find that this increases the tang in your bread.


Prepare your pans by greasing them or line with parchment paper.  


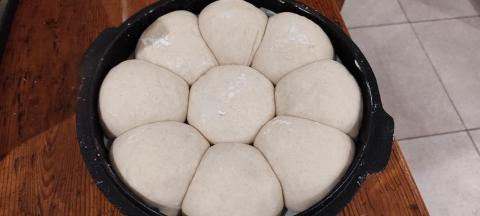
Lightly flour the top of the dough. Scrape the dough out onto a clean counter top and divide it into 12. Shape each tightly into boules, allow to rest 5 mins. Using a rolling pin roll each ball out and then shape tightly into boules.  Place them into your prepared pan.


Cover and let proof for 6-8 hours at a warm temperature.  I proof at 82°F.  You will need longer than 3-4 hours if you chilled your dough for shaping. Proof until the dough passes the finger poke test.


Preheat the oven to 350F and brush the dough with the egg-milk wash.  Just prior to baking brush with the egg-milk wash again.


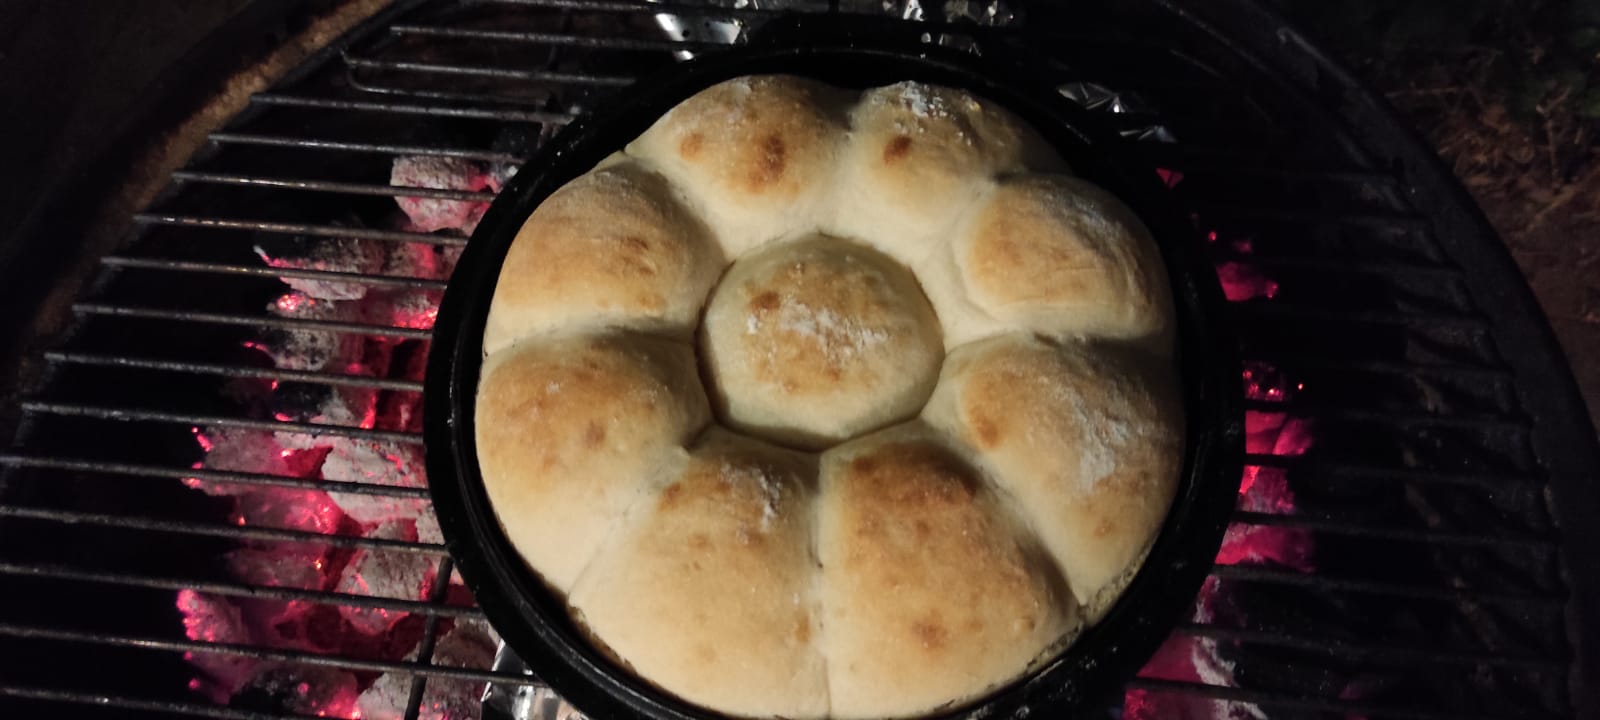
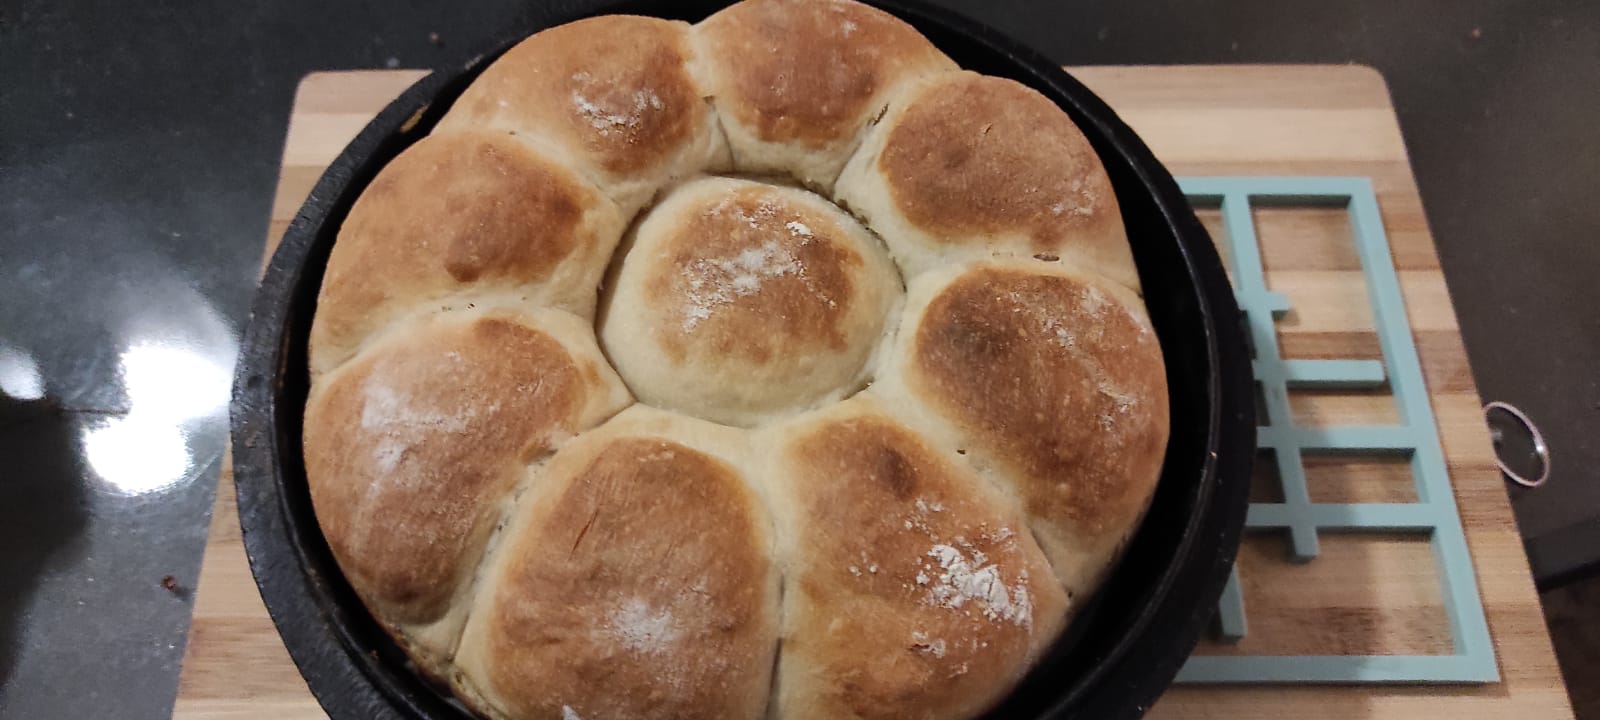
Bake the buns for 30-35 minutes or until the internal temperature is at least 190F. Shield your buns if they get brown early in the baking process. You can brush the top of the buns with butter if you wish at this point while the buns are still hot and sprinkle with flaked salt.

My index of bakes.

trailrunner's picture
trailrunner

So pleased!!! 36 hr cold fermentation and boy did the dough respond. Flavor is terrific as well. Really enjoying this flour… good thing since I have 22 kg! 

Benito's picture
Benito

Two of our close friends have birthdays this month. We decided to host a brunch for them, in part to give me an excuse to bake a challah loaf again. I thought I’d make a couple of changes to Maggie Glezer’s SD challah. Mostly I thought it needed more egg, so I increased the egg from 3 to four and reduced the water to compensate for the 72% of the egg which is water. I needed the challah to make a peach and blueberry strata. Basically this is a type of French toast that you bake in a pan using cubes of the challah. This makes for an easy meal that you prepare the night before and then bake the morning of the brunch.

I decided to coat only three of the strands of this six stranded challah for a different look.  It didn’t quite turn out the way I thought it might.  I started with the seeded vs unseeded strands in alternating positions.  I wonder if I’d started them three seeded on the left and then three unseeded on the right if it might have ended up looking more random.  I’ll have to try that next time and find out.

Procedures


  1. The night before baking, mix the starter and ferment it at 76°F for 8-12 hours.
  2. In the morning, in a large bowl or the bowl of a stand mixer, dissolve the starter in the water, then mix in the 4 eggs, salt, honey and oil until completely combined.
  3. Mix in all the bread flour until it forms a shaggy mass.
  4. Knead the dough on the bench or in a stand mixer until it is smooth and there is moderate gluten development. (Add small amounts of water or flour to achieve the desired consistency, better if you do not have to) The dough should be quite firm.
  5. Transfer the dough to a lightly oiled bowl and cover it tightly. Ferment for about 2 hours. It may not rise much.
  6. To make one loaf, divide the dough into two equal portions, and divide each portion into the number of pieces needed for the type of braiding you plan to do, so divide each by 3 to make 1 six strand braided loaf.
  7. Form each piece into a ball and allow them to rest, covered, for 10-20 minutes to relax the gluten.
  8. Form each piece into a strand about 14” long. (I like Glezer’s technique for this. On an un-floured board, flatten each piece with the palm of your hand. Using a rolling pin, roll out each piece to about ¼ inch thickness. Then roll up each piece into a tight tube. Using the palms of your hands, lengthen each piece by rolling each tube back and forth on the bench with light pressure. Start with your hands together in the middle of the tube and, as you roll it, move your hands gradually outward. Taper the ends of the tube by rotating your wrists slightly so that the thumb side of your hand is slightly elevated, as you near the ends of the tube.)
  9. Braid the loaves. Braiding somewhat loosely, not too tight.
  10. Place each loaf on parchment paper on cookie trays. Cover well with plastic wrap or place the pans in a food grade plastic bag, and proof at room temperature until the loaves have tripled in volume. In my oven with the light on and door cracked open, it takes 4-6 hours, be patient.
  11. If it’s almost tripled and when poked the dough only springs back a little, preheat the oven to 180°C/350°F. Gauge the dough again. Stick a finger lightly in the dough. If it makes an indentation that doesn’t spring back, the dough is ready to be baked. If not, wait a bit more.
  12. Pre-heat the oven to 350ºF with the rack in the lower third of the oven about 30 mins before final proof is complete.
  13. Brush each loaf with an egg and some milk, lightly beaten with a pinch of salt.
  14. Optionally, sprinkle the loaves with sesame seeds and/or poppy seeds.
  15. Bake until done – 25-40 minutes rotating half way, shield from above to slow browning… If baking as one large loaf may take a bit longer, bake until sounds hollow or reaches 190ºF in the middle.
  16. Cool completely before slicing.

My index of bakes.

CrustyJohn's picture
CrustyJohn

I've been needing to re-stock on whole wheat flour for a while, but I haven't been able to a good a good whole wheat flour from a local or regional small farm/mill.  After a number of weeks getting by without, doing a lot of porridge loaves for something interesting, I caved and bought a bag of Bob's Red Mill whole wheat to tide me over.  It seemed a good occasion to try another whole wheat heavy loaf.

I've heard that spelt ferments fast, so I though perhaps adding it in later might be a good idea.


300g (50%) Bob's Red Mill hard red whole wheat

150g (25%) Redtail Grains Sungold Spelt

150g (25%) bread flour

480g (80%) water

55g starter (9%)

4 tsp salt

1 tbsp fennel seeds

2 sprigs of tarragon

-------------------------

1. mix all of whole wheat flour with 280g water, autolyze 1.5 hr (room temp. high 60s/low70s)

2. mix starter with 100g water, mix in all of bread flour, pinch bread flour into whole wheat flour. "autolyse" 1 hr.

3. pinch in salt- stretch and fold every 30min, 1.5hr

4. mix all of spelt with 100g water.  stretch out whole wheat + bread flour dough, spread spelt dough over it, fold 

5. stretch out dough sprinkle fennel seed and tarragon over dough, fold.  continue stretch and folds over next 1.5 hr

6. continue bulk ferment overnight 9 hrs. (temp. low 60s) 

7. shape

8. retard in refrigerator 12 hrs.

9. Bake: 500 20min., uncovered 10 min., 450 40min., let cool in turned off oven


It's been quite a while since I've worked with a mass market whole wheat flour. I was surprised at how strong of a dough it formed just by itself, even before adding the bread flour.  I guess I've gotten used to lower gluten content stone milled flours that are a bit more finicky to work with.  I was pleased with how manageable this dough was.  

Pages

Subscribe to Recent Blog Entries