The Fresh Loaf

A Community of Amateur Bakers and Artisan Bread Enthusiasts.

Recent Blog Entries

PANEMetCIRCENSES's picture
PANEMetCIRCENSES

Latest gluten nebula discovery by JWST in my kitchen  :-D

A new member’s here to join the ‘lyse’ family. Autolyse, fermentolyse, saltolyse and now sourlyse. All recipe’s flour, water and sourwort (up to 30% baker’s percentage) roughly incorporated  together and left in the fridge (4C) for 18-24hours. The acidity of sourwort and cold environment guarantee there’ll be very small chance of any unwanted spontaneous activity to occur. The sourlysed dough is then left at ambient temp for 3-4hours to warm up and standard steps followed till bake.

Result is a fully hydrated and extremely supple dough with well-formed gluten that makes kneading completely unnecessary. Custardy open crumb with increased sourness and aromas.

These are photos of a couple of bakes using this technique leavened by a small amount of stiff rye starter (3% prefermented flour) and hydration about 80-85%.


trailrunner's picture
trailrunner

Making SD YW T65/Semola pizza crusts in my Detroit pans. Prep with sauce and parmigiana and then par bake and freeze. Better than Costco 😂😬. The little one on my 40 yr old steel pan ( can’t get it anywhere anymore) will be gone almost immediately after coming out of the oven fully topped. Let me know if you want the best crust formula. 1700 g of yum

And it’s only Tuesday  


par baked goodness ready for freezer when cool

trailrunner's picture
trailrunner

A variation of previous bakes. More pleased than ever with shaping and scoring…thank you TFL . This iteration has home milled 300 g spelt, 300 g Yecora Rojo and 400 g AP Arrowhead Mills flour. 40 g  rye storage starter used to make 280 g YW  and home milled rye levain at 100% hydration. I do not feed my stored starter prior to bakes and my stored YW hasn’t been fed in weeks. Both present with rapid growth so I have let them be. 


Benito's picture
Benito

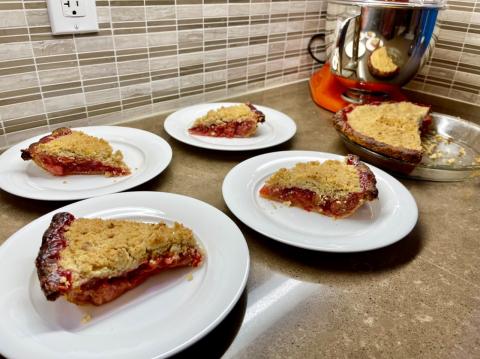
I baked another Sour Cherry Rhubarb Streusel Pie for dessert last night but this time not vegan and used my usual all butter pastry and butter in the streusel topping. This has quickly become my favorite pie this summer.  I love the tart sweetness of the cherries and the distinctive rhubarb flavour.  The almond extract brings out the cherry flavour while the lemon brightens everything up.

Ingredients

  • 2 1/2 cups (12.5 ounces; 350g total) all-purpose flour, divided, 233 g with the butter and 117 g after.
  • 2 tablespoons (25g) sugar
  • 1 teaspoon (5g) kosher salt; for table salt use same weight or half as much by volume
  • 2 1/2 sticks (10 ounces; 280g) unsalted butter, cut into 1/4-inch pats (see note)
  • 6 tablespoons (3 ounces; 85 g or 85ml) cold water


Directions

  • Combine two thirds of flour  (233 g) with 25 g sugar and 5 g salt in the bowl of a food processor. Pulse twice to incorporate. Spread butter pats evenly over surface. Pulse until no dry flour remains and dough just begins to collect in clumps, about 25 short pulses. Use a rubber spatula to spread the dough evenly around the bowl of the food processor. Sprinkle with remaining flour (117 g) and pulse until dough is just barely broken up, about 5 short pulses. Transfer dough to a large bowl. 
  • Sprinkle with 85 g of cold water. Then, using a rubber spatula, fold and press dough until it comes together into a ball. Divide ball in half. Form each half into a 4-inch disk. Wrap tightly in plastic and refrigerate for at least 2 hours before rolling and baking. 

  • When ready to shape the dough, pull out one ball, set it on a well-floured work surface, and sprinkle with more flour. Use a tapered rolling pin to start rolling the dough out into a circle, lifting the dough and rotating it while rolling to achieve an even shape. Continue rolling, changing the angle of your rolling pin as you go to get an even shape and thickness. The finished dough should overhang your pie plate by an inch or two.

  • Pick up the dough by carefully rolling it around your rolling pin, using your bench scraper to help lift it off the work surface. Unroll it over a pie plate. Gently lift and fit the dough into the pie plate, getting down into the corners.  

  • For a single-crusted pie, use a pair of scissors to trim the dough so that it overhangs the edge by 1/2 inch all around. For a double-crusted pie, at this stage, fill it and drape your second round of pie dough over the top. Trim it to a 1/2-inch overhang along with the lower crust. Either way, tuck the overhanging edge(s) under itself all the way around the pie. 

  • Flute the edges of the pie crust using the forefinger of one hand and the thumb and forefinger of the other. The single-crust pie shell is ready to be blind-baked or filled. For a double-crusted pie, brush with an egg white, sprinkle with sugar, and cut vent holes in the top with a sharp knife before baking. 

Par-baking

Par-bake crust for 20 mins at 400°F with pie weights and the edge crust shielded right from the start.


Remove weights then bake further 5-10 mins until lightly golden.


Filling 

450 g pitted sour cherries

450 g rhubarb cut in 0.5-1 inch pieces

170 g sugar

2 tbsp or 40 g cornstarch 

A pinch of salt

1 tsp of almond extract


Juice of ½  lemon 

prepare the night before baking


Mix all of the above except cornstarch and allow the fruit to macerate releasing much of its juices.  Add cornstarch and mix to dissolve.  Cook on medium heat until the liquid just starts to thicken.  Remove from the heat until needed.


Streusel Topping for Pies

1⅔ cups streusel, to top Makes 1⅔ cups streusel, enough for one 9- or 10-inch pie topping

1 cup all-purpose flour

3 tablespoons packed light brown sugar

4 teaspoons granulated sugar

¼ teaspoon kosher salt

6 tablespoons unsalted butter, cut into ½-inch cubes, at room temperature

Prepare the night before baking and refrigerate.

Stir together the flour, brown and granulated sugars, and salt in a large bowl. Sprinkle in the butter pieces and toss to coat. Rub the butter into the dry ingredients with your fingertips until the butter is incorporated and the mixture is chunky but not homogenous.

Chill for at least 15 minutes before using.


The streusel will keep refrigerated for 5 days or frozen for 1 month.


Once the par-baked crust has cooled 20-30 mins fill crust with the filling spreading it evenly.  Top with the streusel.


Bake at 425°F for 20-25 mins with the edge shielded then 375°F until the juices are bubbling, 25-30 mins.  Allow to cool fully before slicing.


Benito's picture
Benito

I plan to make a barley risotto with lemon ricotta, sun dried tomatoes and spinach for dinner and wanted a bread to go along with it.  It has been a long time since I made a plain old country sourdough so decided that would go well with dinner. I made small changes to my usual country sourdough recipe for this bake.  I went back to using a liquid levain instead of a stiff levain just because I hadn’t done a liquid levain in a long long time.

Build overnight levain and ferment at 78°F for about 8-9 hours.

Overnight saltolyse of water, salt and flours.

In the morning add the levain to the saltolysed dough and knead until well developed.

Do a bench letterfold and then place in a proofing box at 82°F.

Do a coil fold every 30 mins until the dough is strong and holds its shape between folds.   I did five coil folds.

Shape the dough when it has risen about 40% or the pH has fallen about 1.1 since the beginning of bulk.  Place in a rice flour dusted banneton.

Monitor the pH and rise once the dough is in the banneton and start cold retard once the dough has risen to a total of 70% or the pH fallen a total of 1.4.


The next morning pre-heat the oven 500°F and set up for steam baking.  30 mins before ready to bake pour 1 L of boiling water into your metal loaf pan with the Sylvia towel rolled tightly inside to pre-steam the oven.  When the oven reaches 500°F flip the dough onto a parchment paper sheet, brush off excess rice flour, score and then brush water onto the dough but not the main score.  Transfer to the oven and onto the heated baking steel or stone.  Pour 250 mL of boiling water into your cast iron skillet.  Drop the temperature of the oven to 450°F baking with steam for 25 mins.  After 25 mins vent the steam and remove the steaming gear.  Drop the temperature to 420°F and bake for a further 20-25 mins, turning half way through and moving the bread to a rack instead of the baking steel.

My index of bakes.

HeiHei29er's picture
HeiHei29er

I've only made this a couple times.  It's a Finnish bread and a favorite in the local bakeries.  It makes great French Toast!  Traditionally, it's a 3-strand braid, but this is my second attempt making it with a 5-strand.

Makes two braids...

Levain
114g    AP Flour
74g     Water
0.5g    Active Dry Yeast
1)  Dissolve yeast in water.  Combine all ingredients and ferment at 70 deg F for 12-14 hours.

Final Dough
646g    AP Flour
281g   Scalded Whole Milk
7.6g    Salt
4.8g    Active Dry Yeast
134g   Sugar
3 large eggs (beaten)
75g     Butter (softened to room temp)
5.5g    Cardamom (2 tsp)

1)  Combine flour, salt, sugar, and cardamom in a bowl.  Whisk them to mix.
2)  Scald milk and cool to less than 100 deg F.  Dissolve yeast in milk.
3)  Add eggs and milk to the dry ingredients and mix until flours are wetted.  Rest 10 minutes.
4)  Slowly add the butter while mixing.  Continue mixing until the dough comes back together.  Rest 10 minutes.
5)  Four sets of bowl kneading to develop gluten with 10 minutes rests between sets.  Knead for 2-3 minutes on first set.
6)  Place in oiled bowl and let double.
7)  Divide dough in half and then split each half into the number of strands you want to braid.
8)  Shape each piece of dough into a ball and let rest for 15-20 minutes.
9)  Roll out each dough to approximately 16" in length using a rolling pin.  Flour each side of the dough to avoid sticking to counter top.
10) Tightly roll the dough lengthwise into a long tube and pinch the seam shut.  Let the strand rest on the counter (seam side down) for 5-10 minutes to relax gluten.
11)  Braid dough loosely and tuck the ends under the loaf.
12)  Cover the dough and let rise till doubled. 
13)  Preheat oven to 350 Deg F while dough is rising.  Apply a light egg wash to dough and bake for 25-35 minutes until top is browned and internal temp is 190-195 deg F.
14)  Remove from oven and fully cool before slicing.

Follow me on Instagram at sweetandsourdoughdad.


gavinc's picture
gavinc

I just prepared my rye starter for an 8 week holiday. I took 10-gram of my ripe stiff rye culture and crumbed it using 100-gram whole rye. Air dried for a couple of days and stored in a clean old sock. It's now laid to rest in the cupboard.

When I get home in November, I'll rehydrate it into a paste and feed for a couple of days. Should be good to go :)

Cheers,

Gavin

Benito's picture
Benito

We have friends staying over tomorrow night.  I am planning on baking a strata for breakfast on Sunday morning.  Because the strata requires an egg bread I decided that I couldn’t possibly just buy a grocery store challah for our friends’ breakfast.  So the decision was made to bake a delicious 50% WW SD Challah and push fermentation further.  This time I pushed the fermentation until the aliquot jar showed a full 190% rise at the time of baking.  At this point the poke test showed that the dough just slightly sprung back.  I should have waited just a bit longer, but my impatience got the best of me.  For challah, you can see that it is under fermented when you see a lot of tearing between the strands when baked.

Procedures

  1. The night before baking, mix the starter and ferment it at 76-78°F for 8-12 hours.
  2. In the morning, in a large bowl or the bowl of a stand mixer, add the starter then water, then mix in the 4 eggs, salt and honey and mix until completely combined.
  3. Mix in all the flour until it forms a shaggy mass.
  4. Knead the dough on the bench or in a stand mixer until it is smooth and there is moderate gluten development. (Bassinage the hold back water to achieve the desired consistency) The dough should be quite firm.  Gradually add the oil, the dough may break down, wait until it comes back together and before you add more.  Mix until gluten is well developed.
  5. Transfer the dough to a lightly oiled bowl and cover it tightly. Ferment for about 2 hours. It may not rise much.  At 82°F it rose 20-25%
  6. To make one loaf, divide the dough into two equal portions, and divide each portion into the number of pieces needed for the type of braiding you plan to do, so divide each by 3 to make 1 six strand braided loaf.
  7. Form each piece into a ball and allow them to rest, covered, for 10-20 minutes to relax the gluten.
  8. Form each piece into a strand about 14” long. (I like Glezer's technique for this. On an un-floured board, flatten each piece with the palm of your hand. Using a rolling pin, roll out each piece to about ¼ inch thickness. Then roll up each piece into a tight tube. Using the palms of your hands, lengthen each piece by rolling each tube back and forth on the bench with light pressure. Start with your hands together in the middle of the tube and, as you roll it, move your hands gradually outward. Taper the ends of the tubeby rotating your wrists slightly so that the thumb side of your hand is slightly elevated, as you near the ends of the tube.).  You can consider rolling each rope of dough in two different types of seeds at this point for a decorative effect, or only a few of the strands.
  9. Braid the loaves.  Braiding somewhat loosely, not too tight. 
  10. Place loaf on parchment paper on a sheet pan. Brush with egg wash. Cover well with plastic wrap (brush with oil so it doesn’t stick to the dough) or place the pans in a food grade plastic bag, and proof at room temperature until the loaves have tripled in volume. About 4-6 hours.
  11. If it's quadrupled or more and when poked the dough only springs back a little, preheat the oven to 180°C/350°F.  Gauge the dough again. Stick a finger lightly in the dough. If it makes an indentation that doesn't spring back, the dough is ready to be baked. If not, wait a bit more if you can.
  12. Pre-heat the oven to 350ºF with the rack in the upper third of the oven about 30 mins before final proof is complete.
  13. Brush each loaf with an egg lightly beaten with a pinch of salt.  I do this twice.
  14. Optionally, sprinkle the loaves with sesame seeds and/or poppy seeds.
  15. Bake until done – 30-40 minutes rotating half way.  If baking as one large loaf may take a bit longer, bake until sounds hollow or reaches 190ºF in the middle.
  16. Cool completely before slicing.

My index of bakes.

justkeepswimming's picture
justkeepswimming

We just moved from sunny AZ to Cheyenne, WY. My starter seems to have made the move just fine, bubbling up nicely when fed. Unpacking is progressing, and I am starting to find kitchen things bit by bit.

I threw together a sandwich loaf yesterday just so we could have something, and wasn't sure how things would turn out. This was a no recipe/no notes concoction, put together after discovering my loaf pans. 🎉

50/50 store bought whole wheat/bread flour, 80% hydration, about 40 gm of starter discard, 1/4 tsp of yeast, 9 gm salt, and a Tbsp of olive oil. Hand mixed, a couple of rounds of S&F and mostly ignored for 5 hours. "Shaped" (it was a bit wet for real shaping, so more like organized into a loaf pan configuration of sorts), sprinkled with sesame seeds, and proofed until it was about 3/4 in above the edge of the pan edge. Topped with another loaf pan as a lid and baked at 375 F. Lid off after 30 min, and watched it every 5 min or so. The crust looked good at 50 min. Other TFL members mentioned to bake to a lower internal temp than at sea level or risk having dried out bread, so I pulled it out at 197F internal temp. 

It turned out pretty well! Sliced it for breakfast and more for lunch. It doesn't taste like SD, more of a yeast bread flavor, but a big improvement over our recent random grocery store selections. 

 I'll be learning more later, but this was an encouraging first attempt. 

Mary


SueVT's picture
SueVT

Adapted from Schvartzapel's recipe in Chambelland.

I've added candied strawberries, Valrhona caramel chocolate, and caramel chunks, 

Recently, I've focused on lievito madre feeding schedules, techniques for improving the microbial balance of LM, mixing procedures, timings of fermentation stages, and baking techniques.

There are literally hundreds of aspects to making panettone, and many of them are on the critical path for success. This is why it is so challenging, and also why it is so enjoyable and rewarding. Of course, eating the end product is very rewarding too.

Pages

Subscribe to Recent Blog Entries