The Fresh Loaf

A Community of Amateur Bakers and Artisan Bread Enthusiasts.

Most bookmarked

holds99's picture
holds99

Dutch Oven Baking - Atta Durum Flour and K.A. Bread Flour

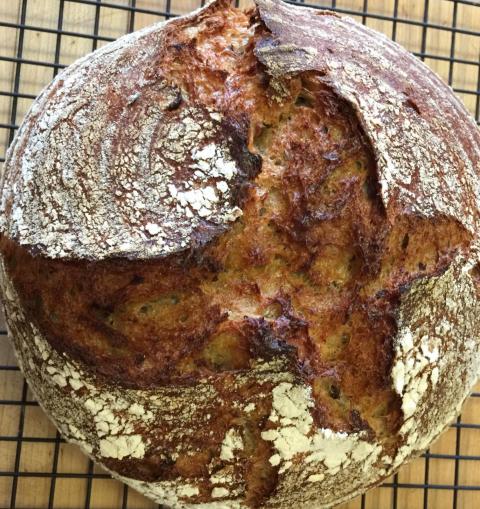
This bread is made using 50% Golden Temple Atta durum wheat flour (not semolina) and 50% King Arthur bread flour.  In the past I have used King Arthur durum flour.  For this bake I decided to try Golden Temple Atta.  The main difference I noticed between the King Arthur and Golden Temple durum flour, is King Arthur durum gives a yellowish color to the crumb, whereas Atta gives the crumb a light- golden tan color.  Other than color, I think the flavor of the two flours are comparable in taste/flavor.  After I finished baking this bread, I was putting away the Golden Temple Atta, it dawned on me that Varda had written a blog a while back on Atta durum flour, where she discussed some problems, options for mixing and hydration.  Using the TFL search function I found Varda’s: “Atta Durum Hearth Loaf” and read her excellent post on the characteristics of this flour and how she dealt with “taming the beast”.   The comments on the post were also interesting.  Varda used 100% Atta durum in her loaf, where I used only 50% Atta.  Incidentally, Varda’s loaf was beautiful.  Next time I will try using 100% Atta durum flour for this formula to see what results I get.

As can be seen in the photos, I used the Dutch oven method, which works well with this high-hydration dough.  In fact, I bake about half of all my bread in a Dutch oven.  As for shape, my personal preference is oval, rather than round Dutch oven.  The main reason is the oval (except for each end of the loaf) allows the slices to be fairly uniform in size/shape; nice for sandwiches.

After shaping, the loaves were retarded overnight in bannetons inside a plastic bag.  I preheated the oven to 500 degrees.  The temperature of the Dutch oven were room temp., not preheated.  I turned the shaped loaves from the bannetons into the Dutch oven, put the lid on and set them on the stone in my oven (see photo).  As can be seen in the photo, these Dutch ovens are large; the pair span the entire oven rack. 

I made slightly less than 8 pounds (7.85 lbs.) of dough and divided it equally into 2 – nearly four pound loaves.  The formula can be halved to produce approximately 4 pounds of dough, which can then be divided equally to produce 2 – approximately two pound loaves.  I also used a double-levain build.  The first build takes 12-14 hours (overnight), the second build, because of the yeast activity, takes much less time, 2-3 hours.  The final-dough flour and water was mixed together and allowed to autolyse for 30 minutes before adding the levain to the final dough mix.  After the autolyse, the levain was mixed with the final dough mixture for approximately 8 minutes (DLX Attendent - 10 qt. stand mixer - low speed) before the salt was added.  After adding salt it was then mixed an additional 4 minutes on low speed.  The dough was given 4 stretch and folds; one at the beginning of bulk fermentation, 3 more at 20 minute intervals for a total of one hour.  The dough was allowed to bulk ferment for an additional hour after the stretch and folds.  At the end of the 2 hour folding and bulk fermentation process the dough was divided, pre-shaped and allowed to rest on the work surface, covered, for 30 minutes.  Then the final shaping was done, after which the dough was placed into bannetons (seam side up) and retarded in the fridge overnight in plastic bags.

Note 1:  Before turning the dough into the Dutch oven, generously sprinkle the top of the dough in the bannetons with semolina.  After the dough is turned out of the banneton(s) into the Dutch oven, the semolina will act as an insulator and keep the bottom of the loaf from scorching.

Note 2: After 20 minutes of baking at 500 deg. F, reduce the oven temperature to 480 deg. F.  After an additional 10 minutes further reduce the oven temperature to 470 deg. F.

Also, turn the Dutch ovens around every 20 minutes.  Remove the lids approximately 10 minutes before the end of the baking cycle.  These 4 lb. loaves were baked for 58 minutes, the final 10 minute with the lidsoff the Dutch ovens.

Note 3: A few months ago I started experimenting with Chad Robertson’s technique for high-hydration dough.  He uses warm water in his final dough mix.  After final dough mix, Robertson places the dough into a plastic tub and over a 3-4 hour period he thoroughly turns the dough back on itself at half hour intervals (see Chad Robertson’s Masters Video clip on YouTube).  This method is really effective for developing strong gluten and really gets the yeast cranking.  So much so that when you try to retard the dough the yeast keeps on cranking/fermenting in the fridge, and when it is taken out of the fridge the following day the dough is over-proofed.  This results in the dough degassing when it is scored, before going into the oven.  This happen to me three times, with two different types of dough.  So, I asked David Snyder what he thought about solving the problem?  He suggested using cold water in the final dough mix and lowering the fermentation temperature.  Thank you, David.  That’s what I did.  In short, I used cold water for the final dough mix, shortened the total bulk fermentation time to 2 hours and retarded it overnight for about 12 hours.  The combination of cold water and shorter bulk fermentation time kept the yeast activity suppressed during retardation.  After removing the bannetons from the fridge I was able to leave the dough in the bannetons for close to two hours, allowing them to nearly double in volume, at room temperature, before putting them onto the D-o, scoring them, covering them and placing them in the preheated oven.

Note 4: If you are not retarding your loaves, then you don’t need to use cold water in the final dough mix.  You can use room temperature water.

Overall, the final dough mix has: 71 oz. flour, 53.25 oz. water and 1.42 oz. salt.  These ingredients make 7.85 lbs. of dough. The final dough is 75% hydration. 

Levain build No. 1  (12—14 hours)

2 oz. ripe sourdough starter (heaping tablespoon)

8 oz. water

8 oz. bread flour

Levain build No. 2  (2-3 hours)

All of levain build no. 1

8 oz. water

8 oz. bread flour


Final Dough Mix

 19.5 oz. bread flour

35.5 oz. Atta durum flour

37.25 oz. cold water (keeps the dough from over-proofing during retardation)

1.4 oz. salt


Isand66's picture
Isand66

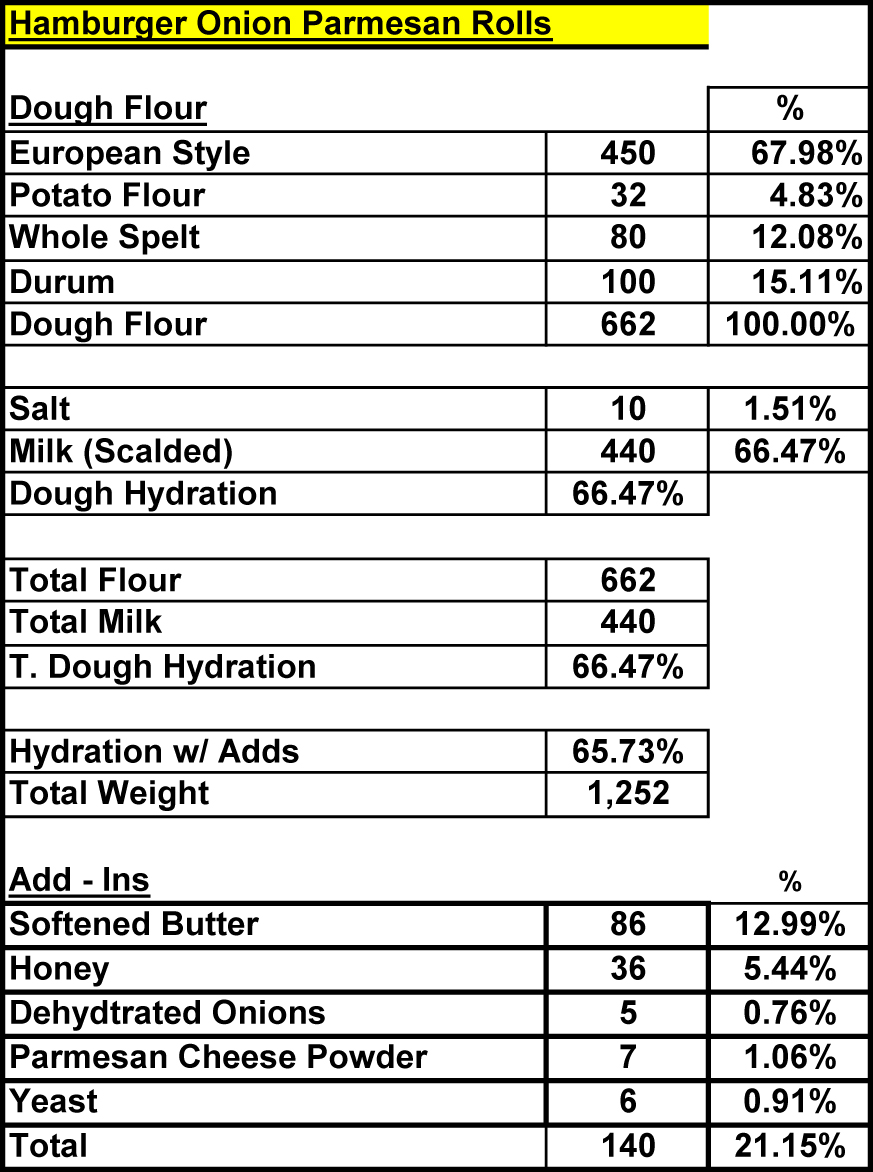
Hamburger Onion Parmesan Buns

We bought some chicken Buffalo style sliders the other day so I wanted to make some tasty buns to go with them.  The buns needed to be hearty enough to hold the burgers and the fixings as well as soft enough like a hamburger bun needs to be.

I adapted a recipe from KAF and made several changes including the flour types and changes and additions in several ingredients.  I added some dried onions and some Parmesan powder to give it a little extra flavor and just enough honey to round out the flavor profile.

These would have been perfect had I not left them in the oven a few minutes too long since I was working at the same time I was baking these.  One of the benefits of working from home but also one of the possible pitfalls.  In any case these tasted great and made perfect burger buns and sandwich rolls as well.  If you try these you will not be disappointed, of that I can guarantee you.

The European style flour I used has a small percentage of white whole wheat flour and malt which along with the Spelt flour and Durum flour really gave these rolls some excellent flavor.

Hamburger-Onion-Rolls

Directions

Bring the milk up to a boil in a heavy-duty sauce pan and let it simmer for a couple of minutes.  Take it off the heat and let it cool to room temperature before using.

In the mean time leave your butter out at room temperature or soften in your microwave.

Mix flours with yeast to combine.  Next add remainder of the ingredients and mix on low for 1 minute and then for 9 minutes at speed number 2 and 1 minute at speed number 3.  You want to mix/knead until you develop a nice thin window pane which will ensure that the rolls end up nice and soft.

Take the dough out of your mixer and form it into a ball and place in a well oiled bowl or dough rising bucket.  Make sure to cover the dough and let it rise at room temperature of if you have a proofer set it to 82 degrees and let it rise until doubled.  It took me about 1 hour to double in my proofer.

Next gently deflate the dough and form into rolls and place on cookie sheet with parchment paper.  Cover with a moist towel or plastic wrap sprayed with cooking spray.  Let it sit at room temperature for about 1 hour until the rolls have almost doubled in size and pass the poke test.

NoSeedsRisen

Around 30 minutes before ready to bake the rolls, pre-heat your oven to 450 degrees and prepare your oven for steam as well.  I use a heavy-duty pan in the bottom shelf of my oven and pour 1 cup of boiling water in right before placing the rolls in the oven.

Right before you are ready to bake the rolls prepare an egg wash, paint your rolls and add  your topping of choice.

Seeded-Risen-Rolls

Seededclosup

Bake the rolls at 450 degrees for the first 5 minutes and lower the oven to 425 degrees until they are nice and brown.  Just make sure that they don't turn into charcoal like mine almost did :).

These should take about 25 minutes to cook thoroughly.  When done  let them cool on wire rack for at least half an hour before digging in if you can wait that long.

Crumb

IMG_0130
Cleopatra didn't mind the "dark" rolls at all....
txfarmer's picture
txfarmer

Laminated Sandwich loaf - best of both worlds

Sending this toYeastspotting.
Click here for my blog index.


After weeks of driving, moving, and settling down, I've finally gotten my new kitchen more or less in order and ready to start baking/bloging again. Loving everything about Seattle so far, the active lifestyle, the urban living environment in downtown, the seafood, the "green" mentality -- I even like the grey weather! It's good for making laminated dough... :P


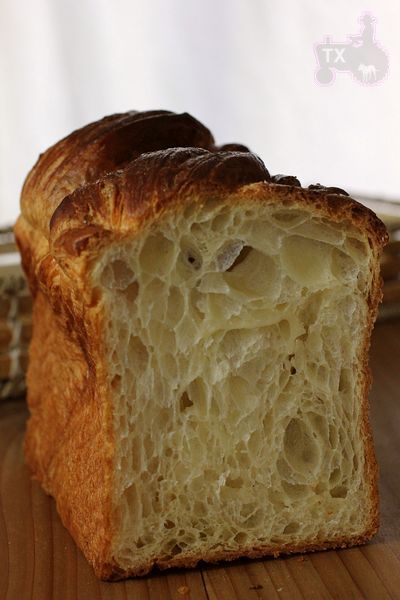
Now back to bread, this is a very Asian bread, I don't think I have seen anything similar in a western bakery. It's essentially the love child of Danish and Asian Style Soft Sandwich bread, inheriting the best qualities of both parties: nice and crispy on the outside, soft inside, and full of buttery goodness. While still a laminated dough, in order to rise high in the sandwich tin, it differes from croissants(tips here) and traditional danishs in following ways:
1. For croissants and danishs, we usually keep the dough fairly dry to ensure crisp and clean layers. While more kneading would make layers seperate more, resulting in a better crumb, we usually don't knead the dough to fully developement for the ease of rolling out. However, Asian style soft sandwich breads need to be kneaded very well to pass a very thin and strong windowpane test, otherwise the bread volume would suffer, and the texture won't be shreaddably soft (see details here). For this bread, we do knead the dough well (similar to other Asian style soft sandwich breads). In the mean time, the dough is kept pretty wet to have more extensibility, which make it possible to roll out.
2. Since the dough is fairly wet, and shaping procedure is different from traditional croissants, we don't expect as many honeycomb-like holes in the crumb, instead, crumb just need to be fairly even and open. In the mean time, the final dough doesn't need to be rolled out very thin (15mm instead of 4mm for croissants). For those reasons, the amount of roll-in butter is considerably less than croissants.
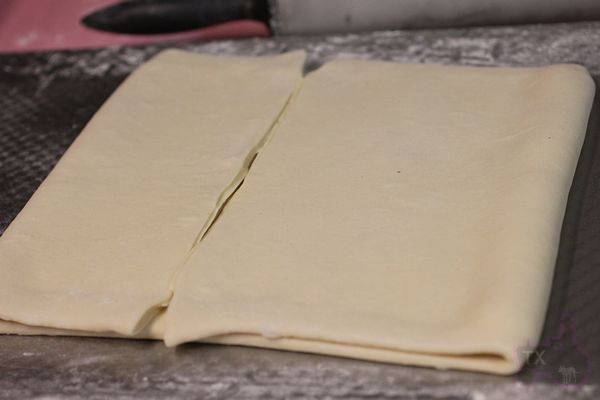
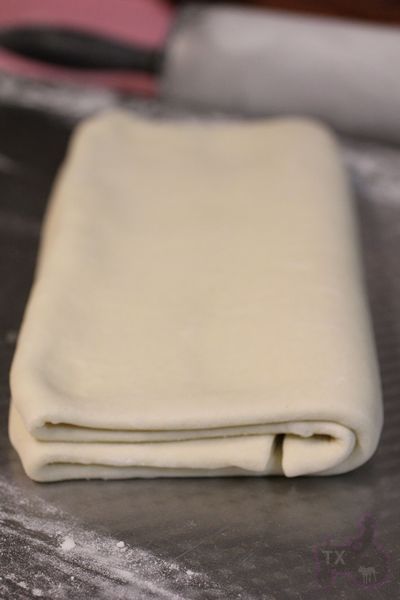
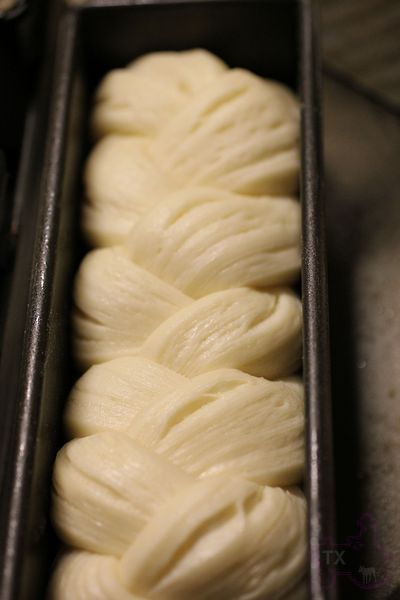
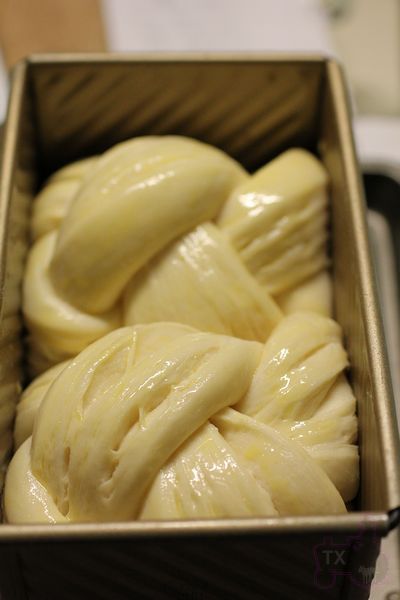
3. While for this particular batch in the first photo, I did one 4-fold, and two 3-folds, but this bread usually requires less folding than croissants. The most common method is one 4-fold, and one 3-fold, which I tried in another batch with good result.
In summary, since the dough requires less folds, and doesn't need to be rolled out very thin, it's an easier laminated dough than croissants and danishes. However, it does have different challenges: the intensive kneading to full developement, the final shaping which requires concise cutting and weighing, as well as braiding.

Laminated Sandwich Loaf (Adapted from many different sources)
Note: for details and tips on making croissants, please see this post
Note: for tips on kneading soft sandich loaves see this post
Note: this recipe makes about 930g of dough, less or more depending on how much you trim off the edges etc.

-levain
starter (100%), 44g
water, 75g
bread flour, 134g

1. mix and leave at room temp for 12 hours.

-final dough
bread flour, 361g
milk, 145g
egg, 77g
sugar, 60g
salt, 10g
instant yeast, 7g
butter, 41g, softened
levain, all
roll-in butter, 245g

1. Mix everything other than butter, knead until gluten starts to form. Add in butter, mix until fully developed. see this post for details.

2. Round, press flat, put in fridge immediately for 2 hours.
3. Make butter block, put in fridge for at least one hour before using.  Take out the dough, roll out, and enclose butter. (see this post for details)
4. Roll out to 20X60CM, fold one 4-fold as in the following pictures. Put in fridge for one hour


5. Roll out again and do one 3-fold, put in fridge for one hour. (see this post for details)
6. Repeat 5. (optional)
7. Roll out dough to 1.5CM-2CM thickness. Length of the dough piece  would depend on the tin you use. Since we are braiding them, you will need the length to be about 2X length of the tin.
8. Cut the dough into thin pieces. This is where experience becomes important. We are braiding 3 pieces into one group, each group need to have a certain weight. Do note that if a tin requires more than one group of dough, each group should weigh the same, otherwise bread would appear uneven at the end. In another word, for each tin, select a weight for each dough group (less for flat top, more for round top),  then stick to that weight for each group of dough.
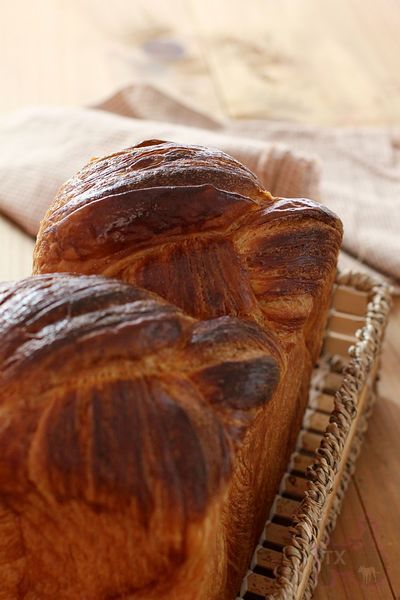
a) For my bigger Chinese pullman tin (pictured on the left), I need 2 groups, each group has 3 pieces, and each group (all 3 pieces together) weigh 225-250g (225g if cover of the tin is used to make a flat top shape, more if cover is not used to make round top as in the picture).
b) For my small Chinese pullman tin, I only need one group of 3 pieces, each group (all 3 pieces together) weigh 150g (if cover of the tin is used to make top flat).
c) For 8X4 US loaf tin,  I suggest to use 2 groups, each group has 3 pieces, and each group (all 3 pieces together) weigh 250-270g.
d) For KAF 13X4X4 pullman pan, I would suggest to use 4 groups, each group has 3 pieces, and each group (all 3 pieces together) weigh 195-215g.
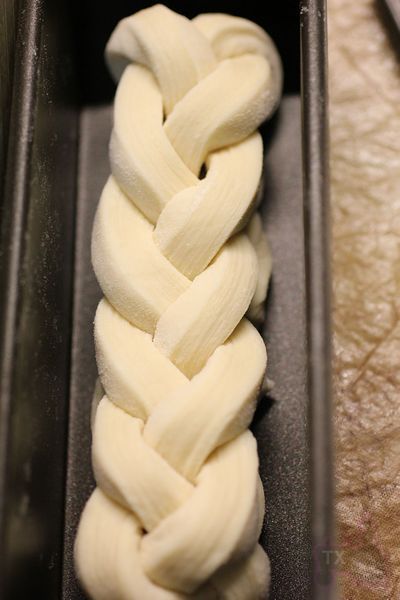
9. For each group of 3 pieces of dough, braid them. Make sure the cut surface is facing up, to expose the layers. Fold ends under, put into tin.

10. Proof at around 27C until 80-90% full, about 4-5 hours in my case. Egg wash if you are not using the pullman pan cover.


11: Bake at 425F for 10min, lowered to 375F and bake until done. The bigger Chinese tin which took 450g - 500g of dough, needed about 40-45min of TOTAL baking time. The smaller tin which took 150g of dough, needed 30min in total. If colors too much, cover with foil.


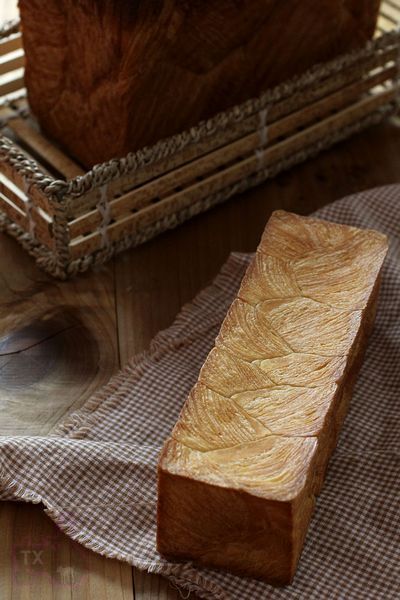
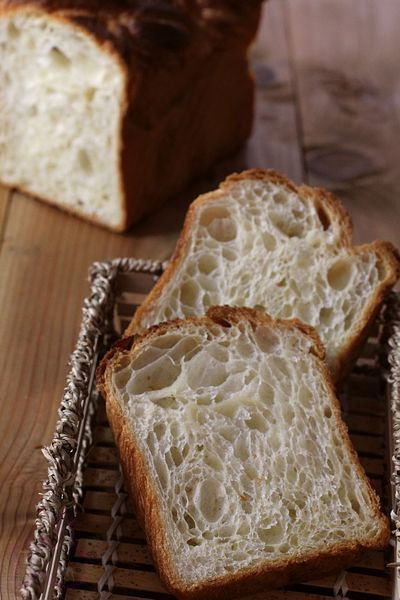
If the gluten network is fully developed, the bread should be proud and tall, with clear layers visible.

If the pan cover is used, the dough amount needs to be fairly accurate for the pan, other wise it's each too short (not reaching the top), or bursting out (the cover can literally be blown open). This neat rectangle shape is nicknamed "golden sticks".

The crumb soft but open with honeycomb structor.

In general, I feel it's easier than croissants, since you can fold less and doesn't have to roll out as thin. However, the success does depend on proper kneading and careful piecing and shaping.


sortachef's picture
sortachef

Real Italian Hoagie Rolls

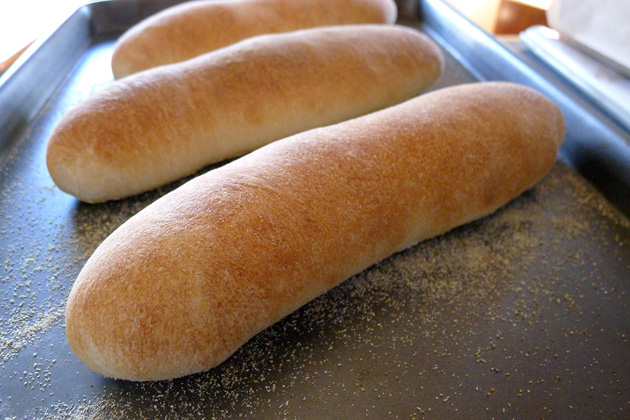
Homemade Hoagie Rolls fresh from the Oven


Real Italian Hoagie Rolls


After a week in the Philly area rediscovering my local sandwich joints, I came back to Seattle with the fresh taste of hoagie rolls lingering in my mouth. Over the next few weeks, with some hints from the folks at the Conshohocken Italian Bakery, I managed to replicate them.

I'd had Conshohocken Bakery's rolls at Pudge's, famous for steaks and hoagies in Blue Bell, PA. My first attempts came out more like baguettes, and so I tweaked the humidity and the flour content, but once I got close the cross-section of my rolls were not super round, and the bite was still too dense.

One morning I called the people at Conshohocken Bakery (voted #1 Italian bakery in the region) and told them what I was doing. Their head baker listened to my techniques and sorted a few things out.  

So here you go, sandwich rolls that are as close to authentic East Coast sandwich rolls as you're ever likely to get in a home kitchen. Call them what you want: torpedos, hoagie rolls, subs or zeps. In any case, I think you'll agree they make the best sandwiches around!


Makes 6 rolls, 9" long

14 hours for overnight rise (8 hours for fast rise)


2 teaspoons dry yeast (+ 1 teaspoon for fast rise)

4 teaspoons sugar

½ cup water at 100°


14 ounces (2 ¾ cups) unbleached all purpose flour

6 ounces (1¼ cup) High Gluten flour

2½ teaspoons salt
¼ teaspoon ascorbic acid, available as Fruit Fresh

2/3 cup whey*

2/3 cup water at 100°


½ cup extra flour for bench work

2 Tablespoons of cornmeal or semolina to coat pans


Necessary for producing high-rising rolls:

2 heavyweight cookie sheets or jelly roll pans

6 quarry tiles to line oven rack, or a pizza stone

A good spray bottle to create steam in your oven

A humid 80° environment


*To make whey: 32 ounces of plain low-fat yogurt will yield 2/3 cup whey in about 2 hours. Line a strainer with paper towels or several layers of cheese cloth and set it over a pan or shallow bowl. Pour in the yogurt, cover lightly and set it to do its stuff in the refrigerator. The whey will drain from the yogurt and collect in the bowl. Measure carefully before adding.

(The resulting strained yogurt is great drizzled with honey for breakfast. You can also mix it with shredded cucumber, salt, garlic and thyme to make tatziki - our favorite Greek dip.)


Make the dough: In a large mixing bowl, stir together yeast, sugar and ½ cup of warm water. Let sit for 10 minutes until foam forms on the mixture. Add 20 ounces of flour, salt, ascorbic acid, whey and water and mix to form a cohesive mass, scraping down the sides of the mixing bowl as necessary.

Knead for 10 minutes, using as little extra flour as possible to keep the dough from sticking to your counter and hands. Clean out the mixing bowl.


First rise: You can start these rolls in the morning (using an extra teaspoon of yeast in the dough) and let rise, lightly covered, for 4 ½ hours at room temperature. In order to have the rolls ready for lunchtime, however, it's best to make your dough the evening before and let it rise, covered, in a 55° environment overnight. Set the dough at room temperature for an hour or two in the morning before continuing. By this time either method will yield dough that has roughly tripled in bulk.


Second rise: Punch down the dough and turn it out onto a lightly floured work surface. Push the dough into a fat snake and fold it into thirds. Gently push the dough into a fat snake shape again, letting it rest for a few minutes as it resists. This method will elongate the gluten, yielding the best rolls. Fold in thirds, put back in the mixing bowl, cover lightly and let sit at room temperature (70°) for 1½ hours, until nearly doubled in bulk.


Shape the rolls: Turn the dough out onto a lightly floured work surface. Gently shape into a snake again, tucking the long outer edge over itself and squeezing in to the bottom seam by using your fingers. Your emphasis from here on out is to create a gluten cloak, a continuous skin on the top and sides of the rolls.

When the snake of dough is about 2 feet long, cut it in half. Form each half into an 18" snake and cut it into three equal pieces. You will now have 6 portions of dough, each weighing between 6 and 6½ ounces. Tuck into cigar shapes and let them rest for 15 minutes.

Sprinkle cornmeal onto the cookie sheets or jellyroll pans and have them handy. Warm your 80° humid environment. (See Creating an 80° Environment at the bottom of Aunt Marie's Dinner Rolls.) Your environment should include a pan of hot water.

After your rolls have rested, flatten them somewhat to expel the largest gas bubbles, and then fold them gently into torpedoes of dough that are 9" long. Pull the gluten cloak over each roll evenly and tuck into one long seam. Put three rolls on each pan, seam-side down onto the cornmeal.


Third rise and preheat: Let finished rolls rise for 1 hour to 1 hours 10 minutes in an 80° humid environment. Line the center rack in your oven with a pizza stone or quarry tiles and preheat the oven to 450° a half hour into this rise. Have a good spray bottle with water in it beside the oven.


Bake with steam: Put a pan of the fully risen rolls directly on the quarry tiles or pizza stone and quickly spray the hot sides and bottom of the oven with 6 or 7 squirts of water. Clap the door shut to keep in the heat and the steam. Bake rolls for 10 minutes without opening the oven door. Turn oven off for 2 more minutes, and then remove rolls to a rack to cool. (As oven temperatures and spray bottles vary, your results may as well. Rolls are ready when the crust is medium brown.)


Repeat with the other pan of rolls.


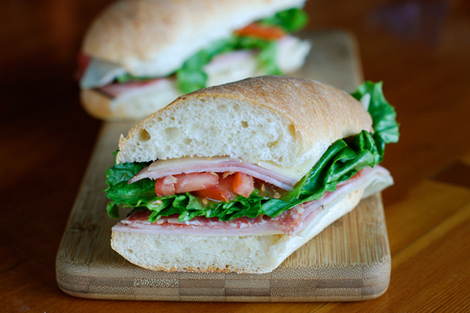
When rolls have cooled, split them and pile on your favorite sandwich ingredients. My favorite Ham Hoagie is shown below. Enjoy!


Many thanks to the Conshohocken Italian Bakery for advice on this recipe. If you live nearby, run - don't walk - to their bakery.


Copyright © 2011 by Don Hogeland.  For original post, sandwich stories and more photos go to  http://www.woodfiredkitchen.com/?p=1657


Ham Hoagie made the a Real Italian Hoagie Roll

Danni3ll3's picture
Danni3ll3

Caramelized Onion Sourdough with Parmigiano-Reggiano and Italian Herbs

I have had a number of breads that include onions bookmarked, but never got around to trying them. So this is my attempt at this.

1. Caramelize 3 diced onions in 1 tbsp each of butter and olive oil. Since I quadruple my recipes, this took me 3 hours! Normally, it takes 45 minutes to an hour. Set aside to cool. I prepared mine a few days ahead and put them in the fridge. I let them come back to room temperature before using them.

2. Autolyse 650 g unbleached flour, 50 g freshly milled buckwheat flour, 252 g freshly milled red fife flour, 50 g freshly ground flax seed, 1 tbsp and 1 tsp of dried Italian herbs (the plan was to use 2 tbsp but I didn't have enough), 50 g freshly grated parmigiano-reggiano cheese and 700 g of water. I found putting in 600 g of water first, mixing and then adding the last 100 g to work really well in mixing the initial dough. Due to other things interfering, I let the dough autolyse for about 3 and half hours. Wow! I was very surprised at how supple the dough felt after this. I will have to not be afraid of autolysing for longer than a couple of hours.

3. Mix in 30 g plain full fat yogurt, 72 g of caramelized onions (or all that you got from step #1), 20 g salt and 275 g of 80% freshly fed levain. My levain is usually rye and unbleached flour but I have a bag of whole grain Rogers Whole Wheat flour that I need to use up so I am feeding my levain that instead of the rye. I find things are a bit slower but that is okay. I use my levain once it has tripled.
4. Do 3 sets of folds 20-30 minutes apart and leave to double. This took 5.5 to 6 hours. The wholewheat instead of the rye does slow things down. Or it just might be because it is much colder here... who knows. The dough will be ready when it is ready.

5. Divide into 729 g boules, pre-shape, let rest 15 minutes and do a tight final shape. I then put them in bannetons, covered them and then put into the fridge to proof for ~10 hours.

6. The next morning bake as usual in Dutch ovens for 25 minutes at 450F, uncover and then at 425F for 22 minutes. 

They smell fabulous! Unfortunately, they are all promised to other people, I even had to give away the loaf that I was saving for us so no crumb shot unless one of my friends sends one to me. 


Flour.ish.en's picture
Flour.ish.en

Tartine Olive Walnut Bread

Breaking this bread is tantamount to opening a holiday present. At least, it feels that way when I cut the bread. The abundant good eats: olives, walnuts, sunflower seeds, herbs de Provence, lemon zest, filled the interior to the rim, are what make this bread sing. 

This Tartine olive walnut bread uses a young leaven (20% of flour weight) and 10% whole wheat flour. Nothing out of the ordinary. However, the big winner is with all the add-ins, especially the olives. Since the dough is quite wet, series of stretch-and-fold help to strengthen it. I sprinkled more sunflower seeds around the proofing basket to prevent the dough from sticking. The dough was retarded in the fridge overnight. I made a full recipe (see the cheat sheet below for details) and baked two large loaves in Dutch ovens (one round, one oval) in a preheated 500°F oven. Lower the oven temperature to 475°F as the loaves are loaded. Finally, bake for 15 minutes with the cover on and 20-25 minutes uncovered.

All the olives, nuts, seeds and herbs make for quite a substantial bread. The bread stands on its own with its fairly loud flavors. Like all good breads, serve up with some fine cheese and wine, nothing can be better!

Adapted from Tartine Bread by Chad Robertson

https://www.everopensauce.com/tartine-olive-walnut-bread/

dabrownman's picture
dabrownman

Lucy’s Favorite Methods To Make Healthy and Beautiful Bread

This is something that Lucy has been researching and trying to get right for at least a couple of years and she thinks she is close enough to getting a method finalized to post about it.  First off, I am a type 2 Diabetic which makes her quest a little more difficult but the results would be better for everyone - diabetic or not.

 People who have gluten protein sensitivity might also be able to digest this bread better.  Those who have a problem digesting the starches in whole grain breads should also benefit by having more starches pre-digested in the fermentation process.

 Minerals, vitamins and nutrients cannot be released in whole grain yeast bread because of the binding effects of phytic acid in bran.   We want to neutralize it so these nutrients can be utilized by our bodies.

 More than half the nutritional value in grain is stored in the bran and endosperm.  If it is sifted out to make white flour or isn’t treated properly, this extra nutritional value to us is lost.  We want to use all the grain to add nutritional value and not be wasteful.  We want to increase the protein, fiber, vitamins and minerals in the finished bread without any additives at all.

 That is a pretty tall order but the science behind how to do it has now caught up, over the last 100 years, with the bakers who have been doing it for thousands of years without really knowing exactly why what they did had such health benefits.

 On top pf all that, we want the bread to keep well, spring, bloom and brown neautifully, have a soft moist crumb, taste better and not be bitter even if it contains a high percent of whole grain - without adding a sweetener.

Now this bread making task is really starting to get difficult and take longer - but it’s not impossible - Lucy and I do it every week.....and if we can do it ….. then anyone else can too.

 Some keys to maximizing the health benefits while producing a great looking and tasting loaf of bread are:

  1. Use fresh milled whole grains -sprout,mill and dry then first if possible - make whole and sprouted grans 30-50% of the flour or more
  2.  Get some whole rye in every bread recipe - even if only in the starter.  There is no grain like rye when it comes to health benefits.
  3. Autolyse the flour including the flour in the levain build.  The enzymes will make for plenty of food for the wee beasties and the left over sugars make for sweeter and browner bread. Nothing like the pre digestion of starch for our stomachs too.
  4. Make sourdough bread and use less pre-fermented flour to do it - 10% or so. Dump the commercial yeast entirely.  It just works too fast and you lose the health befits only sourdough can provide with LAB and yeast fermentation working together.  Plus the bread will keep much longer too.
  5. Sift your milled whole grain and use the sifted out 15-20% hard bits to feed the levain.  Then retard the finished levain for 24-48 hours.  There is sill 20% starch in the bran that the autolyse enzymes will break down providing plenty of food for the sourdough wee beasties.  The wee beasties will love it and your bloom, spring, crumb and taste bubs will thank you for making the bran as soft as possible.  Plus the phytic acid will be neutralized. This will release half the health goodies that were previously locked up plus the bran will be pre-digested making life easier on your stomach.
  6. Use long cold retards for the starter, levain and dough.  Long, low and slow means extra flavor.  Lucy’s No Muss No Fuss Starter can be stored for up to 20 weeks in the fridge with no maintenance hassles.  Create recipes that have low pre-fermented flour amounts so that you can do a bulk or even shaped final proof of 18 - 48 hours.
  7. Use a higher overall hydration for the dough.  The crumb will be more open, soft and moist than low hydration bread plus the wee beasties love a higher hydration.  Too much liquid will make for Frisbee's Flat Bread.
  8. Do the counter work for building levains, gluten development and countertop bulk ferment at higher temperatures. A mix of high and low temperature brings out all the flavor your SD bread can provide.  Think Detmolder http://germanfood.about.com/od/germanfoodglossary/a/Detmolder-Three-Phase-Sourdough-Method.htm
  9. Try a double levain - one white and one dark each made with high and low temperatures with high and low hydration to squeeze out more flavor.
  10. Try a different liquid for the dough like potato water or yogurt whey to enhance the flavor and fortify the nutritional benefits of the bread. Put some healthy add ins into the dough like seeds n nuts and re-hydrated dried fruits to increase it’s nutritional value and flavor too.

Here is a recent bread that utilizes most of Lucy’s methods above.  Double Levain Sprouted 4 Grain Sourdough with Seeds and here are many, many sites for further reading about the health benefits of making sourdough bread

Happy sourdough baking Lucy’s way.

https://en.wikipedia.org/wiki/Bran

https://en.wikipedia.org/wiki/Phytic_acid

http://realfoodforager.com/5-reasons-to-make-sourdough-your-only-bread/

http://www.naturaltherapypages.com.au/article/Benefits_Sprouted_Grains

http://health.usnews.com/health-news/blogs/eat-run/2012/11/27/what-are-sprouted-grains

dmsnyder's picture
dmsnyder

Converting starter hydrations: A Tutorial. Or through thick and thin and vice versa


Questions regarding how to convert one kind of starter into another are frequently asked on The Fresh Loaf. The easy answer is to just take "a little bit" of seed starter and add enough flour and water to make a mixture of the desired thickness. This is fine and it generally works very well. However, sometimes a recipe calls for a precise hydration level levain and changing this, even a few percentage points, will make the dough consistency quite different from that intended by the formula's author. For those times, one needs to be more precise in making up the levain. 

To convert a starter of one hydration to a starter of another hydration - For example, if you have a 50% hydration starter and want to build a 100% hydration starter from it. 


Here's a general method for a precise conversion:

First, you need to know four things:

1. What is the hydration of your seed starter?

2. What is the hydration of your final starter?

3. How much of the total flour in your final starter comes from your seed starter?

4. How much (weight) final starter will you be making?

Second, you need to calculate the total amount of flour and the total amount of water in your final starter.

Third, you need to calculate the amount of flour and the amount of water in the seed starter.

Fourth, you can now calculate the ingredients of your final starter. They will be:

1. Seed starter

2. Flour (from seed starter plus additional)

3. Water (from seed starter plus additional)


So, let's see how this method works with some specific assumptions. 

The four things you need to know:

Assume you have a 50% hydration seed starter that you want to use. Assume you want to make 100 g of a 100% hydration starter. And assume you want the seed starter to provide 25% of the total flour in the final starter.

Note: Using "Baker's Math," Flour is always 100%, and all other ingredients are proportionate to the flour. So, in a 50% hydration mix, the water is 50% (of the flour, by weight). If hydration is 125%, the water is 125% (or 1.25 times) the flour.

To calculate the total amount of flour and water in your final starter:

Flour (100 parts) + Water (100 parts) = 100 g

So, the 100 g of starter is made up of 200 "parts." The weight of each part is calculated by dividing the total weight by the number of parts. So, 100 g /200 parts = 0.50 g.  This number is sometimes called "the conversion factor."

Then, since there are 100 parts of flour, its weight is 100 parts x 0.5 g = 50 g.

The total water in the final dough is 100 parts x 0.5 g = 50 g.

To calculate how much flour will come from the seed starter and how much will be added to make the final starter:

We now know that the total flour in the final starter will be 50 g. But we decided that 25% of this flour is going to come from the seed starter. This means that the seed starter must contain 50 g x 0.25 = 12.5 g of flour, and the flour added to this to make the final starter will be 50 g - 12.5 g = 37.5 g.

To calculate the total weight of the seed starter and the weight of water in the seed starter:

We now need to calculate how much seed starter it takes to provide 12.5 g of flour, and how much water is in this amount of seed starter.

If the seed starter is 50% hydration, it contains 100 parts of flour and 50 parts of water. We know then that the amount of water is 50 parts water/100 parts flour = 0.5  parts of the flour.  Since we already know that the flour has to weigh 12.5 g, then the water must weigh 12.5 x 0.5 = 6.25 g and the total weight of the seed starter is the sum of the water and flour or 12.5 g of flour + 6.25 g of water = 18.75 g.

To calculate the weight of water that must be added to the seed starter to make the final starter:

Now we can calculate how much water must be added to the seed starter to make the final starter. It is the total water in the final starter minus the water in the seed starter or 50 g - 6.25 g = 43.75 g.


Now we know "everything!" To make 100 g of 100% hydration starter, beginning with a 50% hydration seed starter, we would mix:

1. 18.75 g Seed Starter.

2. 37.5 g Flour

3. 43. 75 g water


This method can be used to build any amount of starter of any hydration using a seed starter of any (known) hydration. 


David


Shiao-Ping's picture
Shiao-Ping

Chocolate Sourdough - Chad Robertson's way

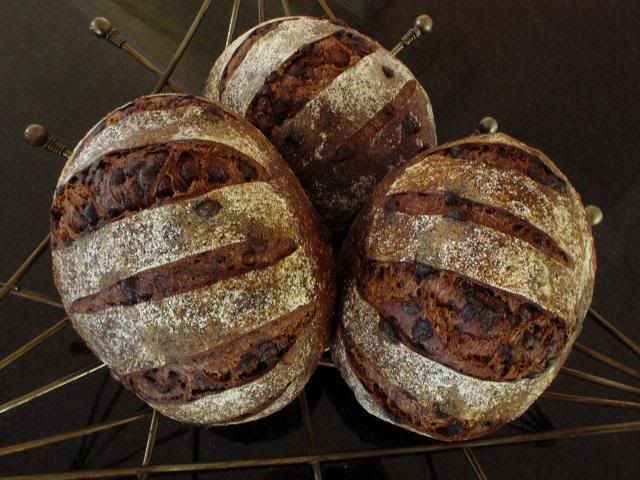
Chad Roberson's Tartine Bakery doesn't do chocolate sourdough (if they do, I haven't had the fortune of tasting it).  We did Pane Cioccolata (chocolate bread) at Artisan III, SFBI, and it was very good.  Everybody loved it but at the time I was thinking to myself if I were to make it at home I would make some changes for the following reasons: 

First of all, I feel really uneasy about "double hydration" method, which is supposed to be good whenever you have any "add-ins" for your dough, be it dried fruits, nuts, seeds or soakers, or in this case, chocolate chips.  The procedure is: you mix your dough with only 80 - 85%% of the recipe water in the first and 2nd speed as usual until a slightly stronger than normal gluten development has achieved, then turn the mixer back to first speed, slowly incorporate the reserved water and finish off on 2nd speed, then, add the seeds and nuts (or whatever add-ins you have) in the first speed initially for incorporation, and finish off, again, in 2nd speed.  The reasoning for this method is it is easier to develop dough strength with a stiffer dough than a wet dough and so the purpose is to build up the strength before you incorporate any add-ins.  Because of the longer mixing time, the temperature of water you use with this method is lower than for other doughs. 

I remember we mixed the dough for nearly 20 minutes in the spiral mixer.  I am not confident that I could do such a long mixing time with the mixer I have at home.  I always feel "traumatized," looking at the dried fruits or nuts being beaten up and chopped up while they try to be mixed in to the dough after the latter's gluten structure has already been formed; it really takes time to break the gluten bond.

Secondly, after the dough was bulk fermented, it was scored then proofed. One other type of bread where we scored first then proofed was rye bread.  It was said that because of the delicate gluten structure in both of these cases, if you were to score after the dough is proofed, you may destroy the gases that were produced.  While this makes sense to me, I don't care for the look when it's baked.

Thirdly, the Pane Cioccolata formula we used at Artisan III has only 20% levain (in baker's percentages) and therefore it also has a small percentage of dry instant yeast (DIY).  If I increase levain to 100% I wouldn't have to have DIY!  Also, chocolate chips used were only 12% of total flour, I know my son would just LOVE more chocolate chips. 

So here is my Chocolate Sourdough inspired by Chad Robertson's method all by hand (timeline as described in Daniel Wing and Alan Scott's The Bread Builder) in my previous post.


Formula for My Chocolate Sourdough 

Two nights before bake day - first stage of levain build-up

  • 61 g starter @ 75% hydration
  • 121 g bread flour (i.e. two times starter amount for me; I do not know what ratio Chad Robertson uses.)
  • 91 g water

Mix and ferment for 6 - 8 hours at 18C / 65 F (depending on your room temperature, you may need shorter or longer fermentation time for your starter to mature)

The morning before bake day - second (and final) stage of levain expansion

  • 273 g starter @ 75% hydration (all from above)
  • 273 g bread flour (I use one time starter amount in flour but I do not know what amount Chad Robertson uses)
  • 204 g water

Mix and ferment for two hours only

Formula for final dough

  • 750 g starter (all from above)
  • 650 g bread flour
  • 100 g cocoa powder (8.5% of total flours*verses 5% in SFBI recipe)
  • 86 g honey (7% of total flours verses 15% in SFBI recipe)
  • 250 g chocolate chips (21% of total flour verses 12.6% in SBFI recipe)
  • 433 g water (note: with every 12 g extra water, your total dough hydration will increase by 1%. If you wish, you can increase up to 5% more hydration. See step 10 below.)
  • 1 to 2 vanilla pods (optional but really worth it)
  • 20 g salt
Total dough weight 2.3 kg and total dough hydration 73%

*Total flour calculation takes into account the flour in starter. 

  1. In a big bowl, first put in water then put in the starter.  Break up the starter thoroughly in the water with your hands.
  2. Then put in honey; scrape the seeds from the vanilla pods and put it in, and stir to combine
  3. Put in all the remaining ingredients except choc. chips
  4. Stir with a wooden spoon to combine for 1 - 2 minutes. (Take down the time when this is done, this will be your start time.  Starting from this time, your dough is fermenting.  From this start time to the time when the dough is divided and shaped, it will be 4 hours; i.e., bulk fermentation is 4 hours.  The preferred room temperature is 18 - 21C / 65 - 70F.  You may need to adjust your dough temperature by using cooler or warmer water.)
  5. Autolyse 20 - 30 minutes
  6. Sprinkle half of the choc. chips on a work surface (spreading about 30 cm by 30 cm) and stretch or pad the sticky dough thinly to cover the choc. chips.  Then sprinkle the other half of choc. chips over it; press the choc. chips into the dough so they stick.
  7. Gather the dough from the edges to the centre and place the choc. chip dough back into the mixing bowl.
  8. Start the first set of stretch and folds in the bowl by pinching the edges of the dough and fold onto itself to the centre (10 - 20 times).  Rotate the bowl as you go.  As the dough is quite stiff, you may need both hands for the folding.  The hand folding serves as mixing.  I used my left hand to press down the centre, so my right hand can pinch an edge of the dough and fold it to the centre.  As you stretch and fold, try not to tear the dough; only stretch as far as it can go.
  9. After 45 minutes, do a second set of stretch and folds.  At the end of this stage, the dough will already feel silky and smooth.  As the dough is quite stiff, its strength develops very fast.  Be mindful that the bottom of the dough is the right side of the dough; and the right side of the dough always remain at the bottom in the bowl.
  10. After another 45 minutes, do a final set of stretch and folds.  As the dough feels quite strong, no more folding is necessary (unless you choose to increase total dough hydration, in which case, you may need one more set of stretch and folds).
  11. At the end of the 4 hour bulk fermentation, divide the dough to 3 - 4 pieces as you wish.  Be mindful that the bottom of the dough is the right side; sprinkle some flour on your work bench, and place the pieces right side down.
  12. Shape the pieces - gather the edges to the centre, flip it over (so the right side is now up) and shape it to a tight ball with both hands.  (As I find the dough is quite strong, I did not think pre-shaping is necessary.)
  13. Place the shaped boules in dusted baskets or couche, right side down and seam side up to encourage volume expansion.  Cover.
  14. Proof for 2 hours in room temperature of 18 - 21C / 65 - 70F.
  15. Into the refrigerator for retardation at the end of the 2 hour proofing (minimum 8 hours; I did 18 hours).


Bake Day

  1. Bake the boules cold for best result (ie, straight out of refrigerator).  Just before baking, sift flour on the dough and score it.  Bake at 190C / 380F (not higher due to honey) for 40 minutes.  Once the dough is loaded onto the baking stone, steam the oven with no more than 1 cup of boiling hot water.
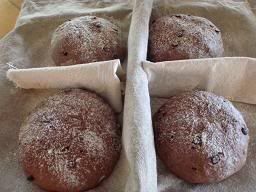
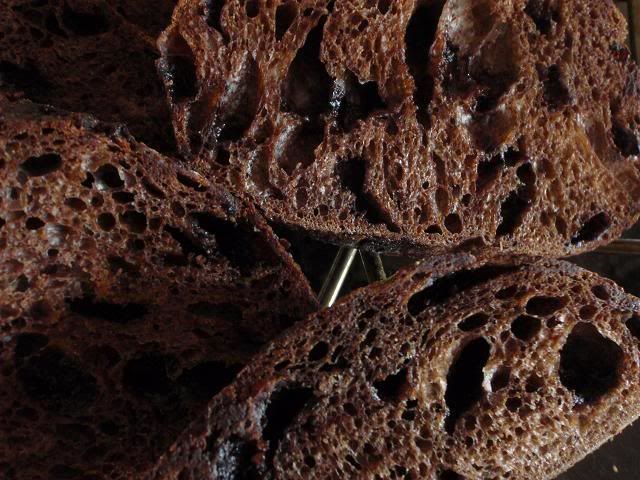
  2. Note: I find better result when baked cold.  One boule was left at room temp while others were being baked, and it became quite puffy so when I scored, it deflated quite a lot and there was no noticeable oven spring with this bake.          


I sliced one of the boules and went down to the back yard to water the plants.  When I came back up, my son said to me, Mum, the chocolate sourdough was epic.  How I love his choice of words.  Well, you know how to please a growing boy - make a chocolate sourdough!

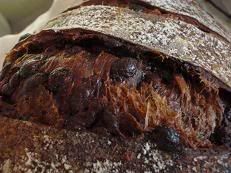
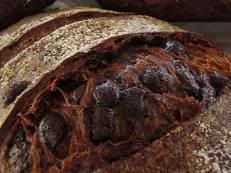
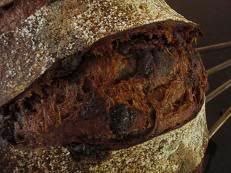
This is the first time that I made a chocolate sourdough - it is not sour at all because of the chocolate and honey, but it is very chewy.  And the crust!  Very crispy.  The crumb?  Very more-ish.

I don't imagine you find chocolate sourdough made this way in the shops - they would go bankrupt if they do - too much work (but absolutely worth the trouble for home bakers)!

Shiao-Ping

dmsnyder's picture
dmsnyder

Baguette crumb - 65% hydration dough

Some time ago, Pat (proth5) posted her formula for baguettes. This was in the context of our "great baguette quest" of some months back. We were playing with higher hydration doughs and cold fermentation à la Gosselin and Bouabsa.

Pat's formula is levain-based and employs a 65% hydration dough. She has insisted repeatedly that, while higher hydration is one route to a more open, holey crumb, fermentation and technique in shaping the baguettes are at least as important and that good technique can achieve the desired open crumb even with a dryer dough.

Okay. It was past time I tested my own technique against Pat's claim.

Pat's formula is as follows:

This is for two loaves at a finished weight of 10.5 oz each

.75 oz starter

1.12 oz flour

1.12 oz water 

Mix and let ripen (8-10 hours) 

Bread

All of the levain build

10.95 oz all purpose flour

.25 oz salt

6.6 oz water 

Dough temperature 76F 

Mix to shaggy mass (Yes! Put the preferment in the autolyse!) – let rest 30 mins

Fold with plastic scraper  (30 strokes) – repeat 3 more times at 30 min intervals 

Bulk ferment at 76F for 1.5 hours – fold

Bulk ferment at 76F 2 hours

Preshape lightly but firmly, rest 15 mins

Shape.  Proof 1 hour or so

Slash

Bake with steam at 500F for about 20 mins


I followed this except I baked at 480F. I used Whole Foods 365 Organic AP flour. The result was an excellent, classic baguette with a crunchy crust and cool, creamy crumb. It was slightly sweet with imperceptible sourness when eaten just ... well, almost ... cooled.

Here's  the crumb:

I'll let you draw your own conclusions.

Thanks, Pat!

David

Pages