The Fresh Loaf

A Community of Amateur Bakers and Artisan Bread Enthusiasts.

Most bookmarked

Floydm's picture
Floydm

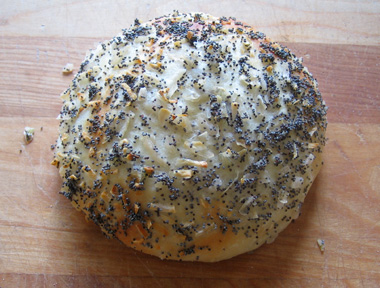
Norm's Onion Rolls


Norm, AKA nbicomputers, is a retired professional baker from New York City. He has been sharing his recipes and his baking wisdom with us for close to a year now.

Norm's NY Style Onion Rolls have become a favorite on The Fresh Loaf. Below are the list of posts I could find that contains pictures, tips, and comments about this recipe.

Thank you, Norm.


subfuscpersona's picture
subfuscpersona

Wheat: Red vs White; Spring vs Winter

Wheat: Red vs White; Spring vs Winter

Home millers have definite preferences when it comes to wheat. Many favor hard spring wheat over winter wheat for it's somewhat higher protein value (and stronger gluten). Furthermore, some prefer the red variety for it's robust flavor while others prefer the milder taste of white.

Some Background: Hard Red Wheat vs Hard White Wheat

Hard white wheat was developed from hard red wheat by eliminating the genes for bran color while preserving other desireable characteristics of red wheat. Depending on variety, red wheat has from one to three genes that give the bran its red cast; in contrast, white wheat has no major genes for bran color. The elimination of these genes results in fewer phenolic compounds and tannins in the bran, significantly reducing the bitter taste that some people experience in flour milled from red wheat. Nutritional composition is the same for red and white wheat.

Spring wheat is planted in April to May, makes a continuous growth and is harvested in August to early September. Winter wheat is planted in the fall. It makes a partial growth, becomes dormant during the cold winter months, resumes growth as the weather warms and is harvested in the early summer (June and July).

Flour from hard red winter wheat is often preferred for artisan breads.

Artisan bread flour, which is milled from hard red winter wheat, resembles French bread flour in its characteristics, that is, it is relatively low in protein (11.5–12.5 percent). The low protein content provides for a crisper crust and a crumb with desirable irregular holes...Artisan bread flour often has a slightly higher ash content than patent flour. This creates a grayish cast on the flour and is thought to improve yeast fermentation and flavor. (source: How Baking Works by Paula I. Figoni)


This photo shows hard red wheat on the left and hard white wheat on the right

(I don't find the color contrast as marked as in this photo, so be sure to keep your grains clearly labeled.)


The Test

I wanted to see if the slightly higher protein of spring wheat made a signficant difference in gluten development and rising power. A secondary interest was whether there was a marked difference in taste between white and red wheat.

I decided to do a two pronged test of home milled wheat flour: red vs. white wheat and winter vs. spring wheat. I used my tried-'n-true recipe for a fifty percent whole wheat loaf bread. I made the bread four times - twice with home-milled hard red winter wheat and twice with home-milled hard white spring wheat. The baker's percentage was the same for all trials, as were the other ingredients and the procedure followed.

Here are few recipe details...

  • The dough is leavened with instant dry yeast.
  • The recipe uses a biga, which constitutes about 30% of the dough.
  • Flour is 50% home-milled whole wheat flour, 50% commercial (white) unbleached bread flour (including bread flour in biga)
  • total hydration (including water in the biga) is 68%.
  • The recipe includes a small amount of oil (3%) and buckwheat honey (4%) in addition to flour, water, salt and yeast
  • Wheat is milled very fine with a Nutrimill. Flour is used within a few hours of milling.


Fresh Milled Four

I get an equally fine flour from winter and spring hard wheat using my Nutrimill grain mill. As expected, red wheat is more tan than white wheat, though the real life difference is somewhat more obvious than the photo below shows. Bran flecks tend to concentrate in the center of the flour receptacle, which accounts for the darker color in that area.

Final Dough

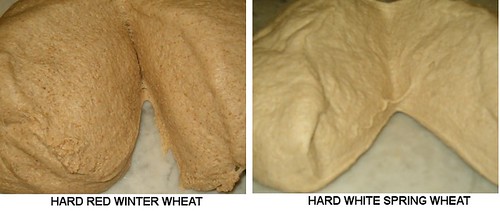
By the time the final dough is ready for bulk fermentation, the color differences have become more apparent. Since the wheat is finely milled, the bran pretty much disappears into the dough. I made no adjustments in water content for the two different grain flours and could find little difference in water absorption, feel or gluten development. All doughs passed the windowpane test.

Baking

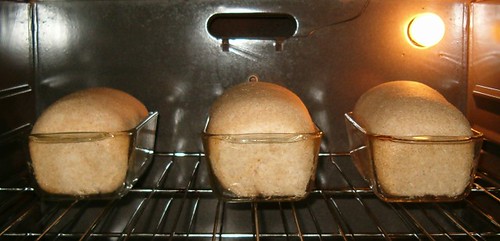
For all trials the dough was baked in loaf pans in a 350F oven using the cold start / no preheat method. Total baking time was same same for both kinds of whole wheat flours. There was no difference in oven spring; all loaves rose about one inch during the bake. The photos below show the loaves at the start of baking and after about 15 minutes in the oven.

The Final Product

Doesn't look much different on the outside, does it?

Only way to tell the difference is to cut it. Crumb is virtually identical. The red wheat looks like what most of us think of when we think of whole wheat bread. The white wheat looks a lot more like 100% white bread.

Evaluation

I should have believed the North Dakota Wheat Commission. Their brochure on hard white wheat says...


Before I started this test, I'd never worked with hard white wheat. While others frequently comment on it's mild taste, I wasn't prepared for a fifty percent whole grain bread that tasted like - ummmm - white bread! OK, not exactly like white bread, maybe an eensy bit denser and an eensy bit more taste but close enough to make me question the wisdom of purchasing 25 pounds of hard white spring wheat.

A lot of posters here use only whole grain flour, mixing white and red wheats to get the flavor profile they prefer. When they describe white whole grain as mild, you'd better believe it.

zolablue's picture
zolablue

Thom Leonard's Country French

I'm posting this recipe for discussion as we have been talking about it on the Glezer firm starter thread.  I have made this bread often with variations because I did not have the high-extraction flour yet.  I recently purchased the Golden Buffalo flour from Heartland Mill in Kansas and it was superb.  I didn’t take photos of those so will next time I make it.


The one pictured here was made using Hodgson Mill WW graham flour sifted for the WW portion (250g) and mixed with the 750g King Arthur bread flour.  I’ve also made it sifting the King Arthur traditional and organic WW flours but I like the sweetness of the graham flour.  Still, I think after using that high-extraction flour the flavor was so extraordinary I would choose to make it that way more often.


Mountaindog has also posted her variation on this bread here and she makes beautiful loaves of it. 

http://www.thefreshloaf.com/node/1806/thom-leonard-country-french-boule-recipe

This is a great recipe to play around with and it always comes out fabulous bread.  Another note – I generally like to make four smaller boules but when I made them with the high-extraction flour I made two boules and they were large and fantastic. 


Here are the some photos of the ones I made a few months ago (more photos here: http://zolablue.smugmug.com/gallery/2671417#141408937 ) and the recipe follows:

Thom Leonard’s Country French Bread - © Maggie Glezer, Artisan Baking  

Makes one 4 pound (1.8-kilo) loafTime: At least 18 hours with about 30 minutes of active work 

Much of what makes this bread so special is the high-extraction flour used in it.  This is a bolted whole-wheat flour much lighter in color and sweeter in flavor than a whole-wheat flour (at 100% extraction), but much darker and more flavorful than a white flour (at 72% extraction).


The method I give here for making your own high-extraction flour will work best on coarsely ground whole wheat flour.  If you already have a good high-extraction flour, substitute it for the whole-wheat and bread flour in the final recipe.  Thom also includes a little of his sourdough rye starter in the dough, but it is such a small amount that I have bumped up the levain slightly and added rye flour to the final dough instead.

RECIPE SYNOPSIS The evening before baking - making the Levain: 

25 grams (1 1/2 tablespoons or 0.8 oz) fermented firm sourdough starter refreshed 8 hrs before (17%)

140 grams (2/3 cup or 4.9 oz) water, lukewarm (100%)

140 grams (1 cup minus 1 tablespoon or 4.9 oz) unbleached bread flour (100%)


Dissolve the sourdough starter in the water in a small bowl.  Add the flour and beat this batter-like dough until very smooth. Place in a covered container and let it ferment overnight for 8 hours, or until fully risen and just starting to sink in the middle.

Bake Day – Mixing the Dough: 

350 grams (about 12 oz or about 2 1/2 cups) Coarsely ground whole-wheat flour, preferably milled from an organic, hard winter wheat (eventually 25%)

750 grams (26.5 oz or 5 cups) unbleached bread flour, preferably organic (75%)

30 grams (1 oz or 1/4 cup) organic whole-rye flour (3%)

660 grams (24 oz or 3 cups) water (66%)

Fermented levain (30%)

23 grams (0.8 oz or 1 tablespoon plus 1 1/2 teaspoons) salt (2.3%)

Preparing the flour: 

Sift the whole-wheat through your finest sieve or flour sifter.  The large flakes of bran should be caught in the sieve (use them for flouring your peel or for muffins).  Measure out 2 cups 3 tablespoons (8.8 ounces, 250 grams) sifted flour.  Mix this dark flour with the bread flour and the rye flour in a large bowl or in the work bowl of your mixer.


Add the water to the fermented levain to loosen it from the container.


Mixing the dough: 

By hand:  Pour the watered levain into the flours and stir with your hands or a wooden spoon just until a rough dough forms.  Turn the dough out onto the unfloured work surface and continue kneading until the dough is very smooth and shiny, about 10 minutes.  This is a lot of dough and will take some muscle.  Sprinkle on the salt and continue to knead the bread until the salt has fully dissolved and the dough is very smooth and shiny.


By stand mixer:  Add the watered levain to the flours in the work bowl and stir the dough together with a wooden spoon or your hand (this will make the mixing go more quickly).  Using the dough hook, mix the dough on medium speed for about 10 to 15 minutes, or until the dough is very smooth and almost cleans the bowl.  Add the salt and continue mixing until the dough is much tighter and cleans the bowl, about 5 more minutes.

This should be a soft, sticky, and extensible dough.  

Fermenting and turning the dough:  

Place the dough in a container at least 3 times its size and cover it tightly with plastic wrap. Let it ferment until it is airy and well expanded but not yet double in bulk, about 3 hours.  Turn the dough 3 times at 30-minute intervals, that is, after 30, 60, and 90 minutes of fermenting, then leave the dough undisturbed for the remaining time.

Rounding and resting the dough: 

Flour the surface of the dough and your work surface and turn the dough out.  Tuck the edges of the dough in to tighten it, round it, and cover it loosely with plastic wrap.  Let it rest until well relaxed, 10 to 15 minutes.  While the dough is resting, sift flour over a linen-lined basket or line a large colander with a well-floured tea towel.

Shaping and proofing the dough: 

Shape the dough into an even and tight round loaf without deflating it.  Place the dough topside down in a linen-lined basket or large colander, lightly sprinkle it with flour, and cover it well with plastic wrap.  Proof the dough until it is well expanded, about doubled in volume and remains indented when lightly pressed with a floured finger, after about 4 hours.

Preheating the oven: 

At least 45 minutes before the dough is fully proofed, arrange a rack on the oven’s second-to-top shelf and place a baking stone on it.  Clear away all racks above the one being used Preheat the oven to 450°F (230°C).

Baking the bread: 

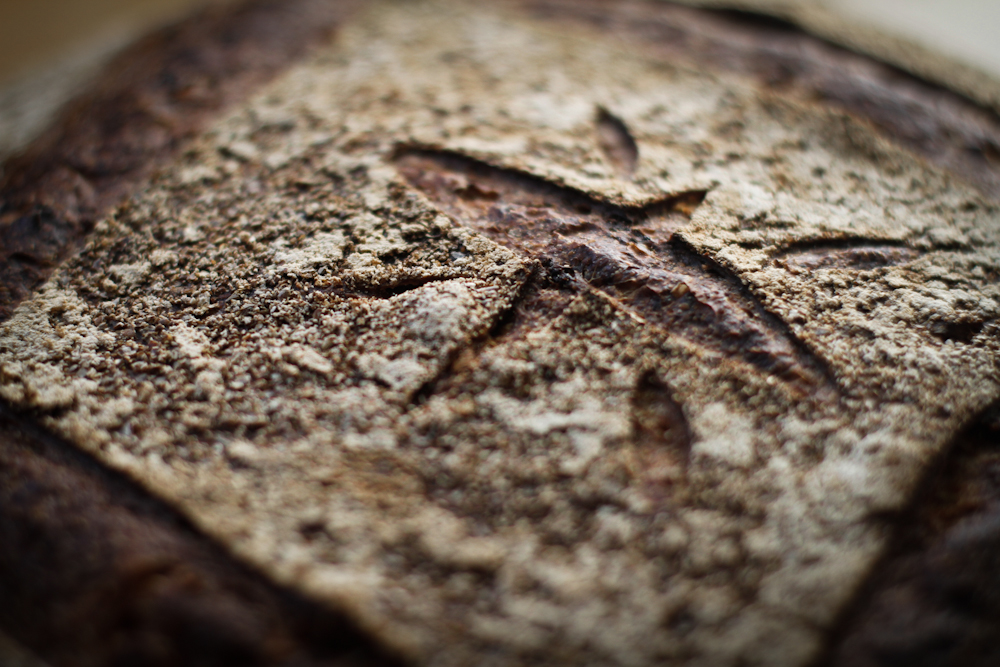
If desired, just before baking the bread, fill the oven with steam.  Turn the bread out onto a sheet of parchment paper or a floured peel and slash 3 to 4 diagonal slashes and 3 to 4 horizontal slashes into the top.  It will look like a skewed grid with diamond-shaped openings.  Slide the bread, still on the paper, onto the hot stone and bake until the bread is dark and evenly browned all around and sounds hollow when thumped on the bottom, 70 to 80 minutes, rotating it halfway into the bake.  If the bread is browning too quickly, reduce the oven temperature to 400°F (205°C), but still bake the bread for at least 70 minutes.  Let the bread cool on a rack.


Jeffrey Hamelman's picture
Jeffrey Hamelman

Starter maintenance

I was told that a FreshLoafer had asked about my method of sourdough maintenance. Now that my baking is done at home as needed, and not as daily production, my method might be pertinent to some FL bakers. 

During my first baking job, I worked for a German woman in Northampton, Massachusetts. We used a rye culture for all the breads--rye, whole wheat, white. Before leaving that job, I began a rye culture of my own, on August 28, 1980. It wasn't for another 12 or 15 years that I began maintaining a liquid levain culture along with the rye. The rye culture was the backbone of the bakery I owned, and over the years it has brought me to six continents. Both cultures were fed daily, as the healthiest cultures always are. And how good it feels to know that well over a million loaves of bread have been generated by the cultures.

These days I  bake once every week or two, and I only maintain the rye culture. I feed it daily. Here's how: 10 g ripe culture, 16 g water, 20 g whole rye flour. Pretty straightforward, right? However, I do make slight adjustments as the seasons come and go. For instance, this time of year--hot and humid in Vermont--I may start with just 7 or 8 grams of ripe culture to slow it down a bit. And I make it just slightly firmer during the hot months, as a firmer culture ripens more slowly than a looser one. And for that reason, I may increase the water weight by a gram or two in the winter to encourage full ripening  (I heat with wood, so the house is pretty cool by morning). Occasionally I'll use some of the discard for waffles, pancakes, or crackers, but most days I discard it. Into the compost it goes. I certainly don't consider this to be "waste," as I'm sure all those many millions of sourdough bugs are contributing in their own way to the metabolism of the compost. I simply consider that the discard is changing its "job description."

If I am making a bread that requires a wheat culture, I simply feed some of the discard with wheat for a day or two before building the final sourdough.

The sourdough is kept on my baking table 24/7. If I am going away, I give a normal feed, then refrigerate it after two hours. The principle is that the yeasts can get a bit of a head start before a lot of acidity develops, and once refrigerated, the majority of the rye flour is still available for them to feed on. I think the longest I've kept it refrigerated in this way is about three weeks. It returns to full health almost instantly. This method also works well with firm levain cultures (making the build slightly firmer before refrigeration is a good idea). If I maintained a liquid levain culture and was leaving for awhile, I'd simply make it into a firm levain first. 

I try to remember to dry some of the rye culture every year. I take maybe 10 grams of ripe culture and patiently rub it with roughly 100 g of whole rye. I put it into a square of cheesecloth or an old (clean!) cotton sock and leave it on my desk. I've successfully re-hydrated the culture after two-plus years of dormancy. I'm currently holding some dried culture back to see how it does after five years. It's a good idea for all bakers to keep some dried culture as a back-up, just in case. I also like to dry some as it preserves the culture's "DNA."

I guess if I decided to eat just one day a week and spend the majority of my life at 38F, I'd feed my culture just once a week too and refrigerate it the other days. However, I really enjoy seven days of nutritious eating each week. Although my trusty old rye culture doesn't speak English, it surely does communicate, and the message it sends is that it prefers daily meals too. 

Doc.Dough's picture
Doc.Dough

Methods and Rationale for Sourdough Starter Maintenance and Elaboration

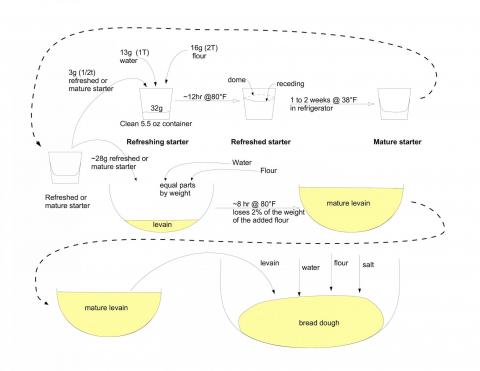
Since the facility for uploading fully formatted Word and PDF documents has not been implemented, the details of this post can be found here and I have loaded (above and below) a pictographic shorthand version which lacks any explanation of the rationale.  The artwork covers the whole bread-making process of which the illustration above covers starter maintenance, elaboration into a levain, and then using the levain to initiate a batch of bread dough.  The linked paper covers only the starter maintenance and elaboration aspects of this process. The remainder of the complete bread process is included in the illustrations below.

One point I want to make here is that you don't need to keep a lot of starter, even if you want to make a lot of bread. Using the quantities noted below, you are keeping about 30g of starter, from which you use 3g to seed a refresh cycle and either throw out the remainder or use it to make a levain, from which you will make a batch of bread.

Many sources would have you keep at least a cup of starter (or a pint, or a cup in a pint jar, or a pint in a quart jar) which is totally unnecessary.  If you are going to need 10Kg of levain, you can elaborate 20g into 10,500g in two steps (or 3g into 10500g in three steps), building 20g into 500g of refreshed starter by feeding it at 20:250:250 (a factor of 12.5) and letting it ferment for 6 to 12 hrs depending on the temperature and repeating the feeding to expand it by another factor of 10 (500:5000:5000) to yield 10.5 Kg of levain. So your little 5.5 oz polypropylene food service cup containing 28g of starter becomes 10.5 Kg of levain in 24 hrs.  By doing this and assuming that you feed it every day (which is one option though once a week is enough to maintain it if you don't need bread during that time) you throw out starter containing ~16g of flour every day. That is a total of  over 5.5Kg of flour in a year which is not trivial, but it does make for a pretty inexpensive hobby - or you might perfer to think of your starter as a pet which doesn't eat nearly as much as a dog.  If you maintain a pint of starter and feed it 50g of flour daily you will need 18Kg of flour over the course of a year in addition to the amount you use to make bread. And you have to figure out where to throw out 100g+ every day (which should never go down the drain since it will eventualy coat your drain line like hundreds of layers of paint and irretrieveably plug it up).

You can also read the blog post down below the one about idli that explains the The 2% weight loss method for judging levain maturity (which you can also use for your starter if you have a high accuracy scale).


DanAyo's picture
DanAyo

Maximizing Yeast in SD Starter

Michael Wilson’s use of the highly yeasted Levito Madre (Pasta Madre) have interested me for years. Unfortunately (as far as I know) all of the definitive literature is written in Italian. Because of this I have not ventured into this endeavor.

I recently got in touch with Debra and asked her for help to develop a sourdough starter which prioritizes the yeast population over the LAB. Below is her reply, which has been posted with her permission. Hopefully others will find the information useful.
<Thanks, Debra>

You're in luck. It's not that difficult to shift the balance, and it can be done rather quickly, although changes in the organism profile will likely follow more slowly. The best way is to reduce hydration to a firm dough, 50-60% or whatever gets you to something that isn't sticky after you knead the flour in. Feed it 3x a day if you can. (If you want to see it lose all sourness, feed every 4-6 hours for a day or two.) Like always, you need to work out feeding ratios that get you to the next feed without being overripe or deflated, because that's when LAB are forging ahead. You don't need high temperatures for this, room temp works best, especially now that the weather is cooling off. The warmer it is, the more frequently it will need to be fed to keep LAB from increasing too much.

With a strong ap like King Arthur, I usually go 60% on the water and feed 1:3:5, 3:3:5, 5:3:5, or even 8:3:5 depending how long it will be going between feeds --- 12, 8, 4-6 hours or less, accordingly, or depending on temperature. You know the drill. You develop your own routine as you go. Taste along the way, because that and how much rise you get will tell you everything you need to know about the balance. You'll probably get about 4x rise once it has transitioned and stabilized, provided you have the gluten structure to support that.

So the factors that favor yeast are: white flour, low hydration, more frequent feeding, and moderate-low temperature. This kind of starter makes great pain au levain, and I'll bet it would be the perfect choice for sourdough baguettes too. I don't know if high temperature is essential for the right species profile of a good panettone starter (it could be), but if you choose that route, just remember the higher the temp, the shorter the feeding intervals need to be to keep LAB in check.

Debra Wink's picture
Debra Wink

Raisin Yeast Water

This post is in honor of the current community bake featuring Jeffrey Hamelman’s Swiss Farmhouse Bread. The process begins with soaking raisins in water for 5 to 6 days to create the natural leavening for this bread. Essentially, the long raisin soak is making wine, but from rehydrated dried grapes instead of fresh. Just the first stage of wine fermentation, though. Being higher in natural sugars than most other fruits, grapes are particularly suited to winemaking. But making wine is very different from making sourdough in both the species that are initially present in the raw materials – grapes versus grains – and how their cultures develop over time.

Grape skins, like the bran covering on grains, provide a natural biofilm of microorganisms, most of which have names quite foreign in the baking world. Two of them – Kloeckera and Hanseniaspora – together account for 50-70% of the yeast, with the balance made up of a variety of other genera – Candida, Metschnikowia, Cryptococcus, Pichia, Kluyveromyces, Hansenula... In wine lingo, these flora are collectively referred to as the non-Saccharomyces yeasts. Indigenous strains of our old friend Saccharomyces cerevisiae are also present, but in very low numbers by comparison. And yet, S. cerevisiae is by far the most important.

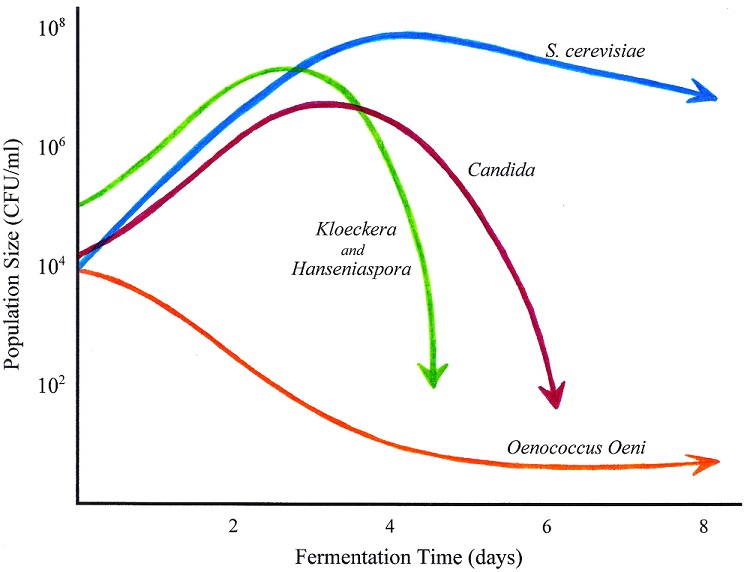
In the beginning of a typical wild fermentation, non-Saccharomyces yeasts take off. Their initial flush is short-lived, however, and after about the first two to four days of fermentation, they start dying. They require more vitamins than S. cerevisiae, and vitamins are in limited supply; they are less tolerant of alcohol than S. cerevisiae, and S. cerevisiae is a more prolific producer of alcohol; they have a slower growth rate at typical fermentation temperatures than S. cerevisiae, and so are less competitive. In other words, Saccharomyces cerevisiae is just all-around tougher and less demanding. It is a better contender over the long haul, and so it rises valiantly to the top.


Growth Pattern During Alcoholic Fermentation by Species Naturally Present on Grapes


Note the time line. At four to five days, the Saccharomyces population reaches its maximum, while other yeasts are dropping like flies. Temperature plays an important part in indigenous wine fermentations. Fastest yeast growth and fermentation occur at 77-86ºF (25-30ºC) with a general pattern following the one shown here. Below 68ºF (20ºC), the non-Saccharomyces yeasts don't necessarily die off. Their rate of growth is faster than S. cerevisiae at the lower temperatures and their tolerance to ethanol is increased, so their populations may remain high to the end.

Now take a look at lactic acid bacteria (the orange line). They drop to their lowest numbers after about five days (less than 10/ml), which explains absence of acidity in the bread. Oenococcus oeni is a species of lactic acid bacteria unique to wine ecosystems, and depending upon pH, may be the only one involved. It is the primary agent in malolactic fermentation later in the winemaking process. But lactic acid bacteria don’t take off until about two to three weeks after alcoholic fermentation is complete, giving us a nice window of opportunity to leaven bread without their interference.

While fermented raisin juice provides natural leavening, being primarily Saccharomyces cerevisiae without lactic acid bacteria, clearly it isn’t sourdough. This is the wild counterpart to bakers’ yeast. You may be wondering, "So why bother fermenting raisins if you end up with the same species?" I think you’ll know the answer the first time you bake a loaf for yourself. Wines produced by wild, mixed fermentations have the potential for more complex and interesting aromas and flavors, even if less predictable than those induced by commercial monocultures. And so it seems just as true for breads leavened by them. The fragrance that filled my house the first time I baked this bread had a richness and intensity I had never experienced in a lean bread before, the foretelling of wonderful flavor. 


What it Looks Like in Action

Your timeline might be a little different than this, although you should see bubbling within 48-72 hours if it's working. As always, with variable live cultures, variable ingredients and variable conditions, results will vary.


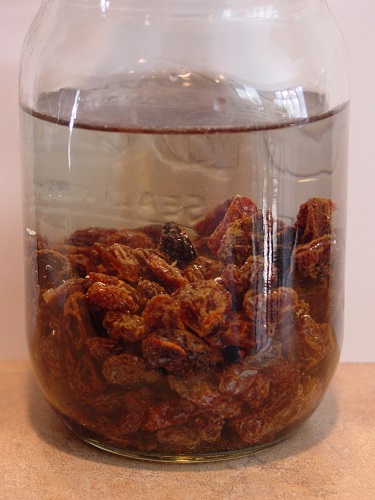
Day 1

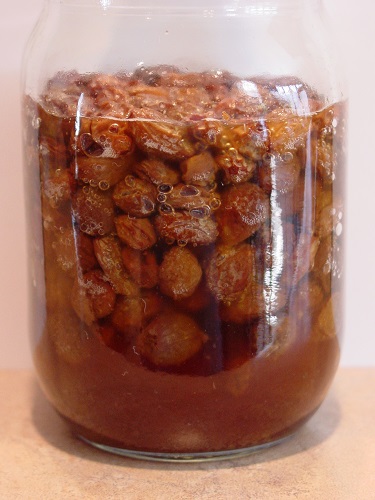
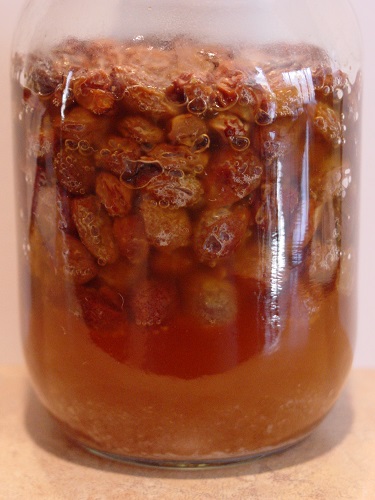
Initially, raisins sink in water and start out on the bottom. Some air bubbles may get trapped in the wrinkles.


Day 2

As they absorb water and swell, raisins expand and appear to be suspended throughout the watery raisin juice, although still underneath the surface.


Day 3

You'll know fermentation is underway when active bubbling becomes evident. The liquid will turn cloudy with yeast, and the raisins migrate upward as they become gassy.


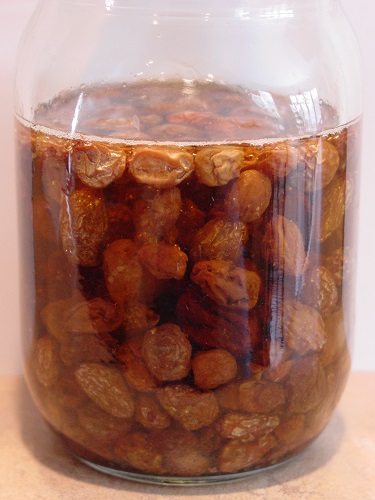
Day 4

As fermentation progresses, the raisins become more buoyant, floating higher in the liquid (above the surface). Excess yeast cells settle in an increasing layer of sediment on the bottom.


to be continued ...

DanAyo's picture
DanAyo

Community Bake - Maurizio's Fifty-fifty Whole Wheat Sourdough - Everyone is Welcome

It's that time again, this will be our second "Community Bake". The FIRST ONE was a great success! This time we are baking Maurizio's Fifty-fifty Whole Wheat Sourdough. Guess what? As luck would have, today Maurizio celebrates the 5th anniversary of his website, The Perfect Loaf.

Since most bakers are separated by many miles and even different countries, this “community bake” may be the best way to share information and learn together along the way. The idea, for those who want to participate, is that we document our progress with pictures and post. It is suggested that each participant start a new comment to document their progress. As more information and images are available for your bake you can edit that post and append it. We’ll share our success, and just as informative, our failures. During the process we can ask questions, compare results, or offer suggestions. Both expert and novice have a place here.

We plan to start our bake today. We will be following Maurizio's well documented instructions. They can be found here. https://www.theperfectloaf.com/fifty-fifty-whole-wheat-sourdough-bread/

I hope you choose to join in. The more the merrier. Even if you don’t come aboard now you can still post your bake and results at any time in the future. All threads are constantly monitored for recent activity. Be sure, someone will be available to assist you.

Some may prefer to bake small loaves. It seems 500 grams loaves are the choice of many. Below I setup the spreadsheet for 1050 grams of total dough. This would make (2) 500 gram loaves or divide the ingredients weights in half to make a single 500 gram loaf. NOTE - the total dough weight is slightly increased to account for loss. On most of these bakes I choose to omit the Diastatic Malt and they baked well. I know many don't have this ingredient in their kitchens.

Dan
Always remember this, "we learn more from our failures than we do from success".
   
Post it all. The good, the bad, and (if you dare) the ugly. 

joc1954's picture
joc1954

Tarragon and Cranberries Bread

There are several posts on TFL for bread with cranberries but there are almost no posts using tarragon and nothing about a combination of tarragon and cranberries. In Slovenia, where I live, one of very popular national dishes (cakes) is tarragon cake ( in Slovenian language “pehtranova potica” ). In this cake, which is made for different holidays, we mostly use fresh (green) tarragon. “Potica” is made from dough typical for Italian panettone. The dough is spread after bulk rise and topped with a mixture of fresh tarragon, young or cottage cheese, crème fraiche or something like this with some sugar added. Then everything is usually rolled together and put in a typical model for the final raise. For a while I had idea to combine cranberries and tarragon and make special kind of bread which would not be as sweet as a cake, but would be an ideal one for eating at breakfast topped with butter and cranberry jam or with some camembert cheese.

Tarragon Plant

My wife likes cranberry jam and her birthday was just a perfect occasion to put my idea in practice. The dough recipe is following the idea for a Tartine County Loaf. The additions are dried but rehydrated cranberries, chopped fresh tarragon (one can also use dried tarragon) and 2 teaspoons of honey. I used fresh tarragon from our garden. If you don’t like sweet bread you can omit completely two teaspoons of honey.

The recipe calls for using milk but one can use water instead. However, be prepared that the taste in this case will be quite different.

Several hours before you start mixing the dough you should soak the cranberries in the water and dry them before you put them in the dough. However, soaking them in the water will cause that a lot of their juice will be dissolved in water so it is good to use the water from the soaker for mixing the dough. Alternatively what I do is soaking cranberries in milk which is used in the recipe and strain that milk away before mixing the dough. It might happen that the milk will coagulate a little bit due to the acid in the cranberries but when you add cranberries to the dough you will not notice this at all. If you are using milk then after straining add missing quantity of milk to have 200 grams of milk for mixing the dough. Sometimes cranberries can be quite thirsty and you have to correct this by adding more milk.  One can also use re-hydrated cranberries. In this case there is no need for soaker.

Dough after bulk fermentation before divide


Cranberry Soaker


Ingredient

Grams

Baker's %

dried cranberries

200

20%

Milk/water

200

20%

Total soaker

400


Levain


Ingredient

Grams

Baker's %

AP flour

200

20%

water

200

20%

SD culture (SD starter)

50

5%

Total levain

450


Final Dough


Ingredient

Grams

Baker's %

bread flour

400

40%

AP flour

400

40%

milk

200

20%

levain

450

45%

butter

70

7%

2 eggs

130

13%

salt

20

2%

honey

20

2%

tarragon fresh

100

10%

cranberry soaker

400

40%

Final dough weight

2190

219%


Totals:


Ingredient

Grams

Baker's %

flour

1000

100%

milk/water

730

73%

hydration

73,00%


Preparation:
 
1.) Mix with mixer 2 eggs, butter (leave it on room temp for a while to soften), honey, about 100g of the flour and some milk to get a thick batter. Then add strained milk from cranberries, levain, rest of milk/water and rest of flour and mix with hand to get a shaggy mass and let it rest from 20-60 minutes.
2.) Add 20 grams of salt and mix thoroughly with hand.  
3.) Do stretch & fold every 30 minutes. Add cranberries and tarragon one hour into bulk fermentation (at second stretch & fold).
4.) After three to four hours of bulk fermentation (watch the dough, not the hour) divide the dough and let it rest for 15-30 minutes on the bench.
5.) Do final shaping and let it rise for about 2 hours or retard immediately and bake it direct from refrigerator after 8-12 hours.
6.) Bake in Dutch oven – for 10 minutes at 240 dC (460 dF) and then reduce to 220 dC (435 dF). Open the lid after 30 minutes and bake for another 10-20 minutes.   Alternatively bake with steam for 15 minutes, after that continue with convection bake. CAUTION: As this dough contains more sugar it will brown faster so it is a good idea to reduce the baking temperatures for about 10-20 degrees. 
7.) Cool on a rack for at least 1 hour before slicing.

Tarragon  & Cranberries Bread
 
Taste of this bread is really great in if you like tarragon you will love this bread. One can use dry tarragon for the recipe as well; however in this case use only 30 grams of dry tarragon. Actually the quantity of tarragon in this bread is completely arbitrary and depends on your taste.


Update 4.8.2016

Today I was baking this bread for my mother who turned 91 and also for our neighbor who turned 61. I took several pictures which I am publishing now. My today's baking is with excellent Italian "00" flour.

Italian flour type "00"

Italian flour type "00"


Adding tarragon to the dough

Adding tarragon to the dough


Adding cranberries soaked in milk

Adding cranberries soaked in milk (see some milk coagulation around berries)


Dough with added tarragon and cranberries

Dough with added tarragon and cranberries


Dough after 8 hours in fridge

Dough after 8 hours in fridge before going into DO


Scored dough

Scored dough in LODGE skillet


After removing lid

After removing lid 30 minutes later


 Final result

Final result


 Final result - details

Final result - details


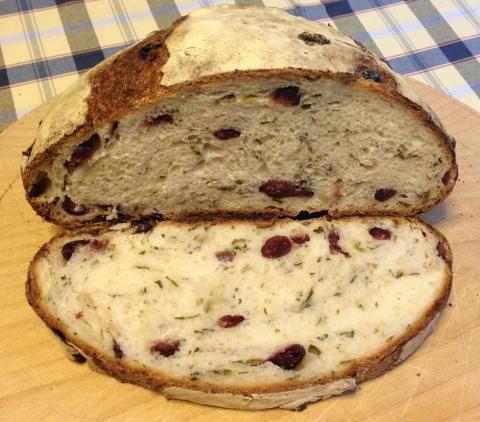
 After slicing

After slicing - crumb was very soft, not too open (this was my intention), the crust was not too strong. This bread amazes me every time I eat.


Happy baking!


WoodenSpoon's picture
WoodenSpoon

Oatmeal Hazelnut Miche

Over my last two days off I made this really big Oatmeal Miche. Its subtle and earthy and maybe a little too big but it will last all week until I have time to make another so I'm pleased.

Here's how I made it

Levain build one 

  • 20g rye chef
  • 50g fresh ground hard red
  • 20g water

Levain build two

  • 25g firm levain
  • 100g fresh ground hard red
  •  50g water

Final Dough

  • 1100g Bread Flour (69%)
  • 320g Hard White (20%)
  • 70g Hard Red (4%)
  • 10g Rye (1ish%)
  • 150g Levain (6.6%hard red 3.3%water)
  • 1150g water (72%) (hold 100g)
  • 400g Cooked oatmeal (25%)
  • 235g Toasted Hazelnuts (15%)
  • 32g Salt (2%)

First I mixed all the flours and let the dough autolyse  at room temp holding 100 grams of water for later.

Eight hours later I dissolved the levain in the leftover water and incorporated it into the dough. Fifteen minutes later added the salt and have the dough a few slap and folds. followed by a ten minute rest and a set of stretch and folds followed by a 20 minute rest.

During that 20 minutes I roasted and cracked the hazelnuts and cooked the oatmeal.

I incorporated the nuts and oatmeal and for the next hour and forty minutes I have the dough 4 sets of semi evenly spaced out stretch and folds. then I left it alone for around six hours. Then I shaped it and put it right in the fridge to proof

21 hours later I removed it from the fridge and put it right in a 500degree oven. 5 minutes later I reduced the heat to 450 and continued baking for another 55 or so minutes. once the the loaf was done I turned the oven off and left it in with the door cracked for an additional ten minutes.


Pages