The Fresh Loaf

A Community of Amateur Bakers and Artisan Bread Enthusiasts.

Most bookmarked

JMonkey's picture
JMonkey

Video tutorial: Shaping a sandwich loaf

Here's a video that I put together this weekend on how to shape, slash and bake a sandwich loaf. Nothing too hard, but it gave me a great excuse to play around with iMovie. Fun!

I hope you all enjoy the video. Here's a link. Hopefully, it'll show up as an embedded video soon.

JMonkey's picture
JMonkey

Chocolate cherry sourdough bread


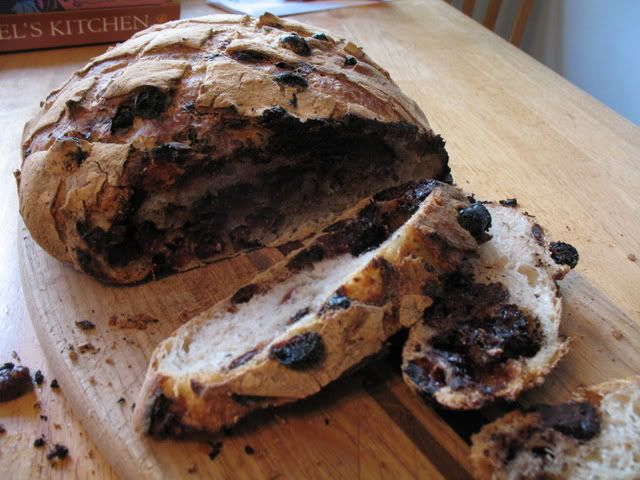
I've been wanting to make this bread for years, ever since I first had a bite of chocolate cherry bread from Zingerman's in Ann Arbor, Mich. I've tried making this several times over the past few months, all of them flops. Pancakes, covered in charcoaled chocolate (Yum-o!) were the usual products of my labors. Not this time. I finally got think I nailed it. Here's how I made it (note: These cups are Laurel's Kitchen-style cups. Don't fluff up the flour and spoon it in -- dig deep and let it settle.

Ingredients:

  • 120 grams or 1/2 cup active sourdough starter (100% hydration)
  • 340 grams or 2.25 cups bread flour
  • 8 grams or 1 1/8 tsp salt
  • 210 grams or 3/4 cup + 3 Tbs Water
  • 150 grams or 1 cup dried tart cherries
  • 125 grams or 1 scant cup big chunks of chocolate

    I've found I get more flavor out of my sourdough if I let the starter ripen at above 80 degrees. It's not necessary, though. Just make sure your starter is ripe. The night before, dissolve the starter into the water as best you can. Mix the salt with the flour (You can try using all-purpose -- I think all-purpose has better flavor and texture for sourdough, personally -- but I find that bread flour gives this bread the heft it needs to rise well despite the weight of the goodies). Then dump the flour into the starter slurry and mix it all up together until it's all hydrated. The dough should be very tacky and maybe a little sticky, but not super sticky. We're shooting for the texture of wet French dough, not ciabatta.

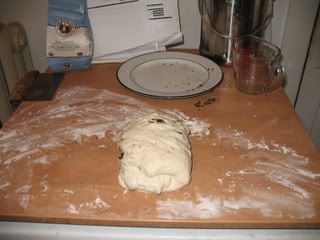
    Cover the bowl with plastic or a plate, and let it sit at room temperature (about 70 degrees F, more or less) for about 12 hours (anywhere from 10-14 should be fine). Once it's ready, it should look something like the photo to the left.

    Meanwhile, pour some boiling water over the cherries. If you can't find dried tart cherries (Trader Joe's sells them around Boston), dried cranberries will usually do almost as well. Let the fruit soak for about 15 minutes, drain and then place them on towels or paper towels to dry. You want the interior wet enough so that the fruit won't draw moisture from the dough, but dry enough on the exterior so they won't turn your dough into soup (it can happen -- believe me, I know). When the fruit is ready, mix it up with the chocolate in a bowl, and have it handy.

    Flour a workspace lightly, and then gently turn the dough out onto the board. With wet hands, lightly pat the dough into a rectangle. Stretch the dough to about twice its length, and then spread 1/4 of the chocolate cherry mixure in the center. Fold one-third of the dough on top, and again, spread 1/4 of the mixture on top. Fold the final third of the dough like a letter, and then turn the dough one-quarter. Follow the same procedure, and then cover the dough. Let it rest for about 15 minutes. Here's a photo sequence to show you what I'm talking about.


    Stretch and spread.


    Fold and spread.


    Fold again. Then turn the dough one quarter and repeat! Easy-sleazy. (That's the final product above. I skipped a few steps in the photos. It's well-established that stretch and fold only remains exciting and engaging for ... oh ... no more than three photos, I believe..)

    Folding the chocolate and cherries into the bread ensures that the vast majority of the goodies stay protected from the fierce heat to which you're going to subject the dough in order to get that lovely, crunchy crust we all adore. The yummy stuff is not as evenly distributed as it would be were it mixed in from the beginning, but uneven distribution is highly preferable to charcoal. Trust me.

    Now, after letting the dough rest for 15 minutes, gently shape the dough into a boule, and place it in a well-floured banneton. I splurged a while back and bought one of my own, but you can easily construct a makeshift banneton out of a bowl and a well-floured linen napkin.

    I like to let my sourdough proof in the makeshift proof-box you see to your right. I pour a cup or two of boiling water in there and close it up. It'll stay within 3-4 degrees of 85 degrees F for about 90 minutes. I then pour in another cup or two of hot water.

    After 3 hours, my bread looked like this.


    About an hour beforehand, I'd put my cloche in the oven and preheated it to 500 degrees F, but if you don't have a cloche, a dutch oven or oven-safe casserole will do. If you don't have that, just use your baking stone and steam the oven. If you don't have that, just put the bread on a baking sheet. Once the bread was scored, I baked it covered for 30 minutes, and uncovered for about 17-18 minutes, and then let it cool an hour (can you believe it?) until we dug in. I had a minor mishap with a bit of my bread sticking to the peel, thus the odd shape to the left. It didn't disuade us from gobbling it all up with 48 hours though.

  • JMonkey's picture
    JMonkey

    Ciabatta Integrale from KAF Whole Grains Baking

    For my birthday, my mother bought me the brand-new King Arthur Flour Whole Grains Baking book. It's well timed. Their first book turned me on to bread baking, but after a few months, I moved toward whole grain breads almost exclusively, and the King Arthur Flour Baker's Companion is about 95% white flour recipes. I learned a lot from it, but I wasn't baking much from it. So, suffice to day, I was itching to knead something up out of this book as soon as possible.


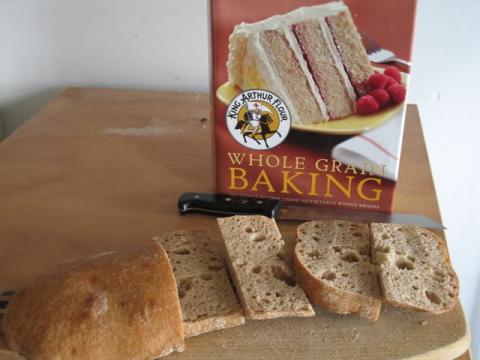
     I've made a few of the quickbreads. The Sailor Jack muffins, in particular -- an incredible cake-like concoction with raisins steeped in spices, molasses and brown sugar, along with whole wheat flour and oats, topped with a lemon sugar glaze -- are very, very tasty indeed. But I'd not tried a yeast bread until this weekend.  The first recipe to catch my eye was Ciabatta Integrale, a ciabatta made with half whole wheat flour, olive oil and a bit of powdered milk. I love ciabatta -- nothing is better for a sandwich or simply a bit of oil and balsamic vinegar. But whole grains just don't do ciabatta. Those holes? Forget it. Or so I thought. This recipe isn't 100% whole grains, but it's half, and I'll take it, given the results.  Here's one loaf all sliced up for sandwiches.
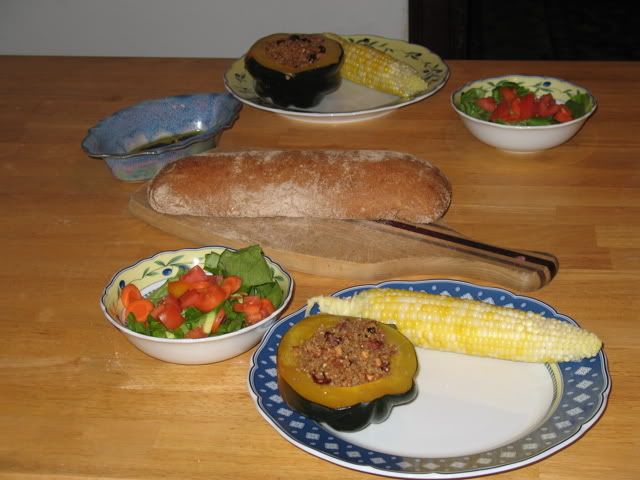
       And here's the other loaf, which served as dinner bread with some stuffed acorn squash (stuffed with quinoa, maple syrup, raisins, almonds and cinnamon), fresh corn and a green salad composed of our morning trip to the farmers' market. Olive oil and balsamic vinegar are in the gravy boat, natch. 
      I was really impressed with the results, especially since the recipe said it's impossible to mix completely without a stand mixer. I don't own a stand mixer, so here's how I did it, thanks to a little help from Peter Reinhart's Bread Baker's Apprentice.  Ingredients  Pre-ferment  1 cup or 4 oz. whole wheat flour 1/2 cup or 4 oz cool water Pinch of instant yeast  Dough  All of the pre-ferment 1 1/4 cups or 5 oz. whole wheat flour 2 1/4 cups or 9.5 oz white bread flour 1 1/4 cups or 10 oz. cool water 1/4 cup or 1.75 oz olive oil 1/4 cup or 1 oz. nonfat dry milk 1.5 tsp salt 1/4 tsp instant yeast  Yes, you read that right. This recipe makes two loaves of ciabatta with less than 3/8 tsp yeast.  The night before mix together the pre-ferment. The next morning dump all the ingredients (including the pre-ferment, which should be spongy and full of bubbles) EXCEPT for the salt and additional yeast into a bowl, and mix it together with a large spoon or a dough whisk until it seems mostly hydrated. Cover and let it stand for 45 minutes to an hour.      

    After the autolyse (that's what you're doing when you soak), add the salt and yeast.

    DON'T FORGET, OR YOU'LL REGRET IT. :-)

                      Get a small bowl of cool water, and dip your hands in it. Shake off most of the water (important, otherwise you'll end up overhydrating the dough and you'll have soup) and then, using your hand like a dough hook, impale the dough with all five fingers. Turn your wrist clockwise while you turn the bowl with your other hand counter clockwise. Continue to do this, occassionally changing direction and wetting your hands if the dough starts to stick, for about 10 minutes. The dough should pull away from the sides of the bowl, but it will stick to the bottom. Adjust the flour or water as necessary. Put the dough in a pre-greased bowl and cover it.  Every hour or so, copiously flour your work surface, remove the dough, copiously flour the dough and give it a good stretch and fold, brushing off as much of the flour as you can before folding. By stretch-and-fold, I mean gently pat out the gas, stretch the dough to twice its length and then fold it in thirds like a letter. Give the dough a one-quarter turn, and then stretch-and-fold once more. Place it back in the bowl and re-cover it. Here's a good lesson on the technique.  After about 3 hours and 2 or 3 folds (depending on how much strength the dough needs), remove the dough, and divide it into two. Gently stretch and pat each loaf into a 12 x 4 inch rectangle, and place them in a baker's couche (essentially, well-floured linen that you bunch up around the loaves so that they rise up instead of spreading out) or on parchment paper-lined baking sheets. Cover with greased plastic.  It took mine about 4 hours for the final proof, but then my house is a chilly 62-64 degrees F. If your house is around 70-75 degrees, you may only have to wait two hours or so. In any case, preheat the oven to 500 degrees and put the loaves in the oven either on a preheated baking stone or a cold baking sheet when they're good and puffy. Steam the oven (I keep a cast iron skilet in the bottom of mine and usually toss about 1 cup of boiling water in it) and turn the oven down to 425. The loaves should take 20-25 minutes to cook and should register 205 degrees when done. With all that oil, the crust is not as crisp as I usually like ciabatta, but I find I do like the flavor it adds.  Enjoy!
    Benito's picture
    Benito

    Underproofed vs Overproofed

    We frequently get questions about whether or not a crumb shows evidence of underproofing or overproofing.  Having baked plenty of examples of both I thought I would share how I look at the baked bread to decide if it is under or over.

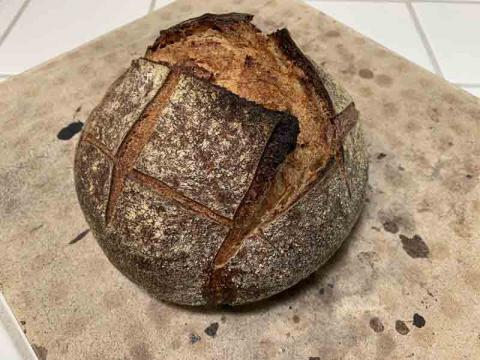
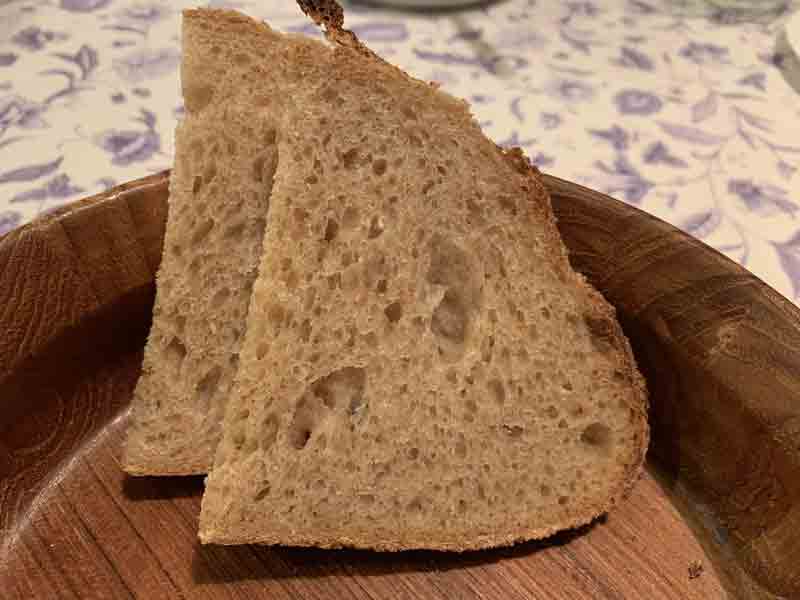
    This first loaf has some pretty classic signs of underproofing.  Looking at the crumb, I find it helpful to ignore the big holes first and have a look at the crumb.  Is the crumb very tight and dense or is the crumb actually quite nice and open.  Generally if it is very tight and dense, it is more likely to be underproofed than just right or overproofed.  Next look at the large holes.  Are these large holes actually big long tunnels through the bread?  Are they generally in the upper half of the bread and not immediately under the crust?  In underproofed breads the big holes have a tendency to be large tunnels in the upper half of the bread and not ones immediately under the crust.  Next, sometimes there are clues before you even slice the loaf.  I unfortunately didn’t get the best photos of the outside of this loaf to demonstrate this, but you might see an exaggerated oven spring and ear.  In fact the center of the bread might even be quite pointy as it is pushed upwards by the expansion of those huge tunnels in the bread while baking.


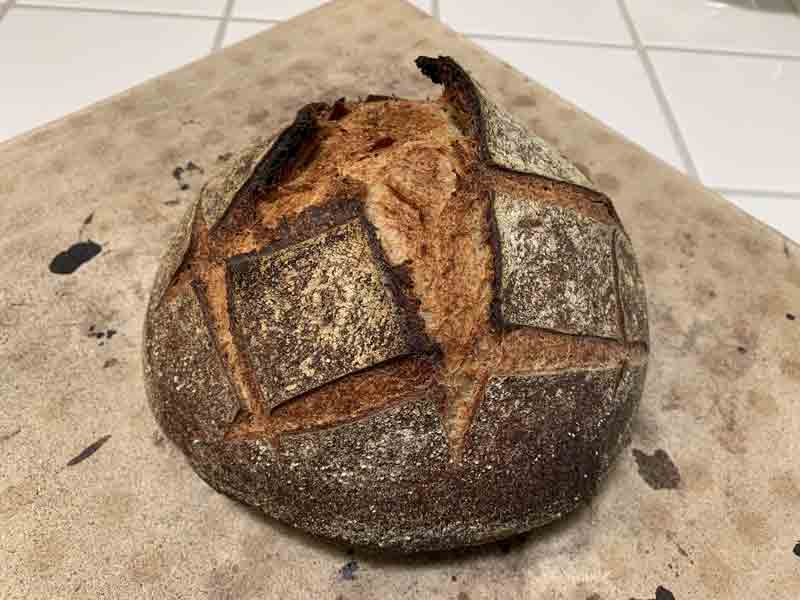
    This next loaf has signs of overproofing.  Let’s start again with the crumb and ignore any larger holes.  The crumb in this example isn’t particularly tight or dense despite it being 100% whole grain, so it isn’t likely underproofed.  So it could be just fine or overproofed.  Now look for the larger holes.  In this case the larger holes are just under the crust and if you look closely you’ll see some broken gluten strands.  These broken gluten strand happen because as the dough overproofs, the gluten becomes weaker as the pH falls activating the proteolytic enzymes.  Then as the gases expand in the oven when baking the weakened gluten fails and smaller alveoli coalesce to become larger ones.  Next let’s look at the outside of the loaf.  The weakened gluten affects the outward appearance of the loaf.  Again rather than expanding upwards, the loaf spreads as the gases expand as the gluten breaks down so we often get a flattened loaf.  The ear is often unable to form properly so you might get only a small ear at best.  In the area of the score you’ll often a collapsed area rather than a crust that stands proud.

    What do you look for to decide if a loaf is over or under?

    Benny

    Benito's picture
    Benito

    Aliquot Jar to determine bulk fermentation rise

    Can I share a recent trick that I have been using to fine tune my sourdough baking?  I am now using an aliquot jar to gauge bulk fermentation.  A small piece of dough, about 30 g, removed from the dough after the first set of stretch and folds and placed into a small jar with straight sides.  Make sure you pressure the dough firmly into the bottom of the jar trying to eliminate any air pockets.  I got this idea originally from an IG post of Kristen’s (Full Proof Baking). This dough will ferment at the same rate as the larger dough mass assuming you keep it in the same conditions as the larger dough.  You will mark the starting point and can very accurately measure the volume rise of the large dough by the dough in the aliquot jar.

    I’ve always had a very hard time measuring rise because I bulk ferment in a Pyrex 8” x 8” square dish and make one loaf at a time.  So when the dough starts out it isn’t even touching the sides of the dish.  I’ve started using the aliquot jar in the past 3-4 bakes and now I can really measure the rise so if the end result of the crumb is a bit too tight I can next time let bulk go further with confidence by using the aliquot jar and get a more fully fermented loaf.  Or vice versa of course if over fermented I can dial back on the fermentation next time.

    I hope someone finds this as helpful as I have.  Using this I can learn to judge the visual and tactile features of my dough in a way that I haven’t been able to before.

    Benny

    idaveindy's picture
    idaveindy

    Various links, "bookmarks."

    Bannetons:

    Oval banneton, 10x6x4, with liner:

    https://amazon.com/inch-Premium-Banneton-Basket-Liner/dp/B06XJ698WV?tag=froglallabout-20

    Oval banneton, 11", with liner:

    https://amazon.com/Agile-shop-Banneton-Brotform-Proofing-Handmade/dp/B01HXTLDH4?tag=froglallabout-20

    Round banneton, 11.8", with liner:

    https://amazon.com/Agile-Shop-Banneton-Brotform-Proofing-Handmade/dp/B01FXA5K3S?tag=froglallabout-20

    Round banneton, 12", Brick Oven Baker: 

    https://amazon.com/BrickOvenBaker-12-inch-Banneton-Proofing-Basket/dp/B01B9UEP3W?tag=froglallabout-20

    Oval, high, 10", Brick Oven Baker:

    https://amazon.com/BrickOvenBaker-10-inch-Banneton-Proofing-Basket/dp/B01B9UELCM?tag=froglallabout-20

    ---

    80+ types of flour at General Mills: 

    https://www.generalmillscf.com/products/category/flour

    Of note to bread and pizza bakers:

    See right side for form to locate a distributor based on zip code.

    ---

    To get more tang, and lactic vs acetic:

    https://www.thefreshloaf.com/node/62064/want-more-sour

    https://truesourdough.com/best-temperature-for-proofing-sourdough-full-guide-how-to/

    https://truesourdough.com/18-ways-to-make-sourdough-bread-more-or-less-sour/

    https://www.kingarthurbaking.com/blog/2022/02/22/how-to-make-your-sourdough-bread-more-or-less-sour-part-1

    -- 

    addendum, other references

    King Arthur professional flour, mostly 50 lb bags: https://www.kingarthurflour.com/pro/products

    Explanation of various types of rye flour, and dark vs whole: https://www.kingarthurbaking.com/blog/2020/09/28/types-of-rye-flour

    Volume to weight conversion chart: https://www.kingarthurbaking.com/learn/ingredient-weight-chart

    Caputo (mill in Naples, Italy): http://www.mulinocaputo.it/en/flour link broken.
    https://www.mulinocaputo.it/art-of-baking/?lang=en
    https://www.mulinocaputo.it/linea-cucina/?lang=en

    Moul Bie: https://www.grandsmoulinsdeparis.com/produits/farines.html

    US distributor of Caputo/All Trumps / mail order/ repacks: https://brickovenbaker.com/collections/all/flour
    Brick Oven Baker's explanation of Caputo Flours: www.brickovenbaker.com/pages/information-about-caputo-flours   Out of business.

    Central Milling (Utah): www.centralmilling.com/store

    Keith Giusto Bakery Supply, KGBS, Petaluma CA, part of Central Milling: https://kgbakerysupply.com/bakery-supply-products

    Explanation of W, PL, ash%, extraction, Italian/French/German/US specification systems: www.theartisan.net/Flours_One.htm

    Bakerpedia, baking encyclopedia: https://bakerpedia.com/
    Ingredients, Processes, Terms, Resources/recipes.

    Bread Bakers' Guild of America, formatting formulas: https://www.bbga.org/files/2009FormulaFormattingSINGLES.pdf
    https://www.bbga.org/

    Comparison of KitchenAid Mixers: https://mixitbakeit.com/compare-kitchen-aid-stand-mixers/

    Hemp hearts vs hemp seeds. https://www.besthealthmag.ca/article/hemp-hearts-vs-hemp-seeds/

    ------

    KitchenAid manuals, dough/flour limits:
    https://www.manualslib.com/manual/372167/Kitchenaid-Ksm150ps-Artisan-Series-Mixer.html?page=21#manual

    "NEVER use recipes calling for more than 9 cups of all-purpose flour or 6 cups of whole wheat flour when making dough with a 5-quart tilt-head mixer"

    For a "bowl lift" model, example:
    https://www.manualslib.com/manual/806754/Kitchenaid-Bowl-Lift-Mixer.html?page=10#manual

    It says: "NEVER use recipes calling for more than 1.68 kg (12 cups) all-purpose flour or 840 g (6 cups) whole wheat flour when making dough with a 4.8 L (5-qrt) Stand Mixer."

    ------

    Panman's How to clean and season cast iron: http://panman.com/how-to-clean-season-cast-iron/

    Guide to GF binders: https://www.culturesforhealth.com/learn/gf-sourdough/guide-binders-gluten-free-sourdough-baking/

    How butter, sugar, eggs hydrate flour: https://www.thefreshloaf.com/comment/481125#comment-481125

    Importance of shaping to build surface tension: https://www.thefreshloaf.com/comment/489849#comment-489849

    Starter to Levain to dough, flow chart: https://www.thefreshloaf.com/node/68585/methods-and-rationale-sourdough-starter-maintenance-and-elaboration

    Soaker ingredient hydration percents:
    https://www.thefreshloaf.com/node/61245/soaker-ingredient-hydration-percents-some-data

    Freezing pizza dough:
    https://www.thefreshloaf.com/node/68686/freezing-pizza-dough

    Debra Wink,  pesky thiol compounds:
    https://www.thefreshloaf.com/comment/121566#comment-121566

    Summary of what TFL is:
    https://www.thefreshloaf.com/node/69078/research-questions#comment-494753

    --------------------------------

    Australian flour and malt.  Web site specifically for Australian bakers:

    https://www.sourdoughbreadrecipe.com.au

    Based on this web page, some Australian bread recipes do require diastatic malt: https://www.sourdoughbreadrecipe.com.au/methods/how-to-make-a-bread-dough/

    The malt is in step 5 where the water is added.

    These two pages talk about Diastatic malt powder:

    An australian recipe that calls for a pinch of diastatic malt, and some stoneground (presumably whole grain) flour which adds some bran and its attendant enzymes. https://www.sourdoughbreadrecipe.com.au/recipes/sourdough-baguettes/

    --------------------------------

    Recipes:

    Favorite tortilla:  www.youtube.com/watch?v=Fy3VZcRJkl4 or www.paulaq.com  - don't use all the water. Or www.paulaq.com/mexican-flour-tortillas_1.html

    Detroit Pizza, J Kenzi Lopez-Alt: https://www.seriouseats.com/detroit-style-pizza-recipe

    Cast iron Pan Pizza: https://www.seriouseats.com/recipes/2013/01/foolproof-pan-pizza-recipe.html

    Cast iron Pan Pizza, Ragusea: https://www.youtube.com/watch?v=uYxB4QBlrx4
    Also see Binging with Babish channel.

    Make your own GF mix: http://www.thebreadkitchen.com/recipes/gluten-free-flour-mix/

    Great G/F web site:
    https://glutenfreeonashoestring.com/all-purpose-gluten-free-flour-recipes/

    Swedish "Polar bread" on a griddle: http://www.thebreadkitchen.com/recipes/polar-bread/

    Naan with yeast: http://www.madhurasrecipe.com/

    Borodinsky:


    Whole wheat sandwich bread: https://www.seriouseats.com/100-whole-wheat-sandwich-bread

    Mark Bittman's pizza dough: https://www.markbittman.com/recipes-1/pizza-dough

    Egg pasta, Helen Rennie: https://youtu.be/m_fu5RaXMVk

    How to make baking powder. 1 part baking soda, 2 parts cream of tartar, 1 part corn starch. https://www.allrecipes.com/article/how-to-make-baking-powder/

    How to make cultured buttermilk:
    https://www.thespruceeats.com/make-your-own-buttermilk-p2-995500#toc-how-to-make-cultured-buttermilk
    https://www.foodnetwork.com/how-to/packages/food-network-essentials/how-to-make-buttermilk
    http://benstarr.com/blog/all-about-buttermilk/

    Citric acid to pH calculations: https://www.humblebeeandme.com/hive/topic/how-much-citric-acid-you-should-weight-to-get-a-specific-ph/
    https://ezcalc.me/ph-calculator/

    How to make rice paper
    https://www.wikihow.com/Make-Rice-Paper

    Trailrunner's Trinity: 9% of _dough_ weight: 3% evoo, 3% honey, 3% yogurt/buttermilk.  This replaces equal weight of water. IE, for 1000g dough, take out 90 g water, and add 30g evoo, 30g honey, 30g yogurt. https://www.thefreshloaf.com/comment/512335#comment-512335

    --------------------

    Recipe web sites:

    www.thefreshloaf.com
    www.theperfectloaf.com - Maurizio Leo. 
    www.allrecipes.com
    www.seriouseats.com
    www.thespruceeats.com
    www.theryebaker.com - Stanley Ginsberg. 
    www.ploetzblog.de - Lutz Geissler. In German. 
    www.brotdoc.com - der Brotdoc, Björn Hollensteiner. In German. 
    https://brotgost.blogspot.com - "Rusbrot." In Russian. 

    ----

    Cookbook errata:

    Cresci, by Massari: https://www.facebook.com/groups/338771723354166/about/

    Bread, 1st edition only, by Hamelman:
    http://mellowbakers.com/ErrataSheetFeb2011.pdf
    or: http://mellowbakers.com/HB/index.php/topic,242.msg1129.html#msg1129
    or: http://www.bit.ly/BreadErrata

    Crumb, by Bertinet: https://www.thebertinetkitchen.com/2019/03/28/crumb-whoops-erratum/

    Inside the Jewish Bakery, by Ginsberg & Berg: https://www.stanleyginsbergbooks.com/ITJB/files/IJB_Errata.pdf

    Southern Ground, by Jennifer Lapidus:
    https://static1.squarespace.com/static/50f71f63e4b09e4ad0220969/t/60b7f449632f1b06b3f002d9/1622668361322/Errors+final2.pdf

    The Pizza Bible, Gemignani. Errata for early printings:
    https://web.archive.org/web/20191218172657/http://www.thepizzabible.com/errata

    ------

    Videos:

    TFL users:

    DanAyo: www.youtube.com/channel/UC7mXjnPpTDoVJxRdrG3ZeYw/

    Alfanso: www.youtube.com/channel/UCN9_G-eUBD5tMnrWItQGUPQ/

    The Roadside Pie King (Will F.): www.youtube.com/channel/UCocnoxG7aduh6hUqB19UJkQ/

    Benito: https://youtube.com/channel/UCw2VDjLY7eDXxwgzvLZJ8Gg/videos

    Brotcraft: https://youtube.com/user/stefanjkramer

    _JC_ : https://www.youtube.com/channel/UCUy-wB_IPjBl_cDydF0R2mg

    Other baking video channels:

    Steve Gamelin, no-knead but with yeast, not sourdough. His extremely simple method got me out of the bread machine, and into artisan/no-knead bread. A big round of applause for him. If you want K.I.S.S., this is it: www.youtube.com/user/artisanbreadwithstev/

    The Bread Code: https://www.youtube.com/c/thebreadcode

    Rus Brot (in Russian): www.youtube.com/c/rusbrot

    Bake with Jack: www.youtube.com/channel/UCTVR5DSxWPpAVI8TzaaXRqQ/

    Full Proof Baking, Kristen Dennis: www.youtube.com/channel/UCym_8JHA4htlFLIHGpNZGrQ/

    Joshua Weissman: www.youtube.com/channel/UChBEbMKI1eCcejTtmI32UEw/

    Jeff Hertzberg & Zoe François of Bread in 5 minutes/day fame: www.youtube.com/user/BreadIn5/videos

    Shaping, gluten cloak: https://www.youtube.com/watch?v=bIb8fC9BdWs

    Jeff's own channel: www.youtube.com/user/jhertz10/videos

    Peter Reinhart on the TenSpeedPress channel: www.youtube.com/playlist?list=PLYzonddbxYw8ghFfHIUJz9POrnW4tmQ4E

    Ken Forkish (FWSY and Elements of Pizza): www.youtube.com/user/KensArtisan/

    King Arthur Flour (Jeff Hamelman & Martin Philip): Most excellent!
    www.youtube.com/user/KingArthurFlour/playlists

    Breadtopia: www.youtube.com/user/breadtopia/videos

    Foodgeek: https://www.youtube.com/channel/UC7eLtGAzNECUqurqMdiNYJg

    How to shape dough: https://www.youtube.com/watch?v=IxVSlizlt-s
    More on shaping, why: https://www.youtube.com/watch?v=JvA6jJsr0HY

    Foodgeek web site: https://foodgeek.dk/en/

    Trevor J. Wilson: https://www.youtube.com/channel/UCRK2AFfEfjhFcpYtu44Uzvw

    Trevor's website:  breadwerx . com

    Stanley Ginsberg: https://www.youtube.com/watch?v=QuOv-v8h1L0
    Websites: https://theryebaker.com
    https://nybakers.com

    Sourdough Journey: https://www.youtube.com/channel/UCvFd727zQvioesPXe3eKkfg

    Northwest Sourdough, with Teresa Greenway: https://www.youtube.com/c/NorthwestSourdough/videos

    or by playlist: https://www.youtube.com/c/NorthwestSourdough/playlists

    Teresa's commercial video courses: https://www.udemy.com/user/teresalgreenway/

    Teresa's website: https://northwestsourdough.com/

    Proof Bread: https://www.youtube.com/channel/UCPYHRKEqMycep7r5kO-1org

    Bread by Joy Ride coffee: https://www.youtube.com/channel/UCcLCX8VIcNWIu6BJyjWQDww

    Elly's Everyday Whole Grain Sourdough channel:
    https://www.youtube.com/channel/UCozBpyoi-j7plavuZKLIgQg

    ------------

    Food storage: https://www.churchofjesuschrist.org/topics/food-storage/longer-term-food-supply?lang=eng

    dmsnyder's picture
    dmsnyder

    Another Attempt to Produce a San Francisco-Style Sourdough Bread: Finally, success!

    San Francisco Style Sourdough Bread

    March, 2019

    David Snyder


    This recipe was kindly shared by Ann Rogers who got it from Mike Giraudo. Mike's recipe is his own adaptation of that of Ramon Padilla,who worked for 30 years as a baker for Parisian and Boudin bakeries in San Francisco.

    These are the instructions she provided verbatim, followed by my adaptation, reformulated to make 1000g of dough.
    ------------------------------------------

    Mike Giraudo's Recipe (per Ann Rogers)

    250g starter (60% hydration)
    600g water
    1000g flour
    20g salt
    Makes two 875g loafs

    Mix all ingredients 2 minutes on low speed until mixed, then mix 9 more minutes on next level speed. Then a quick stretch and fold, rest dough 30 mins, then stretch and fold one more time. 

    Then cover and let dough rest for about 8 hours at room temp. 

    After 8 hours, divide and shape into loafs and then into bannetons or lightly oiled containers, cover- then into the refrigerator for at least 12 - 32 hours. (The longer the time, the more sour the bread)

    After refrigeration, place immediately into a pre-heated Dutch oven @475 for 20 mins and then uncover and cook for another 10 mins @450 (or until you like the color of your bread.) Feel free to use all purpose flour, makes for a great crumb. 
    -------------------------------------------

    David Snyder's Adaptation

    Total Dough


    Ingredient

    Wt (g)

    Bakers' %

    Total flour

    617

    100

    AP

    463

    75

    WW

    154

    25

    Water

    371

    60

    Salt

    12

    2

    Total

    1000

    162


    Note: The original recipe and the San Francisco Sourdough of yore are 100% low extraction (white) flour. I have modified this by including 25% whole wheat flour, because that is my preference. Besides effects on flavor complexity and nutrition, the anticipated effects would be: 1) A less open crumb, 2) faster fermentation, 3) enhanced acid production.

    Note: 15.7% of the flour is pre-fermented. This is less than most sourdough formulas which average 20-25% pre-fermented flour. The effect would be: 1) A longer bulk fermentation, 2) more acid content at the time of dividing and shaping.

    Starter


    Ingredient

    Wt (g)

    Bakers' %

    Total flour

    84

    100

    AP flour

    63

    75

    WW flour

    21

    25

    Water

    50

    60

    Active firm starter

    21

    25

    Total

    155

    185

    Note: The 21g of active firm starter consists of 7g water + 10g AP flour + 3g WW flour.

    1. The night before mixing the Final Dough, dissolve the active firm starter in the water.

    2. Add the flours and mix thoroughly.

    3. Cover and ferment at room temperature overnight.


    Final Dough


    Ingredient

    Wt (g)

    AP flour

    390

    WW flour

    130

    Water

    313

    Salt

    12

    Starter

    155

    Total

    1000


    Procedures

    1. Place all the ingredients in the bowl of a stand mixer. Mix at Speed 1 for 2 minutes to distribute ingredients then for about 9 minutes at Speed 2 to develop the dough.

    2. Transfer the dough to a lightly floured board.

    3. Do one stretch and fold. Cover the dough and let it rest for 30 minutes.

    4. Do one more stretch and fold and transfer the dough to a clean, lightly oiled bowl.

    5. Cover the bowl and ferment at room temperature for “about8 hours.”

    6. Divide the dough, if smaller loaves are desired, pre-shape into rounds and cover. Let rest for 10-30 minutes.

    7. Shape as boules or bâtards and place in floured bannetons.

    8. Refrigerate for 12-32 hours (The longer the cold retardation, the more sour the final loaf).

    9. Check on degree of proofing. If not sufficiently proofed, remove from refrigerator and proof at room temperature or warmer until adequately proofed. Then procedure to scoring and baking.
    10. Transfer to a peel. Score as desired.

    11. Bake: If baking in Dutch oven, bake at 475ºF covered for 20 minutes, then uncovered at 450ºF for another 10 minutes or until done to satisfaction.

    12. Bake: If baking on the hearth, pre-heat oven at 500ºF for 1 hour with baking stone and steaming apparatus in place. Turn down oven to 460. Load loaf and steam oven. After 15 minutes, remove steam and continue baking for 20-35 minutes, until loaf is baked. (Time depends on size and shape of loaf.)

    13. The bread is done when the crust is nicely colored and the loaf sounds hollow when thumped on the bottom. The internal temperature should be at least 205ºF.

    14. Transfer the bread to a cooling rack and cool thoroughly before slicing.

     Note: I retarded this loaf for about 15 hours. At the end of that time, it was nowhere near adequately proofed. I placed it in my proofing box set to 80ºF and proofed it for another 2.5 hours, the last hour while my oven pre-heated. You can see from the overly exuberant oven spring and bloom that the loaf was still somewhat under-proofed. I baked it on a pizza stone, as described in Step 12., above, for a total of 50 minutes.


    I had a couple slice ... well, three ... but one was very thin! The crust was delightfully crunchy. The crumb was pretty open for a 60% hydration, 25% whole grain bread. It was very well aerated, demonstrating good fermentation. The crumb was moderately chewy. The flavor was a bit wheaty and sweet with a moderately prominent acetic acid tang, yet well-balanced. It has the old-fashioned San Francisco Sourdough feel - the genuine article. It's just what I would imagine Parisian "Wharf Bread" to have been like, if they had baked a "whole wheat" version.

    I shared my results with Ann Rogers and Mike Giraudo, and Ann reiterated that, if I wanted it more sour, I should just extend the cold retardation to 32 hours (or more!) I am going to do it.

    This is a keeper. It is the bread I have been trying to make for many years. I would encourage those who miss the San Francisco Sourdough Bread of yesteryear or just wonder what all the fuss is about, to make this. It's simple and easy and delicious.

     Happy Baking!

    David

    dmsnyder's picture
    dmsnyder

    Same-Day Pizza

    Same Day Pizza

    David Snyder

    February, 2019


    When given a choice, I would always make pizza with dough leavened with sourdough. This could be a sourdough made with a three day lead time (See: http://www.thefreshloaf.com/node/34452/pizza-bliss) or even dough made with sourdough “discard.” (See: http://www.thefreshloaf.com/node/37179/pizza-made-sourdough-starter-discard) But, you know, sometimes I decide I want pizza for dinner tonight, not two or three days from now. I have found that the “Same-Day Straight Pizza Dough” formula from Ken Forkish's “Flour Water Salt Yeast” makes darn good pizza.

    You do have to decide on pizza for dinner tonight by 8 or 9 am in order to get the dough made and ready for a 7 or 8 pm dinner. I usually plan for it before I go to bed the night before.

    Note on quantities: These amounts of ingredients are for about 5 medium-sized pizzas. I usually scale the ingredients for 4 pizzas and actually make two pizzas and a quarter sheet pan of focaccia.

    Note on flours: This formula works well with a variety of flour blends. You can use AP or Bread Flour entirely. You can substitute whole wheat for some of the white flour. I have made this dough with Bread Flour and 00. I found the crust less crispy and more chewy than I prefer. I have made it with all 00 flour. The flavor was wonderful, but 00 is milled to work best in a real pizza oven that heats to 700ºF or even hotter. In my home electric convection oven, the best I can do is 500ºF convection bake. Pizza dough made with 100% Italian 00 flour does not brown well. So, a mix of AP and 00 flours is the best I have found to date, giving me great flavor and beautiful performance. Well, a little whole wheat flour doesn't hurt a bit.

    Total Dough


    Ingredient

    Wt (g)

    Bakers' %

    All purpose flour

    350

    35

    Caputo 00 flour

    650

    65

    Water (90-95ºF)

    700

    70

    Instant yeast

    2

    0.2

    Salt

    20

    2

    Total

    1722

    172.2


    Procedure

    1. Measure the yeast into a small bowl. Mix it with a couple tablespoons of the heated water and put it aside.

    2. In a large bowl, mix the flours. Add the rest of the heated water and mix to fully hydrate the flours. Cover the bowl and let it sit for 30 minutes to an hour. (Autolyse)

    3. Sprinkle the salt over the dough and scrape the dissolved yeast over the dough. Mix thoroughly. (I start by folding the dough over itself repeatedly with a silicon spatula, rotating the bowl 30º or so after each fold. I then squeeze the dough repeatedly with one hand, alternating squeezes with a series of stretch and folds. This both distributes the salt and yeast more evenly and develops the gluten further.)

    4. Transfer the dough to a clean, lightly oiled bowl. Cover the bowl. Allow the dough to ferment until almost double in volume (6-8 hours, depending on ambient temperature.) Do not under-ferment the dough. In this case, a bit over-fermented is better than under-fermented.

    5. Do a stretch and fold after one hour.
    6. Transfer the dough to a lightly floured board. Divide the dough into pieces – 350g for 10inch pizzas; 700g or more for focaccia; etc.

    7. Form each piece into a tight ball. Flour lightly or oil lightly and refrigerate well-covered until 1-2 hours before use. They can be refrigerated until the next day, if desired. (Note: What I generally do is use a 1-quart Ziploc bag for each dough ball and spread a tablespoon or so of olive over the interior surfaces. Then I put a dough ball in each bag and refrigerate them, ideally for at least a couple of hours.)

    8. An hour or two before use, take the dough balls out of the refrigerator.

    9. Form each ball into a pizza shell by your method of choice. Top as desired and bake. (Note: I bake pizza on a pizza steel, preheated at 500ºF Convection for an hour. These pizzas baked in 8 minutes. Your time may vary depending on your oven.)

    Pizza shaped, topped and ready to bake

    Right out of the oven

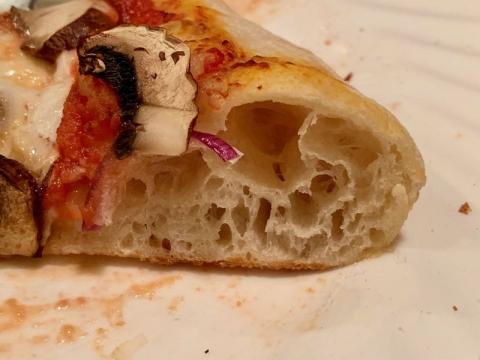
    Cornicione crumb

    Enjoy!

    David

    alfanso's picture
    alfanso

    Semolina w/fennel seeds, golden raisins and pine nuts,

     alfanso-style.

    Friends paid a visit last week from the other side of the peninsula.  And I baked them some bread.  Jim is the extraordinarily talented chef of his own small restaurant and does indeed like my bread, so I was pleased to provide him and Donna with two favorites.  The remaining batards sent home with them.

     In conversation, Donna expressed her enjoyment for one particular item from Amy’s Bread – Amy’s being one of the better known bakeries in NYC, that little burg from whence we all started.  It was a 1992 creation of Amy’s – a semolina studded with raisins, fennel seeds and pine nuts.  Donna suggested that I try my hand at it.   She forwarded the above link to the formula to me.  It employs a ~79% biga. And with a little searching I found Susan’s, of Wild Yeast, version of a similar, quite similar, bread using a levain.  A semolina with fennel, currants and pine nuts. So it was time to investigate, and make one to send along with my wife to her Tuesday night taiko practice for all those hungry drummers who now well know my bread.

    The levain is a two stage 100% white flour build. Mixed yesterday and baked this morning.  This bread also asks for olive oil and IDY, two items I tend not to use in my own baking of levain breads, but so be it.  And as usual, I had to, just had to, tinker with the formula to make it my own version of the Susan/Amy creations.

     Using Susan’s formula as my template, I abided by her 1100g total dough weight as well as most of the other ingredient percentages.  But went off the rails on a number of instances.  Some of her formula ingredients are not completely stated. And here are the differences:

    •  The Levain build doesn’t specify what kind of flour to use, so I made the assumption that it was an AP, but instead I used Bread Flour.  Also used for the Final Dough mix.  I decided on Bread Flour over AP as I like to bolster my durum with the stronger white flour. 
    • The formula calls for “semolina” and while taking that at face value, I decided to use semola rimaccinata instead. 
    • While abiding by the white flour and semola percentages, I upped the water content from 64% to 65% while lowering the Olive Oil from 4% to 2% - plenty if you ask me.  According to Mr. Hamelman, oils are considered to be part of the hydration, and therefore my take on this clocks in at 67% total hydration.
    • Being a cautious chap, as well as deciding on a long overnight retard, I opted to just about halve the IDY down to 0.35%.

     Now, as I mix just about everything with French Folds rather than by machine, I add the ingredients differently than the original, autolysing just the flour and water.  Then pinch and fold each of the following separately – IDY, levain and finally the salt.

    The dough rests for 5 minutes halfway through the French folds, and it was at that post-rest point that I returned the dough to the mixing bowl and incorporated the oil, turning a somewhat stiff dough into something luxuriously silky by the time the 2nd half of the French Folds completed.

    Being that this was a hand mix, I added the fruit, spice and nuts during the first of two letter folds.  The original calls for no folds during the bulk rise.

    And then retarded the bulk dough in my usual way, removing it after x hours to divide, shape and then return to retard on a couche for the overnight nap.

    Baked cold from retard and abided by Susan’s baking instructions.

    Just for fun, I made two fat baguettes/long batards, each weighing in at ~550g.  And as you can see, I provided ample space between scores.  But that didn’t matter to the yeast.  Their growth in the oven during steaming was explosive, and the batards blew right through most of my scoring.

     And now with this behind me, I think that I’ll make one to bring to our gracious Thanksgiving hosts, along with a Vermont SD as companion.

    This being the 10th anniversary of Susan posting the formula on her Wild Yeast website - happy birthday bread.  And thank you Donna and Susan!

    Coming off the couche, and scored awaiting the oven.  You can see the ample spacing between scores.


    Steam released and doughs rotated.

    Fresh out of the oven. The oven spring was surprisingly BIG.

    Sliced up and ready to ship off to taiko practice with the wife.

    long batards, 2 x 550g


    Semolina Bread with Fennel, Golden Raisins & Pine Nuts    
    Susan, Wild-Yeast        
         Total Flour    
     Total Dough Weight (g) 1100 Prefermented18.00%   
     Total Formula   Levain  Final Dough 
     Ingredients%Grams %Grams IngredientsGrams
     Total Flour100.00%537.6 100.00%96.8 Final Flour440.9
     Bread Flour59.00%317.2 100%96.8 Bread Flour220.4
     Durum41.00%220.4 0%  Durum220.4
     Water65.00%349.5 100%96.8 Water252.7
     Salt2.05%11.0    Salt11.0
     IDY0.35%1.9    IDY1.9
     Olive Oil2.00%10.8    Olive Oil10.8
     Whole Fennel Seeds1.70%9.1    Fennel Seeds9.1
     Golden Raisins, Hydrated20.50%110.2    Golden Raisins110.2
     Pine Nuts, Toasted13.00%69.9    Pine Nuts69.9
     Starter3.60%19.4 20%19.4   
              
            Levain193.5
     Corn Meal Crust (opt.)        
     Totals204.60%1100.0 220%212.9  1100.0
              
         2 stage liquid levain build 
    Yield: 1100 g (4 short baguettes)   Stage 1    
    Mix: 15 minutes   Bread Flour48.4   
    First fermentation: 1.5 hours   Water48.4   
    Divide/rest/shape: 30 minutes   Starter19.4   
    Proof: 1.25 hours   Stage 2    
    Bake: 35 minutes   Bread Flour48.4   
         Water48.4   
         Total212.9   
    Doc.Dough's picture
    Doc.Dough

    Debunking a wives tale about the value of steam

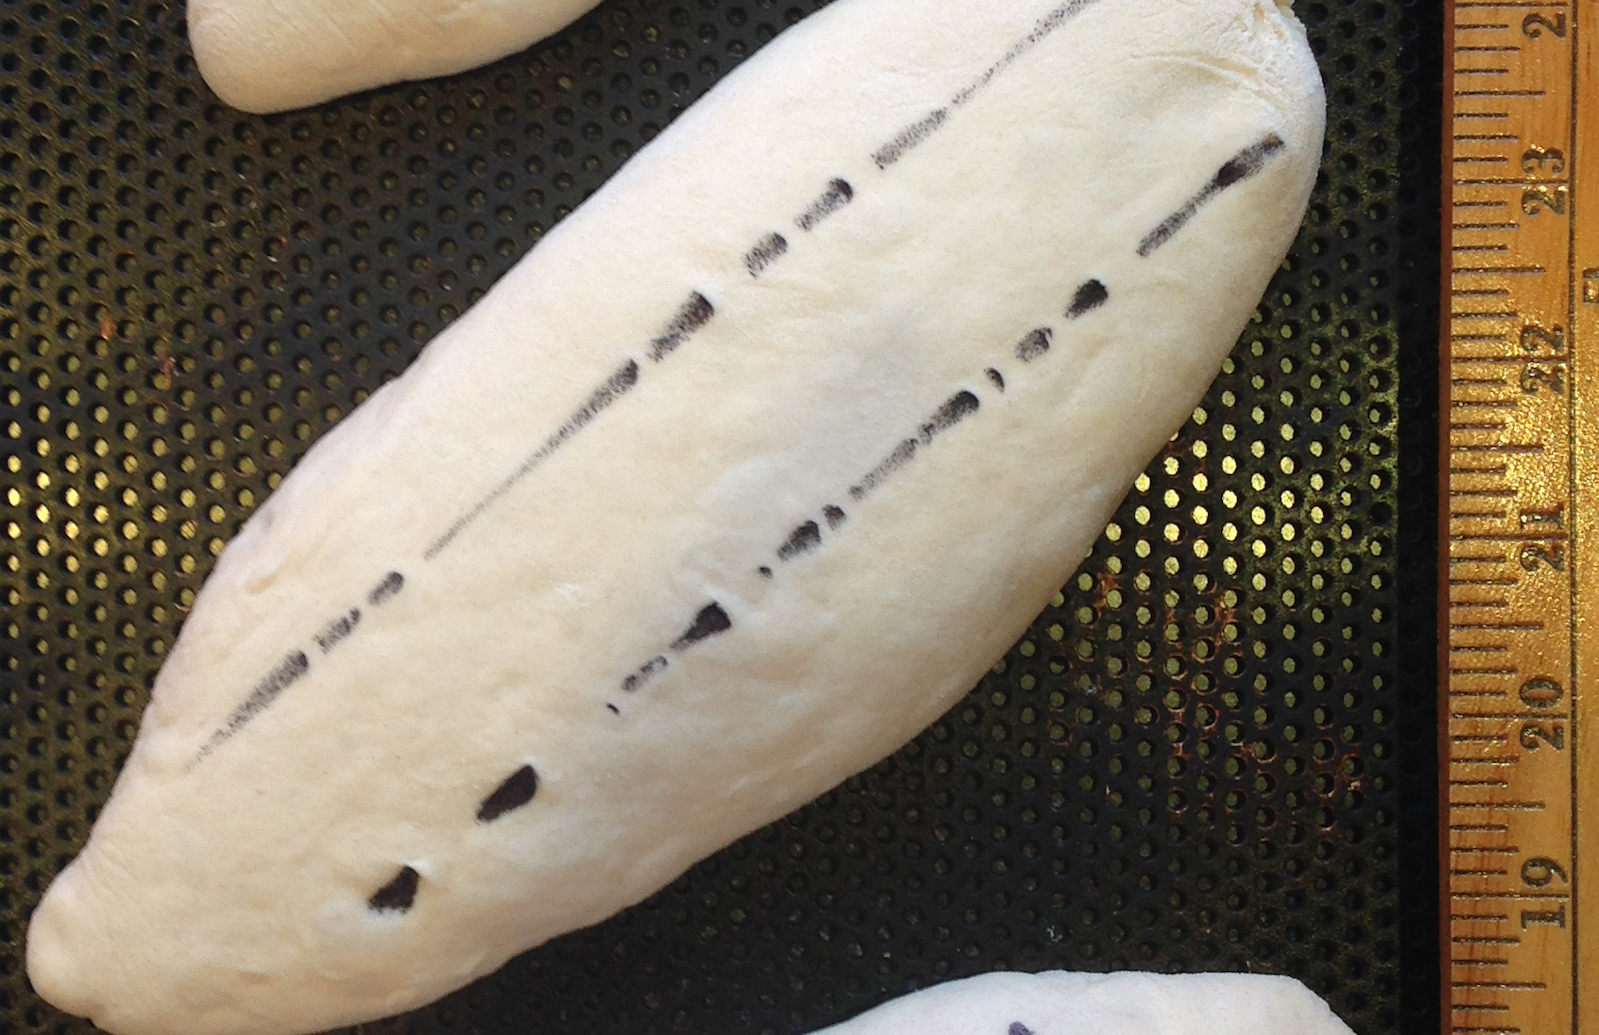
    Below is a proofed demi-baguette that was marked with lines spaced 1.25" apart.  It is about to be baked without any steam as a baseline for testing the hypothesis that steam facilitates the stretching of dough. Since this loaf is not scored, we should expect it to blow out along the side.  But still, if the surface stretches in response to internal pressure generated by the expanding CO2, then we will be able to observe and measure how much stretch there is.

    Raw marked no steam


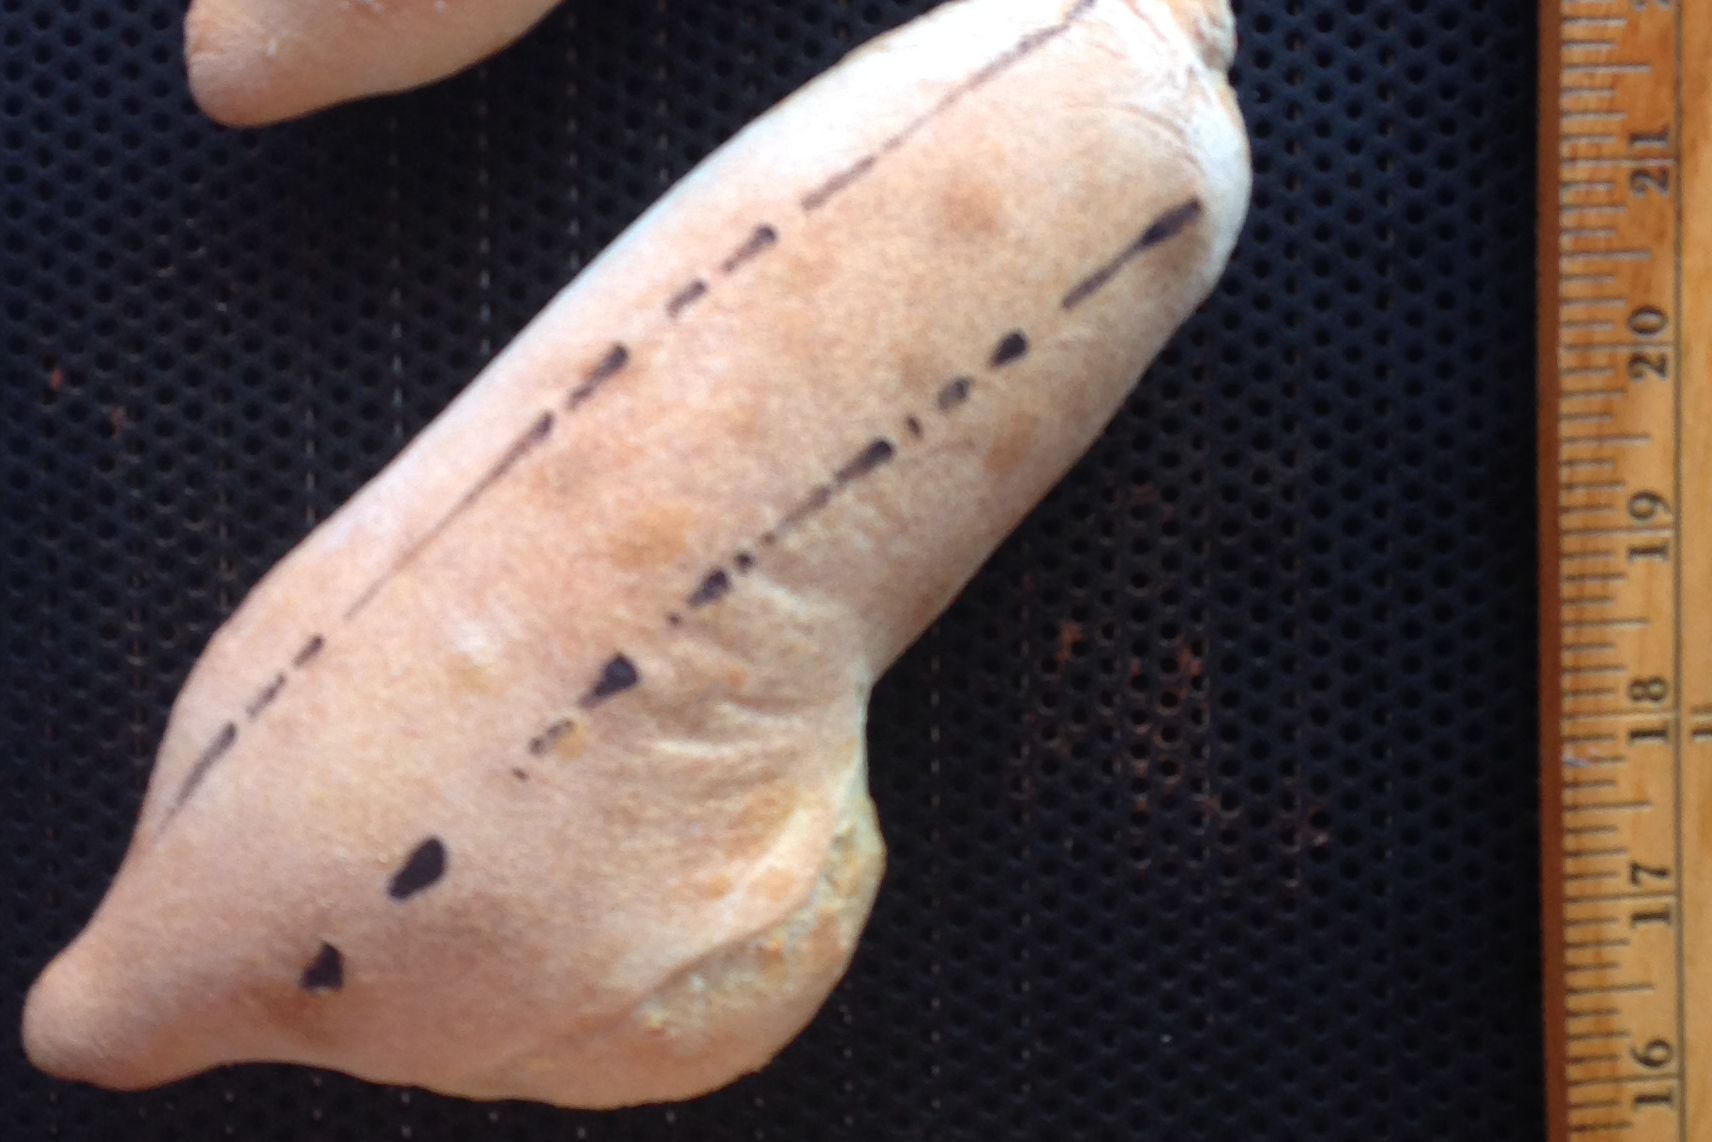
    Here is the resulting baked demi-baguette. The spacing between the lines is still very close to 1.25" indicating that there is little or no stretching when baked in a dry oven (this was baked in a combi oven set to hold the box humidity below 20% which effectively removes even the steam that escapes from the bread itself).

    Cooked marked no steam

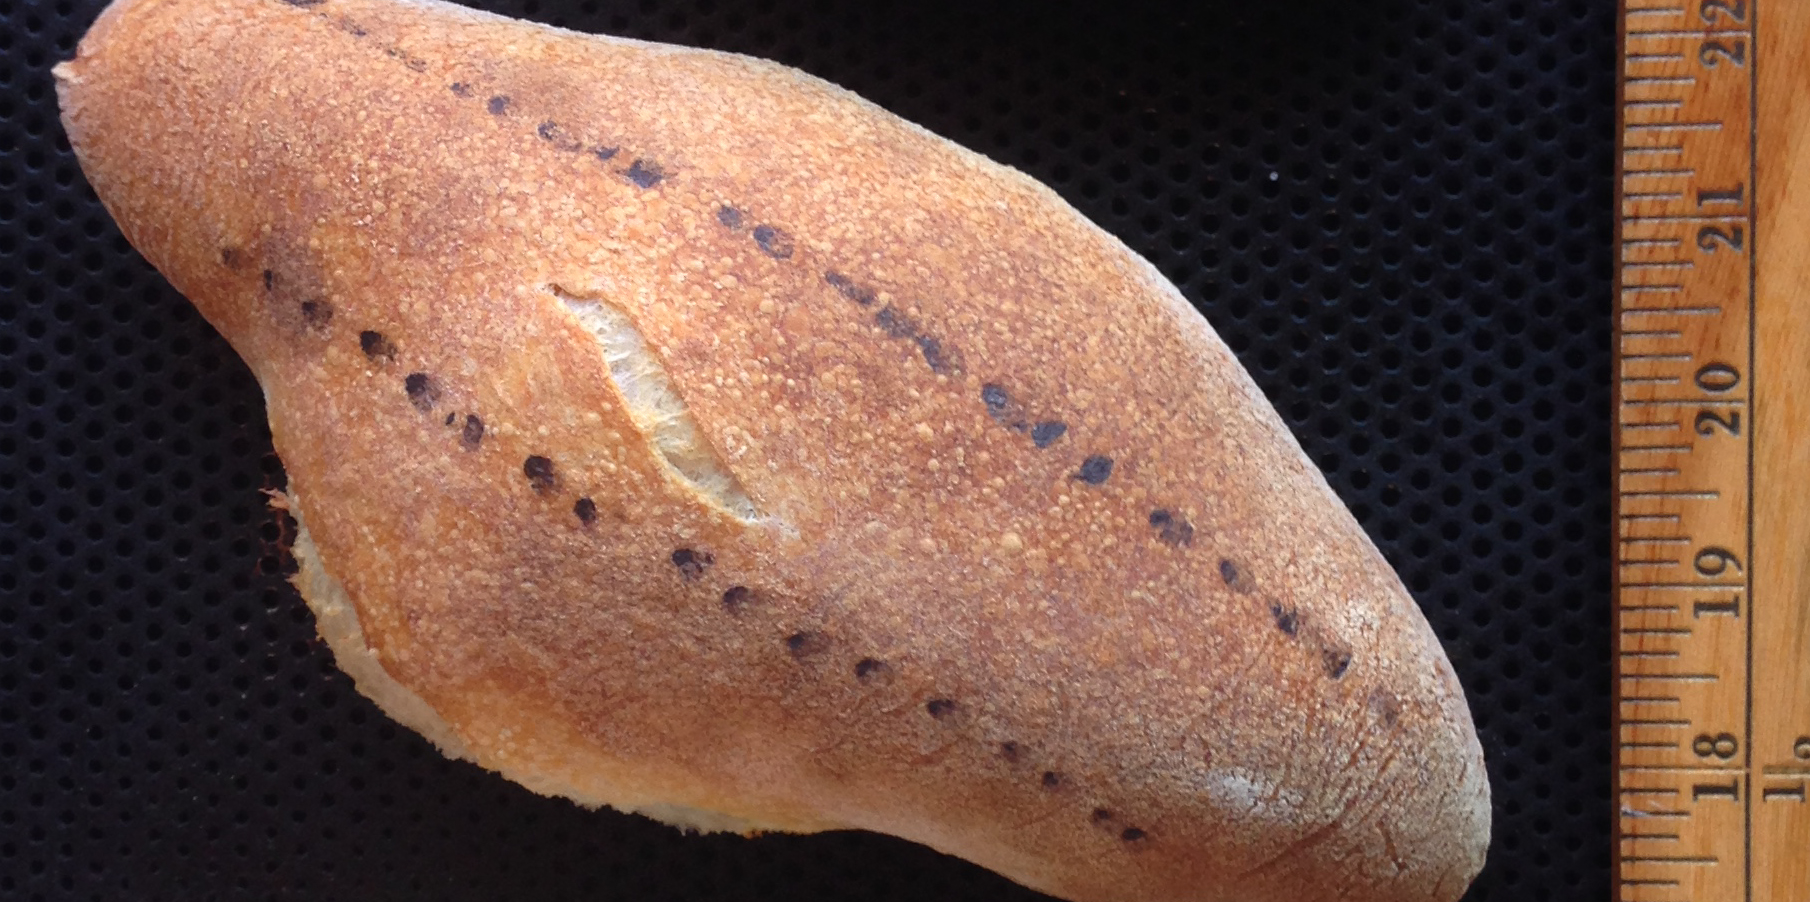
    The photo below is another demi-baguette from the same batch that was baked with steam.  It too was marked with lines spaced 1.25" apart before it was baked.  This loaf had a defect on the top that allowed it to open slightly (actually the side-to-side dimension of the slit it almost exactly 0.25"), and the post-bake line spacing is very close to 1.375" except where the defect increases it to 1.625".  So there is some small amount of surface stretching that seems to be facilitated by steam in the oven.

    Cooked with steam marked

    This loaf was baked in the same combi oven but with the steam generator and humidity controls set to maintain 100% humidity in the oven for the first 7 minutes of the bake (when it was just beginning to brown).

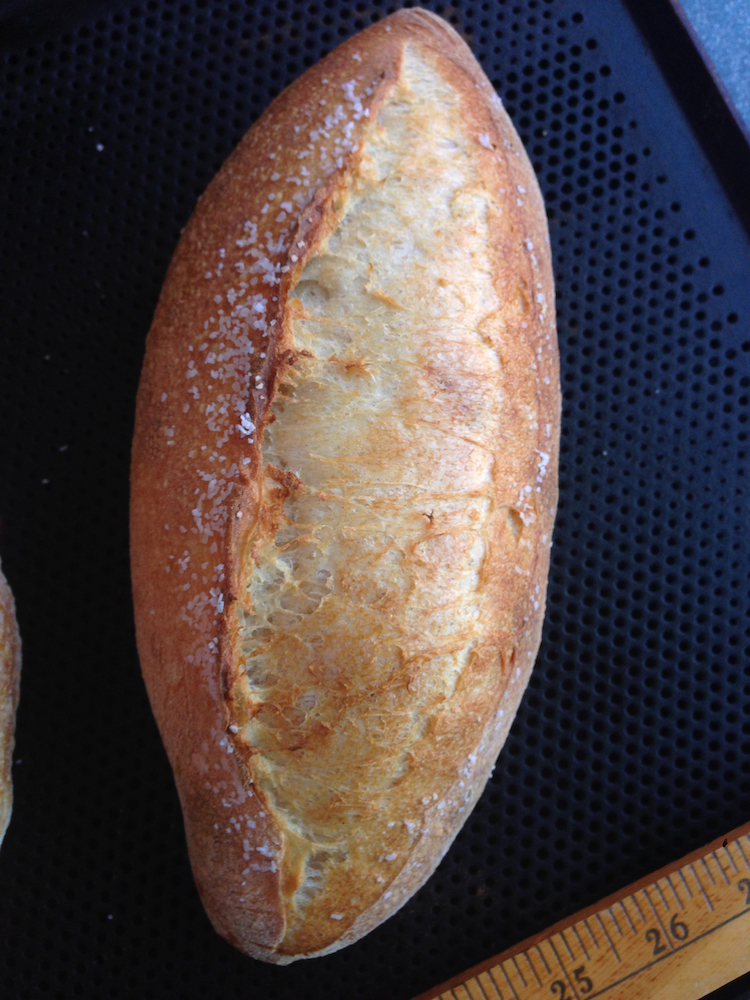
    The photo below is another demi-baguette from the same batch that was slashed and baked with steam, illustrating the surface expansion that occurs when a well proofed loaf is slashed to allow the oven spring to open the loaf where you want it to split.

    So the data indicates that the difference between having no steam and maximum steam is the difference between no surface area increase, and perhaps ~20% area increase even when there is no steam in the oven. It is a measurable but not significant effect.  However, you can see the difference in color between the steamed and un-steamed loaves, with the steamed loaves having a more yellowish tone and a shiny surface (as opposed to a dull brown surface for the loaf baked without steam.

    It is worth noting that this experiment has a sample size of 1 which does not imbue it with great weight in a statistical sense. But it does set expectations and will guide further experimentation.  This particular batch of dough was mixed at 70% hydration, which is a bit higher than the 67% at which I would normally make baguettes. The objective was to build a fairly stretchy dough that I thought might be more amenable to surface stretch than a lower hydration mix.  The next step up would have been 75%, but at that level it is ciabatta and I was not sure that I could put marks on the surface without deflating it.

    Slashed unmarked w/ steam


    Pages