The Fresh Loaf

A Community of Amateur Bakers and Artisan Bread Enthusiasts.

Most bookmarked

Modern Jess's picture
Modern Jess

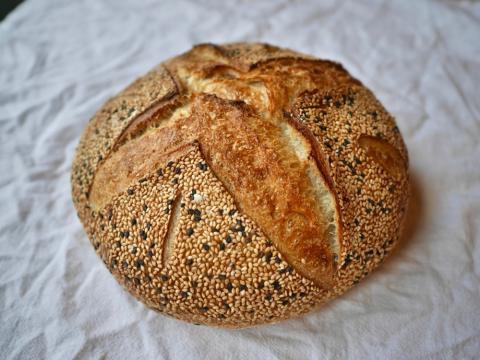
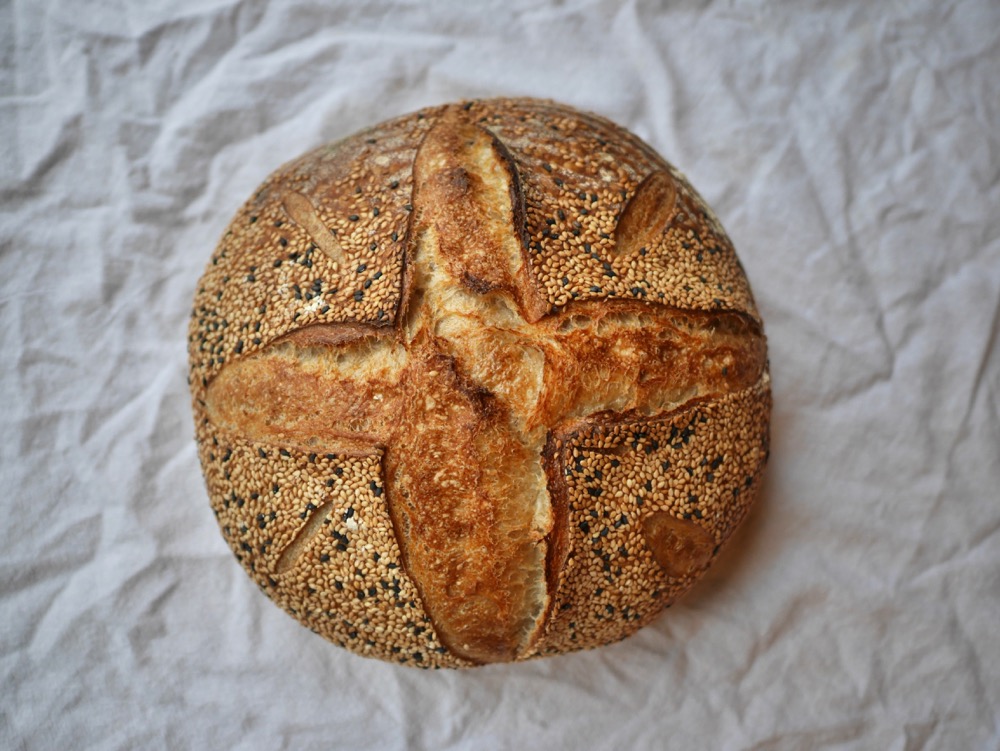
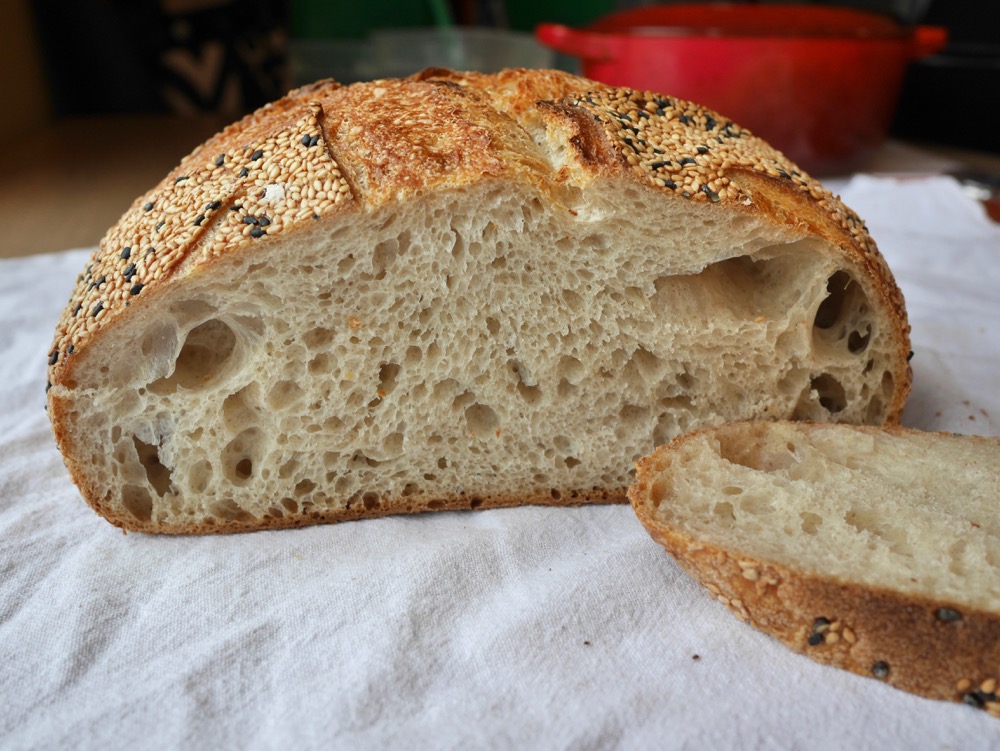
[2017-06] Standard Sesame Loaf

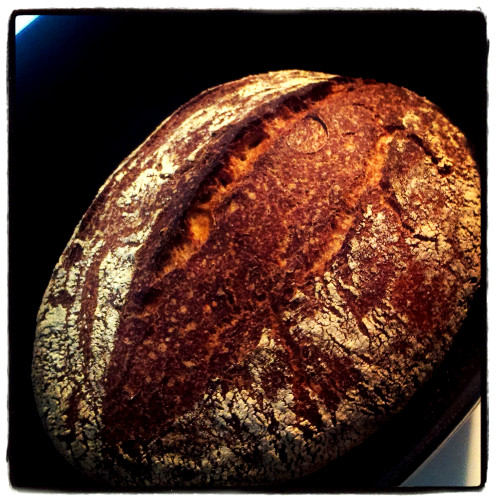
I've made this loaf probably more than any other, and yet I still managed to screw up a few things. This is my Standard Sesame Loaf, though in this particular instance I used a little bit of spelt starter that would otherwise have gone to waste, along with some of my regular wheat starter. I wouldn't call this one of the better examples, though -- rise was a little bit less than I would have hoped for. I messed up here and there, both on ingredients and timing.

Recipe as follows:

  • 500g KA bread flour
  • 362g water (73°) (overshot and poured too much)
  • 100g spelt starter (100% hydration)
  • 50g wheat starter (70% hydration)
  • 13g kosher salt

S&F for 3 hours, followed by bench rest, then formed loaf and applied sesame crust. Proofed overnight in a banneton for ~8 hours, then retarded in refrigerator for ~12 hours, then proofed on counter for another ~3 hours. Okay, that's probably too much.

Baked in Lodge combo cooker covered @ 500° for 20 minutes, uncovered @ 450° for 10 minutes. In the future, I will probably avoid cooking a sesame-crusted loaf at 500° -- this was my first time trying it like that. Too dark for sesame, I think.

doughooker's picture
doughooker

San Francisco-Style Sour Bread

They don't make sourdough bread like they used to — not even in San Francisco! The city used to be renowned for its sourdough bread as far back as the California gold rush of 1849. I call this recipe "sour bread" because it does not use a traditional sourdough culture; it would thus be misleading to call it "sourdough".

Through the years, San Francisco sourdough has been closely studied by microbiologists and food scientists. The microorganisms that produce the acids that give the bread its tangy flavor are well known.

The two main souring agents in San Francisco sourdough bread are acetic acid and lactic acid. This recipe is for a yeasted bread to which the baker adds acetic and lactic acids. The result is a sour bread which is very close in flavor to traditional San Francisco sourdough.

A loaf of traditional sourdough bread takes a long time to make due to the long proofing times required for the starter and the bread dough. Because this recipe uses baker's yeast, the proofing time is greatly reduced.

These directions are for one small loaf or boule. You can make a larger bâtard simply by doubling the ingredients.

Because acids are added directly to the dough, it is advisable to make this recipe using bread flour (not all-purpose flour) due to bread flour's higher gluten content.

 WHAT YOU WILL NEED:
A digital scale White vinegar Liquid lactic acid  https://www.amazon.com/gp/product/B000MBW7V2/ref=ppx_yo_dt_b_search_asin_title?ie=UTF8&psc=1 An eyedropper Bread flour Water Salt Instant or "rapid rise" yeast A sharp blade An electric mixer is helpful but is not required. Some knowledge of artisan baking techniques is helpful.

IMPORTANT!!! Do not use "active dry" yeast. Make sure the yeast is "instant" or "rapid rise". If Fleischmann's yeast is used, look for the bright yellow packets.

It is important to measure the ingredients as precisely as possible. In addition to a digital scale, I use an eyedropper to measure the vinegar and whey.

Combine the following ingredients in a mixer bowl:
146 grams flour
92 grams water
(Optional) 1/2 teaspoon diastatic malt powder

Mix flour, water and malt powder to the "shaggy" stage. All of the flour should be wet. Let rest (autolyze) for 30 minutes.
Add the following ingredients:
3.5 g Instant dry yeast
1/2 teaspoon salt
1.5 g White vinegar
1.5 g liquid lactic acid
Mix until a dough ball forms.
Place the dough ball on a towel or preferably a flax linen cloth and allow to proof for 2 hours in a warm place.
Using a sharp knife or blade, cut some slits in the top crust, about 1/4 inch deep. These slits allow the crust to expand while baking.

Bake at 375° to 425° F for one hour. You can steam the oven prior to baking by placing a shallow pan of water in the oven as it heats up, or bake in a Dutch oven or roasting pan.

During baking, the slits you have cut into the crust will open up. This is an indication of oven spring, or the degree to which the yeast has raised the bread.

VERY IMPORTANT: It is important to let the loaf cool completely after baking. This will take some time, anywhere from one-half to one hour. The flavor is still developing as the bread cools, so for the best flavor it is important to allow the loaf to cool completely.
THE RECIPE IN BAKER'S PERCENTAGES
IngredientBaker's percentage:Grams boule:Grams bâtard:
Flour100%146292
Water60%88176
Salt2%36
Instant Yeast2.7%3.57
Diastatic malt powder 1/2 tsp1/2 tsp
Lactic acid (liquid)1%1.53
White Vinegar1%1.53
Total Dough Weight 240480
Hydration60%  
WoodenSpoon's picture
WoodenSpoon

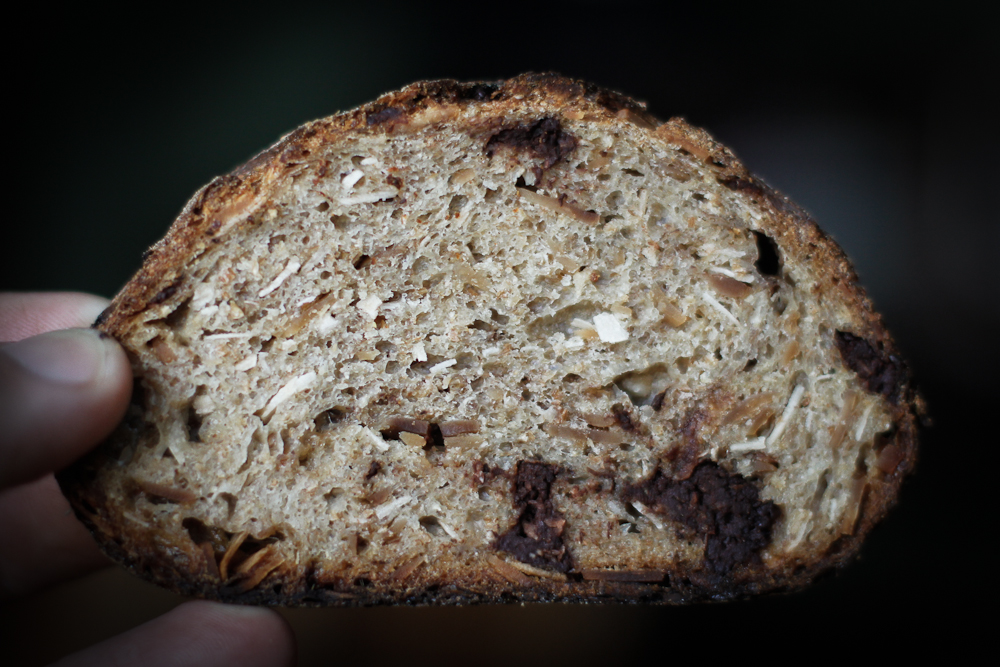
Almond Joy Levain


I have been making a ton of whole grain breads lately, breads were the flavor comes entirely from fermentation and the actual flavor of the grain, and while I think that is essentially the only way that great bread should be flavored every once in a while I feel like messing around and experimenting with flavors that would be otherwise impossible to coax out of grain alone.


Hence, the Almond Joy Levain was born, with a crunchy crust and heavy additions of toasted coconut, toasted almond, toasted wheat bran and coconut chocolate this loaf is great with peanut butter and/or salty butter. In hindsight I would of upped the hydration by 7-10% but the autolyse was so darn wet I was scared to add more, and by the time I was folding in all the additions it was to late to add the liquid that it was suddenly painfully apparent I needed.


Heres how I made it

  • 206g sifted white wheat (sift it yourself and save the bran)
  • 34g unsifted red fife
  • 80g T85
  • 40g Ap
  • 40g Bf
  • 80g Youngs chocolate stout (20%)
  • 268g Coconut water with pulp (67%)
  • 80g Levain (20%)
  • 10g Salt (2.5%)
  • 47g Toasted coconut flakes (12%)
  • 72g Toasted sliced almonds (18%)
  • 92g Chopped coconut chocolate (23%)
  • 23g Toasted previously sifted white wheat bran (6%)


  1. autolyse @ 0 min
  2. mix in salt and levain @ 40
  3. stretch and fold @ 50
  4. fold in almonds, coconut and bran @ 80
  5. fold in chocolate @ 120
  6. stretch and fold @ 180
  7. preshape @ 220
  8. shape @ 255
  9. retard @ 360

The next morning, bake at 550 for 10 min with steam, then turn the oven down to 480 and continue baking for 15 minutes, then down to 465 for 10 or so minutes, then down to 450 until the loaf is done.


cristina.w's picture
cristina.w

Pain d'épi

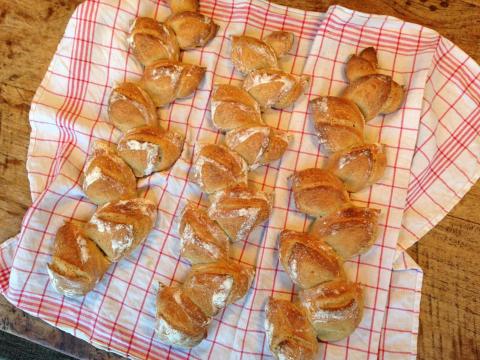
I had intended to try baguettes again a few weekends ago, but some cookbook photos of a pain d’épi changed my mind. So much crust on these!

I made a basic baguette following this formula:

-       500 g levain

-       750 g AP flour

-       10 g salt

-       0.5 teaspoon instant yeast

-       430 g water

The dough got a 30 minute autolyse, about 30 stretch-and-folds, a bit of a rest, and a few more S+F and repeat. To experiment a bit with flavour and fermentation time, I put 2/3 of the dough in the fridge overnight, and made one épi after a few hours. 

This first one was 560 g of dough, and I discovered was too thick to cut and shape into a nice looking épi. The ears started out alright, but the top of the stalk looks a bit more like a zig-zag than wheat. Despite its less-than-perfect looks, we were still able to stomach it…

After about 14 hours in the fridge, and 1.5 hours coming to room temperature, I weighed and divided the remaining dough. Instead of 2 loaves as planned, I divided it into 3. These were 375 g or so each, and I shaped them thinly enough to cut and shape nicely this time. They baked at 480 F for about 20 minutes.

The flavour was great after the overnight fermentation, and I found they looked nicest with a good sprinkling of flour before being sliced up! They also got a decorative double point, which I saw here: https://www.youtube.com/watch?v=aN5QL_kaowQ


It was so much fun to make (and eat) these, and they were just great for sharing at a dinner party! 

WoodenSpoon's picture
WoodenSpoon

Kamut, wine soaked figs and toasted walnut levain


  • 120g 100% hydration levain (11%flour and 11%water)
  • 171g fresh milled kamut (31%)
  • 284g bread flour (50%)
  • 45g ap flour (8%)
  • 160g wine soaked figs (20% fig 9%wine)
  • 112g wine (20%)
  • 298g warm water (58%)
  • 100g toasted walnuts 18%
  • 12g salt (2%)


  • 1 hr autolyse
  • mix in levain & salt
  • slap and fold @ 5 minutes
  • slap and fold @ 10 minutes
  • fold in figs and nuts @ 1/2 hr
  • fold @ 1 hr
  • fold @ 1 1/2 hr
  • fold @ 2 hr
  • fold @ 2 1/2 hr
  • preshape/rest/shape @ 5 1/2 hr
  • retard @ 8 hr
  • bake @ 21 hr

I baked this on my stone, covered by a large mixing bowl at 500F for 25 minutes then uncovered at 460 for 45 minutes.

Lately I have started to shy away from loaves with ingredients whose flavors will over power the taste of the grains and fermentation, but my house has been so cold lately that coaxing out those subtle flavors has been a bit of a up hill battle, so I gritted my teeth and made a flavored loaf and I'm glad I did.

 This loaf is so good that I'm going to make it again, and I usually don't make things twice in a row as I really only bake on my weekends and over the course of a week I'v got a hundred new ideas that I want to try. But this will be an exception, the flavor was good enough that I think its worth taking a crack at upping the whole grains to a percentage I'd be more proud of.

If any of you take a shot at making this keep in mind that my house is very brisk, >60f so take that into account and possibly adjust yer levain percentage or fermentation times accordingly.

emkay's picture
emkay

Naturally leavened no knead bread

The no knead bread has been all the rage since Bittman wrote about Lahey's method in the NY Times. I've always wanted to try it out, but just never got around to it. I had about 50 grams of sourdough starter leftover after feeding. It had only been about 15 hours since it had been fed (at 1:3:3), so instead of discarding it I used it to experiment with a naturally leavened no knead bread.

I used only all-purpose flour and no whole grain flours because my all-purpose is less costly than my whole grains. If the resulting bread turned out poorly then I would be less sad about tossing it out. I knew I needed something fairly wet so the following are the baker's percentages I decided to use: 100% flour, 80% water, 2% salt, 10% levain. The overall hydration including the 100% hydration levain was 80.9%.

Naturally Leavened No Knead Bread

500 grams AP flour

400 grams water

10 grams salt

50 grams levain (aka my leftover starter)

Final dough: 960 grams

  • I put all the ingredients in a bowl and mixed it into a shaggy mess. No kneading, no stretching, no folding, and no slapping.

NK_levain_aug17_dough

  • I covered the bowl and let it ferment undisturbed at room temperature (about 71F) for 9 hours, and then I put in the refrigerator (about 38F) for 72 hours. 
  • I took the cold dough from the refrigerator and shaped it into a loose boule.
  • I proofed the boule at room temperature (about 71F) for 3 hours. 
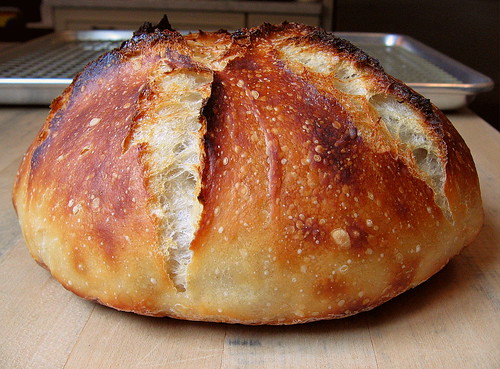
  • I did not slash nor did I score it.
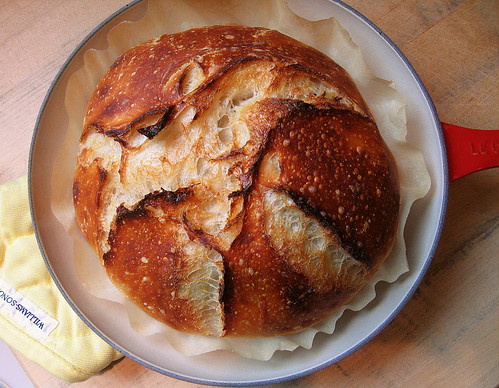
  • I baked it seam side up in a cast iron pot at 450F for 40 minutes (20 minutes with the lid on and 20 min without the lid). 

NK_levain_aug17_1

The crust was thin and crisp and covered in blisters.

NK_levain_aug17_3

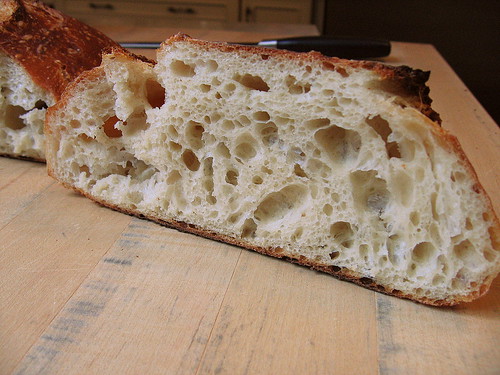
The crumb was really moist and almost custardy. There was a nice pleasant chew to it too.

NK_levain_aug17_crumb1

NK_levain_aug17_crumb2

In hindsight the 72 hours in the refrigerator could have been disastrous, but luckily my dough was not overfermented. I think the 72 hours in the refrigerator really made a positive impact in the flavor department. The bread was tangy and sour like the SF sourdough that I remember eating as a child and it was nothing like the one-dimensional vinegary flavors that plague today's Boudin bread. Overall I think it was a very sucessful experiment and one that I will be repeating again and again.

:) Mary

Isand66's picture
Isand66

Ian's Oat Porridge Bread

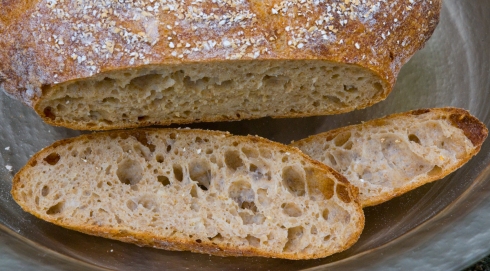
Last week I made the Oat Porridge Bread from Tartine 3 and I loved it.  I wanted to take that basic idea and convert it to my normal procedures using a larger amount of per-fermented flour and a bulk retarding of the dough in the refrigerator.

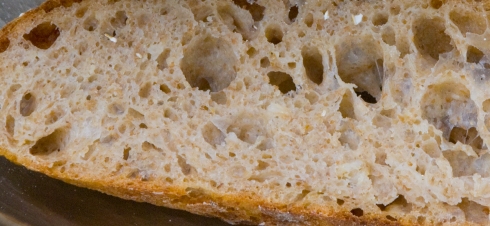
Well I have to say it was a great success.  I find this method much easier and I think the final bread actually has a more complex flavor with the same creamy moist crumb.  I highly recommend that you try this as I know you will like it and like it a lot!

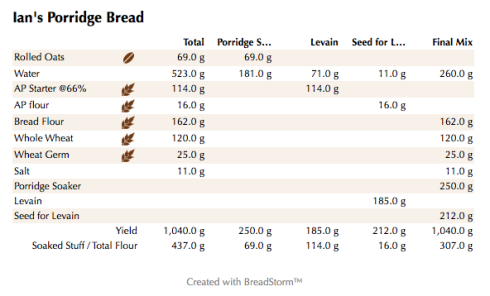
I used my standard refreshed AP starter at 66% this time instead of adding some whole wheat to the starter, mainly for convenience sake.  I also added some wheat germ which was suggested in the original formula.

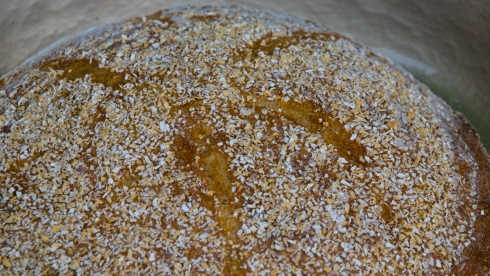
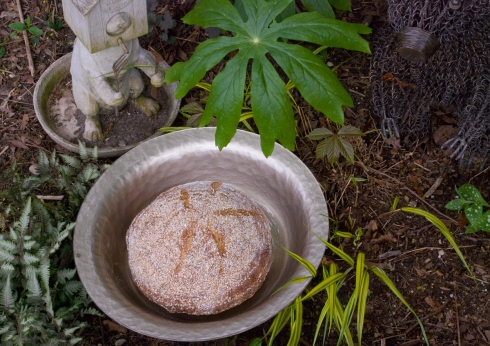
Closeup1

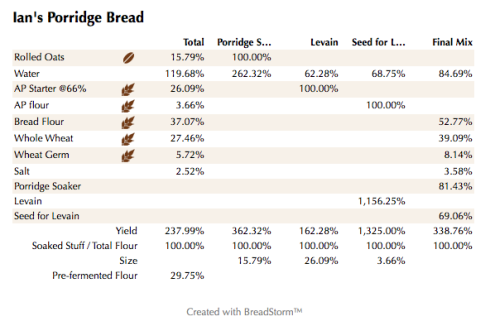
Ian's Porridge Bread (%)

Ian's Porridge Bread (weights)


Here are the Zip files for the above BreadStorm files.


Levain Directions

Mix all the levain ingredients together  for about 1 minute and cover with plastic wrap.  Let it sit at room temperature for around 7-8 hours or until the starter has doubled.  I used my proofer set at 83 degrees and it took about 4 hours.

Oat Porridge Directions

Add about 3/4's of the water called for the porridge to the rolled oats in a small pot set to low and stir constantly until all the water is absorbed.  Add the remainder of the water and keep stirring until you have a nice creamy and soft porridge.  Remove from the heat and let it come to room temperature before adding to the dough.  I put mine in the refrigerator and let it cool quicker.

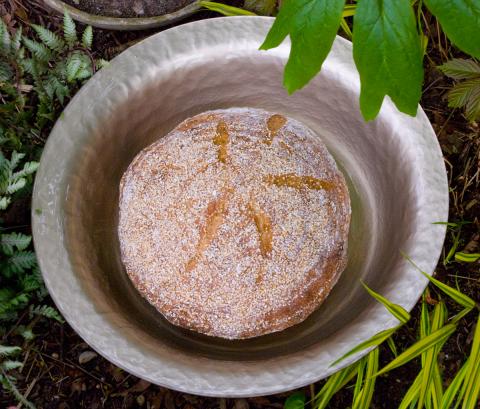
WideShot

 Main Dough Procedure

Mix the flours and wheat germ with the main dough and the water for about 1 minute.  Let the rough dough sit for about 20 minutes to an hour.  Next add the levain, cooled porridge and salt and mix on low for 4 minutes and speed #2 for another 2 minutes or by hand for about 6 minutes.   You should end up with a cohesive dough that is slightly tacky but very manageable.  Remove the dough from your bowl and place it in a lightly oiled bowl or work surface and do several stretch and folds.  Let it rest covered for 10-15 minutes and then do another stretch and fold.  Let it rest another 10-15 minutes and do one additional stretch and fold.  After a total of 2 hours place your covered bowl in the refrigerator and let it rest for 12 to 24 hours.  (Since I used my proofer I only let the dough sit out for 1.5 hours before refrigerating).  Note: this is a pretty wet dough so you may need to do a couple of additional stretch and folds.

When you are ready to bake remove the bowl from the refrigerator and let it set out at room temperature still covered for 1.5 to 2 hours.  Remove the dough and shape as desired.

The dough will take 1.5 to 2 hours depending on your room temperature and will only rise about 1/3 it's size at most.  Let the dough dictate when it is read to bake not the clock.

Around 45 minutes before ready to bake, pre-heat your oven to 550 degrees F. and prepare it for steam.  I have a heavy-duty baking pan on the bottom rack of my oven with 1 baking stone on above the pan and one on the top shelf.  I pour 1 cup of boiling water in the pan right after I place the dough in the oven.

Right before you are ready to put them in the oven, score as desired and then add 1 cup of boiling water to your steam pan or follow your own steam procedure.

After 5 minute lower the temperature to 450 degrees.  Bake for 35-50 minutes until the crust is nice and brown and the internal temperature of the bread is 205 degrees.

Take the bread out of the oven when done and let it cool on a bakers rack before for at least 2 hours before eating.

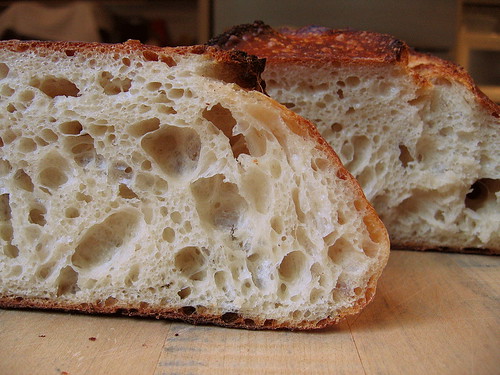
Crumb1

Bear

Crumbclose


mcs's picture
mcs

Baguette Video

Hey everyone,This week I had an order for some baguettes and I thought it would be cool to shoot a video while making them so customers (and bakers too of course) could see some of the process.  It's more of a demo rather than an instructional video, but if you pay close enough attention, you can pick up a few tips.  I hope you enjoy it!

-Mark

Baguettes


Antilope's picture
Antilope

Old Baking Books Free at Openlibrary.org

There are many old baking books in e-formats at the Openlibrary.org
Here are some interesting ones I found that you can read online
or downloaded for free in various formats such as PDF, EPUB, MOBI, etc.


Ryzon Baking Powder Baking Book 1916 - with color illustrations
http://openlibrary.org/works/OL1472910W/Ryzon_baking_book


GOLD MEDAL FLOUR COOK BOOK Published 1910
http://openlibrary.org/works/OL7870393W/GOLD_MEDAL_FLOUR_COOK_BOOK


Book of American Baking 1910 - Bakery Volume Recipes from Trade Publication
http://openlibrary.org/works/OL16455754W/Book_of_American_baking


A Treatise on Flour, Yeast, Fermentation, and Baking 1914 - Bakery Volume Recipes from The Fleischmann Co.
http://openlibrary.org/works/OL13849610W/A_treatise_on_flour_yeast_fermentation_and_baking_together_with_recipes_for_bread_and_cakes


The_Fleischmann_Treasurey_Of_Yeast_Baking_ (1962)
http://archive.org/details/The_Fleischmann_Treasurey_Of_Yeast_Baking_


Grocers' manual: 1888 containing recipes, formulas and instructions for the manufacture of baking powders, flavoring extracts, essences, condiments, etc.
http://openlibrary.org/works/OL15373341W/Grocers'_manual_containing_recipes_formulas_and_instructions_for_the_manufacture_of_baking_powders_f


The modern baker, confectioner and caterer 1907
http://openlibrary.org/books/ia:modernbakerconfe05kirkuoft/The_modern_baker_confectioner_and_caterer_a_practical_and_scientific_work_for_the_baking_an...


Baker's bread 1913 - Bakery Volume Recipes
http://openlibrary.org/books/OL6558710M/Bakers'_bread.


A treatise on bread, and bread-making 1837
http://openlibrary.org/books/OL13447596M/A_treatise_on_bread_and_bread-making.


Modern Practical Baking 1921
http://openlibrary.org/works/OL210964W/Modern_practical_baking


Vienna bread 1909
http://openlibrary.org/works/OL16333912W/Vienna_bread


New England breakfast breads, luncheon and tea biscuits 1891
http://openlibrary.org/books/OL7223020M/New_England_breakfast_breads_luncheon_and_tea_biscuits

Abelbreadgallery's picture
Abelbreadgallery

100% whole wheat bread with rye sourdough

Ingredients:

- 100 grams of active rye sourdough

- 500 gr of whole wheat flour (organic Stone Ground Whole Wheat Flour, if it's possible)

- 10 gr salt

- 320 ml water


Mix all the ingredients and let them rest 20 minutes. Knead the dough for 10 minutes or until it's smooth and elastic. Use your favorite method. Let it rest 3 hours. You can strecht and fold two times during this period. You can make one piece of 930 grams or two pieces off 465 grams. Shape a ball or a batard, trying not to degas the dough very much. Let it rest one hour more. Bake about 55-60 minutes if you make one piece of 930 grams or 35-40 if you make two pieces of 465 grams. The temperature at the beginning should be about 230C and you should create some steam into the oven. The temperature at the end of the baking process should be about 180C, without steam.

In this case, I baked this bread with dutch oven, 30 minutes with the lid on and 25 minutes without lid.

More info: http://breadgallery.wordpress.com/2013/07/19/hogaza-100-trigo-integral-100-whole-wheat-bread/

Pages