Celebrating Rye Breads
Celebrating Rye Breads
This weekend has involved multiple home bakes as I feed up my leavens in preparation for the 2 day “UK Fresh Loaf” course which I will be running at the College on 19th and 20th July. Many thanks, in particular to ruralidle for suggesting this in the first place, and for his work to make it happen. It will be my swansong at Newcastle College, as I am leaving at the end of this month in search of more exciting professional adventures in the wake of the savage cuts currently being inflicted across the board by the ruthless and deeply unimaginative Government currently in power over here. The result is that the College has re-structured to continue to attract sources of funding without being brave enough to find ways to continue to fulfil a key aspect of its traditional role in UK education. I am not short of ideas and leads, so am optimistic that a far more exciting future lies on the horizon. The only definite part of the plan is to make sure I complete my MSc in Food Policy between January and August of next year.
So, the show, very much, goes on. Here are the breads I made at home over Friday, Saturday and Sunday [8th – 10th July], having started refreshing the 2 leavens on Thursday evening, 7th July 2011.
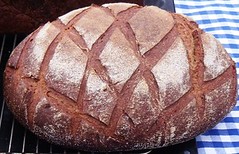
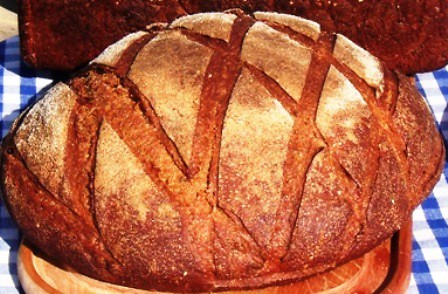
1. Caraway Rye with Blackstrap Molasses
This is a bread I first developed and made some time ago, not long after joining the TFL community and beginning this Blog. You can read about it here: http://www.thefreshloaf.com/node/16273/carawy-rye-bread-black-strap-molasses-superwet-ciabatta-too This version is, however, quite different in that the leaven is wheat-based, with Dark Rye being added at the dough stage. The original used a Rye Sourdough with only wheat flour added to the final dough. There is half the amount of caraway in this formula, as this is all the stock I currently had in. More detail on taste is given below. I made 2 large miche type loaves from this dough; the recipe/formula and method detail are shown below:
Material | Formula [% of Flour] | Recipe [grams] |
1. Wheat Leaven Refreshment One | 18:15, Thursday 07.07.2011 |
|
From Stock |
| 40 [25 flour, 15 water] |
Marriage’s Strong Organic White Flour |
| 100 |
Water |
| 60 |
TOTAL |
| 200 |
2. Refreshment Two | 13:30, Friday 08.07.2011 |
|
Wheat Leaven [from above] |
| 200 |
Marriage’s Strong Organic White Flour |
| 300 |
Water |
| 180 |
TOTAL |
| 680 [40 retained as stock] |
TOTAL used |
| 640 [400 flour, 240 water] |
3. Final Dough | 19:00, Friday 08.07.2011 |
|
Wheat Leaven [from above] | 40 [25 flour, 15 water] | 640 [400 flour, 240 water] |
Carrs Special CC Flour | 50 | 800 |
Bacheldre Organic Dark Rye | 25 | 400 |
Organic Blackstrap Molasses | 6.25 | 100 |
Salt | 1.75 | 28 |
Caraway Seeds | 0.9 | 14 |
Water | 50 | 800 |
TOTAL | 173.9 | 2782 |
% pre-fermented flour | 25 | - |
% overall hydration | 65 | - |
Method:
- Weigh the dough water, and dissolve molasses and salt into that. Add the flours and caraway seeds and mix until clear. Autolyse for one hour.
- Combine the leaven and autolyse and develop the dough. As Shiao-Ping originally noted, the empirical feel of the dough is akin to much higher hydration than that actually used. This is the effect of using molasses and 25% rye flour making the dough very sticky indeed. Persevere with slow and gentle mixing, avoiding adding any flour at all to the dough. I used Bertinet’s slap and fold here, mixing for almost an hour, but with lots of resting phases along the way.
- Bulk ferment for 2 hours
- Retard for 7 hours, overnight.
- Scale, divide and mould the dough pieces. I scaled one at 1550g and the other at 1200g and placed each piece upside down in prepared bannetons. The large loaf stayed out for proof, and the other went back in the chiller for a further 2 hours to give a manageable production schedule, with the second bread following, then another bread after that. Final proof time for loaf one was just short of 4 hours, and for loaf two exactly 5 hours.
- I cut the tops of each loaf with a diamond pattern and set them to bake at 220°C using plenty of steam. For the bigger loaf, I baked it for 15 minutes at 220°C, then 20 minutes at 200°C, then a further 15 minutes at 180°C. The smaller loaf baked the same, but for 40 minutes instead of 50 minutes.
- Finished loaves cooled on wires, as always. The baked loaves had a finished weight which showed moisture loss of just under 10%. I achieved a core temperature of 96°C for both loaves.
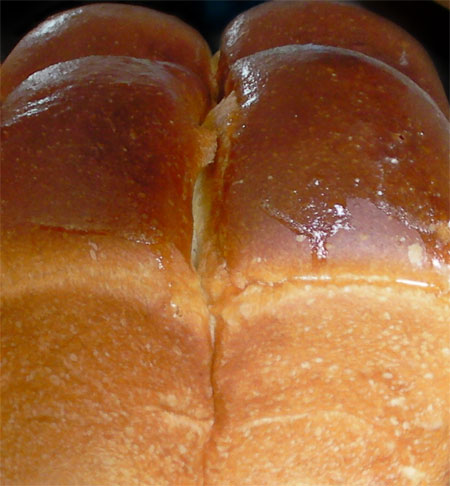
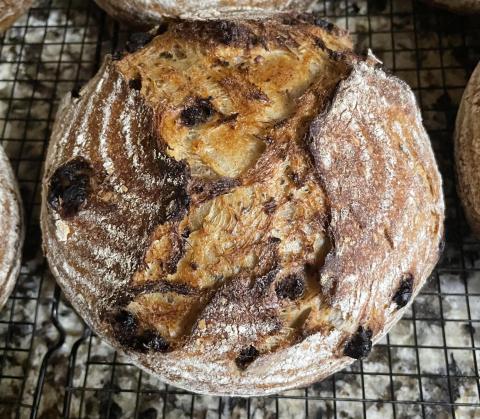
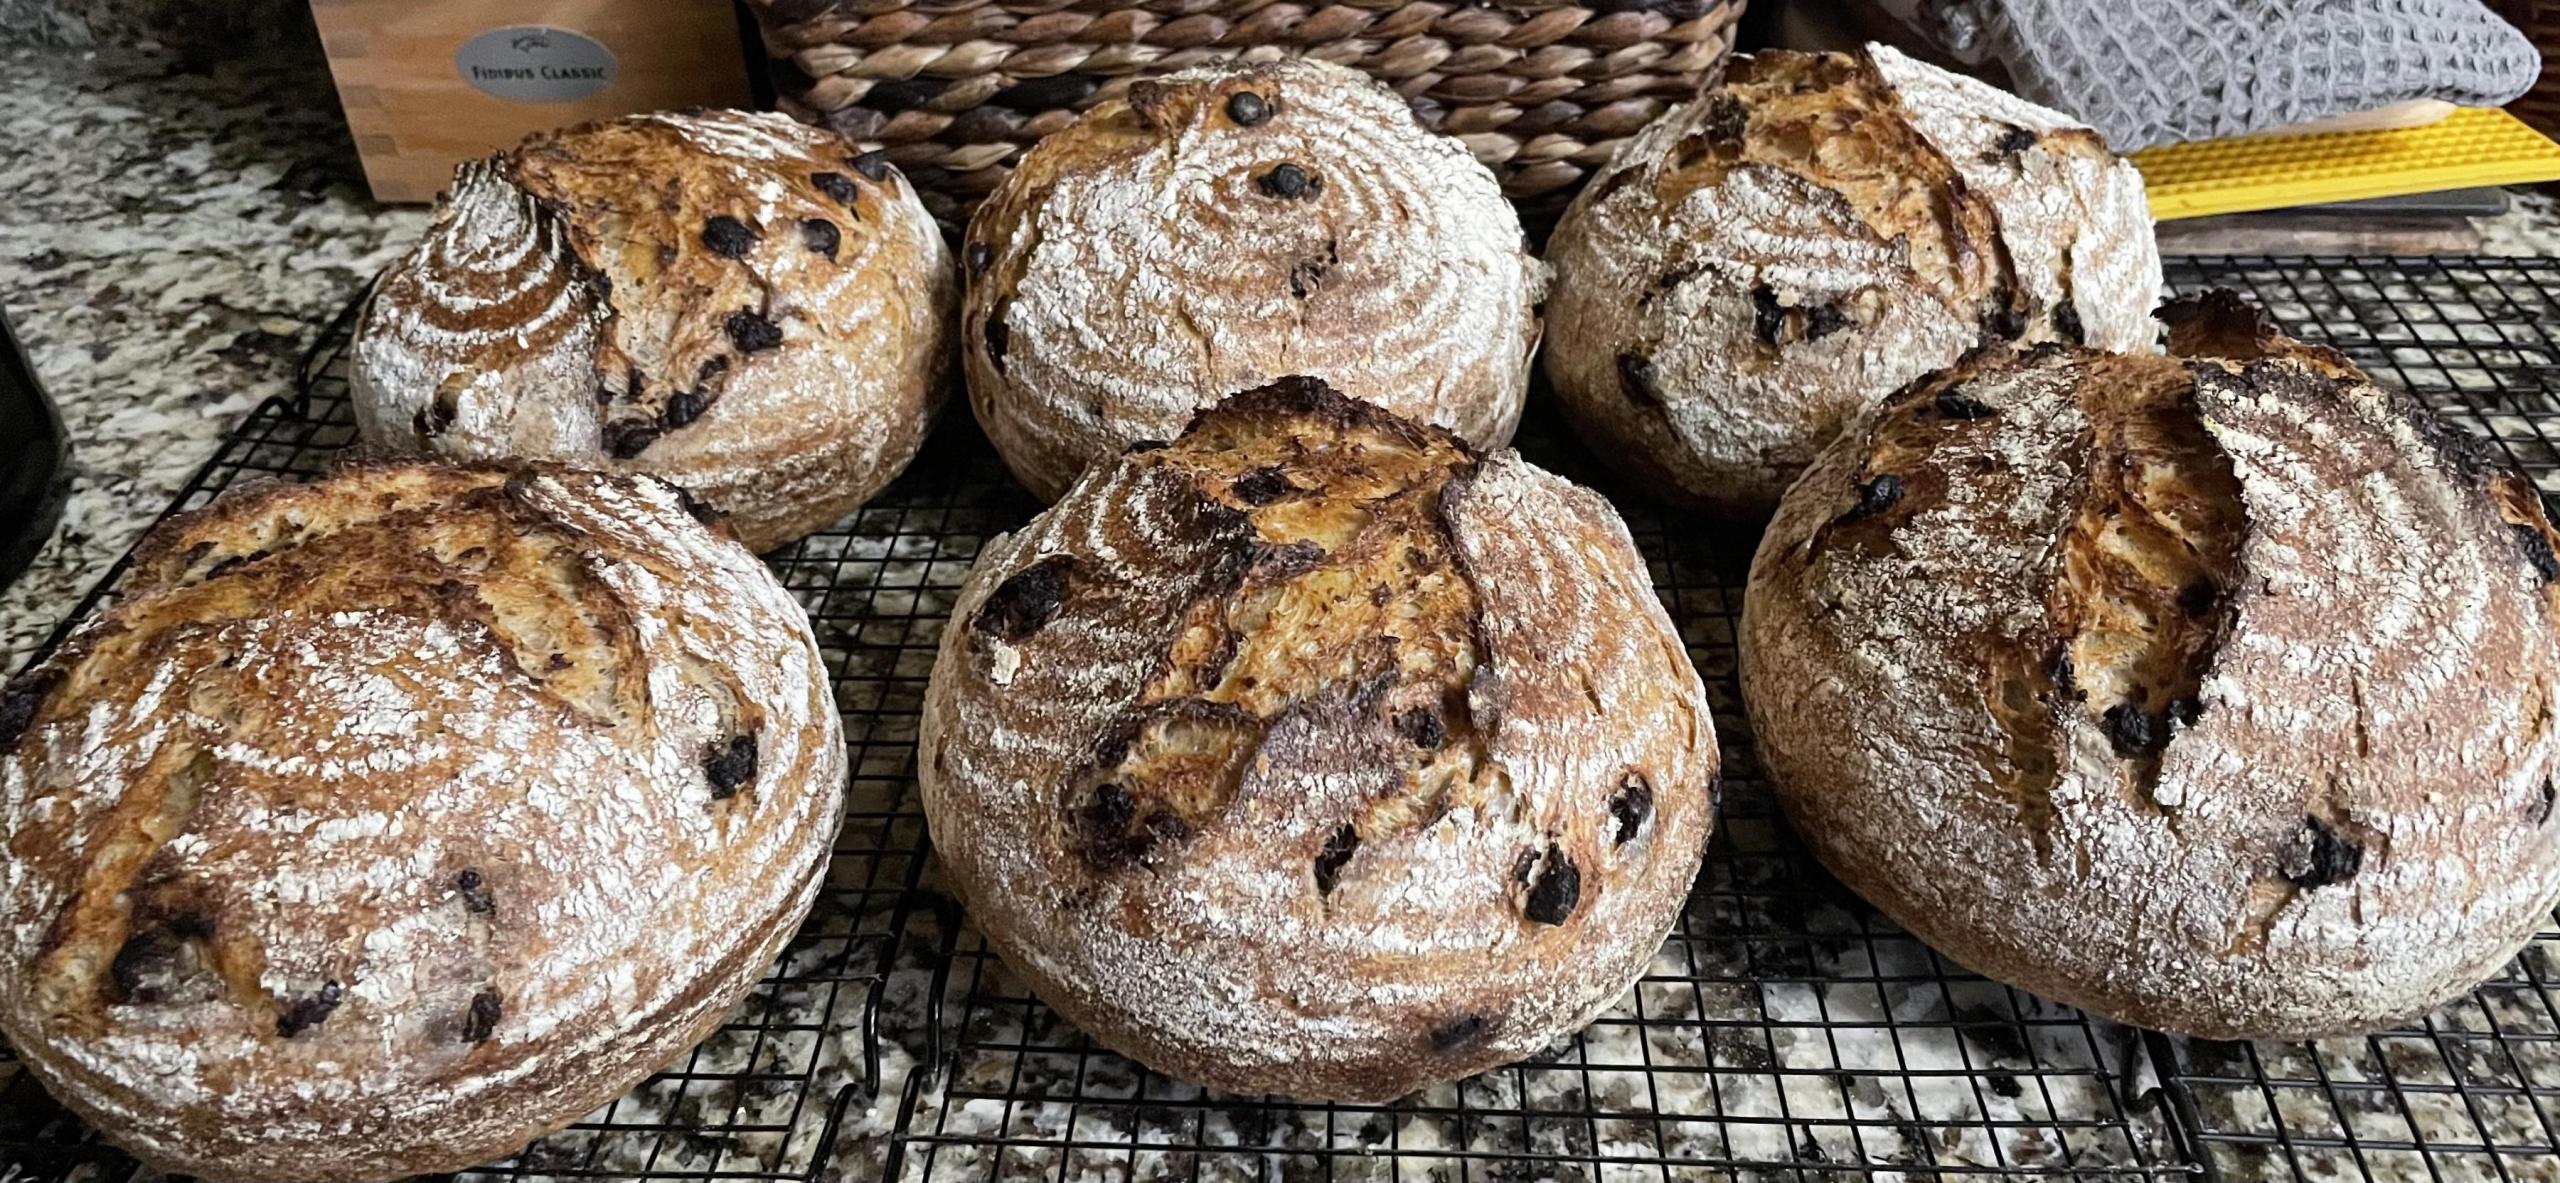
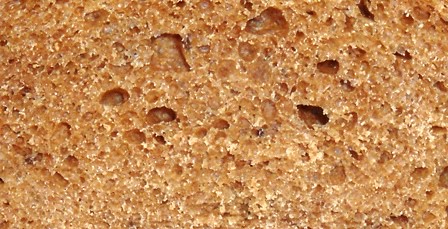
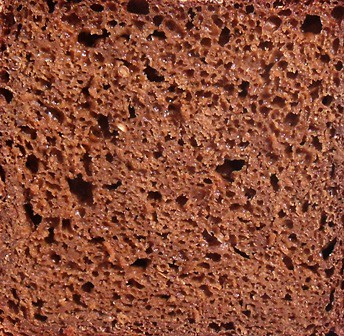
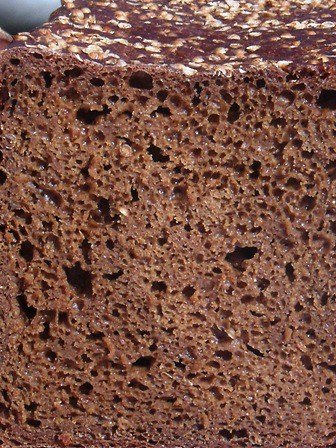
Some photographs of the finished loaf are shown below. Regarding analysis of the finished bread, this is one of Alison’s absolute favourite loaves. There is sourness and bitterness coming from the rye and molasses. There is sweetness too, and plenty of aroma from the caraway. The crumb colour is particularly lovely, and the moistness brings great pleasure to the final eating quality. We took one of these loaves along as a gift to some friends’ house last night, as we had been invited round for dinner. That was the first chance we had to sample the bread, but we had a slice each for breakfast this morning, with just a thin coating of butter.

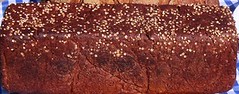
2. Borodinsky – The Auerman Formula [or thereabouts anyway]
I have now tracked down a supply of Red Malt, and managed to find a way to fit the more complex 3-stage build used for this bread into my home schedule for the last couple of days. It’s something I have long wanted to do, have been slightly taken to task for previously on TFL, and am really happy with the finished result; subject to tasting and crumb analysis which I have yet to carry out.
I made one large loaf, in a Pullman Pan, weighing just over 1660g
Material | Formula [% of flour] | Recipe [grams] |
1. Rye Sour Refreshment | 18:15, Thursday 07.07.2011 |
|
From Stock |
| 70 [26 flour, 44 water] |
Bacheldre Organic Dark Rye Flour |
| 60 |
Water |
| 100 |
TOTAL |
| 230 |
|
|
|
2. Full Sour | 13:00, Friday 08.07.2011 |
|
Rye Sour from above |
| 230 |
Bacheldre Organic Dark Rye Flour |
| 180 |
Water |
| 300 |
TOTAL |
| 710 [38 retained as stock] |
TOTAL used | 80 [30 flour, 50 water] | 672 [252 flour, 400 water] |
|
|
|
3. “Scald” | 22:30, Friday 08.07.2011 |
|
Bacheldre Organic Dark Rye Flour | 20 | 168 |
Red Malt | 5 | 42 |
Organic Blackstrap Molasses | 6 | 50 |
Coriander, freshly ground | 1 | 8 |
Salt | 1 | 8 |
Boiling Water | 35 | 294 |
TOTAL | 68 | 570 |
|
|
|
4. “Sponge” | 23:30, Friday 08.07.2011 |
|
Rye Sourdough [from 2] | 80 [30 flour, 50 water] | 672 [252 flour, 400 water] |
Scald [from 3] | 68 | 570 |
TOTAL | 148 | 1242 |
|
|
|
5. Final Paste | 07:30 Saturday 09.07.2011 |
|
Sponge [from 4] | 148 | 1242 |
Bacheldre Organic Dark Rye Flour | 23.5 | 197 |
Carrs Special CC Flour | 26.5 | 223 |
TOTAL | 198 | 1662 |
% pre-fermented flour | 50 | 30 from sour + 20 from scald to make “sponge” |
% overall hydration | 85 | - |
Method:
- Refresh the rye sour as directed in the table above.
- Make the “scald” as follows: Weigh the red malt and dark rye flour into a bowl, add the salt, and coriander, which should be freshly ground using a mortar and pestle. Weight the molasses into a pan, and pour boiling water onto this to the specified weight. Bring this to a rolling boil on the cooker hob top. Pour onto the dry ingredients and combine well with a stout plastic or wooden spatula. Add any extra boiling water required first by checking the weight of the contents to allow for any evaporation. Cool the scald as rapidly as possible down to a maximum temperature of 45°C. This took an hour.
- Combine the scald and the full sour to form the sponge. Leave this to ferment for 5½ hours. I then retarded it a further 2 hours, as it was 05:00 and I needed a bit more sleep!
- Add the 2 remaining portions of flour to the sponge to form the final paste
- Prove in bulk for 1½ hours, and meanwhile prepare a large Pullman Pan by lining it with silicone paper.
- Pan the paste, smooth it off and dust the top with a sprinkling of freshly ground coriander. Put the lid on the Pan and set for final proof for 2 hours.
- Use a pan of water in the oven and set to bake at 160°Cfor 2 hours, with a gentle supply of steam, topped up as needed.
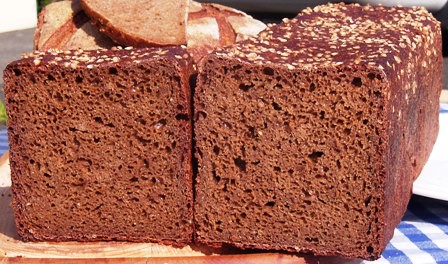
- De-pan and cool on wires. The finished weight of the cooled bread was 1400g, indicating a weight loss of 15.8%. This means that the moisture retained within the bread remains at just under 70% of the flour, and equates to 35% of the total weight of the finished bread!
Notes:
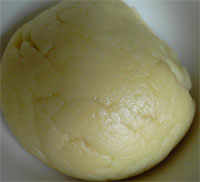
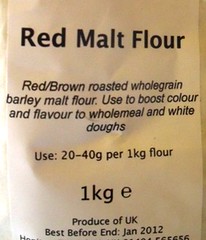
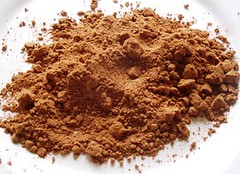
- Red Malt: this is derived from malted barley, ground to a fine powder. I believe it has been lightly roasted to the levels which would be known in the brewing industry as “Crystal Malt”. In terms of amylase, it makes no contribution, as the grain has been roasted at too high a temperature for the enzymes to survive. I suspect the Russian version would use rye as the source, rather than barley, but this is as close as I can get at the moment. It looks like this:
- Constructing the Scald: I did this exactly the same as I have done it in the past, except for using the red malt instead of the barley malt syrup which I have previously had to use as an alternative. The formula does not use molasses or salt in the scald. The reason I added the molasses at this stage is because I did not want to use sugar in the formula, as the “official” recipe directs. Adding molasses to the final paste would be a difficult mixing process, as there is no liquid added at this stage to use to dissolve the molasses into.
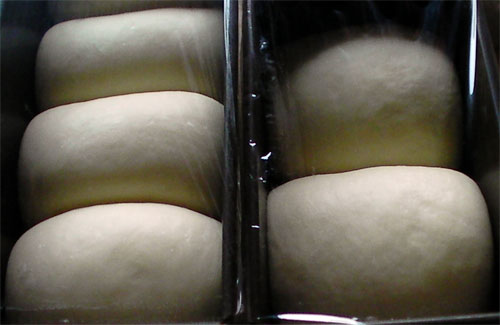
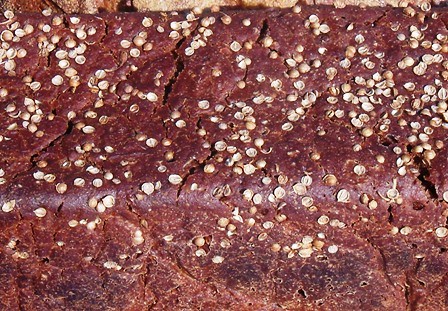
- Additionally, the sponge process had to be left for longer than the 4 hours directed in the formula, on account of me requiring a bit more sleep. So I added the salt in the hope it would retard the ferment. I also hoped that the level of molasses in the formula would be sufficiently high to have a slight retarding effect too. In the event, I woke up 5 hours into the final fermenting phase, and stored the sponge in the fridge to retard it for just over 2 hours before getting up to make the final paste. This worked very well; some pictures of the dark and rich “sponge” are attached here.

- Undoubtedly this is the best version of this bread I have made. You can reach your own conclusions about the origins of the term “Borodinsky” from the various stories uncovered in the research posted above. I’ve never been to Russia, and have no idea what the “official” Borodinsky produced in Soviet times, or, the older, traditional loaf of its type tasted or looked like. This version is stunning. The bitter/sweet flavours are intense, the crumb is DARK, and very moist. For all that, it is very easy to eat, and intensely “moreish”!
- References: there is more information about the Borodinsky formula given below. Some of these are taken from previous discussion threads of interest on TFL. This one http://www.thefreshloaf.com/node/11812/rye-amylase is of interest in that discussion is given over to the part played by the scald in the formula, and the extent to which the water should be heated before it is poured onto the flour. Here, I am left wondering if the key purpose of the scald is to fully gelatinise the starches in order to encourage maximum liquid take up in the final formula? Or, have I still not got this part right, and missed that the scald is actually a “mash” and not a “boil up”? Informative further discussion on mash chemistry and its potential impact here would be much appreciated.
- I did then go on to complete the process as outlined originally by Borodin, by combining the sour and scald. However, I wonder if, because my scald was a “boil-up”, and not a “mash”, whether that meant the sponge would not work exactly as intended, and as outlined here in an earlier post on the referenced thread: http://www.thefreshloaf.com/node/11812/rye-amylase#comment-66360
- Two clear derivations are offered for Borodinsky bread, and this topic seems to spark off heated debate about what is the “true” Borodinsky. Is it a black bread created in the immediate aftermath of the Battle of Borodino, to celebrate the Russian army success in 1812? Or, is it the heavily prescribed Soviet bread of the GOST standards, as referenced here: http://www.borodinsky.com/recipe/index-r.html on this thread: http://www.thefreshloaf.com/node/20370/russian-sourdough-no-more My attempt here was to re-produce the latter style, and I acknowledge I have not been entirely successful. Some of this is deliberate…avoiding sugar, and replacing it with molasses. The story on the zavarkha is another matter. Can anyone provide further detail on whether the process is carried out primarily to mash, or, to gelatinise? That would be much appreciated; if we can avoid derogatory comments this time, that would be all the better.
- For further information, I highly recommend reading the various discussion posts here: http://www.foodbanter.com/baking To do this, you will have to register. Then use the “Search” tab in the top menu, and type “Borodinsky” into the search box when it comes up. Select the threads you want to see from there.
For information on the very precise rye bread recipes from the Soviet era, see this table here: http://www.indiana.edu/~pollang/Russian_bread_table.pdf
I would like to dedicate this bread and post to my friend and TFL colleague Daisy_A, and pass on all good wishes for a speedy recovery, as I know you are having an operation on one of your eyes round about now. Your intellect shines through in some of the passages referenced above and these typify the enormous cultural contribution you make to the pages of TFL. “Get well soon!”
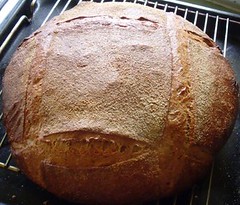
3. Pain de Campagne with mixed levains
Just a quick one, to give me an excuse to feed up the rye sour and wheat levain one more time. Recipe/formula and method below for one large loaf in a banneton. The refreshment programme for the 2 leavens is not given, however, I used the cultures leftover from the previous 2 doughs, fed them each once more, and used these to make this bread, returning small amounts of each to stock for re-generation.
Material | Formula [% of flour] | Recipe [grams] |
Wheat Levain | 36.1 [22.5 flour, 13.6 water] | 256 [160 flour, 96 water] |
Rye Sourdough | 36.6 [14.1 flour, 22.5 water] | 260 [100 flour, 160 water |
White Bread Flour | 63.4 | 450 |
Salt | 1.7 | 12 |
Water | 31.8 | 226 |
TOTAL | 169.6 | 1204 |
% pre-fermented flour | 36.6 | - |
% overall hydration | 67.9 | - |
Method:
- Combine all the items in the table in a bowl to form a dough. Mix by hand on the bench for 15 minutes.
- Retard overnight in the fridge.
- Mould round and place upside down in a prepared banneton.
- Prove for 5 hours
- Score the top of the loaf, and bake in a pre-heated oven with steam, for 45 minutes.
- Cool on wires.
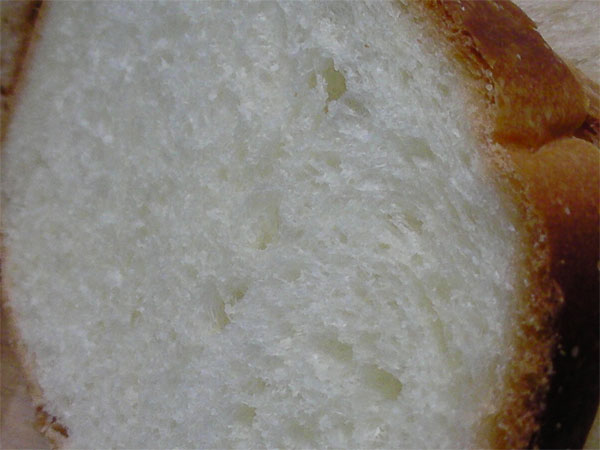
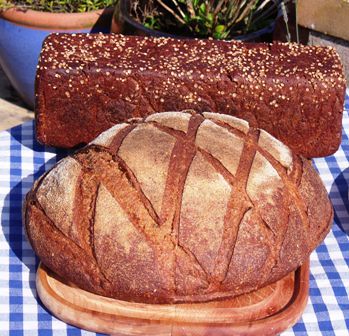
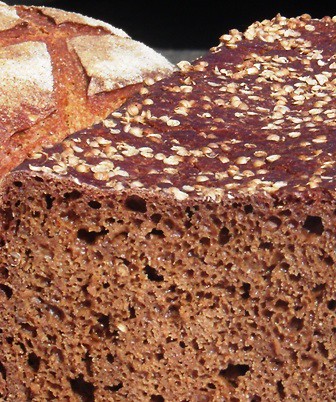
A somewhat less detailed formula to finish with. Photographs of the crust and crumb are here. The loaf has gentle flavours in comparison to the full-on tastes of the other 2 breads.


Happy Baking!
Andy